
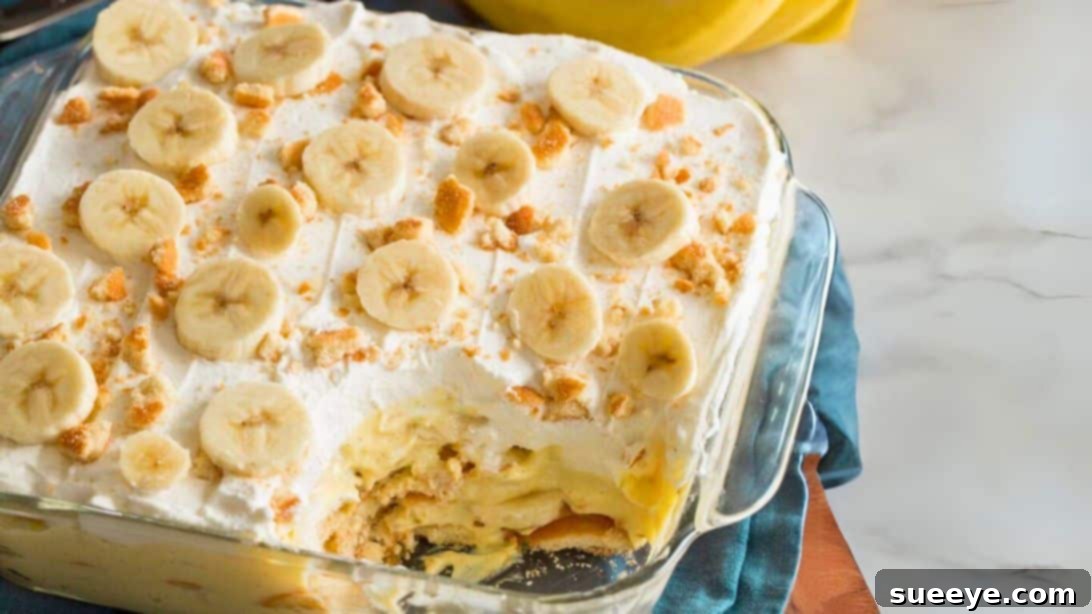
Craving a dessert that brings warmth, nostalgia, and undeniable deliciousness? Look no further than this exquisite old-fashioned homemade banana pudding. This timeless recipe, perfected by culinary talents like Chef Lorious, is more than just a sweet treat; it’s a comforting classic that consistently wins hearts and palates. In a world of fleeting food trends, traditional dessert recipes stand as pillars of culinary comfort, offering a taste of home and happiness with every spoonful. This particular Southern classic holds a special place in many families, effortlessly becoming the star of any gathering, from casual weeknight dinners to grand holiday celebrations. Its universal appeal makes it a guaranteed hit, often requested for birthdays and special occasions, becoming a cherished tradition in itself. Beyond its delightful flavor, one of its greatest virtues is its simplicity. This recipe is remarkably easy to follow and comes together quickly, allowing you to whip up a show-stopping dessert without spending hours in the kitchen. Prepare to impress your loved ones with a dessert that embodies both rustic charm and sophisticated flavor.
RELATED: Bread Pudding With Vanilla Sauce
Crafting this iconic banana pudding requires just a handful of straightforward ingredients, many of which are likely staples in your pantry if you have a penchant for baking. You’ll need sugar, evaporated milk, all-purpose flour, egg yolks, butter, vanilla extract, ripe bananas, and a box of Nilla wafers. Should you find any ingredient missing, a quick trip to your local grocery store will easily resolve it, as these items are readily available. One of the most frequently asked questions when preparing banana pudding revolves around preserving the fresh appearance of the banana slices. The secret to preventing them from turning brown is remarkably simple: just a light toss in a small amount of lemon juice. This simple step not only maintains their vibrant color but also adds a subtle zest that beautifully complements the sweetness of the pudding. Once you’ve mastered this delightful recipe, the rich, creamy texture, tender bananas, and crisp wafers will undoubtedly make your mouth water in anticipation of that first irresistible bite.
This recipe provides a solid foundation for a truly exceptional banana pudding. Each ingredient plays a crucial role in building layers of flavor and texture, creating a symphony for your senses. The combination of creamy custard, soft banana slices, and crunchy vanilla wafers creates a delightful contrast that is both satisfying and addictive. Whether you’re a seasoned baker or a novice in the kitchen, this recipe is designed to guide you through each step, ensuring a perfect outcome every time. Get ready to create a dessert that will be remembered and requested for years to come.
Classic Banana Pudding Ingredients
Achieving the perfect balance in an old-fashioned banana pudding relies heavily on the quality and correct measurement of its core components. Here’s a breakdown of the essential ingredients:
- 2 1/2 cups of sugar: Granulated sugar provides the foundational sweetness for the custard.
- 2 cans (12 oz each) evaporated milk: This is key to the pudding’s rich, creamy, and slightly caramelized flavor profile, offering a depth that regular milk cannot match.
- 6 tablespoons of all-purpose flour: Acts as the primary thickening agent for the custard, ensuring a smooth and luxurious consistency.
- 4 egg yolks (beaten): Contributes to the custard’s velvety texture, rich color, and contributes significantly to its overall richness.
- 4 tablespoons of butter: Unsalted butter adds a delectable richness and smoothness to the finished custard, enhancing its mouthfeel.
- 1 teaspoon of vanilla: Pure vanilla extract is essential for adding a warm, aromatic depth that complements all other flavors.
- 5 bananas: Opt for ripe, but firm, bananas. They should have a few brown spots, indicating sweetness, but not be overly soft or mushy.
- 1 box of Nilla wafers: These classic vanilla wafers are integral for both texture and flavor, softening slightly as they absorb the custard while retaining a subtle crunch.
Beyond these core ingredients, a pinch of salt can also be added to the custard base to enhance and balance the sweetness, though it’s often omitted in simpler recipes. Ensure all ingredients are at room temperature, especially the egg yolks, as this can aid in smoother incorporation into the hot mixture and prevent curdling.
How to Make Banana Pudding
Creating this homemade banana pudding is a rewarding process that culminates in a truly unforgettable dessert. Follow these detailed steps to achieve a perfectly creamy, flavorful, and beautifully layered pudding.
Step 1: Prepare the Custard Base
Begin by combining the sugar, evaporated milk, and all-purpose flour in a sturdy pot or saucepan. Use a whisk to thoroughly mix these ingredients until the flour is completely dissolved and there are no lumps. This initial blending is crucial for a smooth custard. Place the pot over medium heat, ensuring you continue stirring constantly. This continuous agitation is vital to prevent the mixture from sticking to the bottom of the pot and burning, which can impart an unpleasant taste. Stirring also helps prevent lumps from forming as the flour begins to thicken the liquid. The mixture will gradually thicken over approximately 20 minutes or more, transforming into a rich, creamy custard. You’ll know it’s ready when it’s thick enough to coat the back of a spoon, and when you run your finger across the spoon, a clear path remains. The consistency should be similar to that of a thick gravy or a pourable pancake batter before it hits the griddle – smooth, luscious, and free of any graininess. Maintain a careful watch to ensure it doesn’t boil too vigorously, as this can affect the texture of the custard.
Step 2: Temper the Egg Yolks
Once your custard base has reached the desired thickness, it’s time to incorporate the beaten egg yolks. This step requires a gentle touch to prevent the yolks from scrambling. Slowly drizzle the beaten egg yolks into the hot milk mixture, adding only 1 to 2 tablespoons at a time. As you add the yolks, stir constantly and vigorously. This process, known as tempering, gradually raises the temperature of the egg yolks without cooking them directly, ensuring they seamlessly integrate into the custard, adding richness and a beautiful golden hue. Continue stirring for another minute or two after all the yolks have been added, ensuring they are fully incorporated and the custard maintains its smooth consistency.
Step 3: Finish the Custard
Immediately remove the pot from the heat. This is important to prevent any further cooking of the custard and to ensure the butter and vanilla retain their full flavor. Stir in the butter until it is completely melted and smoothly integrated into the hot custard. The butter adds a luxurious sheen and an extra layer of richness, enhancing the overall creaminess. Next, add the vanilla extract. Stir well to distribute the vanilla evenly throughout the custard. The warmth of the custard will beautifully bring out the aromatic notes of the vanilla, filling your kitchen with a delightful scent. Set the finished custard aside to cool slightly while you prepare for assembly. You may want to place a piece of cling wrap directly on the surface of the custard to prevent a skin from forming as it cools.
Step 4: Assemble the Pudding Layers
Now for the satisfying part: assembling your banana pudding masterpiece. Choose a classic 9 x 13-inch baking dish, ideally a glass one, so you can admire the beautiful layers. Begin by spreading a thin layer of the warm custard at the bottom of the dish. This creates a soft bed for the first layer of wafers. Next, arrange a single layer of Nilla wafers over the custard, making sure to cover the entire surface as much as possible. On top of the wafers, evenly distribute a layer of sliced bananas. Remember the lemon juice trick here; toss your banana slices in a tiny amount of lemon juice (about 1 teaspoon for all 5 bananas) before layering to keep them from browning. Repeat this layering sequence: custard, then wafers, then bananas. Continue until all ingredients are used, ensuring your final layer on top is Nilla wafers. This provides a satisfying base for the final toppings. Once all layers are neatly stacked, gently cover the dish with cling wrap, ensuring it touches the surface of the top layer to prevent a skin from forming. Transfer the dish to the refrigerator and chill for a minimum of 3 to 4 hours, or ideally, overnight. Chilling is crucial as it allows the flavors to meld beautifully, the custard to set properly, and the wafers to soften slightly, creating that characteristic melt-in-your-mouth texture.
Step 5: Garnish and Serve
Once thoroughly chilled and set, your old-fashioned banana pudding is ready for its grand finale. Just before serving, generously top the pudding with freshly whipped cream. You can pipe it elegantly or simply dollop it for a more rustic look. For an extra touch of texture and visual appeal, sprinkle some crushed Nilla wafers over the whipped cream. You can also add a few whole wafers for garnish. This final flourish not only makes the dessert look irresistible but also adds another layer of flavor and crunch. Serve chilled, allowing each guest to enjoy the harmonious blend of creamy custard, sweet bananas, and vanilla-infused wafers. This dessert is perfect for any occasion, from a casual family meal to a festive gathering. Enjoy the smiles and compliments that are sure to follow!
Tips for Perfect Banana Pudding
To elevate your banana pudding from great to truly extraordinary, consider these expert tips:
- Banana Selection: Always use ripe but firm bananas. They should have yellow skins with a few brown spots, indicating peak sweetness. Overly green bananas will lack flavor, while overly soft ones will turn mushy in the pudding.
- Preventing Browning: The lemon juice trick is your best friend. Toss sliced bananas in about 1 teaspoon of fresh lemon juice (for 5 bananas) immediately after slicing. The acidity slows down the oxidation process, keeping them looking fresh.
- Custard Consistency: Don’t rush the custard cooking process. Stirring constantly over medium heat is crucial. The custard should be thick enough to cling to the back of a spoon without running off. If it’s too thin, it won’t set properly; too thick, it can be gummy.
- Tempering Eggs: When adding egg yolks, always temper them. This means slowly incorporating a small amount of the hot custard into the beaten yolks first, whisking constantly, before adding the warmed yolk mixture back into the main pot. This prevents the eggs from scrambling.
- Chilling Time: Patience is key! A minimum of 3-4 hours of chilling is essential, but overnight is always best. This allows the custard to fully set, the flavors to meld, and the wafers to soften to that delightful, cake-like texture.
- Quality Ingredients: Using good quality evaporated milk, fresh eggs, and pure vanilla extract makes a noticeable difference in the final taste of your pudding.
- Covering the Custard: After cooking, if you’re not assembling immediately, place plastic wrap directly on the surface of the hot custard to prevent a “skin” from forming.
Variations and Serving Suggestions
While the classic recipe is perfect as is, there are many ways to customize your banana pudding:
- Cookie Alternatives: Experiment with different types of cookies. Graham crackers, shortbread cookies, or even gingersnaps (for a spiced twist) can offer unique flavor profiles.
- Spiced Pudding: Add a pinch of cinnamon or nutmeg to the custard while cooking for an extra layer of warmth and complexity.
- Chocolate Drizzle: A light drizzle of melted chocolate or chocolate syrup over the whipped cream topping can add a decadent touch.
- Meringue Topping: For a truly traditional Southern experience, consider topping your pudding with a fluffy meringue and lightly toasting it in the oven for a few minutes.
- Individual Servings: Instead of a large dish, assemble the pudding in individual clear glass cups or ramekins for elegant presentation.
- Boozy Twist: A tablespoon of banana liqueur or a splash of rum can be added to the custard (after it’s off the heat) for an adult version.
- Serving Temperature: While best chilled, some prefer a slightly less cold pudding, allowing the flavors to be more prominent. Let it sit out for 10-15 minutes before serving if desired.
Banana pudding is a versatile dessert that shines at any event. It’s a fantastic choice for potlucks, family reunions, birthday parties, or simply as a comforting treat on a lazy Sunday afternoon. Pair it with a cup of coffee or a glass of sweet iced tea for the quintessential Southern experience.
Storage and Make-Ahead Tips
Proper storage ensures your banana pudding stays fresh and delicious:
- Refrigeration: Always store banana pudding in an airtight container in the refrigerator. Due to the fresh bananas and dairy, it should be kept chilled.
- Shelf Life: Enjoy your homemade banana pudding within 3-4 days when stored properly in the refrigerator. Beyond this, the bananas may continue to soften and the quality might decline.
- Preventing Browning (Storage): If you’re concerned about the top layer of bananas browning, you can place a piece of plastic wrap directly onto the surface of the pudding before sealing the container.
- Freezing: Freezing banana pudding is generally not recommended. The custard can separate, and the bananas and wafers can become mushy and watery upon thawing, affecting the texture significantly.
- Make-Ahead: This is an excellent make-ahead dessert! In fact, it tastes even better the day after it’s made, as the flavors have more time to meld and the wafers soften perfectly. Simply assemble it the night before your event and chill overnight. Add the whipped cream and crushed wafers just before serving.
The Southern Legacy of Banana Pudding
Banana pudding holds a revered status in Southern American cuisine, often considered the ultimate comfort food dessert. Its origins are somewhat debated, but it rose to prominence in the late 19th and early 20th centuries, becoming a staple at family gatherings, church potlucks, and holiday feasts throughout the Southern states. The simplicity of its ingredients—eggs, milk, sugar, vanilla, and bananas—made it accessible, while its rich, creamy texture and sweet flavor cemented its place in culinary tradition. The use of Nilla wafers, a Nabisco product introduced in 1898, further popularized the dessert, as these vanilla-flavored cookies provided the perfect foundation and texture contrast. Over the years, countless variations have emerged, but the core essence of a creamy custard, ripe bananas, and soft wafers remains a beloved constant. Eating banana pudding is more than just enjoying a dessert; it’s an experience imbued with heritage, warmth, and the sweet embrace of Southern hospitality.
There’s a reason why this old-fashioned homemade banana pudding continues to be a favorite across generations. It’s a dessert that speaks of comfort, family, and tradition, all wrapped up in a creamy, delightful package. With its simple ingredients and straightforward steps, you can easily recreate this beloved classic in your own kitchen. Whether you’re making it for a special occasion or simply to satisfy a craving for something sweet and comforting, this recipe promises to deliver pure joy with every spoonful. So go ahead, gather your ingredients, follow these steps, and prepare to indulge in a timeless dessert that will leave everyone asking for more. Happy baking!