
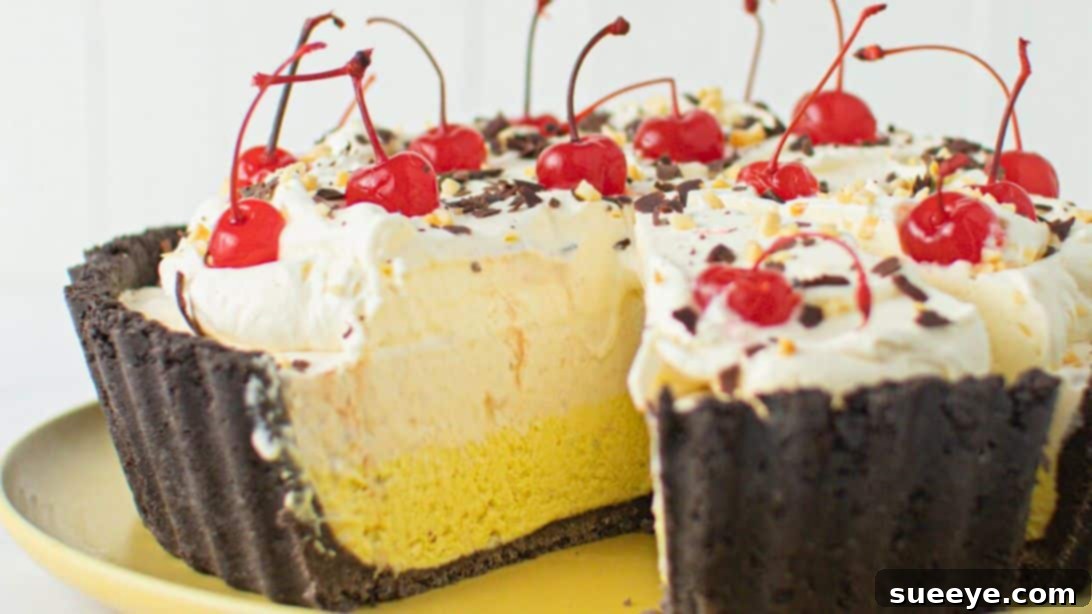
Are you a devoted banana lover? If the sweet, creamy taste of bananas brings a smile to your face, then prepare to be utterly delighted by this sensational Banana Split Ice Cream Tart recipe. Inspired by the culinary creativity of The Scran Line, this dessert takes the beloved classic banana split and transforms it into an elegant, easy-to-make tart that’s perfect for any occasion. Imagine a rich, chocolatey Oreo crust cradling a luscious, homemade banana ice cream filling, all crowned with billows of freshly whipped cream, delicate chocolate shavings, a scattering of crunchy chopped nuts, and vibrant Maraschino cherries. It’s a symphony of textures and flavors – perfectly sweet, incredibly creamy, and utterly delicious.
This dessert is not just a treat for the taste buds; it’s also a feast for the eyes, making it an ideal centerpiece for gatherings, celebrations, or simply a luxurious weekend indulgence. Its vibrant colors and classic appeal ensure it will impress your guests and become a memorable highlight of any meal. And the best part? It’s remarkably simple to create, requiring no baking for the filling and utilizing ingredients that are readily available at your local grocery store. Get ready to experience the timeless joy of a banana split in a wonderfully new and exciting form!
RELATED: Air Fryer Banana Bread
The beauty of this recipe lies in its straightforward approach and the harmonious blend of familiar flavors. The foundation is a delightful no-bake crust made from crushed Oreo cookies and melted butter, creating a decadent chocolate base that perfectly complements the fruit-filled interior. The star of the show, the filling, is a dream concoction of ripe bananas, caster sugar, smooth cream cheese, aromatic vanilla extract, and rich heavy cream. These simple components come together quickly to form a creamy, irresistible banana ice cream layer. If you’re searching for a dessert that offers both ease of preparation and a truly show-stopping presentation, this Banana Split Ice Cream Tart is your ultimate answer. It’s a testament to how simple ingredients can yield extraordinary results.
Here’s another delightful banana recipe for you to explore: Banana Pudding Milkshake Recipe
Why You’ll Love This Easy Banana Split Ice Cream Tart
This Banana Split Ice Cream Tart isn’t just another dessert; it’s a culinary experience designed for maximum enjoyment with minimal fuss. Firstly, its “no-bake” nature for the filling means you won’t need to turn on your oven, making it a perfect treat for warm weather or when you’re short on time. The classic combination of flavors—chocolate, banana, and cream—is universally loved, ensuring it will be a crowd-pleaser for all ages. The chocolatey Oreo crust offers a delightful crunch and richness, providing the perfect contrast to the velvety smooth banana ice cream filling. This filling, infused with cream cheese, boasts a unique texture that’s richer and more stable than traditional ice cream, making it ideal for slicing and serving.
Beyond its incredible taste, the visual appeal of this tart is undeniable. With its vibrant yellow and white layers, topped with colorful cherries, dark chocolate, and golden peanuts, it truly embodies the festive spirit of a classic banana split. It’s a dessert that invites smiles and happy memories, evoking nostalgic feelings of old-fashioned ice cream parlors. Whether you’re hosting a dinner party, planning a family gathering, or simply craving something extraordinary, this tart delivers on all fronts: ease, elegance, and irresistible flavor. It’s a testament to how simple ingredients, thoughtfully combined, can create a truly unforgettable dessert experience.
Easy Banana Split Ice Cream Tart Ingredients
Crafting this delightful Banana Split Ice Cream Tart requires a selection of readily available ingredients, each playing a crucial role in creating its iconic flavor and texture. Pay attention to the quality and state of your ingredients for the best results.
Crust:
- 3 cups of Oreo cookies: These form the foundation of our tart, providing a rich, chocolatey, and crunchy base. Original Oreos work best, but feel free to experiment with other flavors if you dare. Ensure they are finely crushed for a cohesive crust.
- 1/2 cup of unsalted butter: Melted butter binds the cookie crumbs together, creating a firm and flavorful crust. Using unsalted butter allows you to control the overall saltiness of the dessert.
Filling:
- 3 very ripe bananas: The star of the show! Extremely ripe bananas (those with plenty of brown spots) are essential as they provide the most intense banana flavor and natural sweetness, reducing the need for excessive added sugar.
- 1 cup of caster sugar: Also known as superfine sugar, caster sugar dissolves easily, ensuring a smooth and non-gritty filling. It balances the tartness of the cream cheese and enhances the bananas’ sweetness.
- 2 blocks of cream cheese (typically 8 oz each, totaling 16 oz): Full-fat cream cheese is recommended for the best texture and richness. Make sure it’s softened to room temperature for a lump-free, silky smooth filling.
- 1 teaspoon of vanilla extract: A classic flavor enhancer that complements the banana and chocolate, adding a warm, aromatic note to the filling. Good quality vanilla extract makes a noticeable difference.
- 2 cups of heavy cream (chilled): Essential for creating a light, airy, and creamy texture for the filling. It’s crucial that your heavy cream is very well chilled to ensure it whips up properly and holds its structure.
- 2 drops of yellow food gel: This is optional but highly recommended for achieving that iconic, vibrant banana color in one of your filling layers, making the tart visually stunning.
Whipped cream:
- 1 1/2 cups of heavy cream: Again, ensure this is very well chilled for optimal whipping. It will form the luscious topping of our tart.
- 1 teaspoon of vanilla extract: To infuse the whipped cream with a delicate and complementary aroma.
Topping:
- 2 tablespoons of chocolate shavings: These add a sophisticated touch and an extra burst of chocolate flavor. You can make these by scraping a chocolate bar with a vegetable peeler or using pre-made shavings.
- 2 tablespoons of chopped peanuts: Providing a delightful crunch and a classic banana split element. Feel free to use roasted and salted peanuts for an extra layer of flavor complexity.
- 1/2 cup of maraschino cherries: The quintessential banana split garnish, adding a pop of color and a sweet, fruity finish. Ensure they are well-drained before placing on the tart.
Essential Equipment for Your Banana Split Tart
While the ingredients are key, having the right tools will make your tart-making process smooth and enjoyable. You won’t need a lot of specialized equipment, but these items will be immensely helpful:
- Food Processor: Indispensable for quickly turning Oreo cookies into fine crumbs. If you don’t have one, a sturdy Ziploc bag and a rolling pin can achieve similar results, though it will require more effort.
- 9-inch Tart Tin (with removable bottom recommended): This is crucial for shaping your tart and ensuring easy removal for a beautiful presentation. A removable bottom is a game-changer for serving.
- Large Mixing Bowls: You’ll need at least two – one for mashing bananas and mixing the filling, and another for whipping the heavy cream.
- Hand Mixer or Stand Mixer: Essential for achieving a smooth, lump-free cream cheese filling and for whipping the heavy cream to stiff peaks. Manual whisking is possible but significantly more labor-intensive.
- Rubber Spatula: Perfect for scraping down the sides of bowls, folding ingredients, and smoothing the tart filling.
- Fork or Whisk: For mashing the bananas thoroughly.
- Measuring Cups and Spoons: For accurate ingredient proportions.
- Sharp Knife (and hot water): For slicing the frozen tart cleanly before serving.
How to Make Banana Split Ice Cream Tart
Follow these detailed steps to create your stunning Banana Split Ice Cream Tart. Precision and chilling time are your best friends in this recipe!
Step 1: Prepare the Oreo Crust Crumbs
Begin by taking 3 cups of Oreo cookies. Place these whole cookies into a food processor. Process them on high speed until they are transformed into very fine, even crumbs. The consistency should be similar to fine sand, ensuring a smooth and uniform crust that holds together well.
Step 2: Combine Crumbs and Butter
Once your Oreo crumbs are perfectly fine, add 1/2 cup of melted unsalted butter directly into the food processor with the crumbs. Continue to process the mixture for another 30-60 seconds, or until the butter is thoroughly incorporated. The crumbs should appear uniformly moistened and cling together when pressed, indicating they are ready to form the crust.
Step 3: Press the Crust into the Tart Tin
Carefully transfer the buttered Oreo crumb mixture into a 9-inch tart tin. Using the bottom of a glass or your fingers, firmly and evenly press the mixture onto the bottom and up the sides of the tin. It’s crucial to compact the crumbs well to prevent crumbling when sliced. Once pressed, place the tart tin into the refrigerator to chill for at least 30 minutes while you prepare the filling. This chilling step helps the crust set and firm up.
Step 4: Mash the Bananas
Take your 3 very ripe bananas, peel them, and place them into a medium-sized bowl. Using a fork or a whisk, thoroughly mash the bananas until they reach a smooth, creamy consistency with very few lumps. Ripe bananas mash easily and provide the most robust flavor. Set the mashed bananas aside for a moment.
Step 5: Prepare the Creamy Banana Filling
In a large mixing bowl, combine the 2 blocks of softened cream cheese, 1 cup of caster sugar, and 1 teaspoon of vanilla extract. Using a hand mixer or stand mixer, whisk these ingredients together for about 3 minutes until the mixture is completely smooth and creamy, with no lumps of cream cheese remaining. Scrape down the bottom and sides of the bowl to ensure everything is well incorporated. Next, add the mashed bananas and the 2 cups of very well-chilled heavy cream to the bowl. Continue to whisk for another 4 to 5 minutes. The mixture will gradually thicken and become light and airy. Once thickened, carefully divide the mixture in half, placing one half into a separate bowl.
Step 6: Color Half of the Filling
To one of the halves of the filling mixture you just set aside, add 2 drops of yellow food gel. Whisk gently, either by hand or with the mixer on low speed, until the yellow color is evenly distributed throughout the mixture. This will create a vibrant, banana-colored layer for your tart, enhancing its visual appeal.
Step 7: Assemble and Freeze the Tart
Retrieve your chilled Oreo crust from the refrigerator. First, carefully transfer the yellow banana filling mixture into the tart crust. Use a spatula to gently spread and smoothen the yellow layer evenly across the bottom. Next, carefully spoon the remaining white banana filling mixture on top of the yellow layer. Smooth it out gently with your spatula to create a distinct, two-toned filling. Once assembled, place the entire tart into the freezer. Freeze for a minimum of 5 hours, or ideally, overnight, to ensure it is completely set and firm enough to slice.
Step 8: Prepare the Whipped Cream Topping
A few minutes before you plan to serve the tart, prepare the fresh whipped cream. In a large, very clean mixing bowl (preferably chilled), combine 1 1/2 cups of very cold heavy cream and 1 teaspoon of vanilla extract. Using a hand mixer or stand mixer fitted with a whisk attachment, beat the mixture on medium-high speed until stiff peaks form. Be careful not to over-whisk, as it can turn into butter.
Step 9: Garnish and Serve
Remove the frozen tart from the freezer. Generously dollop or pipe the freshly whipped cream over the top of the chilled tart, spreading it evenly or creating decorative swirls. Then, artfully sprinkle the 2 tablespoons of chocolate shavings and 2 tablespoons of chopped peanuts over the whipped cream. Finally, arrange the 1/2 cup of well-drained maraschino cherries on top. For clean slices, dip a sharp knife in hot water and wipe it clean between each cut. Serve immediately and savor every cool, creamy, and delightful bite!
Tips for a Perfect Banana Split Ice Cream Tart
Achieving a truly spectacular Banana Split Ice Cream Tart is easy with a few key tips:
- Banana Ripeness is Key: Always use very ripe bananas (those with significant brown spots). They are sweeter and have a more intense banana flavor, which is crucial since bananas can lose some flavor when frozen.
- Chill Everything: Ensure your heavy cream, mixing bowl, and even your whisk attachment are well-chilled before whipping cream for both the filling and the topping. Cold ingredients whip up faster and hold their structure better.
- Soften Cream Cheese: Room temperature cream cheese is vital for a smooth, lump-free filling. If it’s too cold, it will be hard to incorporate properly, leading to a textured filling.
- Don’t Overmix the Cream Cheese: Once the cream cheese, sugar, and vanilla are smooth, be careful not to overmix, especially after adding the heavy cream. Overmixing can cause the fats to separate, making the filling grainy.
- Firm Crust: Press the Oreo crust very firmly into the tart tin. This prevents it from falling apart when you slice and serve the tart. Chilling the crust adequately also helps it set.
- Freeze Thoroughly: The 5-hour minimum freezing time, or ideally overnight, is not a suggestion but a necessity. A fully frozen tart will slice cleanly and hold its shape beautifully.
- Hot Knife for Slicing: For perfectly clean slices, dip your knife in hot water and wipe it dry before each cut. This slight warmth helps melt through the frozen tart without tearing the layers.
Variations and Customizations
While the classic Banana Split Ice Cream Tart is heavenly, don’t hesitate to get creative and personalize it to your taste:
- Crust Alternatives:
- Graham Cracker Crust: Substitute crushed graham crackers for Oreos for a lighter, more traditional cheesecake-style crust.
- Vanilla Wafer Crust: Crushed Nilla Wafers offer a sweet, vanilla-infused base that pairs beautifully with banana.
- Gluten-Free: Use gluten-free chocolate sandwich cookies or a nut-based crust for those with dietary restrictions.
- Filling Enhancements:
- Extra Fruit: Swirl in some finely diced fresh strawberries or a thin layer of strawberry puree between the filling layers for an authentic banana split feel.
- Chocolate Chunks: Fold in mini chocolate chips or finely chopped chocolate into the white filling layer for extra chocolatey goodness.
- Nut Butter Swirl: A delicate swirl of peanut butter or almond butter could add a new dimension of flavor.
- Topping Extravaganza:
- Caramel or Chocolate Drizzle: Add a generous drizzle of homemade or store-bought caramel sauce or chocolate fudge sauce over the whipped cream.
- Toasted Coconut: Lightly toasted shredded coconut adds a tropical twist and delightful texture.
- Different Nuts: Pecans, walnuts, or even candied nuts can replace or complement the peanuts.
- Sprinkles: A shower of colorful sprinkles always adds a festive touch, especially if serving for a birthday or celebration.
- Fresh Fruit: Garnish with thin slices of fresh banana (tossed in a little lemon juice to prevent browning), fresh berries, or kiwi slices for a burst of freshness.
- Flavor Twists:
- Spiced Banana: Add a pinch of cinnamon or nutmeg to the banana filling for a warmer, cozier flavor profile.
- Coffee Infusion: A hint of instant coffee powder in the chocolate crust or a few drops of coffee extract in the filling could add a sophisticated depth.
Serving and Storage Suggestions
To fully enjoy your Banana Split Ice Cream Tart, proper serving and storage are key:
- Serving Temperature: This tart is best served directly from the freezer, after garnishing. The filling has an ice cream-like consistency when frozen solid, making it refreshing and firm enough to slice beautifully.
- Slicing Technique: As mentioned in the steps, always use a sharp knife dipped in hot water and wiped dry before each slice. This technique helps achieve clean, smooth cuts without cracking the crust or smashing the filling.
- Presentation: For an extra special touch, you can serve individual slices on chilled dessert plates. A tiny dollop of extra whipped cream, a mini cherry, or an extra sprinkle of chocolate shavings on the side of the plate can elevate the presentation.
- Storage: Any leftover tart should be stored in an airtight container in the freezer. This prevents freezer burn and keeps the tart fresh. It will remain delicious for up to 1-2 weeks.
- Thawing: While best served frozen, if you prefer a slightly softer, creamier consistency, let a slice sit at room temperature for 5-10 minutes before eating. Be careful not to let it thaw too much, or it will lose its structure.
Frequently Asked Questions
Here are some common questions you might have when making this delightful Banana Split Ice Cream Tart:
Q: Can I make this tart ahead of time?
A: Absolutely! This tart is an excellent make-ahead dessert. In fact, it requires an extended freezing time, so preparing it the day before you plan to serve is highly recommended. You can store the fully assembled and frozen tart (before adding the fresh whipped cream and toppings) in an airtight container in the freezer for up to a week.
Q: What if I don’t have a food processor for the crust?
A: No problem! You can place the Oreo cookies in a large, sturdy Ziploc bag, seal it, and crush them using a rolling pin, the bottom of a heavy pot, or even your hands. Just make sure the crumbs are as fine as possible for a smooth crust.
Q: My whipped cream isn’t getting stiff peaks. What went wrong?
A: This usually happens if the heavy cream isn’t cold enough, the bowl or whisk isn’t chilled, or if there’s any trace of grease in your equipment. Ensure your heavy cream is straight from the fridge, and use a very clean, cold bowl and whisk. Also, avoid overfilling your bowl, as it needs space to incorporate air.
Q: Can I use frozen bananas for this recipe?
A: While fresh, very ripe bananas are preferred for their flavor and texture, you could use thawed frozen bananas. However, ensure they are fully thawed and well-drained of any excess liquid before mashing to prevent making the filling too watery. The flavor might also be slightly less intense than with fresh ripe bananas.
Q: How long does the tart last in the freezer?
A: When stored properly in an airtight container, the Banana Split Ice Cream Tart (without the fresh whipped cream and toppings) will last in the freezer for up to 1-2 weeks. The quality might start to decline slightly after that due to potential freezer burn or flavor changes from freezing.
Q: Can I use a different type of sugar?
A: Caster sugar (superfine sugar) is recommended because its fine crystals dissolve easily, contributing to a smooth filling. Granulated sugar can be used, but you might notice a slightly grainy texture if it doesn’t dissolve completely. Powdered sugar (confectioners’ sugar) contains cornstarch, which can alter the texture, so it’s best to stick to caster or granulated.
Indulge in the Ultimate Banana Split Ice Cream Tart
There you have it – a comprehensive guide to crafting an extraordinary Banana Split Ice Cream Tart. This recipe effortlessly marries the nostalgic charm of a classic dessert with the elegance and convenience of a no-bake tart. From the satisfying crunch of its chocolatey Oreo crust to the velvety smoothness of its homemade banana ice cream filling, crowned with a medley of traditional banana split toppings, every spoonful is a journey of pure delight. It’s an accessible recipe that promises to deliver impressive results, making it ideal for both seasoned bakers and novice dessert enthusiasts alike. So, gather your ingredients, follow these steps, and prepare to enchant your family and friends with this perfectly sweet, creamy, and undeniably delicious frozen treat. Dive in and experience the joy of a Banana Split Ice Cream Tart today!