

Delicious Ground Beef Pockets Recipe: Your Ultimate Guide to Homemade Savory Hand Pies
If you’re a devoted fan of ground beef and crave hearty, satisfying meals that are both delicious and incredibly convenient, then you’re about to discover your new favorite recipe: Ground Beef Pockets. Imagine savory, seasoned ground beef encased in a tender, golden-brown pastry – a handheld delight perfect for any time of day. Inspired by the brilliant culinary creativity of Lecker Schnell on YouTube, this recipe transforms simple ingredients into an extraordinary culinary experience. These meat pockets aren’t just a meal; they’re a versatile solution for busy weeknights, grab-and-go lunches, or even impressive party appetizers. The best part? They’re wonderfully freezer-friendly, making meal prep a breeze!
Forget store-bought frozen options; these homemade ground beef pockets offer superior flavor, freshness, and the satisfying warmth of a home-cooked meal. My family absolutely adores anything involving ground beef and a delicious crust, so when I introduced them to the idea of turning these beloved components into individually portioned, portable pockets, their excitement was palpable. Crafted with care, these pockets are baked to perfection, then easily cut into individual servings, ready to be enjoyed warm. Whether you’re planning ahead for lunches, seeking a convenient dinner solution, or simply want a delectable snack, these savory pastries are an absolute game-changer in your kitchen.
Why You’ll Love These Ground Beef Pockets
- Incredibly Delicious: A perfect blend of savory beef filling and tender, flaky pastry. Each bite offers a comforting taste that’s hard to resist.
- Super Versatile: These pockets are ideal for breakfast, a quick lunch, a satisfying dinner, or even a hearty snack. They fit seamlessly into any meal plan.
- Freezer-Friendly: Make a big batch and freeze them for quick, convenient meals anytime. They reheat beautifully, maintaining their flavor and texture.
- Easy to Make: With clear, step-by-step instructions, even novice bakers can achieve perfect results and impress their family and friends.
- Family Favorite: A guaranteed crowd-pleaser that satisfies even the pickiest eaters. Kids and adults alike will ask for these again and again.
- Cost-Effective: A budget-friendly way to create satisfying meals using common and affordable ingredients you likely already have on hand.
Ingredients For The Ultimate Ground Beef Pockets Recipe:
Crafting these delectable ground beef pockets requires a thoughtful selection of ingredients for both the robust filling and the perfectly tender pastry. Here’s what you’ll need to gather to bring this incredible recipe to life:
- For the Dough:
- 500 grams (approximately 4 cups) of all-purpose wheat flour: This forms the foundation for our wonderfully tender and pliable pastry.
- 1/2 teaspoon of salt: Essential for seasoning the dough itself, enhancing the overall flavor of the pocket.
- 1 to 2 tablespoons of vegetable oil: Adds crucial elasticity and tenderness to the dough, making it easier to work with and resulting in a softer crust.
- Approximately 200-250 ml of warm water: Start with less and add gradually, as the exact amount will depend on your flour and ambient humidity to achieve the perfect dough consistency.
- For the Ground Beef Filling:
- 800 grams (approximately 1.75 lbs) of ground beef: For the best flavor and juiciness, opt for ground chuck or ground brisket, which have a good fat-to-meat ratio. Leaner ground beef can also be used, but may require a bit more oil when browning to prevent dryness.
- Salt and freshly ground black pepper: Season generously to taste. Proper seasoning of the beef is paramount for a flavorful filling.
- 1 medium onion, finely chopped: Adds a delightful sweetness and aromatic depth that complements the savory beef perfectly.
- 30 ml (approximately 2 tablespoons) of water: Used to deglaze the pan and helps create a moist, succulent filling, ensuring it doesn’t dry out during baking.
- 30 grams (approximately 2 tablespoons) of unsalted butter, divided: Half for sautéing the beef and onions, and the other half stirred in at the end for an extra touch of richness.
- Fresh dill, chopped (to taste, about 2-3 tablespoons): Brings a wonderfully fresh, herbaceous note that brightens the rich beef flavor. If fresh is unavailable, use 1 teaspoon of dried dill.
- 2 tablespoons of sour cream: Adds a luxurious creamy texture and a subtle tangy depth to the filling, binding all the flavors together beautifully.
- 1 clove of garlic, crushed or minced: A pungent aromatic that significantly enhances the savory profile of the ground beef.
Step-by-Step Directions: How to Make Savory Ground Beef Pockets
This comprehensive guide will walk you through each stage of creating these amazing ground beef pockets, from preparing the tender dough and crafting the flavorful filling to assembling and baking them to golden perfection. We’ll ensure every step is clear and easy to follow, allowing you to master this recipe with confidence and create a truly satisfying meal.
Part 1: Preparing the Tender Pastry Dough
- Combine Dry Ingredients: In a large mixing bowl, thoroughly combine the wheat flour and salt. Whisk them together to ensure the salt is evenly distributed throughout the flour.
- Incorporate Wet Ingredients: Create a well in the center of the flour mixture. Pour in the vegetable oil. Gradually add the warm water, starting with approximately 150ml.
- Mix and Form Dough: Begin mixing the ingredients with a spoon or your hands, gradually incorporating the flour into the wet mixture. Continue adding water, a tablespoon at a time, until a shaggy, cohesive dough starts to form.
- Knead for Elasticity: Transfer the dough to a lightly floured surface. Knead the dough vigorously for 5-7 minutes. The goal is to develop the gluten until the dough becomes smooth, elastic, and is no longer sticky to the touch. It should spring back slightly when gently pressed.
- Rest the Dough: Form the kneaded dough into a neat ball. Lightly grease the mixing bowl, place the dough back in, and cover the bowl tightly with plastic wrap or a clean kitchen towel. Allow the dough to rest at room temperature for at least 30 minutes. This crucial resting period allows the gluten to relax, making the dough much easier to roll out evenly.
Part 2: Crafting the Flavorful Ground Beef Filling
- Brown the Ground Beef: Heat half of the butter (approximately 15 grams or 1 tablespoon) in a large skillet or frying pan over medium-high heat. Add the ground beef, breaking it apart with a spoon as it cooks. Continue cooking until the beef is thoroughly browned and all pinkness has disappeared.
- Drain Excess Fat (Optional but Recommended): If your ground beef has rendered a significant amount of fat, carefully drain off any excess. This helps prevent the filling from becoming greasy and ensures a better texture.
- Sauté Aromatics: Add the finely chopped onion to the skillet with the browned beef. Reduce the heat to medium and cook for 5-7 minutes, stirring occasionally, until the onion softens and becomes translucent.
- Add Garlic and Seasoning: Stir in the crushed or minced garlic and cook for just one more minute until it becomes fragrant. Be careful not to burn the garlic. Now, season the beef mixture generously with salt and freshly ground black pepper to taste. Remember, this is the primary seasoning for the entire pocket, so ensure it’s well-seasoned.
- Deglaze and Moisten: Pour in the 30 ml of water. Use a wooden spoon to scrape up any delicious browned bits from the bottom of the pan – these bits are packed with flavor! Allow the water to simmer and evaporate slightly, ensuring the filling remains moist but not overly watery.
- Finish the Filling: Remove the skillet from the heat. Stir in the remaining 15 grams of butter, the fresh chopped dill, and the sour cream. Mix everything together until all ingredients are well combined and the filling achieves a creamy consistency. Taste and adjust seasoning if necessary. Set the filling aside to cool completely before proceeding to assembly; hot filling can affect the dough’s texture.
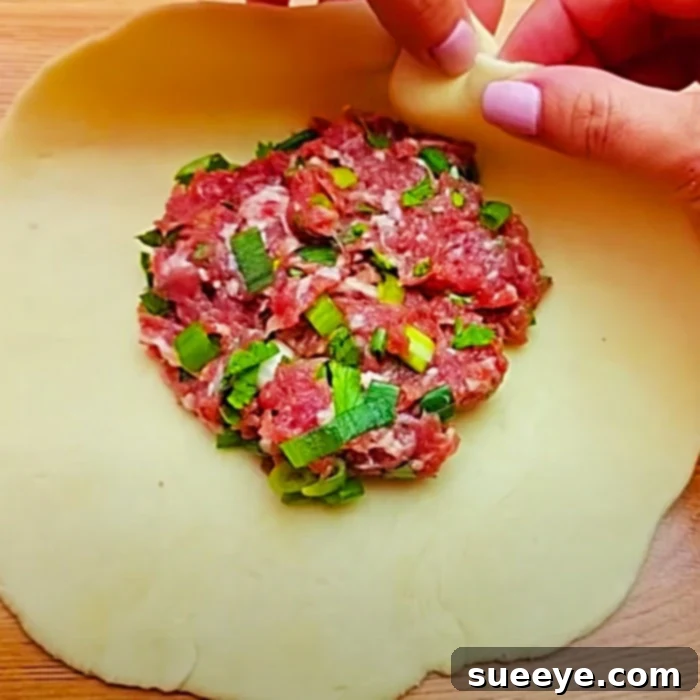
Part 3: Assembling and Shaping Your Savory Beef Pockets
- Preheat Oven and Prepare Baking Sheet: Preheat your oven to 350°F (175°C). Lightly grease a large baking sheet or line it with parchment paper to prevent sticking.
- Divide the Dough: Transfer the rested dough to a lightly floured surface. Divide the dough into equal portions. Depending on your desired pocket size, you might get 10-12 pieces. Roll each individual portion into a smooth, even ball.
- Roll Out Dough Circles: On your lightly floured surface, take one dough ball at a time and roll it out into a thin circle, approximately 6-8 inches (15-20 cm) in diameter. Aim for a thickness similar to a standard pie crust for a delicate yet sturdy pastry.
- Fill the Pockets: Place a generous spoonful (about 2-3 tablespoons) of the cooled ground beef filling onto one half of each rolled-out dough circle. Be sure to leave a small border (about half an inch) around the edge of the dough, which is essential for proper sealing. Avoid overfilling, as this can make sealing difficult and lead to leaks during baking.
- Seal the Pockets: Carefully fold the other half of the dough over the filling, creating a crescent or semi-circular shape. Press the edges firmly together with your fingers to seal. For an extra secure seal and a decorative touch, you can use the tines of a fork to crimp the edges all around the pocket.
- Arrange on Baking Sheet: Carefully transfer the sealed pockets to your prepared baking sheet, ensuring there’s a little space between each one to allow for even baking and air circulation.
Part 4: Baking to Golden Perfection
- Optional Egg Wash for Shine: For a beautiful golden-brown crust and a slight sheen, you can brush the tops of the assembled pockets with an egg wash (one egg beaten with a tablespoon of water). This step is optional but highly recommended for an appealing, professional-looking finish.
- Bake in the Oven: Place the baking sheet with the pockets into the preheated oven. Bake for approximately 15-20 minutes, or until the pockets are beautifully golden brown on the outside and cooked through. The exact baking time may vary slightly depending on your specific oven and the thickness of your pastry.
- Cool Slightly Before Serving: Once baked, remove the pockets from the oven. Let them cool on the baking sheet for a few minutes before serving. This allows the hot filling to set slightly and prevents you from burning yourself on the piping hot interior.

Pro Tips for Perfect Ground Beef Pockets
Achieving perfectly tender pastry and a rich, juicy filling every time is easy with a few expert tips:
- Don’t Overwork the Dough: While kneading is important for developing elasticity, overworking the dough can make the pastry tough. Knead just until it’s smooth and elastic, then let it rest.
- Cool the Filling Completely: This is a crucial step! Ensure your ground beef filling is cooled to room temperature (or even chilled) before assembling the pockets. Hot filling can melt the butter in the dough, making it sticky, difficult to handle, and can also lead to soggy bottoms.
- Seal Properly to Prevent Leaks: A good, tight seal is paramount to prevent the savory filling from leaking out during baking. Press the edges firmly, and use a fork to crimp them thoroughly all around the pocket for extra security.
- Maintain Even Dough Thickness: When rolling out your dough, aim for an even thickness across the entire circle. This ensures uniform baking, resulting in a consistent texture and prevents some parts from being undercooked or overcooked.
- Experiment with Seasoning: While dill, garlic, and sour cream provide a delicious classic flavor, don’t hesitate to experiment with your favorite spices. A pinch of smoked paprika, a dash of Worcestershire sauce, or even a hint of cumin or chili flakes can add a new dimension to your filling.
- Consider Adding Cheese: For an extra layer of deliciousness and gooeyness, sprinkle a tablespoon of shredded cheddar, mozzarella, or a blend of your favorite cheeses over the ground beef filling just before sealing the pockets.
Serving Suggestions and Variations
These ground beef pockets are incredibly versatile. They are fantastic on their own as a complete meal or snack, but they can also be paired with a variety of sides or adapted with different flavors to suit your personal taste and dietary preferences.
- Classic Pairing: Serve them warm with a side of plain Greek yogurt or extra sour cream for a refreshing contrast. A simple, crisp green salad with a light vinaigrette also makes for a perfectly balanced meal.
- Dipping Sauces: Elevate the experience with a flavorful dipping sauce. A simple tomato salsa, a tangy ranch dip, a spicy sriracha mayo, or even a homemade garlic-herb sauce would be excellent complements.
- Hearty Meal: For a more substantial dinner, pair your beef pockets with a warm bowl of soup, a side of roasted root vegetables, or steamed broccoli.
- Spice It Up: For those who enjoy a bit of heat, add a finely diced jalapeño or a pinch of cayenne pepper directly to the beef filling along with the other seasonings.
- Vegetable Boost: Enhance the nutritional value and flavor by sautéing finely diced carrots, bell peppers, mushrooms, or even a handful of fresh spinach along with the onions in the beef filling.
- Herb Variations: If fresh dill isn’t your preference, feel free to substitute with other fresh herbs like chopped parsley, chives, oregano, or a delightful mix of Italian herbs in the filling.
- Different Meats: While this recipe is optimized for ground beef, you could certainly experiment with other ground meats such as ground chicken, turkey, lamb, or even a blend of different meats. Adjust cooking times and seasoning as needed for the chosen protein.
Storage and Freezing Ground Beef Pockets for Meal Prep
One of the greatest advantages of these homemade ground beef pockets is how well they store and freeze, making them an excellent choice for efficient meal prepping. You can enjoy them fresh out of the oven, or save them for a quick, delicious meal on a busy day, eliminating the stress of last-minute cooking.
Storing Cooked Pockets:
Once your beef pockets are baked, allow them to cool completely to room temperature. This is important to prevent condensation that can make them soggy. Store them in an airtight container in the refrigerator for up to 3-4 days. To reheat, simply microwave for 1-2 minutes until warmed through, or for a crispier exterior, pop them in a toaster oven or conventional oven at 350°F (175°C) for 5-10 minutes.
Freezing for Long-Term Storage:
These pockets are perfectly suited for freezing, offering incredible convenience. You can freeze them either before or after baking, though freezing them cooked is often more straightforward for reheating.
- Cool Completely: If freezing after baking, ensure your ground beef pockets are completely cooled to room temperature. This prevents ice crystals and freezer burn.
- Flash Freeze Individually: Arrange the cooled (or unbaked) pockets in a single layer on a baking sheet. Place the baking sheet in the freezer for 1-2 hours, or until the pockets are solid. This crucial step prevents them from sticking together when stored.
- Transfer to Freezer Bag or Container: Once flash-frozen, transfer the solid pockets to a heavy-duty freezer-safe bag or an airtight freezer container. Remove as much air as possible to prevent freezer burn. Label with the date. Properly stored, they can be kept in the freezer for up to 2-3 months.
- Reheating from Frozen: To reheat, you generally don’t need to thaw them first. Place frozen baked pockets directly onto a baking sheet in a preheated oven at 350°F (175°C) for 20-30 minutes, or until thoroughly heated through and crisp on the outside. You can also microwave them from frozen for 2-4 minutes, but be aware that the crust may not be as crispy as when oven-reheated.
Conclusion: Your New Go-To Recipe for Delicious Beef Pockets
There you have it – a detailed guide to creating the most satisfying and convenient ground beef pockets you’ll ever taste. This recipe, inspired by the culinary artistry of Lecker Schnell, expertly combines simple, wholesome ingredients with straightforward steps to produce a truly remarkable meal. Whether you’re looking for a delightful family dinner that brings everyone to the table, an easy grab-and-go lunch solution for busy days, or a smart and efficient meal prep strategy, these savory hand pies tick all the boxes. They’re a testament to the fact that homemade truly tastes best, offering a depth of flavor, freshness, and comfort that store-bought alternatives simply cannot match.
So, roll up your sleeves, gather your ingredients, and get ready to impress your taste buds and your loved ones with these incredible, versatile, and utterly delicious ground beef pockets. They are sure to become a cherished addition to your recipe collection. Happy cooking!