
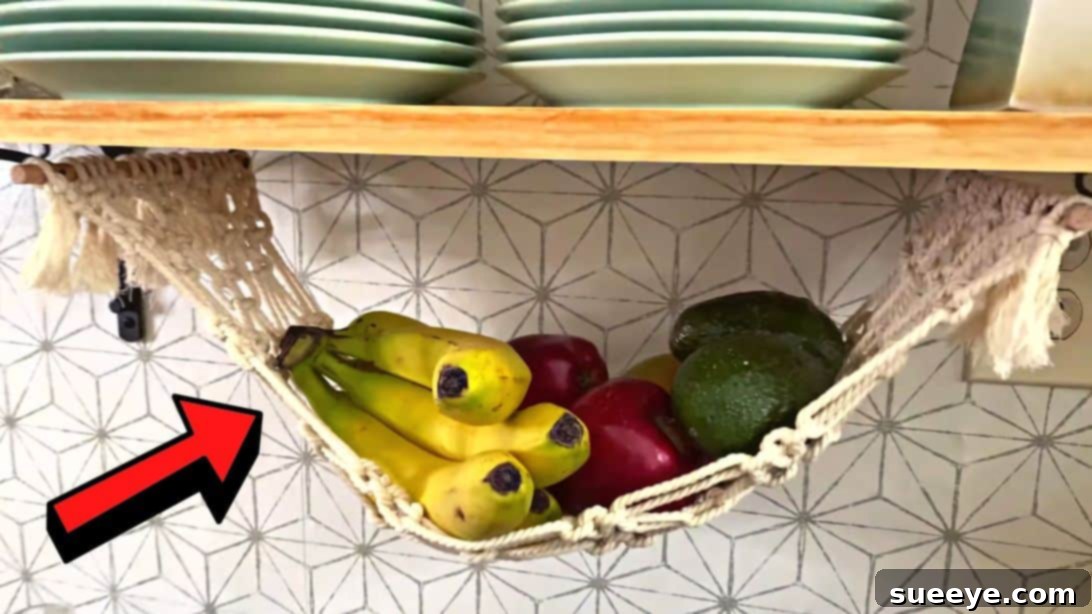
DIY Macrame Fruit Hammock: Elevate Your Kitchen Storage with Handmade Charm
Are you looking for a creative, functional, and aesthetically pleasing way to organize your kitchen? This brilliant DIY macrame fruit hammock project is the perfect solution! Inspired by the fantastic creators at HGTV Handmade on YouTube, this project allows you to craft a beautiful, suspended storage solution for your fresh produce. Not only does it free up valuable counter space, but it also adds a touch of bohemian elegance and warmth to your home decor. Whether you’re a seasoned crafter or completely new to the world of macrame, this guide breaks down each step into an easy-to-follow process, ensuring a successful and rewarding creation. Say goodbye to cluttered countertops and hello to a stylish, organized kitchen with your very own handmade fruit hammock!
Why Choose a Macrame Fruit Hammock for Your Home?
Beyond its undeniable charm, a macrame fruit hammock offers a multitude of practical benefits that make it an excellent addition to any kitchen. It’s more than just a pretty piece of decor; it’s a smart storage solution designed with both aesthetics and functionality in mind.
Aesthetic Appeal and Bohemian Flair
Macrame, with its intricate knots and natural textures, brings a unique bohemian and handcrafted feel to any space. A fruit hammock made with macrame cord instantly becomes a focal point, adding warmth, character, and a touch of rustic sophistication to your kitchen. It’s a beautiful alternative to traditional fruit bowls, transforming everyday produce into a decorative display.
Maximizing Counter Space in Any Kitchen
One of the most significant advantages of a suspended fruit hammock is its ability to free up precious counter space. In kitchens of all sizes, especially smaller ones, every inch matters. By hanging your fruits, you eliminate the need for bulky bowls or baskets on your countertops, leaving more room for food preparation, appliances, or simply a cleaner, more open look. This vertical storage solution is a game-changer for efficient kitchen organization.
Optimal Airflow for Fresher Produce
Unlike solid bowls that can trap moisture and accelerate ripening or spoilage, a macrame hammock’s open, woven design allows for superior air circulation around your fruits. This optimal airflow helps to keep your produce fresher for longer, preventing bruising and mold formation. You’ll find your apples, oranges, bananas, and other fruits remain in prime condition, reducing food waste and ensuring you always have fresh ingredients on hand.
An Eco-Conscious and Sustainable Choice
Crafting your own macrame fruit hammock is also an eco-friendly choice. By using natural materials like cotton or jute cord, you’re opting for a sustainable alternative to plastic or mass-produced items. This handmade approach promotes mindful consumption and allows you to create a durable, reusable item that will serve your household for years to come, aligning with a more sustainable lifestyle.
Gather Your Supplies: What You’ll Need
Before diving into the knotting process, gather all your materials. One of the great things about this DIY project is that it requires only a few simple items, many of which you might already have around the house. Opting for quality materials will ensure your fruit hammock is both beautiful and durable.
- Tape Measure: Essential for accurately determining the space for your hammock and the length of your cords and dowels.
- Pencil: For marking measurements on your dowels.
- Sharp Scissors: A good pair of sharp scissors will make clean cuts through macrame cord, preventing fraying and ensuring professional-looking ends.
- Macrame Cord: The star of the show! A natural fiber cord like cotton or jute is recommended for its strength, texture, and aesthetic appeal. The thickness (e.g., 3mm, 4mm, or 5mm) can vary based on your desired look and strength; thicker cords yield a sturdier, more prominent pattern.
- Two Wooden Dowels: These will form the structural bars of your hammock. Choose sturdy dowels that are smooth and free of splinters. Their length will depend on the width of your desired hammock.
- Comb: A fine-tooth comb is perfect for brushing out the fringe ends of your macrame cords, creating a soft, even finish.
- Painter’s Tape: Invaluable for preventing the ends of your macrame cords from fraying during cutting and for temporarily securing cords while knotting.
- Screw Hooks: Robust screw hooks are necessary for securely hanging your finished fruit hammock. Ensure they are strong enough to hold the weight of your hammock and its contents.
Step-by-Step Guide: Crafting Your Beautiful Fruit Hammock
Now that you have all your materials, let’s embark on the rewarding journey of creating your very own macrame fruit hammock. This guide breaks down the process into clear, manageable steps, making it accessible for everyone.
Step 1: Preparing Your Workspace and Dowels
Begin by envisioning where your fruit hammock will hang. Use your tape measure to determine the optimal length for your hammock, considering the available space and how much fruit you wish to store. Once you have this measurement, you’ll cut your macrame cords. A general rule of thumb is to cut your macrame cord to approximately four times the desired finished length of your hammock. It’s always better to have a bit extra than to run short, especially as knots consume a significant amount of cord.
To prevent fraying, wrap a small piece of painter’s tape tightly around the macrame cord where you intend to cut. Then, cut directly through the center of the taped section. Repeat this for all your cords. Next, cut your two wooden dowels to the desired width of your fruit hammock, which will serve as its spreader bars. These dowels should be long enough to comfortably hold your fruit without bowing. Take one dowel and begin attaching your pre-cut macrame cords using a Lark’s Head Knot. Fold each cord in half, place the loop over the dowel, and pull the two loose ends through the loop, tightening it securely around the dowel. Continue this process across the entire length of the dowel, ensuring that each cord is evenly spaced. This even spacing is crucial for both the aesthetic appeal and structural integrity of your hammock.
Step 2: Weaving the Hammock’s Body
Once all your cords are attached to the first dowel, lay a strip of painter’s tape along each side of the dowel, just below the Lark’s Head knots, to hold the cords firmly in place. This prevents them from shifting while you begin knotting. Now, you’ll start forming the main body of your hammock. The beauty of macrame lies in its versatility, allowing you to choose from various knot patterns. For beginners, the Square Knot is an excellent starting point and forms a strong, classic mesh. Work your way down the cords, creating a consistent pattern. You can follow the pattern shown in the HGTV Handmade video for a proven design, or experiment with your own combinations of square knots, half hitch knots, or spiral knots. Maintaining consistent tension in your knots is key to creating an even and sturdy hammock base. Continue knotting until you reach the desired depth of your hammock, typically around 12-18 inches, depending on your preferred size and the amount of fruit you wish to store.
Step 3: Completing the Structure and Adding Fringes
After you’ve knotted the main body of your hammock to the appropriate depth, it’s time to attach the second wooden dowel. Using the same Lark’s Head Knot technique that you employed for the first dowel, secure the remaining loose ends of your macrame cords to the second dowel. Ensure that the knots are aligned and spaced evenly, mirroring the top dowel, so that your hammock hangs straight and symmetrically. Once all cords are attached and securely knotted, your hammock will take its final shape. Now, for the finishing touch: the fringe. Carefully trim all the hanging cord ends below the second dowel to an even length. You can choose a straight, angled, or V-shaped trim – whatever suits your aesthetic. After trimming, use your comb to gently brush out the individual strands of the macrame cord, creating a soft, flowing, and polished fringe. This adds a beautiful, professional finish to your handmade creation.
Step 4: Installation and Enjoying Your New Hammock
With your macrame fruit hammock complete, the final step is to install it in your chosen spot. Identify a sturdy location, such as underneath a cabinet, a shelf, or a ceiling beam, where you wish to hang your hammock. Using a pencil, mark the exact spots for your screw hooks, ensuring they are level and spaced appropriately for the width of your dowels. Install the screw hooks firmly into the chosen surface. Once the hooks are secure, simply hang your fruit hammock by resting the wooden dowels onto the hooks. Double-check that it feels stable and secure before loading it. Finally, arrange your favorite fruits neatly within the hammock. Step back and admire your beautiful, handmade creation – not only is it a practical storage solution, but it’s also a stunning piece of functional art you made yourself!
Expert Tips for Macrame Success
To ensure your macrame fruit hammock project goes smoothly and yields the best results, consider these helpful tips:
- Practice Makes Perfect: If you’re new to macrame, take a few minutes to practice basic knots like the Lark’s Head Knot and Square Knot on a scrap piece of cord. This builds confidence and consistency.
- Measure Twice, Cut Once: Always double-check your measurements for both the space and your cords before making any cuts. Errors in measurement can lead to a hammock that’s too small, too large, or doesn’t hang properly.
- Choose the Right Cord: While cotton is popular, consider jute for a more rustic look or synthetic cords for outdoor use (though less common for fruit hammocks). The thickness affects the final look and feel – thicker cords for a chunkier, more robust look, thinner for a delicate mesh.
- Maintain Consistent Tension: Uneven tension in your knots will result in a lopsided or irregular hammock. Try to tie each knot with the same amount of tightness for a uniform appearance.
- Personalize Your Pattern: Don’t be afraid to experiment! Once comfortable with basic knots, try incorporating different patterns or even adding beads for a unique touch that reflects your personal style.
- Regular Cleaning: Over time, your hammock might gather dust or fruit residue. For light cleaning, simply shake it out. For deeper cleaning, spot clean with a damp cloth and mild soap. If heavily soiled, check your cord’s care instructions; many cotton macrame items can be hand-washed in cold water and air-dried.
Beyond Fruit: Creative Uses for Your Macrame Hammock
While designed for fruits, the versatility of this macrame hammock extends far beyond just storing apples and bananas. Its stylish design and practical open structure make it suitable for a variety of organizational and decorative purposes around your home:
- Vegetable Storage: Keep onions, garlic, potatoes, or sweet potatoes neatly stored and well-ventilated outside of your refrigerator.
- Small Planter Holder: Suspend small potted plants or air plants, creating a charming indoor garden display.
- Toy Organizer: Ideal for lightweight children’s toys like plush animals or blocks, keeping them off the floor and easily accessible.
- Craft Supply Caddy: Store yarn skeins, fabric scraps, or other craft essentials in an organized and visible manner.
- Bathroom Essentials: Hold rolled towels, extra toilet paper, or toiletries, adding a spa-like touch to your bathroom.
- Entryway Catch-All: Use it to hold mail, keys, or sunglasses, preventing clutter on your console table.
Frequently Asked Questions (FAQ)
What type of macrame cord is best for a fruit hammock?
For a fruit hammock, natural cotton cord is highly recommended. It’s soft, easy to knot, eco-friendly, and offers a beautiful, natural aesthetic. You can choose between single twist, 3-ply, or braided cords, with 3mm to 5mm thickness being ideal for a sturdy yet elegant hammock.
How much weight can a macrame fruit hammock typically hold?
The weight capacity depends on the strength of your cord, the tightness of your knots, and the robustness of your screw hooks. A well-made hammock using 4mm or 5mm cotton cord and properly installed hooks can typically hold several pounds of fruit (e.g., 5-10 lbs or 2-4.5 kg) without issue. Always ensure your hooks are anchored into a stud or use appropriate wall anchors.
Can I wash my macrame fruit hammock?
Yes, most cotton macrame items can be washed. For light cleaning, spot clean with a damp cloth and mild soap. For a deeper clean, hand wash in cool water with a gentle detergent, then reshape and lay flat or hang to air dry completely. Avoid machine washing and drying as it can tangle the knots and cause shrinkage.
How do I choose the right size dowels and cord length?
The dowel length should match the desired width of your hammock. Measure the space where you plan to hang it and subtract a few inches if you want it slightly narrower. For cord length, a good starting point is to cut cords 3 to 4 times the desired finished length of your hammock, considering that knotting significantly reduces the working length of the cord.
Conclusion: Your Handcrafted Touch for a Harmonious Home
Congratulations! By following this detailed guide, you’ve not only created a beautiful macrame fruit hammock but also embarked on a fulfilling DIY journey. This project is a testament to the fact that functional home decor can be both elegant and handmade. Your new macrame fruit hammock will not only keep your kitchen organized and your produce fresh but also serve as a constant reminder of your creativity and skill. It’s a wonderful way to infuse your living space with personality and a touch of artisanal charm. We encourage you to display your creation proudly and enjoy the fruits (literally!) of your labor. Happy knotting!
*All image credit belongs to HGTV Handmade via YouTube. Follow and subscribe to their channel for more inspiring DIY projects!