
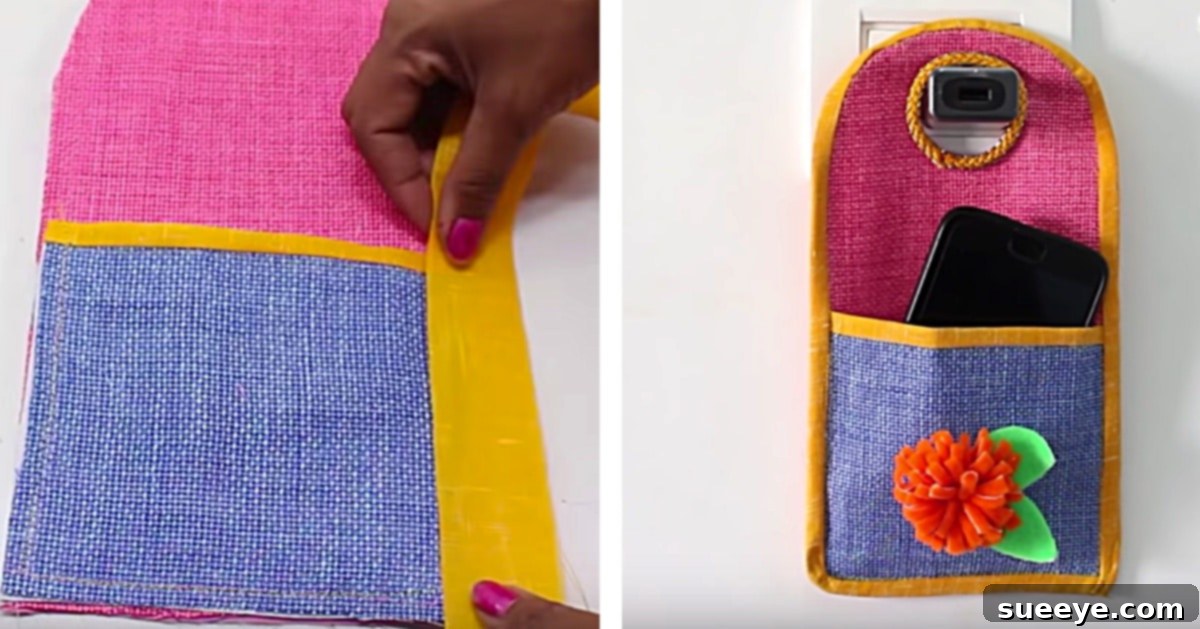
DIY Phone Charging Pouch: A Simple Sewing Project for a Safer, More Organized Home
Are you tired of your phone resting precariously on the edge of a table or nightstand while it charges, always at risk of an accidental tumble? Do tangled cords create an unsightly mess, turning your charging station into a source of frustration rather than convenience? If so, you’re not alone! The common predicament of finding a safe and tidy spot for our indispensable mobile devices while they power up is a daily challenge for many.
But what if there was an elegant, practical, and incredibly simple solution that you could create yourself in just a short amount of time? Imagine a dedicated, secure pouch for your phone, keeping it safely suspended and its cord neatly tucked away. This isn’t just a dream; it’s entirely achievable with a DIY mobile charging pouch! When I stumbled upon a tutorial for this ingenious little project, I was absolutely thrilled. The promise of an organized, risk-free charging setup was too good to pass up, and I knew I had to make one immediately. What’s more, you won’t believe how easy and satisfying this sewing project is – let me show you how!
Why Every Home Needs a Handmade Mobile Charging Pouch
Beyond the immediate satisfaction of creating something with your own hands, a DIY phone charging pouch offers a multitude of benefits that enhance both the functionality and aesthetics of your living space. Firstly, and perhaps most importantly, it addresses the safety concern. By keeping your phone securely nestled in a fabric holder and suspended above the ground, you eliminate the risk of it falling, getting stepped on, or being damaged by spills. This simple solution protects your valuable device and provides peace of mind.
Secondly, it’s a brilliant organization tool. Instead of a phone lying flat and consuming precious surface area, or a charging cord sprawling across your floor, the pouch provides a designated, elevated spot. This not only declutters your nightstand, desk, or kitchen counter but also keeps your charging cable neatly contained, reducing trip hazards and making your space feel much more orderly. Plus, the ability to customize its appearance means your charging station can finally blend seamlessly with your home decor, adding a touch of personal style rather than being an eyesore.
Another fantastic aspect is the sustainability factor. This project offers an excellent opportunity for upcycling, allowing you to transform old clothes, leftover fabric scraps, or discarded linens into something functional and beautiful. It’s a testament to conscious living, minimizing waste, and maximizing creativity. And for those who love to give thoughtful, personalized gifts, these pouches are an absolute winner. They are inexpensive to make, highly useful, and carry the unique charm of a handmade item, perfect for a wide range of occasions.
Gather Your Essentials: Materials and Tools for Your Sewing Project
One of the beauties of this DIY mobile charging pouch is that it doesn’t require an extensive list of specialized materials or tools. Chances are, you already have most of what you need tucked away in your sewing kit or even in your closet. Let’s break down what you’ll want to gather before you begin:
Fabric Choices: The Foundation of Your Pouch
For the main body of the pouch, durability is key. I personally opted for a heavy duck fabric, which offers excellent structure and resilience, ensuring the pouch holds its shape and stands up to daily use. However, the true beauty of this project lies in its versatility. You can use almost any sturdy fabric you have on hand, making it a fantastic upcycling project. Consider options like canvas, denim (from old jeans!), upholstery scraps, or even thick cotton twill. If you’re using thinner fabrics, you might want to double them up or choose a heavier interfacing to provide adequate stiffness. Don’t be afraid to get creative with patterns and colors – this is your chance to infuse your personality into your creation!
Interfacing or Stabilizer: Adding Structure and Support
To give your phone charging holder its essential rigidity and help it maintain its form, you’ll need either a piece of paper or, ideally, a medium to heavy-weight fusible interfacing. Interfacing is a fabric-like material that you iron onto the back of your main fabric pieces. It provides stability, prevents sagging, and gives a much more professional finish than paper. If you’re upcycling thin fabrics, interfacing becomes even more crucial for creating a robust pouch.
Basic Sewing Supplies: Your Crafting Arsenal
Alongside your fabric and interfacing, you’ll need a few standard sewing tools. This includes a sewing machine (though this project is simple enough for hand sewing if you prefer), matching thread, sharp fabric scissors, sewing pins or fabric clips to hold pieces together, a measuring tape or ruler for precise cuts, and an iron for pressing seams. A seam ripper is always a good idea for any “oops” moments, and a fabric marker or tailor’s chalk can be helpful for marking your cutting lines.
Optional Embellishments: Personalizing Your Pouch
To truly make your mobile charging pouch unique, consider adding a few optional decorative touches. While the original tutorial’s simple “piping” method is excellent, you might also think about adding an actual piping cord for a more defined edge. Other ideas include decorative topstitching, small fabric appliques, embroidered details, or even a personalized tag. These small additions can elevate your handmade gift or personal accessory.
Understanding the Pattern Pieces: Your Blueprint for Success
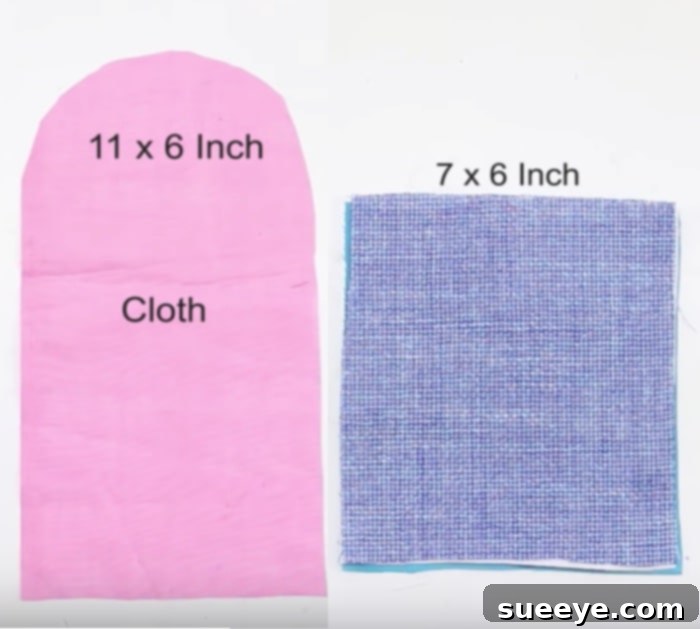
Before you even touch your scissors, it’s vital to understand the simple pattern pieces required for your DIY phone charging pouch. Precision in cutting is paramount for a professional-looking finish. You’ll need to cut three distinct types of pieces, and for most, you’ll need duplicates to create a sturdy, lined effect:
-
Main Back Panel (x2 Fabric, x1 Interfacing): You will cut two pieces of your chosen fabric, each measuring approximately 11 inches in height by 6 inches in width. The key feature of these pieces is a gently curved bottom. To achieve a consistent curve, you can use a small plate or a compass to draw a smooth arc at the bottom two corners before cutting. These two fabric pieces will form the main body of the pouch, cradling your phone. You will also need one piece of interfacing cut to the exact same dimensions, including the curved bottom.
-
Front Pocket Pieces (x2 Fabric): For the front pocket, which will hold the base of your phone and prevent it from sliding out, you’ll cut two square or rectangular pieces, each measuring approximately 7 inches in height by 6 inches in width. These will be sewn together to form a neat, finished pocket.
Always double-check your measurements and ensure your fabric is pressed flat before cutting to guarantee accuracy. Remember, a little extra care in the cutting stage saves a lot of headaches later on!
Step-by-Step Guide: Crafting Your Mobile Phone Charging Pouch
Now that your materials are ready and your pieces are precisely cut, it’s time to bring your vision to life! This project is incredibly beginner-friendly, and the steps are straightforward. Follow along, and you’ll have your custom mobile charging holder in no time.
Step 1: Prepare and Cut Your Fabric
Begin by pre-washing and ironing your fabric if necessary. This helps prevent shrinkage later. Carefully cut all your fabric pieces according to the dimensions provided: two 11″ x 6″ pieces with a curved bottom for the main panel, two 7″ x 6″ square pieces for the front pocket, and one 11″ x 6″ piece of interfacing (also with a curved bottom, matching the main panel). Precise cuts are crucial for a clean final product, so take your time.
Step 2: Assemble the Main Pouch Body
Take one of your main back panel fabric pieces and lay it right side up on your work surface. Place the interfacing piece directly on top, aligning all edges. Finally, lay the second main back panel fabric piece on top of the interfacing, with its wrong side facing up. You now have a fabric-interfacing-fabric “sandwich.” Pin these layers together securely along the side and bottom curved edges. Stitch all around these pinned edges, leaving the entire top straight edge open. Use a 1/4 or 3/8-inch seam allowance. After sewing, trim the seam allowances, especially clip the curves gently (without cutting into the stitching) to ensure a smooth turn. Turn the entire piece right side out and press it well. This creates a sturdy, self-lined main body for your pouch.
Step 3: Create the Front Pocket
Take your two 7″ x 6″ square fabric pieces for the front pocket. Place them right sides together, aligning all edges. Pin along three sides, leaving one of the 6-inch edges completely open. Stitch these three pinned sides using a 1/4 or 3/8-inch seam allowance. Trim the corners to reduce bulk and turn the pocket piece right side out. Press the pocket neatly, ensuring the seams are crisp. For an extra touch of professionalism, you can add a line of topstitching along the open 6-inch edge, approximately 1/8 inch from the edge. This provides a clean finish and reinforces the top of your pocket.
Step 4: Attach the Pocket to the Main Panel
Now, it’s time to combine the pocket with the main pouch body. Lay your main pouch body (from Step 2) flat, right side up. Position the finished front pocket onto the main panel. You’ll want to center it both horizontally and vertically. A good starting point is to align the bottom of the pocket a couple of inches from the curved bottom of the main panel. Pin the pocket securely to the main panel along its sides and bottom edge. Stitch the pocket to the main panel along these three pinned edges. Be sure to backstitch at the beginning and end for reinforcement. If you wish to create two smaller compartments within the pocket (perfect for earbuds or a charging block), you can add a vertical line of stitching down the center of the pocket.
Step 5: The “Super Easy” Piping Method – Finishing the Top Edge and Adding a Hanging Loop
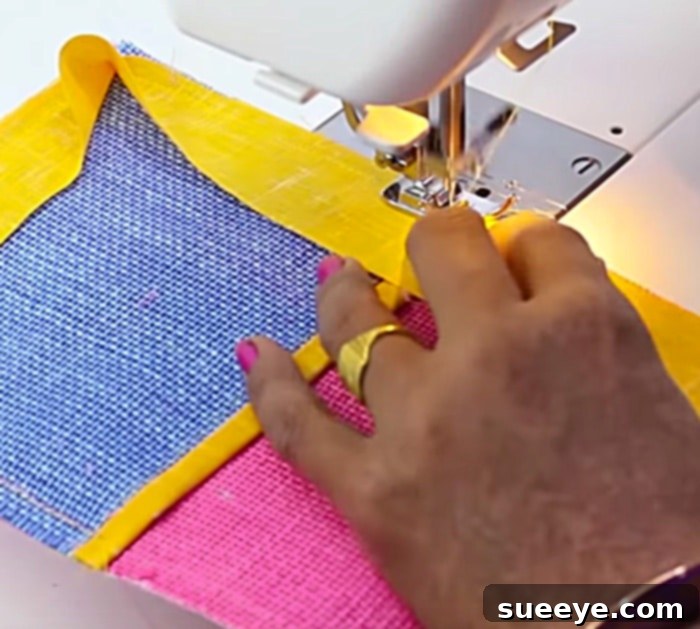
This is where the magic happens, giving your pouch a clean, professional finish and preparing it for hanging. The method described in the original tutorial is indeed “super easy and original,” essentially a simple binding/facing technique for the top edge.
First, if you want a hanging loop: Cut a small strip of fabric (e.g., 1 inch wide by 4 inches long). Fold it in half lengthwise, press, and stitch along the raw edge. Turn it right side out to create a neat fabric loop. Fold this loop in half to create a U-shape and baste it securely to the center top *wrong side* of your assembled main pouch (the side that will be the back). Ensure the raw edges of the loop align with the raw top edge of the pouch.
Next, cut a fabric strip for your binding/facing – approximately 2 inches wide and the same length as the top opening of your main pouch (plus about 1/2 inch for seam allowance). Place this binding strip right sides together with the top raw edge of your main pouch body (where the loop is basted). Stitch along this entire top edge. Now, flip the binding strip upwards and then around to the *back* (wrong side) of the pouch. Press it neatly, folding under the raw edge of the binding for a clean finish. From the *right side* of your pouch, topstitch along the very top edge, approximately 1/8 inch from the fold. This stitch will secure the binding on the back, hide all raw edges, and firmly attach your hanging loop. This method creates a beautifully finished opening for your charger cable to pass through.
Customizing Your DIY Phone Charging Holder
The finished product will be nothing short of amazing, a testament to your creativity and practical skills. But why stop at just one? The beauty of this sewing project is its endless customization potential. Experiment with different fabric combinations – a bold pattern for the main body and a complementary solid for the pocket, or vice versa. Consider adding embroidery to the front pocket with a monogram or a fun design. You could even integrate small fabric appliques or use fabric paint to add unique motifs. For a tablet or a larger phone, simply adjust the dimensions accordingly. This project is a fantastic canvas for your personal style.
The Perfect Handmade Gift for Any Occasion
After completing my first mobile charging pouch, I was so thrilled with the result that I ended up making ten more to give as gifts! This project perfectly suits a variety of occasions, making it an excellent choice for anyone who loves to have a stockpile of thoughtful, handmade gifts ready at a moment’s notice. Whether it’s a teacher appreciation event, an office party Secret Santa, a housewarming gift, a birthday present, or even a thoughtful stocking stuffer, a custom-made phone charging pouch is always appreciated. It’s practical, personal, and shows a level of care that store-bought items simply can’t match. Imagine the delight of a friend or colleague receiving such a useful and beautifully crafted item!
Conclusion: Embrace the Joy of Creative Sewing
Crafting your own DIY phone charging pouch is more than just a simple sewing task; it’s an enjoyable journey that results in a highly functional, attractive, and personalized accessory for your home or as a heartfelt gift. It solves a common household problem with elegance and simplicity, keeping your devices safe, your space organized, and your charging cords tidy. With its straightforward steps and minimal material requirements, it’s an ideal project for sewers of all skill levels, from complete beginners to experienced crafters looking for a quick and satisfying make.
So, gather your fabrics, fire up your sewing machine, and embark on this delightful project. You’ll not only create a fantastic mobile charging holder but also experience the immense satisfaction that comes from making something beautiful and practical with your own hands. We can’t wait to see your unique creations!