
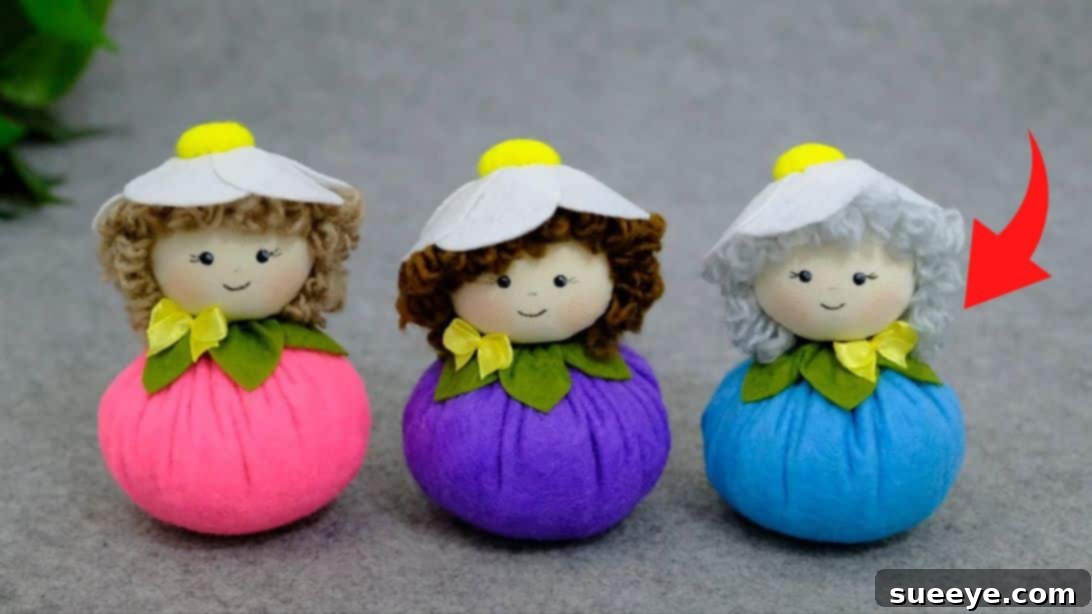
Delightful DIY Berry Dolls: A Step-by-Step Guide to Crafting Adorable Fabric Decor
Imagine your living space adorned with the sweetest, most charming little figures that bring a touch of whimsy and homemade warmth. These adorable DIY berry dolls are precisely that! Crafted with simple materials and a whole lot of love, they are guaranteed to melt hearts and spark conversations. Perfect for brightening up a shelf, serving as unique table decor, or even gifting to friends and family, these delightful creations by Moth Art are a joy to make and behold. Dive into this comprehensive tutorial and discover how easy it is to bring these cute fabric characters to life, adding a personalized flair to any setting.
Why Create Your Own Berry Dolls?
Crafting these berry dolls offers more than just a beautiful end product; it’s a rewarding experience from start to finish. Here’s why you’ll love embarking on this DIY journey:
- Unique Home Decor: Move beyond mass-produced items and infuse your home with decor that tells a story. These handmade dolls add a personalized touch that store-bought items simply can’t replicate.
- Perfect Personalized Gifts: Handmade gifts carry immense sentimental value. A berry doll crafted by you is a thoughtful present for birthdays, housewarmings, baby showers, or just to show someone you care. You can even customize them to match the recipient’s preferences!
- Sustainable Crafting: Many of the materials used are common craft supplies or even scraps, promoting sustainable practices and reducing waste.
- Fun for All Ages: While involving some detailed steps, the core process is accessible, making it a fantastic project for adults and older children (with supervision for hot glue and needles) to enjoy together. It’s a wonderful way to spend quality time and foster creativity.
- Stress Relief and Mindfulness: Engaging in creative activities like crafting can be incredibly therapeutic. The repetitive motions of cutting, stitching, and assembling can help calm the mind and reduce stress, offering a mindful escape from daily routines.
- Develop New Skills: Whether you’re a seasoned crafter or a beginner, this project allows you to practice and refine basic sewing, gluing, and artistic skills, boosting your confidence in handmade creations.
- Endless Customization: From the choice of “berry” color to facial expressions and hair styles, the possibilities for personalization are limitless. No two dolls will ever be exactly alike, making each one a unique work of art.
Materials You’ll Need
Gathering your supplies is the first exciting step in any crafting adventure. For these adorable berry dolls, you’ll need a few common items:
- Felt: Choose vibrant colors that evoke the look of your favorite berries—think deep reds for strawberries, blues for blueberries, or even purples and oranges for fantastical berries. Felt is easy to cut, doesn’t fray, and holds its shape well, making it ideal for the doll’s body and leafy accents.
- Beige Fabric: A soft, light-colored fabric is perfect for the doll’s head, providing a neutral canvas for drawing facial features. Cotton or a light linen blend works beautifully.
- Yarn: Select a color and texture that you envision for your doll’s hair. From classic browns and blondes to playful pinks or blues, yarn adds character and charm. Different thicknesses can create varied hair effects.
- Acrylic Paints: Small tubes of black, white, and a rosy blush color will be essential for bringing your doll’s face to life. Black for eyes and mouth, white for highlights, and blush for rosy cheeks add personality. A fine-tip brush or paint pen will be helpful.
- Fiberfill: This soft, fluffy material is used to stuff the doll’s body and head, giving them their plump, huggable form. Ensure you have enough to make your dolls firm but squishy.
- Ribbon: A thin ribbon in a complementary color will be used to create a lovely bow for the doll’s neck, adding a final touch of elegance and cuteness.
- Thread and Needle: A sturdy sewing needle and matching thread are crucial for stitching the felt and fabric pieces together. Hand-sewing is perfectly suitable for this project.
Tools for the Crafting Journey
In addition to your materials, make sure you have these essential crafting tools on hand:
- Scissors: Sharp fabric scissors will make clean cuts through felt and fabric.
- Hot Glue Gun and Glue Sticks: A hot glue gun is invaluable for quickly and securely attaching various components, such as the hair, facial features, and the decorative elements. Always exercise caution when using a hot glue gun.
- Pencil or Fabric Marker: For tracing patterns and marking cutting lines.
- Ruler or Measuring Tape: To ensure accurate measurements for your fabric pieces.
Step-by-Step Instructions: Crafting Your Cute Berry Dolls
Now, let’s embark on the fun part – bringing your berry dolls to life! Follow these detailed instructions carefully to create your charming fabric friends.
Step 1: Constructing the Berry Body
Begin by forming the main body of your berry doll. From your chosen felt color (e.g., red for a strawberry), cut a perfect circle with a diameter of 5.9 inches. This will form the plump, round base of your doll. Using your needle and thread, stitch all around the edges of this felt circle. A simple running stitch or a small gathering stitch will work best. Once you’ve stitched all the way around, gently pull the thread to start gathering the felt, forming a pouch-like shape. Fill the inside generously with fiberfill, ensuring it’s packed firmly enough to create a nice, round, and smooth berry shape. Once you’re satisfied with the fullness, pull the thread tightly to close the opening completely, securing it with several strong knots. Trim any excess thread. If the doll feels too soft or loses its shape, don’t hesitate to add more fiberfill before fully closing.
Step 2: Crafting the Berry Cap Leaves
Next, we’ll create the distinct leafy cap that sits atop your berry. Take a piece of green felt and cut a rectangular strip measuring 5.9 inches in length by 1 inch in width. This will be the base for your leaves. To create connected leaves, carefully fold this felt strip four times lengthwise. With the strip still folded, cut a shallow ‘V’ shape into both folded sides. Be careful not to cut all the way through the folded edge; the goal is to create a series of connected leaf-like shapes when you unfold it. When unfolded, you should have a row of green leaves, still attached at their base, ready to form a collar around the berry body.
Step 3: Attaching the Leafy Cap to the Body
Now, it’s time to bring the berry body and its cap together. With your needle and thread, stitch along the bottom edge of the connected green leaves you just created. Pull the thread gently to gather these leaves into a circular shape. Then, sew the first and last leaf parts together to form a complete ring. This creates a charming leafy wreath. Apply a small amount of hot glue to the top center of your felt berry ball, and carefully place the gathered green leaf wreath onto it, pressing down firmly to secure it. This leafy top instantly gives your felt ball the unmistakable look of a fresh, ripe berry.
Step 4: Creating a Decorative Flower for the Head
This step involves crafting a pretty decorative element, often a small flower, that will adorn the doll’s head. First, cut one piece of felt into a 1.6-inch diameter circle. Set this aside for a moment. Next, cut five pieces of felt into 1.4-inch gray squares (or another color of your choice for petals). To transform these squares into petal shapes, fold each square in half and then carefully cut it into a rounded leaf or petal shape. Repeat this for all five squares. Once you have five petals, arrange them in a circle, overlapping each one slightly to form a flower shape. Stitch them together securely where they overlap, then sew the first and last petals together to complete the circle. Now, take the 1.6-inch circle you cut earlier. Stitch around its edge, fill it with a small amount of fiberfill, and pull the thread tight to close it into a small, firm ball. This will be the center of your flower. Finally, glue this small fiber-filled ball onto the center of your assembled felt flower. This beautiful little flower is now ready to be a charming accent on your doll’s head.
Step 5: Forming the Doll’s Head
Every doll needs a characterful head! Take your beige fabric and cut a 3.5-inch diameter circle. Just as you did with the berry body, stitch all around the edge of this circle. Gently pull the thread to begin gathering the fabric, then fill the inside with fiberfill. Ensure the fiberfill is evenly distributed to create a smooth, firm, and round head shape. Once filled, pull the thread tightly to close the opening and secure it with strong knots. Now, take the decorative flower you created in Step 4. Apply hot glue to the back of the flower and carefully glue it onto the front or top of this beige fabric ball. This assembly now forms the head of your doll, complete with a lovely floral embellishment.
Step 6: Giving Your Doll a Charming Hairstyle
Hair adds so much personality to your berry doll! Get a piece of yarn in your desired hair color. Begin by separating several strands from the main piece of yarn to make it easier to work with. Take one strand and loop it around your two fingers a few times, creating a small bundle of loops. Then, take another small strand of yarn and tie it tightly around the middle of the looped bundle. This forms a small, individual section of hair. Repeat this process several times until you have enough hair bundles to cover the doll’s head, creating a full and lovely hairstyle. Experiment with different lengths and thicknesses. Once you have your hair pieces, apply a small dot of hot glue to the tied section of each hair bundle and carefully glue them around the doll’s head, arranging them to create a natural and charming look. You can create bangs, side parts, or even a full head of flowing locks!
Step 7: Adding Expressive Facial Features
Now for the part that truly brings your doll to life: the face! Using black acrylic paint and a very fine-tip brush or a permanent fabric pen, carefully draw the eyes, nose, and mouth onto the beige fabric head. You can opt for simple dots for eyes, small inverted V-shapes for noses, and delicate curved lines for mouths. For an extra touch of charm, add tiny white dots in the eyes for highlights to make them sparkle, and a subtle blush on the cheeks using a tiny bit of pink paint. Practice on a scrap piece of fabric first if you’re nervous. The beauty of handmade dolls is their unique expressions, so don’t be afraid to experiment and give each doll its own personality!
Step 8: Final Assembly and Embellishment
With all the individual components ready, it’s time for the grand assembly! Apply a generous amount of hot glue to the bottom of the doll’s head, and carefully attach it to the center of the leafy cap on top of the berry body. Hold firmly for a few moments until the glue sets. This creates a secure connection between the head and the body. To add a final touch of sweetness, take your chosen ribbon and tie it into a small, neat bow. Apply a tiny dot of hot glue to the back of the bow and carefully attach it to the “neck” area of the doll, right where the head meets the body. This bow acts as a charming collar and completes the doll’s adorable look. Step back and admire your beautiful, handmade berry doll!
Tips for Success in Doll Making
- Practice Makes Perfect: Don’t expect perfection on your first try. Each doll you make will be better than the last as you refine your techniques.
- Safety First: Always supervise children when using hot glue guns and sharp tools.
- Material Quality: While inexpensive, good quality felt and fabric will make a noticeable difference in the final look and durability of your dolls.
- Customization is Key: Feel free to adjust measurements slightly to make bigger or smaller dolls. Experiment with different felt colors to create a variety of “berry” types.
- Patience: Take your time with each step, especially the detailed work like facial features and hair placement. Rushing can lead to mistakes.
Creative Variations and Uses for Your Berry Dolls
The beauty of DIY projects lies in their potential for endless customization. Once you’ve mastered the basic berry doll, consider these variations and uses:
- Different Berry Types: Use red felt with tiny black beads or embroidery for strawberry seeds, blue felt for blueberries, or even orange felt for a whimsical pumpkin-berry.
- Seasonal Decor: Create themed dolls for different holidays. Think pastel colors for spring, patriotic colors for summer, or earthy tones for autumn.
- Accessory Fun: Add tiny accessories like miniature felt flowers, little baskets, or even tiny spectacles to give your dolls more character.
- Doll Clothes: For an extra challenge, sew tiny dresses, overalls, or hats for your dolls.
- Keychain Charms: Make smaller versions of the dolls and attach a keyring for a unique, handmade keychain.
- Ornaments: Add a loop of string to the top of the doll’s head to transform them into adorable holiday ornaments or decorative hangers.
- Garlands: Create a collection of berry dolls and string them together to make a charming garland for a nursery, party, or mantelpiece.
- Playtime Pals: While decorative, these dolls can also become cherished friends for gentle play, sparking imaginative stories.
Caring for Your Handmade Dolls
To ensure your delightful berry dolls remain vibrant and charming for years to come, handle them with care. Spot clean any marks with a damp cloth and mild soap. Avoid submerging them in water, as this can affect the felt and fiberfill. Display them in a place where they won’t gather excessive dust or be exposed to direct sunlight for prolonged periods, which can fade fabric colors.
Embrace the Joy of Crafting
Creating these cute berry dolls is more than just a craft project; it’s an opportunity to inject personality and handcrafted charm into your home or to offer truly unique gifts. With each stitch and brushstroke, you’re not just making a doll; you’re creating a tiny piece of art filled with your own creativity and care. We hope this detailed guide empowers you to embark on this delightful journey. Happy crafting!