
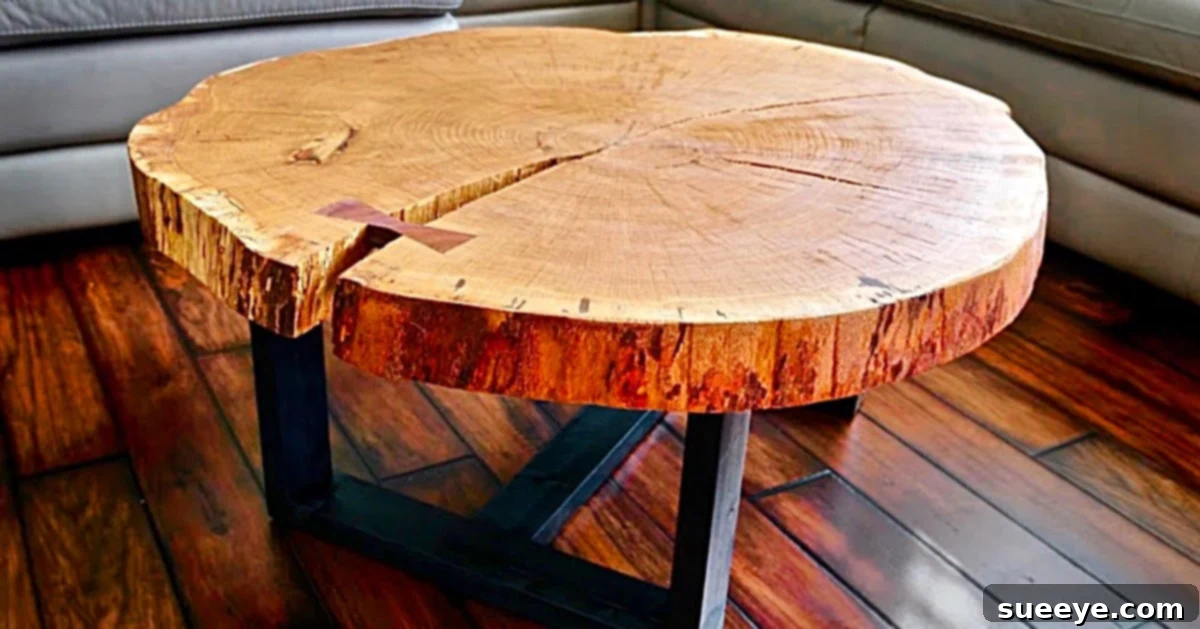
Craft Your Own Stunning Live Edge Log Slice Coffee Table: A Comprehensive DIY Guide
There’s something uniquely captivating about live edge furniture. The raw, organic beauty of a wood slab, with its natural contours preserved, brings an undeniable warmth and character to any space. Like many woodworking enthusiasts, I found myself admiring these exquisite creations on social media, often feeling they were beyond my reach. The thought of transforming a simple log slice into a functional, beautiful coffee table seemed like a distant dream. However, after discovering detailed tutorials, I realized that with the right guidance and a bit of determination, anyone can achieve this rewarding project. I decided to take the plunge, and I’m thrilled to share my journey of crafting a gorgeous log slice coffee table that now graces my living room, proving that often, we simply underestimate our own capabilities.
This comprehensive guide will walk you through every step of creating your own bespoke live edge coffee table. From selecting the perfect wood slab to the final finishing touches, we’ll cover the tools, techniques, and tips you need to succeed. Prepare to transform raw timber into a piece of art that will be a conversation starter and a testament to your craftsmanship.
Essential Materials for Your Log Slice Coffee Table
Selecting the right materials is the foundation of a successful project. Here’s what you’ll need to gather:
- White Oak Live Edge Wood Slab (approx. 40″ in diameter): The star of your table. White oak is chosen for its durability, beautiful grain, and resistance to wear. The “live edge” refers to the natural edge of the tree preserved on the slab.
- Two 2 x 4 x 8 boards (for the Table Base): These will form the sturdy legs and frame of your table base. Common lumber dimensions, readily available.
- One 2 x 8 x 8 board (for the Router Jig Rails): Crucial for building the jig that will help flatten your log slice evenly.
- One 2 x 4 x 8 board (for Jig Rail Frame): To provide additional support and stability for your router jig.
- One 2′ x 4′ 1/2″ Plywood Project Panel (for Router Jig Sled): This piece of plywood will be the movable sled that carries your router across the wood slab.
- 1 1/4″ Screws: General-purpose screws for various assembly tasks, particularly for the router jig.
- 2 1/2″ Pocket Hole Screws: Specifically designed for strong, concealed joints when using a pocket hole jig for the table base.
- 2 1/2″ Powerhead Screws: Heavy-duty screws ideal for attaching the finished wood slab to the table base, providing excellent holding power.
- Danish Oil: A penetrating oil finish that enhances the natural beauty of the wood, provides protection, and is easy to apply and repair.
- Black Spray Paint: For giving your table base a sleek, modern, contrasting look.
- Felt Furniture Pads: To protect your floors and allow for easy movement of the finished table.
Key Tools for Your Woodworking Journey
Having the right tools makes all the difference in achieving professional results and ensuring safety. Here’s a list of the tools you’ll find essential for this project:
- Router Bit: A large diameter surfacing or flattening bit designed to create a perfectly flat surface on your wood slab.
- Dewalt Plunge Router: A powerful router with a plunge base is ideal for slab flattening as it allows for controlled depth adjustments.
- Collet Extension (bent): This accessory extends the reach of your router bit, which can be helpful for larger slabs or specific router setups. Ensure it’s in good condition.
- Dewalt Trim Router: A smaller, more maneuverable router useful for edge detailing or smaller routing tasks.
- 1/4″ Up/Down Cut Spiral Bit: Excellent for clean, precise cuts on edges or for general routing tasks, providing a smooth finish on both the top and bottom of the cut.
- Saw Stop ICS Industrial Cabinet Saw: A high-precision table saw, essential for accurately ripping and cross-cutting the lumber for your table base and router jig components. Its safety features are a major plus.
- Festool Kapex Miter Saw: A premium miter saw known for its precision, perfect for making accurate angled or straight cross-cuts for the table base.
- Powermatic PJ-882HH 8 inch Jointer: Used to create one perfectly flat and square face and edge on your lumber, preparing it for planing and ensuring strong, tight joints for the table base.
- Powermatic 15HH 15 inch Planer: After jointing, the planer is used to achieve a consistent thickness across your lumber, ensuring all components of your base are uniform.
- Kreg K4 Pocket Hole Jig: An indispensable tool for creating strong, hidden pocket hole joints, which are ideal for assembling the table base without visible fasteners.
- Mirka Deros Sander: A high-performance random orbital sander that will make quick work of sanding your wood slab to a smooth, finish-ready surface.
- Belt Sander: More aggressive than an orbital sander, useful for initial shaping, removing imperfections, or heavy sanding on the slab.
- Parallel Bar Clamps: Essential for holding wood securely during glue-up and assembly, ensuring components remain square and tight.
- Fastcap Flushmount Drill Bit: A specialized drill bit designed to create a perfectly flush hole for screws, ensuring the screw head sits even with the surface.
Safety First: A Crucial Consideration
Before you begin any woodworking project, it’s paramount to prioritize safety. Always wear appropriate personal protective equipment (PPE), including safety glasses, hearing protection, and a dust mask. Ensure your workspace is clean, well-lit, and free of obstructions. Familiarize yourself with all your tools and their proper operation. When working with large wood slabs, be mindful of their weight and size, and consider getting assistance for heavy lifting to prevent injury. Never rush a step, and always double-check your measurements and settings.
Step-by-Step Guide to Building Your Log Slice Coffee Table
Step 1: Preparing Your Workspace and the Log Slice
Begin by setting up a stable and clear workspace. Unpack your white oak live edge slab and inspect it. Look for any loose bark, major cracks, or imperfections. While some natural character is desirable, address any structural issues now. Clean off any dirt or debris from the slab. If the bark on the live edge is loose or unwanted, now is the time to carefully remove it using a chisel or wire brush. Decide whether you want a completely debarked edge for a cleaner look or a preserved, more rustic edge.
Step 2: Constructing the Router Flattening Jig
Achieving a perfectly flat wood slab without an industrial planer requires a router flattening jig. This jig acts as a guide for your router, ensuring it shaves off uniform layers across the entire surface.
- Cut the Jig Rails: Using your table saw or miter saw, cut the 2x8x8 board into two parallel rails. These rails should be long enough to span the entire length of your log slice, with extra room on both ends for the router sled to travel. Ensure they are perfectly straight and parallel.
- Build the Jig Rail Frame: Use the 2x4x8 board to create perpendicular supports for your rails. These supports will connect the two parallel rails, forming a stable frame that sits over your log slice. Cut them to length, ensuring the inside distance matches the width of your log slice plus some clearance. Assemble this frame using 1 1/4″ screws, making sure it’s square and rigid.
- Create the Router Sled: From your 1/2″ plywood project panel, cut a piece that is wide enough to securely mount your plunge router and long enough to span across the jig rails. This will be the “sled” that rides on top of the rails. Ensure the sled is perfectly flat and rigid.
- Mount the Router: Attach your Dewalt Plunge Router securely to the center of the plywood sled using appropriate screws or bolts. Make sure the router base is firmly seated and perfectly perpendicular to the sled surface. Install your large diameter surfacing router bit into the router’s collet, along with the collet extension if needed.
- Test Fit and Adjust: Place the assembled jig frame over your log slice. The sled with the router should be able to slide smoothly back and forth along the rails without binding. Adjust the spacing of your rails if necessary to ensure a snug but free-moving fit for the sled.
Step 3: Flattening the Log Slice with the Router Jig
This is where your log slice begins its transformation.
- Secure the Slab: Place your log slice on a stable workbench. It’s crucial that the slab itself is stable and won’t move during routing. Use non-slip mats or clamps to secure it.
- Set the Depth: With the router in the sled, lower the surfacing bit until it just barely touches the highest point of your log slice. Set your plunge router’s depth stop to take very shallow passes – typically 1/8″ or less. Taking shallow passes is safer and results in a cleaner cut, extending the life of your router bit.
- First Pass: Begin at one end of the log slice. Turn on the router and slowly push the sled across the width of the slab. Overlap each pass slightly (about 1/4 to 1/2 of the bit’s diameter) to ensure full coverage.
- Subsequent Passes: Once you’ve completed a pass across the width, move the entire jig frame along the length of the log slice, repositioning it for the next set of passes. Repeat the process, ensuring consistent overlap. Continue until you’ve flattened one entire side of the slab.
- Check for Flatness: Use a long, straight edge and a reliable level to check for flatness across the entire surface. Address any high spots with additional shallow passes.
- Flip and Repeat: Once the first side is perfectly flat, flip the log slice over. Repeat the entire flattening process on the second side. This ensures that both faces of your table are parallel to each other.
- Initial Sanding: After flattening, perform an initial sanding with your belt sander using a coarse grit (e.g., 80-100 grit) to remove any remaining router marks and prepare the surface for finer sanding.
Step 4: Refining the Live Edge and Final Sanding
With the slab flattened, it’s time to refine its edges and prepare the surface for finishing.
- Edge Cleaning: Use your trim router with a round-over bit or a fine sandpaper to gently smooth the top and bottom edges of the slab, removing any sharp corners without sacrificing the live edge character. If you kept the bark, ensure it’s firmly attached and clean. If not, sand the raw wood edge to a smooth finish.
- Detailed Sanding: Switch to your Mirka Deros Sander and work through progressively finer grits of sandpaper (e.g., 120, 180, 220 grit). Sand both the top and bottom surfaces of the slab, as well as the live edge. The goal is to achieve a silky-smooth surface ready for oil application. Between grits, wipe away all dust with a tack cloth or compressed air to prevent scratching.
Step 5: Applying the Danish Oil Finish
Danish oil is an excellent choice for live edge pieces because it penetrates the wood, enhancing its natural grain and providing durable protection while maintaining a natural look and feel.
- Prepare for Oiling: Ensure the slab is perfectly clean and dust-free. Work in a well-ventilated area.
- First Coat: Apply a generous amount of Danish oil to the entire surface of the slab using a clean cloth or foam applicator. Work the oil into the wood, ensuring full coverage, including the live edge. Let the oil soak in for about 10-15 minutes.
- Wipe Off Excess: After the absorption period, use a clean, lint-free cloth to thoroughly wipe off all excess oil. It’s crucial to remove all surface oil to prevent a gummy finish.
- Drying and Re-coating: Allow the first coat to dry completely according to the manufacturer’s instructions (usually 12-24 hours). Lightly sand with 320-400 grit sandpaper between coats if desired, then wipe clean. Apply a second and possibly a third coat, following the same application and wiping procedure. The more coats you apply, the deeper the sheen and protection will be.
- Cure Time: Allow the final coat to cure fully before heavy use. This can take several days or even weeks for complete hardness.
Step 6: Constructing the Table Base
While the log slice is curing, you can build and finish the table base.
- Prepare Lumber: Using your jointer and planer, ensure your 2x4x8 lumber for the base is flat, square, and consistent in thickness. This step is critical for a strong and professional-looking base.
- Cut Components: Using your miter saw or table saw, cut the 2x4s to the required lengths for your table legs and support stretchers. The exact dimensions will depend on your desired table height and the size of your slab. Aim for a coffee table height of around 16-18 inches, considering the thickness of your slab.
- Drill Pocket Holes: Set up your Kreg K4 Pocket Hole Jig. Drill pocket holes into the ends of your stretcher pieces, where they will connect to the legs and other stretchers. This creates strong, hidden joints.
- Assemble the Base: Use your parallel bar clamps to hold components firmly while you assemble the base using 2 1/2″ pocket hole screws. Start by creating two side frames (two legs connected by stretchers), then connect these two frames with additional stretchers to form a rigid rectangle or square base. Ensure all joints are square and tight.
Step 7: Painting the Table Base
A black base provides a striking contrast to the natural wood slab.
- Prepare for Paint: Lightly sand the entire base with 220-grit sandpaper to create a smooth surface for paint adhesion. Wipe away all sanding dust.
- Prime (Optional but Recommended): Apply a coat of primer, especially if you’re working with bare wood. This helps with paint adhesion and provides a more uniform finish.
- Spray Paint: In a well-ventilated area, apply several thin, even coats of black spray paint. Allow each coat to dry to the touch before applying the next. Thin coats prevent drips and runs and result in a smoother finish.
- Cure Time: Let the paint cure completely according to the manufacturer’s instructions before moving on to assembly.
Step 8: Attaching the Log Slice to the Base
The final step brings your two main components together.
- Position the Slab: Carefully place the finished log slice upside down on a clean, padded surface.
- Center the Base: Invert the painted table base and center it on the underside of the log slice. Ensure it’s evenly spaced from all edges. You can make light pencil marks to guide you.
- Secure the Base: Using your Fastcap Flushmount Drill Bit, pre-drill pilot holes through the top stretchers of your table base into the underside of the log slice. Use 2 1/2″ powerhead screws to firmly attach the base to the slab. Drive screws strategically to ensure stability without going through the top surface of your slab. Ensure you use enough screws to prevent any wobbling.
- Add Felt Pads: Attach felt furniture pads to the bottom of each table leg. These pads protect your floors and make it easier to move the table around.
Maintaining Your Live Edge Log Slice Coffee Table
To ensure your beautiful new coffee table lasts for years to come, proper maintenance is key:
- Regular Cleaning: Dust your table regularly with a soft, dry cloth. For spills, wipe immediately with a damp cloth and then dry thoroughly. Avoid harsh chemical cleaners.
- Re-oiling: Depending on use, you may want to reapply a fresh coat of Danish oil every 1-2 years to replenish its protective qualities and refresh the wood’s luster. Lightly sand with very fine sandpaper (e.g., 400-600 grit) before re-oapplication.
- Protect from Heat and Moisture: Always use coasters under drinks and trivets under hot items to prevent water rings and heat damage.
- Avoid Direct Sunlight: Prolonged exposure to direct sunlight can cause the wood to fade or even crack.
Personalize Your Creation: Customization Ideas
While this guide focuses on a specific design, don’t hesitate to make your table uniquely yours:
- Resin Inlays: Fill any cracks or voids in your live edge slab with epoxy resin, optionally tinted with color or embedded with metallic flakes, for a dramatic effect.
- Different Base Designs: Instead of a wooden base, consider metal hairpin legs, a custom-welded steel frame, or even a different style of wooden base like an X-frame or trestle.
- Alternative Finishes: Explore other finishes like lacquer, polyurethane, or a hard wax oil for different levels of protection and sheen.
- Glass Top: For increased practicality and protection, you could have a custom-cut piece of tempered glass placed over the top of your slab.
Conclusion: The Reward of Crafting Your Own Masterpiece
Building a live edge log slice coffee table is more than just a woodworking project; it’s an immersive experience that culminates in a truly unique piece of furniture. The satisfaction of transforming a raw piece of nature into a functional work of art with your own hands is immense. Every time I look at my coffee table, I’m reminded of the effort and joy that went into its creation, and the compliments from friends are just icing on the cake. This project is a testament to the fact that with a little inspiration, thorough planning, and the right tools, you can achieve woodworking feats you once thought impossible.
So, gather your materials, embrace the process, and embark on your own journey to craft a stunning live edge log slice coffee table. You’ll not only gain a beautiful addition to your home but also invaluable skills and a deep sense of accomplishment. Happy woodworking!