
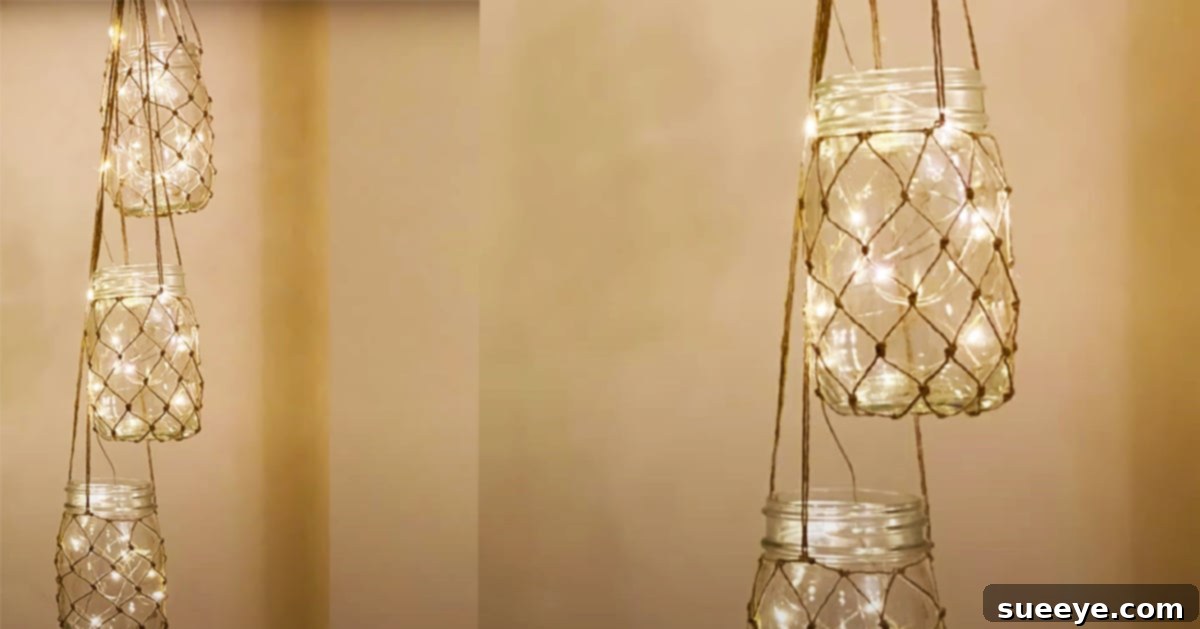
DIY Hanging Mason Jar Lanterns: Illuminate Your Space with Rustic Charm
Transform ordinary mason jars into extraordinary sources of light and charm with this incredibly simple yet stunning DIY project. Perfect for anyone looking to add a touch of rustic elegance, bohemian flair, or cozy warmth to their home, garden, or next special event, these hanging mason jar lanterns are an absolute game-changer. Inspired by the brilliant tutorial from The Little Bench on YouTube, this craft is not only budget-friendly but also offers endless possibilities for personalization. Whether you envision them adorning your backyard patio, adding a soft glow to your living room, or serving as unique centerpieces for a wedding, these lanterns promise to elevate your decor effortlessly. Plus, they’re surprisingly easy to make, even for beginners, requiring just a few basic materials and a dash of creativity.
Imagine the soft, flickering glow of these lanterns as dusk settles, creating an inviting atmosphere that truly captivates. This project is a fantastic way to upcycle old mason jars, turning potential clutter into beautiful, functional art. We’ll guide you through the process of creating the sturdy jute rope hanger, designing the charming net that cradles your jar, and finally, illuminating it with your preferred light source. Get ready to embark on a delightful crafting journey that will leave you with gorgeous, handmade lanterns perfect for any setting.
Why Craft Your Own Mason Jar Lanterns? The Benefits Unveiled
The allure of DIY projects, especially those as rewarding as these hanging mason jar lanterns, extends far beyond the final product. Here’s why investing your time in this craft is a truly brilliant idea:
- Unbeatable Affordability: Store-bought decorative lanterns can quickly add up, especially if you need several. This DIY approach utilizes inexpensive materials like jute thread and often repurposes items you already have, like mason jars. It’s a fantastic way to achieve a high-end look without the high-end price tag, allowing you to create multiple lanterns for the cost of one commercial equivalent.
- Personalized Touch: Unlike mass-produced decor, your handmade lanterns will carry a unique charm and story. You have complete control over the design, from the choice of jute color and knotting pattern to the type of lighting and additional embellishments. This personalization ensures your decor truly reflects your individual style and taste, making each lantern a conversation starter.
- Eco-Friendly Upcycling: Give new life to forgotten mason jars languishing in your cabinets. This project champions sustainability by transforming discarded items into beautiful, functional decor. It’s a small but significant step towards reducing waste and embracing a more eco-conscious lifestyle.
- Versatile Decor Solution: These lanterns are incredibly adaptable. They can be hung from pergolas, tree branches, balcony railings, or shepherd’s hooks outdoors, creating magical patio lighting. Indoors, they make charming bedroom accents, subtle night lights, or festive additions to holiday gatherings. Their rustic aesthetic blends seamlessly with farmhouse, bohemian, shabby chic, and even modern minimalist decor styles.
- Rewarding Crafting Experience: There’s immense satisfaction in creating something beautiful with your own hands. The process of knotting the jute, seeing the structure take shape, and finally witnessing the warm glow of your finished lantern is incredibly fulfilling. It’s a wonderful way to relax, unleash your creativity, and de-stress.
Essential Supplies for Your Mason Jar Lantern Project
Before you dive into the crafting process, gather the following materials. Most of these can be found at local craft stores, hardware stores, or even online, making them easily accessible.
- Jute Thread (or Jute Twine/Rope): This is the backbone of your lantern hanger. Jute is preferred for its natural, rustic appearance, durability, and ease of knotting. You’ll want a good quality, moderately thick jute that holds its shape but is still flexible enough to work with. Consider different thicknesses for varying visual impact – thicker jute will create a bolder, more pronounced design, while thinner jute offers a delicate look. Approximately 50-100 feet should be ample for a few lanterns, depending on their size and complexity of the netting.
- Mason Jar(s): The star of the show! Standard pint or quart-sized mason jars work perfectly, but don’t shy away from experimenting with different sizes and shapes. Wider mouth jars can be easier to work with when inserting lights. Ensure your jars are clean and dry before you begin.
- String Lights (Battery-Operated Fairy Lights): These tiny LED lights are ideal for creating a magical, ethereal glow. Battery-operated versions are crucial for hanging lanterns as they don’t require an outlet. Look for warm white lights for a cozy ambiance, or explore colored lights for a festive touch. Many come with timers, allowing you to set them and forget them.
- LED Candle Light (Optional): For a classic, flickering candle effect without the fire hazard, LED pillar or tea light candles are a fantastic alternative. They add a traditional touch and are particularly suited for indoor use or when you want a gentler illumination.
- Scissors: A good, sharp pair of scissors will be essential for cleanly cutting your jute thread.
- Tape Measure or Ruler: Crucial for accurate measurements of your jute strands, ensuring consistency across all your lanterns.
- Craft Tape (e.g., Painter’s Tape or Masking Tape): This will temporarily hold your jute strands in place while you start the knotting process on the jar lid or rim, making the initial steps much easier.
- Optional Embellishments: Feel free to personalize your lanterns with beads, charms, artificial flowers, or even a touch of paint on the jar itself.
Step-by-Step Guide: Crafting Your Hanging Mason Jar Lanterns
Let’s get started on bringing your beautiful mason jar lanterns to life. Follow these detailed steps, and remember, for a visual guide, the original tutorial by The Little Bench on YouTube is an excellent resource!
Step 1: Preparing Your Jute Strands
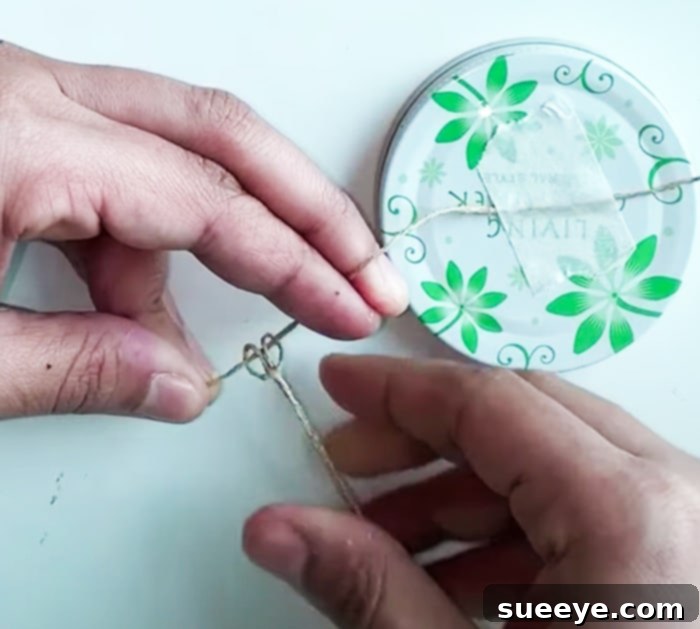
The foundation of a strong and beautiful lantern hanger lies in carefully prepared jute strands. Begin by placing your mason jar upside down. This position allows for easier and more accurate measurement of the jute needed to cover the entire height of the jar, plus extra for knotting and the hanging loop. Measure several strands of jute, each approximately three to four times the height of your mason jar. For a standard quart jar, this might mean each strand is around 3-4 feet long. You will need at least six to eight such strands, depending on the circumference of your jar and how dense you want your netting to be. More strands will create a tighter, more intricate net. Cut all your strands to the same length to ensure symmetry. Once cut, take these multiple strands and gather them together. Temporarily secure one end of this bundle to the very top (the bottom of the jar when inverted) of your mason jar lid using a piece of craft tape. This holds them in place while you begin the knotting.
Step 2: Crafting the Initial Hanging Loop (Lanyard’s Head Knot)
With your jute strands taped securely, it’s time to create the primary hanging point for your lantern. This often involves a sturdy knot like a lanyard’s head knot, or a simple lark’s head/cow hitch knot, which will form the loop from which your lantern will suspend. Take the entire bundle of jute strands and fold them in half. Identify the loop end (where the fold is). Now, take this loop end and pass it underneath the main body of the rope bundle, creating a small loop on one side. Bring the loose ends of the rope bundle through this newly formed small loop. Pull the ends tightly to secure the knot. This action will create a strong, central loop at the top of your jute bundle, which will eventually be the hanger for your lantern. Ensure this knot is snug and secure, as it will bear the weight of the jar.
Step 3: Forming the Decorative Jute Netting Around the Jar
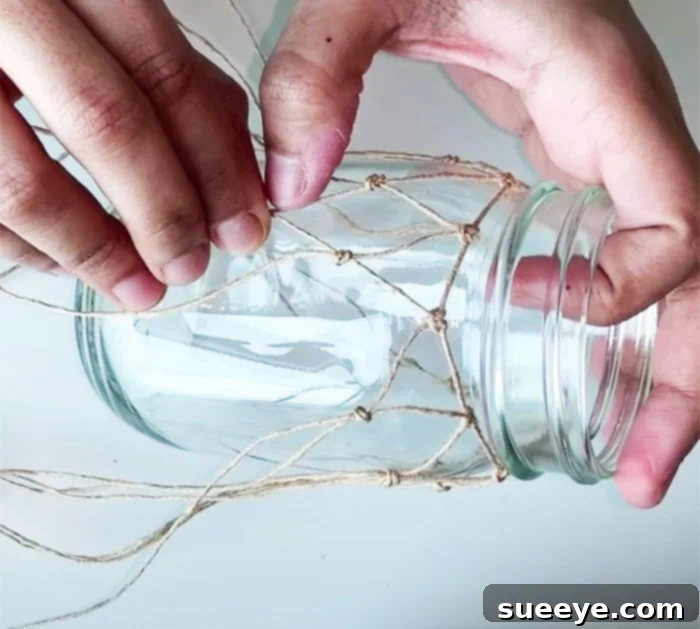
Now, gently remove the tape that was holding the jute to the inverted jar. You should have a bundle of jute strands with a secure hanging loop at one end. With the jar right-side up, drape the jute strands evenly around the exterior of the mason jar, allowing them to fall vertically. You’ll notice the strands naturally spread out. The goal here is to create a “cage” or “net” that will securely hold the jar. Start by taking two adjacent vertical strands of jute and tying them together with a simple overhand knot or square knot. Make sure these knots are positioned roughly 1-2 inches down from the rim of the jar. Repeat this process all the way around the jar, connecting each pair of adjacent strands. This will create a horizontal line of knots just below the rim. Once you’ve completed the first row of knots, you’ll move to the next. For the second row, take one strand from an already tied knot and combine it with one strand from an adjacent knot. Tie these two new strands together, forming a knot that sits approximately 1-2 inches below the first row of knots. This offset knotting pattern will create a beautiful diamond or triangular design as you work your way down the jar. Continue this method – taking one strand from an existing knot and pairing it with a strand from an adjacent knot – until you reach the base of the mason jar. Ensure your knots are snug but not so tight that they distort the glass, and try to keep the spacing consistent for a uniform look.
Step 4: Securing the Base and Finishing the Netting
Once you’ve worked your way down to the base of the jar, you’ll have a series of vertical strands forming a net. Gather all the remaining loose ends of the jute strands at the very bottom of the jar. Tie all these strands together with a single, secure knot directly underneath the center of the jar’s base. This final knot will cinch the netting firmly around the bottom of the jar, ensuring it’s completely secure and won’t slip out. Trim any excessively long ends of jute below this final knot, leaving a short, neat tassel, or integrate them into a decorative braid if you desire. Your mason jar is now encased in a beautiful and sturdy jute netting, ready for illumination!
Step 5: Adding the Lighting Element
With your jute netting securely in place, it’s time to bring your lantern to life with light. Carefully drop your chosen lighting element into the mason jar. If you’re using battery-operated string lights, gently coil them inside the jar, allowing the battery pack to rest either on the bottom or tucked neatly into the jar’s mouth. Ensure the switch for the lights is accessible. For LED candle lights, simply place them upright inside the jar. If you opted for string lights, you can use a small piece of clear tape to secure the battery pack to the inside of the jar lid or the side of the jar if it’s small enough to prevent it from rattling. Test your lights to ensure they’re working correctly and casting the desired glow.
Creative Ways to Display Your New Mason Jar Lanterns
The beauty of these DIY hanging mason jar lanterns lies in their incredible versatility. Once crafted, the possibilities for showcasing their rustic charm are virtually endless. Here are some inspiring ideas to get your creative juices flowing:
Outdoor Oasis Enhancement:
- Patio & Deck Ambiance: Hang a series of lanterns along your patio cover, deck railings, or from an outdoor umbrella to create a magical glow for evening entertaining.
- Garden Pathways: Suspend them from shepherd’s hooks along garden paths or among flower beds to illuminate walkways and highlight your landscaping.
- Tree Decor: Drape them from tree branches for a whimsical, fairy-tale effect in your backyard. Ensure they are hung securely and away from any flammable materials.
- Summer Gatherings: They make perfect decor for BBQs, garden parties, or outdoor movie nights, adding a warm and inviting atmosphere.
- Porch Appeal: A few hanging by your front door can create an inviting welcome for guests, enhancing your home’s curb appeal.
Indoor Sanctuary Styling:
- Cozy Corners: Hang a single lantern in a reading nook or a quiet corner of your bedroom or living room for a soft, ambient light source.
- Farmhouse Kitchen Charm: Suspend them near a window or above an island for a touch of rustic farmhouse style.
- Bedroom Nightlight: A soft LED candle lantern can serve as a gentle nightlight, perfect for children’s rooms or creating a serene sleeping environment.
- Festive Decor: Adapt them for holidays by adding seasonal embellishments like small pinecones or ribbons, making them versatile for Christmas, Halloween, or other celebrations.
- Bathroom Retreat: Place one on a shelf or hang it in a corner to create a spa-like, relaxing atmosphere.
Special Occasions & Events:
- Wedding Wonders: These lanterns are incredibly popular for rustic, bohemian, or outdoor weddings. Use them to line aisles, adorn reception tables, or create stunning ceiling decor.
- Baby Showers & Parties: Customize with ribbons matching your theme for an adorable and memorable party decoration.
- Unique Centerpieces: Instead of hanging, cut the excess jute thread short, add an LED candlelight, and place them on tables for charming, low-profile centerpieces. Group several together for a brighter effect.
Caring for Your Mason Jar Lanterns
To ensure your beautiful lanterns last for many seasons to come, a little care goes a long way:
- Outdoor Placement: While jute is durable, prolonged exposure to harsh weather (heavy rain, intense sun) can degrade it over time. Consider bringing outdoor lanterns inside during extreme conditions or placing them under a covered area.
- Cleaning: The glass jars can be easily wiped clean with a damp cloth. If the jute becomes dusty, a gentle brush or a quick blast of compressed air can clean it.
- Battery Replacement: If using battery-operated lights, remember to replace the batteries periodically to maintain consistent illumination. Consider rechargeable batteries for an eco-friendly option.
- Storage: When not in use, store your lanterns in a dry place to prevent moisture damage to the jute or lights.
Conclusion: Illuminate Your World, One Jar at a Time
In conclusion, crafting your own DIY hanging mason jar lanterns is a journey of creativity, sustainability, and immense satisfaction. This inexpensive project, expertly guided by resources like The Little Bench’s YouTube tutorial, empowers you to create stunning pieces of decor that infuse any space with warmth and personality. Whether you envision them casting a soft glow on your back balcony, adding a rustic touch to your kitchen, or creating a mesmerizing display for a special event, these lanterns are designed to impress.
The beauty of these handmade lights truly comes alive when you cluster a few together, amplifying their brightness and creating a truly captivating ambiance. So, gather your supplies, embrace your inner crafter, and start transforming those humble mason jars into beacons of beautiful light. The simple act of making these lanterns is just as rewarding as admiring their enchanting glow. Get ready to illuminate your world with unique, handcrafted charm!