
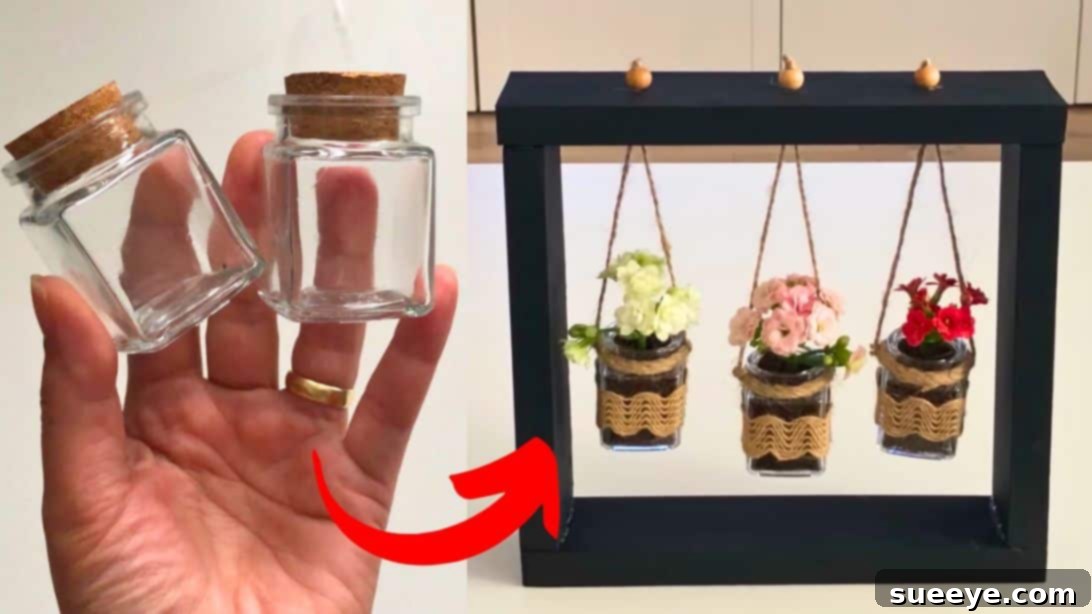
DIY Hanging Glass Jar Decor: Craft Your Own Rustic Home Oasis
Transform ordinary glass jars into captivating decorative pieces with this delightful DIY hanging glass jar decor project! Inspired by the creative vision of Evrim Taşer Yılmaz, this tutorial offers a unique way to add a touch of rustic charm and personalized elegance to any space. Whether you’re looking to brighten up a cozy corner in your living room, add a natural element to your office, or create a unique display for your beloved plants, these versatile hanging jars are the perfect solution.
This project is not only incredibly rewarding but also allows for immense creativity. Imagine delicate succulents nestled within the jars, shimmering fairy lights casting a warm glow, or even small collections of pebbles and shells bringing a piece of nature indoors. The beauty of this craft lies in its simplicity and adaptability, making it accessible for crafters of all skill levels. You’ll be amazed at how easily you can turn a few basic materials into a stunning decorative accent that truly reflects your personal style.
Why You’ll Love This DIY Project
- Personalized Home Decor: Create unique pieces that perfectly match your aesthetic and vision.
- Budget-Friendly: Utilize repurposed materials like old glass jars, making it an economical decorating choice.
- Versatile Display Options: Ideal for displaying small plants, flowers, candles, fairy lights, or even art supplies.
- Sustainable Crafting: Give new life to discarded items, contributing to a more eco-conscious lifestyle.
- Beginner-Friendly: The steps are straightforward and easy to follow, perfect for those new to DIY projects.
- Gift-Worthy: These charming hanging jar displays make thoughtful, handmade gifts for friends and family.
Materials You’ll Need:
Gathering your materials before you begin will ensure a smooth and enjoyable crafting experience. Most items are readily available at craft stores or even around your home.
- Small to medium-sized glass jars (e.g., mason jars, jam jars, condiment jars)
- Jute ribbon (for wrapping jars)
- Thick jute rope (for the main hanging loops)
- Thin jute rope or natural twine (for hanging to the frame)
- Sharp scissors
- Hot glue gun and glue sticks
- Acrylic paint or spray paint (your preferred color for the wooden frame)
- Ruler or measuring tape
- Wood blocks: Two pieces of approximately 9.8 inches (25 cm) long and two pieces of approximately 7.3 inches (18.5 cm) long. (Dimensions can be adjusted based on desired frame size.)
- Wood glue (for assembling the frame)
- Wooden beads (optional, for decorative accents and securing hangers)
- Faux soil and faux flowers/plants (or real soil and small plants like succulents, air plants, herbs)
- Drill with an appropriate sized drill bit (to match the thickness of your thin jute rope)
Detailed Instructions: Crafting Your Hanging Glass Jar Decor
Step 1: Preparing Your Glass Jars with Jute Ribbon
Begin by giving your glass jars a rustic makeover. Select clean, dry glass jars of your preferred size. Take your jute ribbon and carefully wrap it around the exterior of each jar. The goal is to cover a significant portion, or even the entire jar, depending on your desired aesthetic. Apply hot glue in small sections as you wrap, ensuring the ribbon is taut and secure. Pay attention to neat edges where the ribbon starts and ends, trimming any excess for a clean finish. This step not only adds texture and warmth but also provides a more cohesive look to your finished decor. Don’t forget to remove the lids from all jars, as they won’t be needed for this project.
Step 2: Crafting the Jute Hangers for Each Jar
This step is crucial for suspending your jars gracefully. First, measure the circumference of the neck of each glass jar using the thick jute rope. Wrap the rope snugly around the neck, mark the length, and cut three identical pieces for each jar. These three pieces will form the main support structure. Next, cut a much longer piece of thin jute rope or twine – this will be the actual hanging cord, so ensure it’s long enough to suspend the jar from your wooden frame with your desired drop length. Tie the ends of this long, thin rope securely to one of the thick jute rope pieces you just cut. Now, take this assembly, wrap the thick jute rope around the neck of the jar, and glue it firmly in place with hot glue. Repeat this process for all your jars. This method creates a strong, aesthetically pleasing hanger that will securely cradle your jars.
Step 3: Preparing the Wooden Frame Components
Now it’s time to prepare the base for your hanging jars – the sturdy wooden frame. Using a ruler and a saw (or pre-cut wood pieces), carefully cut two pieces of wood to approximately 9.8 inches (25 cm) in length. These will serve as the longer sides of your frame. Then, cut two additional pieces of wood, each approximately 7.3 inches (18.5 cm) long, for the shorter sides. These dimensions are a suggestion; feel free to adjust them based on the number of jars you plan to hang and your desired overall size. Ensure all cuts are clean and smooth for a professional finish. Safety first: always use appropriate protective gear when cutting wood.
Step 4: Customizing and Assembling the Wooden Frame
Personalize your wooden frame by painting it your favorite color. Acrylic paints work well for this, or you can opt for spray paint for a smoother, faster finish. Consider colors that complement your home decor or create a striking contrast. Allow the paint to dry completely according to the manufacturer’s instructions. Once dry, it’s time to assemble. Arrange the painted wood blocks into a rectangular or square frame, depending on your preference. Apply wood glue generously to the ends of the shorter pieces before joining them to the longer pieces, ensuring all corners form a perfect 90-degree angle. Clamp the pieces together if possible, or hold them firmly until the glue sets, creating a strong and durable frame.
Step 5: Precision Drilling for Jar Suspension
With your frame assembled and dry, you’ll need to create the attachment points for your hanging jars. Measure the top border of your wooden frame carefully. Mark three equally spaced points along this top edge. The number of points will correspond to the number of jars you wish to hang; adjust accordingly if you have more or fewer jars. Using a drill with a bit size that matches the thickness of your thin jute rope, carefully drill a hole through the frame at each marked point. Ensure the holes are clean and smooth, without splintering the wood. These holes will be where the hanging cords of your jars will pass through, so precision is key for an evenly balanced display.
Step 6: Bringing Your Jars to Life with Faux or Real Plants
This is where your hanging jars truly come to life! If you’re using faux plants, fill the bottom of each jar with faux soil (or decorative pebbles) and then artfully arrange your artificial flowers or greenery. If you prefer real plants, carefully add a layer of potting soil suitable for your chosen plants. Small succulents, air plants, or trailing ivy are excellent choices that thrive in small containers. Gently plant your chosen greenery, ensuring it’s securely nestled. Remember to consider the light requirements if using live plants. This step adds vibrant color and a touch of natural beauty to your creation.
Step 7: Final Assembly and Secure Hanging
With all components ready, it’s time for the grand finale. Take each prepared glass jar and thread the thin jute rope (the hanging cord attached to the thick jute around the jar neck) through one of the drilled holes in the wooden frame. Pull the cord through from the top of the frame. If you’re using wooden beads, slide one or two onto the cord on the top side of the frame. These beads not only add a decorative touch but also help in securing the jar’s position. Tie a strong knot at the very end of the cord, just above the bead or directly on top of the frame if not using beads, to ensure the jar is securely suspended. Adjust the knot to achieve your desired hanging height for each jar, ensuring they hang evenly or at staggered heights for a dynamic look. Once all jars are secured, your DIY hanging glass jar decor is complete and ready to be displayed!
Tips for Success and Customization
- Vary Jar Sizes: Use jars of different sizes and shapes for an eclectic, visually interesting display.
- Lighting Options: Instead of plants, place small LED tea lights or battery-operated fairy lights inside the jars for a magical evening glow.
- Color Schemes: Experiment with different paint colors for your frame and even consider dyeing the jute rope for a pop of color.
- Alternative Fillers: Fill jars with colorful sand, small polished stones, sea glass, or even scented potpourri.
- Frame Materials: Instead of wood blocks, you could use a sturdy branch for a more natural, bohemian feel, or even metal pipes for an industrial look.
- Secure Knots: Always double-check your knots to ensure your jars are securely fastened, especially if hanging live plants.
- Location, Location, Location: Consider where your decor will hang. Near a window for light-loving plants, or in a cozy nook for ambient lighting.
Creative Variations & Inspiring Ideas
The beauty of DIY lies in endless possibilities. Here are some ideas to spark your creativity:
- Herb Garden: Create a mini indoor herb garden by planting small herbs like mint, basil, or chives in your jars.
- Desk Organizer: Hang this decor above your craft table or desk to store pens, brushes, or other small supplies.
- Bathroom Storage: Use jars to hold cotton balls, Q-tips, or small soaps in a stylish, space-saving manner.
- Seasonal Decor: Change out the contents of your jars seasonally. Think small ornaments for winter, faux berries for autumn, or brightly colored flowers for spring.
- Fairy Garden: Combine miniature figures and tiny plants inside the jars to create enchanting fairy garden scenes.
- Photo Display: Place small, rolled-up photos or tiny framed pictures inside the jars, perhaps with some subtle lighting.
Benefits of Embracing DIY Home Decor
Engaging in DIY projects like this one offers more than just a beautiful finished product. It’s a therapeutic process that allows you to unleash your creativity, reduce stress, and gain a sense of accomplishment. Handmade decor often possesses a unique character and soul that mass-produced items lack. Furthermore, by repurposing items, you’re making an environmentally conscious choice, contributing to sustainability. It’s a wonderful way to infuse your living space with personality, tell your unique story through design, and even develop new skills along the way. Plus, sharing your creations or gifting them brings joy to others, making the effort all the more worthwhile.
Frequently Asked Questions About Hanging Jar Decor
Can I use real plants in these hanging jars?
Yes, absolutely! Small succulents, air plants, pothos, or spider plants are excellent choices. Just ensure you use appropriate potting soil, provide adequate drainage (or water very sparingly for succulents), and consider the plant’s light requirements when choosing where to hang your decor.
How do I make sure the jars are securely attached to the frame?
The key is strong knots and good quality rope. Ensure the thin jute rope is tied tightly to the thick jute rope around the jar’s neck. When threading it through the wooden frame, use sturdy knots (like a double overhand knot or a figure-eight knot) after passing it through any beads. You can also add a small dab of hot glue to the knot on the top of the frame for extra security.
What if I don’t have wood blocks for the frame?
You can get creative! Consider using a sturdy, straight tree branch for a more natural, rustic look. Alternatively, you could adapt the design to hang the jars directly from a decorative curtain rod, a metal pipe, or even a repurposed old window frame.
How can I clean the jars once they are part of the decor?
For jars wrapped with jute, it’s best to wipe them gently with a slightly damp cloth. Avoid submerging them in water, as this could loosen the glue or damage the jute. For any exposed glass, a standard glass cleaner applied to a cloth works well.
Is this project suitable for outdoor use?
While charming, the jute and wood frame might not withstand prolonged exposure to harsh outdoor elements (rain, direct sun) without proper treatment. If you plan to use it outdoors, consider sealing the wood with an outdoor-grade sealant and using synthetic ropes designed for outdoor use. For the jars, ensure they have drainage holes if using real plants outdoors.
We hope you find immense joy and satisfaction in creating this beautiful DIY hanging glass jar decor. It’s a project that combines functionality with aesthetic appeal, allowing you to craft something truly special for your home or as a heartfelt gift. For more inspiring and creative projects like this, be sure to visit Evrim Taşer Yılmaz’s channel on Youtube. Happy crafting!