
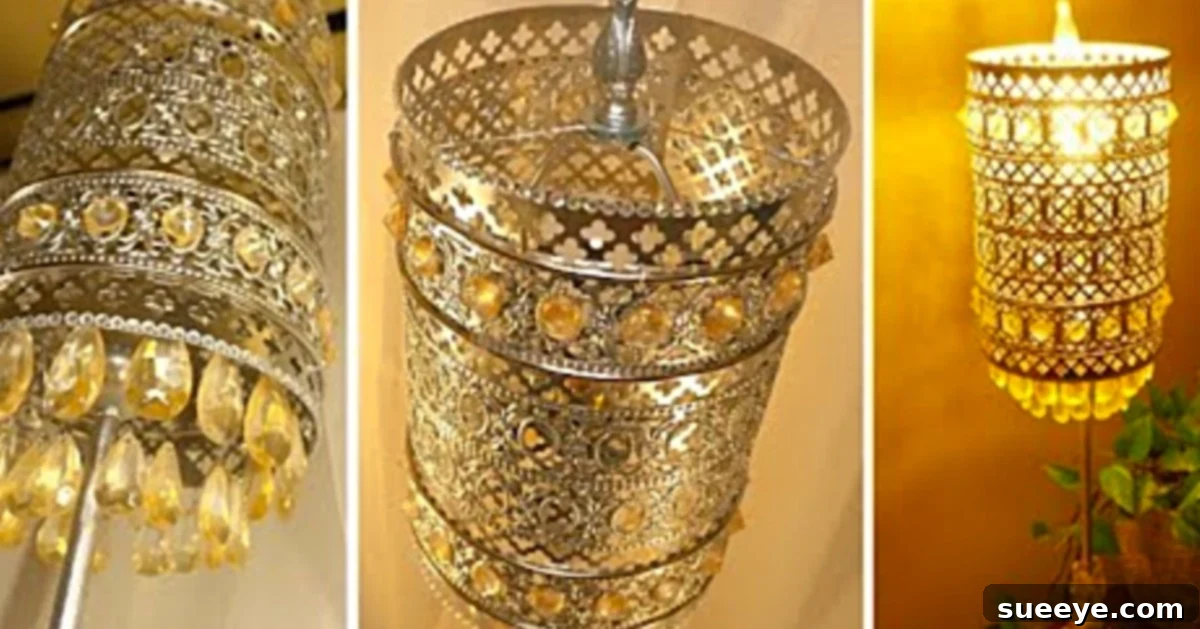
DIY Pier One Copycat Boho Table Lamp: Craft Your Dream Lighting on a Budget
Are you yearning to infuse your living space with a touch of bohemian charm and unique character? A carefully chosen lamp can dramatically alter the entire ambiance of a room, and nothing quite embodies “boho chic” like a statement piece you’ve crafted with your own hands. If you’ve ever admired the intricate designs, rich textures, and artisan feel of Pier One Imports’ bohemian collections but wished for a more budget-friendly approach, your wish is about to come true! This comprehensive guide will meticulously walk you through the process of creating your very own Pier One-inspired Boho table lamp, utilizing readily available and incredibly affordable materials from your local craft store, such as Hobby Lobby.
My personal quest for the perfect bedroom table lamp led me down an exciting creative path. I envisioned something truly special, a piece that would resonate with my distinct “Rockstar BoHo Chic” aesthetic. The idea of a DIY project immediately appealed to me, offering the dual benefits of complete customization and significant cost savings. After some enthusiastic online searching, I stumbled upon an incredible YouTube tutorial that promised to deliver exactly what I had envisioned. My excitement grew tenfold when I realized that all the necessary supplies could be conveniently found at Hobby Lobby, making this project not only inspiring but also remarkably accessible and straightforward.
One of the most satisfying aspects of embarking on a DIY adventure, especially when shopping at stores like Hobby Lobby, is the opportunity for substantial savings. Before heading out to gather my supplies, I made sure to arm myself with Hobby Lobby coupons. These valuable discounts are incredibly easy to find; you can typically snag them daily through their mobile app or with a quick online search on your browser. My diligent coupon hunting paid off handsomely – I found a fantastic 20% off my entire purchase! This not only kept my project comfortably under budget but also fueled my enthusiasm to get started immediately. Gathering all the materials in one convenient place, knowing I was about to transform simple components into a bohemian masterpiece, felt incredibly satisfying and empowering. Let’s dive into what you’ll need to create your own captivating boho lamp.
Materials You’ll Need for Your Boho Lamp Project
Before we embark on this exciting transformation, it’s essential to have all your materials organized and ready. Sourcing your items primarily from a single store like Hobby Lobby can significantly simplify the process, but don’t hesitate to explore other craft stores, thrift shops, or even online marketplaces for unique finds that might add an extra layer of personality to your lamp. Remember, creativity is key, so feel free to adapt and personalize your material choices to truly make this project your own.
- 1 Clover Leaf Metal Sheet (12″ x 24″): This intricately patterned metal sheet will form the main body and decorative element of your lamp shade. The clover leaf design instantly adds a touch of intricate bohemian elegance, but you can also explore other decorative metal sheets if you prefer a different motif, such as geometric patterns or floral designs.
- 1 Old Lamp from the Thrift Store: This serves as the foundation for your upcycled creation. When selecting, look for a lamp base with a sturdy structure and, most importantly, fully functional electrical components. The aesthetic style of the base isn’t critical, as it will be revitalized with fresh paint, but a good height and a stable base are ideal for your finished lamp.
- Metal Ribbon: This will be used for accenting and reinforcing the edges of your perforated metal sheet, giving your shade a polished and finished look. Choose a color and texture that perfectly complements your desired aesthetic – a metallic gold, antique bronze, or even a sleek silver can add a touch of luxury and definition.
- 6-inch Steel Ring: This smaller ring will help define the top diameter of your lamp shade, providing crucial structural support and shaping the upper part of the shade.
- 8-inch Steel Ring: This larger ring will form the base diameter of your lamp shade, giving it a pleasing conical or cylindrical shape and ensuring stability.
- 18 Gauge Wire: Essential for assembling and securely attaching the various components of your lamp shade, particularly for connecting the steel rings to the metal sheet and attaching decorative elements. This wire needs to be flexible enough to bend and manipulate easily but strong enough to hold its shape and support the weight.
- 3/8 x 1 1/4″ Washers: These small but incredibly important components will be crucial for creating secure attachment points when working with the wire, especially for suspending the shade. They can also add a subtle, industrial-chic accent to your design.
- Faceted Teardrop Crystal Beads: These beautiful beads will add a dazzling sparkle and an elegant, light-catching finish to your lamp. Experiment with different colors, sizes, or shapes to create a truly unique and personalized look that shimmers beautifully.
- Diamond Gems: Perfect for adding extra sparkle, glamour, and a touch of luxury. You can opt for adhesive-backed gems for easy application or loose gems to be strategically glued on with a strong adhesive for a more integrated look.
- Masking Tape or Painter’s Tape: An indispensable tool for protecting the lamp’s electrical components when spray painting. It’s also handy for temporarily holding pieces in place during assembly.
- Hot Glue Gun and Glue Sticks: Your go-to tool for quick and strong adhesion, particularly useful for attaching the metal ribbon and other decorative embellishments. Ensure you have plenty of glue sticks on hand.
- Gorilla Glue (or other strong adhesive): For more permanent and heavy-duty bonding, especially useful for securing structural elements, heavier decorations, or parts that will experience more stress.
- Gem Stickers: For adding quick, easy, and shimmering embellishments to various parts of your lamp, from the base to the shade, offering a convenient way to add pops of sparkle.
- Spray Paint (color of your choice): To give your thrift store lamp base a fresh, cohesive look that integrates seamlessly with your boho design. Consider matte black, metallic gold, antique bronze, a vibrant jewel tone, or even a soft cream or white for a different vibe.
- Wire Cutters: Absolutely necessary for making precise cuts to your 18-gauge wire.
- Pliers (needle-nose recommended): Essential for bending, shaping, and securely twisting the wire with accuracy and ease.
- Protective Gloves and Face Mask: Highly recommended when spray painting to ensure your safety and maintain a clean working environment, protecting against fumes and paint residue.
Step-by-Step Guide to Crafting Your Boho Table Lamp
Now that you have meticulously gathered all your materials, let’s embark on the exciting and creative journey of transforming them into a stunning and unique boho lamp. Take your time with each step, paying attention to detail, and don’t hesitate to infuse the project with your personal flair and artistic vision!
Step 1: Prepare and Paint Your Lamp Base for a Fresh Start
The foundation of your new boho lamp is the old lamp you thoughtfully sourced from the thrift store. This initial step is absolutely crucial for giving it a fresh, updated look that perfectly complements your intended bohemian aesthetic and ensures longevity.
- Thorough Cleaning: Begin by thoroughly cleaning the entire lamp base to remove any accumulated dust, grime, or loose paint flakes. A damp cloth with a mild all-purpose cleaner usually does the trick. Pay special attention to crevices and decorative details. Ensure the lamp base is completely dry before proceeding to the next step, as moisture can hinder paint adhesion.
- Masking Critical Electrical Parts: This is a vital safety and functional step. Carefully and meticulously apply masking tape or painter’s tape over all electrical components. This includes the light socket, the entire length of the electrical cord, the plug, the on/off switch, and any other parts you explicitly do not want painted. The goal is to protect these elements from paint, ensuring the lamp remains fully functional, electrically safe, and ready for use after its transformation.
- Prepare Your Workspace: Select a well-ventilated area for painting, preferably outdoors or in a garage with open doors to allow for proper air circulation. Lay down a protective drop cloth, old newspapers, or large pieces of cardboard to shield your surrounding surfaces from overspray.
- Apply Spray Paint with Precision: Shake your chosen spray paint can vigorously for at least one minute to ensure the pigment is well-mixed. Hold the can approximately 8-12 inches away from the lamp base and apply thin, even coats using a sweeping motion. Remember, it is always better to apply several light coats than one thick coat, as thick coats are prone to dripping, unevenness, and a less professional finish. Rotate the lamp as you paint to ensure full and consistent coverage from all angles.
- Allow for Adequate Drying Time: Let each coat dry for the recommended time specified on the spray paint can before applying the subsequent layer. Once all desired coats have been applied, allow the lamp to dry completely for several hours, or ideally, overnight, to ensure the paint is fully cured and hardened before handling it extensively or moving to the next steps.
Step 2: Construct the Decorative Metal Shade with Structure and Style
This is the stage where the magic of the boho design truly begins to materialize. You’ll be transforming the flat, decorative metal sheet into an elegant, structured lamp shade that will be the centerpiece of your design.
- Shape the Metal Sheet: Gently and carefully bend your 12″ x 24″ clover leaf metal sheet into your desired shape. A conical shape is classic for lamp shades and will naturally form by overlapping the edges slightly. Alternatively, you could aim for a more cylindrical form if that better suits your vision. The primary goal is to create a shade that will sit gracefully on your lamp base and comfortably accommodate the steel rings for structural support.
- Attach the Metal Ribbon: Using your hot glue gun, carefully and neatly glue the metal ribbon along both the top and bottom edges of your perforated decorative metal sheet. This step serves multiple purposes: it adds a sophisticated decorative touch, helps to reinforce the edges of the metal, and creates a clean, professional-looking finish. Ensure the ribbon is applied smoothly and securely, without any visible gaps or wrinkles, for the best aesthetic outcome.
- Integrate the Steel Rings for Structure: Now, position your 6-inch steel ring at what will be the top (the smaller opening) of your shaped metal sheet, and the 8-inch steel ring at the bottom (the wider opening). These rings are paramount as they provide the essential structural integrity for your lamp shade, ensuring it maintains its shape and stability.
- Secure Rings with Wire: Using your 18-gauge wire and needle-nose pliers, begin the process of securely attaching the metal sheet to both steel rings. Thread the wire neatly through the perforations in the metal sheet and around the steel rings, twisting and securing it tightly to prevent any movement. Work your way methodically around both the top and bottom rings, ensuring the metal sheet is firmly attached and evenly distributed around the rings. This step requires patience and careful execution to create a strong, durable, and aesthetically pleasing connection.
Step 3: Assemble the Shade’s Top Structure and Add Exquisite Embellishments
With the main body and structural rings of your shade now firmly in place, it’s time to refine its suspension mechanism and begin adding the exquisite bohemian details that will make your lamp truly sparkle.
- Create the Top Suspension Mechanism: This is where the 18-gauge wire and washers become critical for assembling the top of the shade and ensuring it can be properly seated on your lamp’s harp (the metal U-shaped frame that holds the shade). Create several strong loops or hangers from the 18-gauge wire, attaching them securely and evenly to the smaller 6-inch steel ring at the top of your shade. Incorporate the washers into these wire loops. These washers will provide a sturdy, flat point for the shade to rest on the lamp harp’s finial (the decorative knob that screws onto the top of the harp), ensuring the shade is stable and balanced. Double-check that these attachments are robust and symmetrically placed so the shade hangs perfectly level.
- Optional Wire Reinforcement: If, after forming the shade and attaching the rings, you find that the metal sheet feels a bit wobbly or lacks rigidity, you can add additional wire bracing. Run short lengths of 18-gauge wire from the top ring down to various points on the body of the metal sheet, securing them firmly. This extra reinforcement will significantly enhance the overall stability and durability of your lamp shade.
- Attach the Dazzling Crystal Beads: Now, begin the exciting process of attaching the faceted teardrop crystal beads. You have several creative options: you can hang them individually from the bottom edge of the larger 8-inch steel ring using small, delicate loops of 18-gauge wire for a subtle shimmer, or you can create small, cascading chains of beads for a more dramatic and elaborate effect. Space them evenly around the rim for a balanced and harmonious look. The objective is to create a captivating, sparkling cascade that beautifully catches and reflects the light, enhancing the lamp’s bohemian allure.
- Add Diamond Gems and Gem Stickers: For a final touch of sparkle and glamour, strategically apply your diamond gems. Use your Gorilla Glue for a more permanent attachment of loose diamond gems, placing them artfully on the perforated metal sheet, along the metal ribbon, or even to subtly adorn the lamp base itself. For quicker, yet equally shimmering embellishment, utilize gem stickers to add pops of sparkle and color to various parts of the lamp. Don’t be afraid to mix and match sizes, shapes, and placements to achieve an eclectic, layered, and visually rich bohemian look.
Personalizing Your Boho Masterpiece: Make it Uniquely Yours
The true beauty and joy of embarking on DIY projects lies in the unparalleled ability to make them genuinely your own. While this detailed guide provides a robust foundation for creating a stunning boho lamp, do not hesitate to experiment with different elements and embellishments to reflect your unique personal style and creative vision. The possibilities for customization are virtually endless!
- Feathers or Tassels: For an extra layer of free-spirited bohemian flair, consider delicately dangling decorative feathers, small handmade tassels, or even a fringe trim from the bottom rim of your shade. These elements add movement, texture, and a distinctive softness.
- Diverse Bead Types: Expand beyond crystal beads. Incorporate a variety of bead types such as natural wooden beads for an earthy touch, ceramic beads with intricate patterns, or even found objects like polished sea glass, small shells, or vintage buttons for a more natural, eclectic, and personally curated boho vibe.
- Fabric Accents: Introduce soft textures by wrapping select portions of the lamp base or parts of the shade with colorful fabric strips, patterned ribbons, or decorative trim. This can add visual warmth and another layer of intricate detail.
- Metallic Paints and Waxes: Use metallic wax finishes, paint pens, or specialized craft paints to highlight intricate details on the lamp base, bring out the patterns in the metal sheet, or add subtle shimmer to areas that might otherwise go unnoticed.
- Lace or Crochet Elements: For a touch of romantic vintage charm, small pieces of delicate lace, crocheted doilies, or embroidered patches can be artfully glued onto the shade or base, adding a soft, intricate, and nostalgic dimension.
Finding the Perfect Spot for Your New Boho Lamp
Once your DIY Pier One Copycat Boho Lamp is fully complete and all adhesives have had ample time to cure and set, it’s time for the exciting moment of finding its perfect home. This isn’t just another light source; it’s a meticulously crafted statement piece, a compelling conversation starter, and a tangible reflection of your creativity and personal style.
- Bedroom Nightstand: As originally intended, placing it on your bedside table can immediately create a serene yet incredibly stylish ambiance, perfect for late-night reading, quiet reflection, or simply setting a relaxing and inviting mood before sleep.
- Living Room Accent Table: Position your unique lamp on a side table next to a sofa or armchair. It will instantly add a vibrant pop of bohemian elegance, serving as a focal point and enhancing the overall warmth and character of your living space.
- Entryway Console: Make a truly memorable first impression by placing your distinctive lamp on an entryway console table. It will welcome guests with its artistic charm and provide a warm, inviting glow, setting the tone for your home.
- Home Office or Studio: Infuse your workspace with personal style and creative energy. A beautiful, handcrafted lamp can transform your home office into a more inspiring, enjoyable, and aesthetically pleasing environment, making work feel a little less like work.
The warm, inviting glow filtering through the perforated metal sheet and sparkling crystal beads will cast enchanting patterns and soft shadows, transforming any room into a cozy, “Rockstar BoHo Chic” sanctuary. Prepare for compliments and inquiries about where you purchased such a unique piece!
Conclusion: Embrace Your Inner Designer and Illuminate Your World!
Creating this Pier One Copycat Boho Lamp was an incredibly rewarding and immensely satisfying experience, and the final result has far exceeded all my expectations. It truly looks amazing in my bedroom, effortlessly adding that “rock and roll” edge and unique character I was aiming for, while also providing beautiful, ambient lighting that transforms the space. This project stands as a fantastic testament to how a little creativity, a few affordable materials sourced with savvy, and some patient effort can lead to stunning, high-end results without the prohibitive price tag typically associated with designer pieces.
Beyond the undeniable cost savings, there is an immense sense of accomplishment and personal satisfaction in knowing you’ve crafted something beautiful and functional with your own hands. It’s a powerful testament to the transformative potential of DIY – turning ordinary objects and raw materials into extraordinary pieces of decor that tell a story. So, I wholeheartedly encourage you: gather your materials, unleash your inner designer, and get ready to illuminate your world with a unique, handmade bohemian lamp that is truly one-of-a-kind. Don’t forget to share your amazing creations and inspire others to embark on their own rewarding DIY adventures!
I sincerely hope this detailed and inspiring guide empowers you to confidently create your own bohemian masterpiece. Happy crafting, and may your newly illuminated space bring you immense joy!