
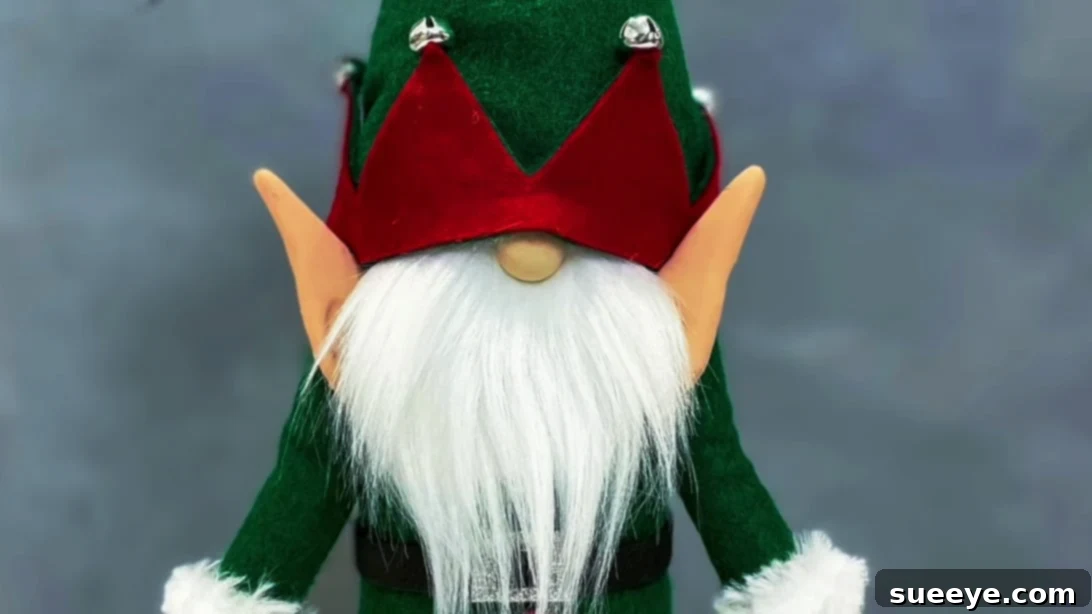
DIY Christmas Elf Gnome: Craft Your Own Whimsical Holiday Decoration!
As the festive season draws near, the excitement of decorating our homes with enchanting holiday cheer begins! For those who adore whimsical gnomes and cherish the magic they bring, we have a delightful project just for you: a charming DIY Christmas Elf Gnome. This step-by-step tutorial, inspired by the creative genius of Patti J. Good’s popular guide, will walk you through crafting your very own festive companion. What makes this project even better? The supplies are incredibly affordable and readily available, many of which can be found at your local dollar store, making it a budget-friendly way to add a personalized touch to your holiday decor. You don’t need to be an experienced crafter to bring this adorable gnome to life; the process is straightforward and enjoyable for everyone.
Imagine the joy of showcasing a unique, handmade elf gnome perched by your fireplace, nestled among your Christmas tree ornaments, or greeting guests on a shelf. This project is not just about making a decoration; it’s about embracing the spirit of creation, adding a personal touch to your festivities, and perhaps even starting a new holiday tradition. Get ready to dive into the wonderful world of DIY gnomes and create a truly special piece that will be cherished for years to come!
Gather Your Supplies: What You’ll Need to Create Your Elf Gnome
Before embarking on this magical crafting journey, ensure you have all the necessary materials at hand. Most of these items are easily accessible, often found at craft stores or dollar stores, making this an economical and convenient project. Carefully gather each item to ensure a smooth and enjoyable crafting experience.
- Pattern: A printable gnome pattern is essential for accurate cutting of fabric and other components. You can usually find these online or create your own simple templates.
- Fur Yarn: Choose a soft, fluffy fur yarn, typically used for knitting or crocheting, to create a textured and cozy trim for your gnome’s shoes and arms.
- White Faux Fur: High-quality white faux fur is crucial for crafting the gnome’s iconic fluffy beard, giving it that classic, charming appearance.
- Poly-Fill: This soft polyester fiberfill is used to stuff various parts of your gnome, such as the hat, providing shape and plumpness.
- Miter Cutter: A miter cutter will help you make precise and clean cuts on dowel sticks for the gnome’s legs. If unavailable, a sharp utility knife and cutting mat can suffice with caution.
- Dowel Sticks: Wooden dowel sticks will form the sturdy internal structure of your gnome’s legs.
- Corks: Standard wine corks or craft corks will serve as the base for the gnome’s feet, providing stability and a natural shape.
- Baby Shoes: A pair of small baby shoes (or equivalent small, soft shoe forms) will act as the foundation for your gnome’s festive elf boots.
- Weights: Small weights (such as poly pellets, rice, or small stones in a bag) are placed inside the shoes to give your gnome a low center of gravity, preventing it from toppling over.
- Black Pipe Cleaners (x2): Two black pipe cleaners will be used to create the internal structure for the gnome’s hat, allowing it to be posed and secured.
- 4.50-inch Pool Noodle or Styrofoam Cylinder: A segment of a pool noodle or a Styrofoam cylinder of approximately 4.50 inches will form the core of your gnome’s body, providing a lightweight yet firm base.
- Jingle Bells: You’ll need six 3/8-inch jingle bells and one larger 3/4-inch jingle bell. These add a delightful festive sound and decorative flair to the hat and shoe tips. (Michaels is often a good source for these).
- Black and Silver Glitter Craft Foam: This sparkling foam will be used for accent details, adding a touch of festive shimmer to your gnome.
- Small Red Button: A single small red button will serve as a charming decorative accent, possibly for the gnome’s outfit or hat.
- Craft Clay: Oven-bake craft clay (like polymer clay) is needed to sculpt the gnome’s ears, nose, and possibly other small features.
- Clay Securing Wire: Thin floral or craft wire is useful for reinforcing the clay ears before baking and for attaching them securely to the gnome’s head.
- Fiskars X-Acto Knife Set: A sharp X-Acto knife or similar craft knife is invaluable for precise cutting of various materials, especially foam and felt.
- Red and White Striped Fabric: A festive red and white striped fabric will be used for the gnome’s legs, giving them a cheerful, candy-cane-like appearance.
- Felt: Green felt will be used for the gnome’s body and hat, and red felt for the shoes. Ensure you have enough in these colors, along with additional felt for small details.
- Small Beads (for nostrils): Tiny beads will add subtle details to the gnome’s nose.
- Hot Glue Gun and Hot Glue Sticks: An essential tool for quickly and securely assembling various components of your gnome. Ensure you have plenty of glue sticks!
- Sharp Scissors: A good pair of sharp scissors is needed for cutting fabric, felt, and other pliable materials cleanly.
Step-by-Step Guide: How to Craft Your Christmas Elf Gnome
Now that you’ve gathered all your materials, it’s time to bring your Christmas Elf Gnome to life! Follow these detailed instructions carefully, taking your time with each step to ensure a beautifully crafted holiday decoration. Remember, crafting is about enjoyment and creativity, so don’t be afraid to add your own personal flair!
Step 1: Crafting the Elf Shoes
Begin by creating the gnome’s adorable elf shoes. Using your chosen red felt, meticulously cut out two shoe shapes based on the provided pattern. Pay close attention to the curled-up toe sections. Once cut, carefully fold these curled parts and secure them together using hot glue, forming the distinctive pointed toe. Next, take a baby shoe or shoe form and position it within your felt design. Apply hot glue along the edges of the felt, meticulously adhering it around the entire baby shoe, ensuring a snug fit. Leave a small opening at the top of the felt shoe. Through this opening, gently stuff the shoe with Poly-Fill to give it shape and plumpness. Once adequately stuffed, seal the gap with more hot glue. For a neat finish, apply glue to the inside of the shoe’s opening and carefully tuck the excess felt downwards. Now, take your soft fur yarn and glue it around the outer opening of each shoe, creating a cozy, festive cuff. To complete the elf look, attach a small jingle bell to the very tip of each pointed toe. Finally, place some weights inside each shoe (covering them with a small circle of felt if desired to prevent shifting) to ensure your gnome stands steadily. Trim a thin strip of felt and glue it around the very bottom edge of the shoe for a clean, finished look. Repeat all these steps for the second shoe.
Step 2: Assembling the Legs and Body Base
For the gnome’s legs, measure and cut two dowel sticks to exactly 5 inches each using your miter cutter for precise, even cuts. To create a more realistic leg shape, sharpen one end of each dowel stick using a pencil sharpener; this will be the top part of the leg. On the blunt end of each rod, securely push on a cork. These corks will form the lower part of the legs and later connect to the shoes. Using a craft knife, carefully shave a small, flat bit off the bottom edge of each cork, allowing it to sit flush. Measure approximately one inch up from the bottom of the cork. Now, prepare your red and white striped fabric for the leg coverings. Hem both long sides of the fabric strips to prevent fraying. Apply hot glue along the dowel rods and carefully wrap the striped fabric around them, ensuring the fabric starts one inch above the bottom of the cork (where you made the shaved mark). Cut small slits into the material at the top sharp end of the dowel rods and pull these tabs back. Glue the bottom part of the dowel legs (the cork end) securely into the prepared shoes from Step 1. Then, push the sharpened top part of the legs into the center of the 4.50-inch pool noodle or Styrofoam cylinder, which will serve as the gnome’s body core. Glue the fabric tabs from the top of the legs firmly down onto the pool noodle to secure the leg coverings. Lastly, cut a circle from a piece of felt. Make a central opening in this felt circle and push it down around the legs until it rests snugly on the bottom of the pool noodle, creating a solid base. Glue both the front and back parts of this felt circle to the noodle and the top of the shoes.
Step 3: Creating the Gnome’s Body
Now, let’s give your gnome a body! Take a piece of green felt measuring approximately 6.5 inches by 9.25 inches. Fold this felt in half lengthwise to create a tube shape. Apply a line of hot glue along one long edge and securely press the other half down onto it, forming a cylinder. Repeat this for the other side if necessary, ensuring the tube is firmly sealed. This felt tube will form the gnome’s jacket. Next, using your “V” jacket pattern, pin it around the felt tube. Carefully cut the green felt following the pattern, which should result in a charming, jagged bottom edge for the jacket, typical of elf attire. Once the jacket shape is cut, remove the pattern. Now, attach the pool noodle section (with the legs already secured) to the inside of this green felt tube. The felt tube should completely enclose the pool noodle and the top parts of the legs, so they are no longer visible. Use hot glue to secure the felt jacket snugly around the pool noodle, ensuring a neat and seamless finish.
Step 4: Designing the Iconic Elf Hat
The gnome’s hat is a key element that adds to its festive charm. Begin by cutting a piece of green felt measuring 10.25 inches by 11 inches. Fold this piece of felt in half. From the folded edge, measure up two inches from the bottom corner. Then, with a pen or marker, draw a diagonal line from this two-inch mark down to the bottom corner on the opposite open side of the folded felt. Carefully cut along this diagonal line to create the hat’s pointed shape. Gently curve the bottom edge of the hat upwards by about half an inch to give it a more whimsical look. Now, apply a line of hot glue along one of the straight edges of the hat and fold it in half, pressing firmly to secure the seam and form the cone shape. Use pliers to help turn the hat inside out, ensuring a clean edge without visible glue lines. For the hat’s decorative accents, cut two small “V” patterns from red felt and two identical “V” patterns from green glitter craft foam. Glue one red “V” to a green glitter “V”, and repeat for the other pair, creating two festive combined “V” shapes. Leave the very tips of these “V” patterns slightly open to allow for the attachment of jingle bells later.
Step 5: Attaching the Arms with Care
To create the gnome’s arms, take two small pool noodles and cut each to a length of 3 inches. These will form the core of the arms. Next, take a piece of your green felt, sized appropriately to wrap around the noodle, and sew or glue one seam along one side. This seam will be hidden against the body. For the hands, take a small ball of craft clay (or a large bead) and glue it firmly to one end of each pool noodle segment. This will give the arm a base to form a hand. Now, roll each pool noodle arm onto the prepared felt fabric, ensuring that the bottom edge of the felt overlaps slightly. Securely glue the felt down along the arm. To add a cozy, festive touch, take your fur yarn and glue it around the end of each arm, creating a soft cuff just above where the hands will be. Repeat these steps for the other arm. Once both arms are complete, attach them to the gnome’s body using hot glue. A key tip here is to ensure that the seams of the felt arm coverings are facing towards the gnome’s body. This way, the seams will be discreetly hidden, resulting in a cleaner and more professional appearance for your charming elf gnome.
Step 6: Adding the Signature Gnome Beard
No gnome is complete without its majestic beard! For this, you will use the white faux fur. On the backside of the faux fur, carefully mark out a rectangle that is two inches across and two inches down. Instead of cutting straight through the fur, gently cut a “U” shape *behind* the faux fur, only cutting the fabric backing and not the fur strands themselves. This technique, often called “cutting the backing only,” helps maintain the natural fluffy appearance of the fur without blunt edges. Once your “U” shaped beard is cut, apply a generous amount of hot glue to the top edge of the beard. Carefully position and glue the beard onto the gnome’s body, approximately one inch down from where the top of the body will meet the hat. Ensure it is centered and neatly attached, providing a prominent and charming feature for your gnome.
Step 7: Finalizing the Hat and Festive Details
Now it’s time to bring the gnome’s hat to life! Take two black pipe cleaners. Twirl and bend the ends of these pipe cleaners together to create a blunt, rounded tip. This will form a flexible support structure for the hat. Fill the gnome’s hat with Poly-Fill stuffing, making sure it’s plump and holds its shape well. Gently insert the pipe cleaner structure into the hat. Next, carefully pull the hat down over the gnome’s body, positioning it snugly over the arms and the top part of the beard. Securely glue the hat in place around its base. Take the two “V” patterned jingle bell decorations you prepared in Step 4. Glue these festive adornments onto the front of the hat, carefully positioning them for maximum visual impact. If the tips were left open, gently insert a small jingle bell into each tip and secure it with a tiny dab of glue. Finally, for that perfect finishing touch, attach the larger 3/4-inch jingle bell to the very top of the gnome’s hat, making sure it’s securely fastened. This adds a playful and iconic element to your gnome’s headwear.
Step 8: Bringing Your Gnome to Life with Ears, Nose, and Accessories
The final touches truly bring your gnome’s personality to the forefront! For the ears, take two 3/4-inch balls of craft clay. Roll each ball out slightly and then cut and shape them into distinct ear forms, similar to a pie slice or a rounded triangle. Attach a small piece of thin craft wire to the base of each clay ear; this will help secure them later. Bake the clay ears according to the manufacturer’s instructions, typically at 250 degrees Fahrenheit for about 15 minutes, until hardened. Once cooled, attach the baked ears securely to the sides of the gnome’s head, positioning them slightly beneath the hat line, using the wire for extra stability and hot glue to secure. Now, sculpt a small nose from craft clay and attach it firmly over the beard, positioning it centrally. Use tiny beads to create realistic nostrils on the nose, securing them with glue. Finally, attach the small red button to the gnome’s jacket or hat as a delightful accent. With these finishing details complete, you’ve successfully created a charming DIY elf gnome, ready to add a touch of handcrafted magic to your holiday celebrations! This festive friend will keep you company throughout the holidays and beyond.
Your Completed Christmas Elf Gnome: A Joyful Addition to Your Holidays!
Congratulations! You have successfully crafted an enchanting DIY Christmas Elf Gnome, a truly unique and heartwarming addition to your holiday decor. This project is a testament to the joy of creation, proving that with a little time and readily available materials, anyone can bring a touch of festive magic into their home. Your handmade gnome not only serves as a charming decoration but also embodies the spirit of the season, making your home feel even more welcoming and joyful.
Take a moment to admire your finished masterpiece. Each detail, from the whimsical shoes to the festive hat and fluffy beard, reflects the care and effort you’ve put into it. These delightful gnomes are perfect for gifting to loved ones, adding a personalized touch to your mantelpiece, enhancing your Christmas tree display, or simply brightening up any corner of your home. We hope this tutorial has inspired you to explore more DIY holiday crafts and continue spreading cheer through your creativity. Happy crafting and happy holidays!