
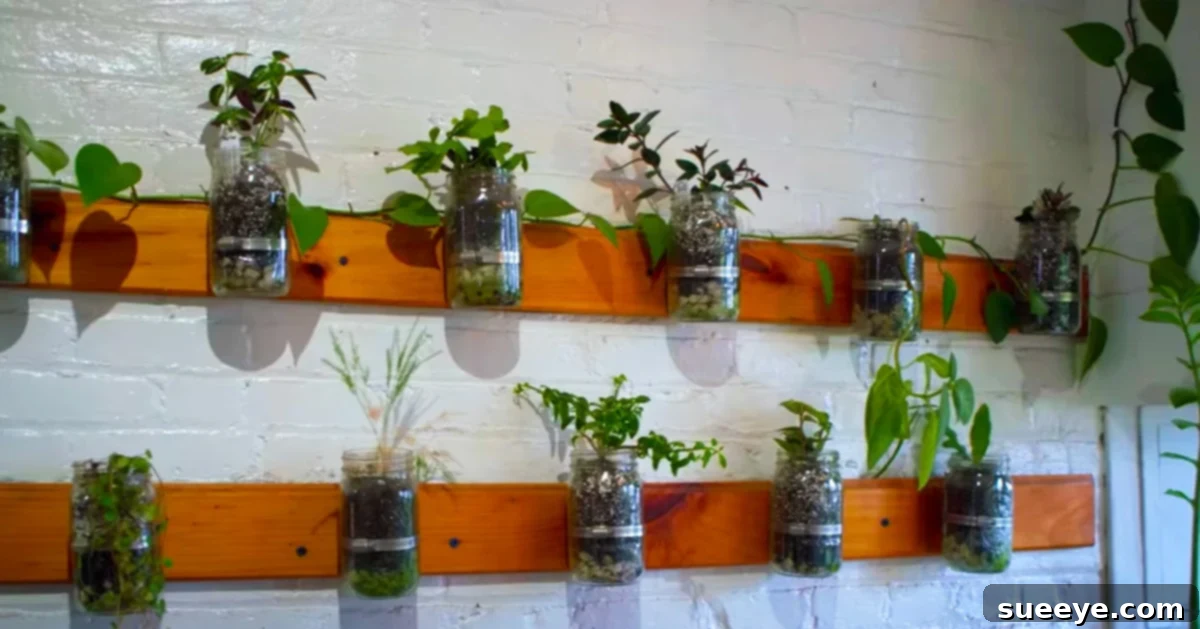
Create Your Own Enchanting DIY Mason Jar Wall Garden: A Step-by-Step Guide
There’s something truly magical about bringing the outdoors in, especially when it involves two of life’s simple pleasures: the rustic charm of mason jars and the vibrant life of plants. This project isn’t just an aesthetically pleasing endeavor; it’s a journey into becoming a proud “plant parent” and transforming any space into a serene, green oasis. As someone who deeply cherishes plants but struggles with less-than-ideal natural lighting in an apartment, I understand the desire to cultivate greenery, even in challenging environments. This unique style, a delightful blend where bohemian meets earthy, offers the perfect solution for urban dwellers and gardening enthusiasts alike. Imagine fresh herbs within arm’s reach in your kitchen, or a cascade of flourishing greenery adorning a blank wall. This dream can become a reality, even if you don’t have a sprawling garden.
My personal aspiration is to build this enchanting mason jar herb garden in my future kitchen, creating a functional yet beautiful display. The inspiration for this incredible project comes from the insightful Summer Rayne Oakes, a true plant guru who provides exceptional guidance in her video. She beautifully demonstrates the potential of mason jars for cultivating a variety of plants, offering perfect insights into her own successful setups. While her video begins with some introductory chatter, feel free to skip ahead to the 5:25 mark to dive straight into the practical tutorial and unlock the secrets to creating your own thriving mason jar haven.
Why a Mason Jar Wall Garden is Your Next Must-Have DIY Project
In an age where maximizing space and embracing sustainable living are key, a DIY mason jar wall garden stands out as an ingenious solution. It’s more than just a decor item; it’s a functional piece of living art that brings numerous benefits to your home and well-being. Here’s why this project is gaining immense popularity:
- Space Efficiency: For apartment dwellers, urbanites, or anyone with limited horizontal surface area, a vertical wall garden is a game-changer. It utilizes vertical space effectively, turning an empty wall into a productive garden.
- Unmatched Aesthetic Appeal: The combination of natural wood and clear glass jars creates a unique aesthetic that complements various interior design styles. Whether your home leans towards rustic, farmhouse, bohemian, minimalist, or industrial, this garden effortlessly integrates, adding a touch of organic beauty and warmth.
- Ease of Maintenance for All Skill Levels: Mason jar gardens are surprisingly low-maintenance, making them perfect for both seasoned gardeners and complete beginners. The transparent jars allow you to easily monitor soil moisture and root health, simplifying the care routine.
- Cost-Effective and Sustainable: This project leverages readily available and often upcycled materials. Mason jars are affordable and versatile, and reclaimed wood adds character while reducing waste. It’s an eco-conscious way to enhance your living space.
- Versatility in Plant Choices: From culinary herbs that elevate your cooking to vibrant succulents that add texture, or even small flowering plants that bring a pop of color, the possibilities for what you can grow are endless.
- Improved Air Quality and Well-being: Indoor plants are known to improve air quality, reduce stress, and boost mood. Having a living garden in your home contributes to a healthier and happier environment.
- Educational Opportunity: It’s a fantastic project for families, allowing children to learn about plant growth, responsibility, and the natural world in an engaging, hands-on way.
Selecting the Perfect Plants for Your Mason Jar Garden
The success and longevity of your mason jar garden heavily depend on choosing the right plants. Given the confined space and often varied light conditions of indoor environments, it’s crucial to select varieties that thrive in these specific settings. Here are some of the best plants suited for mason jar cultivation, categorized for your convenience:
Culinary Herbs: Fresh Flavors at Your Fingertips
Growing your own herbs is incredibly rewarding, providing fresh ingredients for your meals and a delightful aroma for your home. Many common herbs do exceptionally well in mason jars:
- Basil: A kitchen staple, basil loves warmth and bright, indirect light. Harvest regularly to encourage bushy growth.
- Mint: Known for its vigorous growth, mint thrives in jars and prefers consistent moisture. Its invasive nature in traditional gardens makes it perfect for contained environments like jars.
- Chives: Easy to grow and resilient, chives add a mild onion flavor to dishes and tolerate a range of light conditions.
- Oregano: A hardy herb that enjoys good drainage and plenty of sunlight, oregano is a fantastic addition to Italian and Mediterranean cooking.
- Thyme: This delicate herb prefers well-draining soil and ample light. Its small leaves are packed with flavor.
- Rosemary: While it can grow large, young rosemary plants can flourish in mason jars with sufficient sunlight and careful watering.
When growing herbs, remember to rotate the jars periodically to ensure all sides receive adequate light, and pinch off flower buds to redirect energy into leaf production.
Resilient Succulents and Cacti: Low-Maintenance Beauty
If you’re looking for plants that require minimal attention, succulents and small cacti are an excellent choice. Their diverse forms and textures add a modern touch to your display.
- Echeveria: These rosette-forming succulents come in a variety of colors and are stunning in mason jars. They need bright light and infrequent watering.
- Haworthia: Resembling miniature aloes, Haworthias are tolerant of lower light conditions than many other succulents, making them ideal for less sunny spots.
- Sedum: Many small Sedum varieties, like ‘Burro’s Tail’ or ‘Stonecrop’, trail beautifully from jars and are very forgiving.
- Mini Cacti: Small, decorative cacti can thrive in mason jars, provided they have excellent drainage and plenty of direct sunlight.
The key to success with succulents and cacti in jars is ensuring proper drainage and avoiding overwatering, as they are highly susceptible to root rot.
Small Flowering Plants and Foliage for Added Charm
While jars might not accommodate large blooms, several small flowering and foliage plants can add delightful character:
- African Violets: With their beautiful blooms and compact size, African violets are perfect for jars in bright, indirect light.
- Peace Lilies (small varieties): Known for their air-purifying qualities and elegant white spathes, small peace lilies can adapt to jar environments if kept consistently moist.
- Pothos (for propagation): While mature Pothos plants need more space, cuttings can be easily rooted in water-filled mason jars, eventually transplanting to soil or a larger setup.
- Spider Plants (small offsets): The “spiderettes” or offsets from a mother plant can be rooted and grown in jars, creating lovely hanging elements.
Consider the root system of your chosen plants; those with shallow or compact roots are generally best suited for the confines of a mason jar. Always prioritize plants that align with the light conditions available in your chosen location.
Gathering Your Essential Materials for a Thriving Mason Jar Garden
The beauty of this DIY project lies in its simplicity and the accessibility of its materials. Most items can be found at your local hardware store, garden center, or even repurposed from around your home. Here’s a detailed look at what you’ll need to create your stunning mason jar wall garden:
- Wooden Boards: The foundation of your display. Opt for reclaimed wood for a rustic, eco-friendly vibe, or new lumber that you can stain or paint to match your decor. The size and length will depend on how many jars you wish to display and the available wall space. Ensure the wood is sturdy enough to support the weight of the jars, soil, and plants.
- Wall Adhesive (heavy-duty): An option for mounting your wooden board to the wall without drilling, suitable for lighter displays or temporary installations on appropriate surfaces. Always check the weight capacity and wall type compatibility.
- Tapcon® Screws (or similar masonry screws): For a secure, permanent attachment of your wooden board to brick, concrete, or other masonry walls. These require pre-drilling pilot holes with a hammer drill and appropriate drill bits. If mounting to drywall over studs, use wood screws; if mounting to drywall without studs, use drywall anchors rated for the expected weight.
- Hose Clamps (adjustable metal clamps): These are the key components for holding your mason jars securely to the wooden board. Choose wide-band, rust-resistant clamps. The size of the clamps should correspond to the diameter of your mason jars; standard wide-mouth quart jars usually fit 3-4 inch clamps.
- Cable Staples (or small wire clips): While not strictly for mounting the jars themselves, these can be useful for minor electrical routing if you decide to add decorative LED string lights or small grow lights to your display. Alternatively, they can be used to secure decorative twine or other small elements.
- Wide-Mouth Mason Jars: The stars of the show! Wide-mouth jars are easier to fill, plant, and clean. Quart-sized (32 oz) jars are a popular choice as they offer ample space for plant roots, but you can experiment with pint (16 oz) or half-gallon jars depending on your plant choices and aesthetic preference.
- Potting Soil: A high-quality, well-draining potting mix specifically designed for indoor plants is essential. For succulents and cacti, opt for a specialized cactus mix that provides even better drainage.
- Activated Horticultural Charcoal: This layer at the bottom of the jar helps with drainage, prevents root rot, and absorbs odors, creating a healthier environment for your plants, especially in containers without drainage holes.
- Stones or Small Pebbles: Another crucial layer at the bottom of the jar, beneath the charcoal, to further facilitate drainage and prevent the soil from becoming waterlogged. Small river stones or gravel work perfectly.
- Plants: The living heart of your garden! Refer to our “Selecting the Perfect Plants” section for guidance, and choose healthy young plants from a reputable nursery.
Having all your materials gathered before you begin will make the assembly process smooth and enjoyable.
Step-by-Step Guide to Building Your DIY Mason Jar Wall Garden
Bringing this beautiful project to life is a straightforward process that anyone can tackle. While you can certainly find inspiration and visual guidance from Summer Rayne Oakes’ video, or read her comprehensive blog post for detailed instructions, here’s a refined step-by-step approach to help you construct your very own mason jar garden:
Phase 1: Preparing Your Wooden Base and Location
- Select and Prepare Your Wooden Board:
- Choose a piece of reclaimed wood or a new board that fits your desired aesthetic and wall space.
- Sand the wood thoroughly to remove splinters and create a smooth surface.
- (Optional) Apply wood stain, paint, or a protective sealant to enhance its appearance and durability. Allow it to dry completely according to product instructions.
- Determine Wall Placement:
- Identify the ideal location on your wall, considering factors like natural light availability, proximity to power outlets (if adding lights), and aesthetic integration with your room.
- Measure and mark the desired height and horizontal placement for your board. Use a level to ensure it’s perfectly straight.
- Pre-Drill Holes in the Board (for screws):
- Mark the spots on your wooden board where you intend to attach it to the wall (e.g., two points near each end).
- Using a drill bit slightly smaller than your screws, pre-drill pilot holes through the board. This prevents the wood from splitting and makes wall mounting easier.
Phase 2: Securely Mounting the Wooden Board
- Attach the Board to the Wall:
- For Drywall (into studs): Align the pre-drilled holes in your board with wall studs (use a stud finder). Secure the board directly into the studs using appropriate wood screws.
- For Drywall (without studs): If studs aren’t available, use heavy-duty drywall anchors rated for the combined weight of your board, jars, soil, and plants. Drill holes for the anchors, insert them, then screw the board into the anchors.
- For Masonry/Concrete Walls: Using a hammer drill and masonry bit, drill pilot holes into the wall at your marked locations, matching the size for your Tapcon® screws. Insert the Tapcon® screws through your board’s pilot holes and into the wall, tightening them securely.
- Using Wall Adhesive: If opting for adhesive (for lighter displays and suitable wall types), apply it to the back of the board according to the manufacturer’s instructions. Press the board firmly against the wall and hold until it adheres, often requiring temporary support until dry.
Ensure the board is firmly secured and level before proceeding.
Phase 3: Preparing and Attaching Your Mason Jars
- Prepare Your Mason Jars for Planting:
- Wash and thoroughly dry all your wide-mouth mason jars.
- Create the drainage layers:
- Place a layer of small stones or pebbles (about 1-2 inches deep) at the bottom of each jar.
- Add a layer of activated horticultural charcoal (about 0.5-1 inch deep) on top of the stones. This helps with filtration and prevents odors.
- Carefully add your chosen potting soil on top of the charcoal layer, filling the jar about two-thirds full.
- Plant Your Selected Greens:
- Gently remove your chosen plant from its nursery pot, loosening any compacted roots.
- Create a small depression in the soil within the mason jar.
- Place the plant in the depression, ensuring the top of the root ball is level with or slightly below the rim of the jar.
- Backfill with more potting soil, gently patting it around the plant. Leave about an inch of space from the rim for watering.
- Water the plant lightly to help the soil settle.
- Attach Hose Clamps to the Board:
- Position the hose clamps on your wooden board where you want each jar to be. Ensure they are evenly spaced and at the desired height.
- Using small screws (wood screws for wood board) or the cable staples (if appropriate for temporarily holding in place or for small accents), secure the hose clamps to the board. You’ll typically screw through the small eyelet on one side of the clamp. Make sure they are tight enough to hold the jar securely, but loose enough to open and close.
- Mount Your Planted Mason Jars:
- Open each hose clamp slightly.
- Carefully slide a planted mason jar into each clamp, ensuring it’s snug and centered.
- Tighten the screw on the hose clamp until the jar is firmly held in place and cannot spin or slip. Be careful not to overtighten and crack the glass, but ensure it’s secure.
Phase 4: Finishing Touches and Initial Care
- Initial Watering and Cleaning:
- Give your newly planted garden a thorough but careful watering. For jars without drainage holes, be extra cautious not to overwater.
- Wipe down any soil residue from the jars and board for a clean, polished look.
- Admire Your Creation!
- Step back and appreciate the vibrant, living art you’ve just created. It’s truly exciting to see how plants can add such a dynamic and refreshing finish to any room.
Ongoing Care and Maintenance for a Flourishing Mason Jar Garden
Once your beautiful mason jar garden is assembled, a little ongoing care will ensure your plants remain healthy and vibrant for a long time. Remember, the success of your garden relies on understanding the specific needs of your chosen plants and adapting your care routine accordingly.
- Watering Wisely: This is perhaps the most critical aspect, especially for jars without drainage holes.
- How Much: Water sparingly. Aim to keep the soil consistently moist but never soggy. Overwatering is the number one killer of indoor plants, leading to root rot.
- How Often: Check the soil moisture regularly. Stick your finger about an inch into the soil; if it feels dry, it’s time to water. This might be once a week for some plants, or every few weeks for succulents.
- Technique: Water slowly and evenly. If you see water pooling above the soil, stop and let it absorb. The charcoal and stone layers are there to help, but they cannot compensate for excessive watering.
- Optimizing Light Exposure:
- Natural Light: Place your mason jar garden in a location that receives the appropriate amount of light for your plants. Most herbs and succulents thrive in bright, indirect light for at least 6 hours a day.
- Rotation: Rotate your jars every week or so to ensure all sides of the plants receive adequate light and grow evenly.
- Supplemental Lighting: If natural light is insufficient, consider adding a small LED grow light. These are energy-efficient and can provide the necessary spectrum for healthy plant growth.
- Humidity Considerations:
- Some plants, especially tropical herbs, prefer higher humidity. You can mist the foliage occasionally or place a small humidifier nearby if your home environment is very dry.
- Fertilization (Sparingly):
- Mason jar plants generally don’t require heavy fertilization. A diluted liquid fertilizer once every 2-4 months during the growing season (spring and summer) is usually sufficient. Avoid fertilizing in fall and winter when plants are less active.
- Pest Watch and Control:
- Inspect your plants regularly for common houseplant pests like aphids, spider mites, or fungus gnats.
- Address infestations promptly with organic solutions like neem oil spray or insecticidal soap. Early detection is key.
- Pruning for Health and Shape:
- Pinch back herbs to encourage bushier growth and prevent legginess.
- Remove any yellowing or dead leaves promptly to maintain plant health and appearance.
- For succulents, propagate cuttings from leggy plants to start new ones.
- Repotting (Eventual):
- While mason jars are great for containment, plants will eventually outgrow their space. When roots start circling the bottom or poking out, it’s a sign that your plant needs a larger container. This may mean moving it to a bigger pot or dividing it.
By dedicating a little time to these care practices, your mason jar garden will continue to flourish, bringing joy and a touch of nature to your living space.
Customization and Creative Enhancements for Your Unique Garden
One of the most exciting aspects of a DIY project is the opportunity to infuse it with your personal style. Your mason jar wall garden can be as unique as you are, with countless ways to customize and enhance its aesthetic and functionality. Don’t be afraid to get creative!
- Personalize the Wooden Board:
- Paint or Stain: Beyond natural wood, consider painting your board a vibrant color that pops against your wall, or a subtle shade that complements your existing decor. A distressed or whitewashed look can enhance the farmhouse or shabby-chic vibe.
- Stenciling or Hand-Painting: Add inspiring quotes, botanical illustrations, or the names of the herbs you’re growing directly onto the wood.
- Decorative Edges: Route the edges of the board for a more refined look, or add decorative trim.
- Labels and Identification:
- Chalkboard Paint: Paint a section of your board or even directly on the jars with chalkboard paint to easily label your plants with chalk. This is particularly useful for an herb garden!
- Metal or Wooden Tags: Attach small, decorative tags to the jars or directly into the soil to identify each plant. These can be rustic or modern.
- Sticker Labels: Use stylish waterproof sticker labels for a clean, minimalist look.
- Integrated Lighting Solutions:
- LED Strip Lights: For areas with low natural light, or just for ambient evening glow, attach thin LED strip lights to the underside of each shelf or along the top of the board. Choose full-spectrum grow lights for optimal plant health or warm white for aesthetic appeal.
- Battery-Operated Fairy Lights: Drape delicate battery-operated fairy lights around your jars for a magical, whimsical touch, especially charming in the evening.
- Arrangement and Layout Variations:
- Staggered Heights: Instead of a single row, arrange jars at different heights on multiple boards for a dynamic and visually interesting display.
- Geometric Patterns: Mount jars in a specific pattern like a diagonal line, a grid, or even a heart shape.
- Mixed Media: Incorporate other small hanging elements like air plants in macrame holders or small decorative items alongside your jars.
- Thematic Gardens:
- Kitchen Herb Garden: Dedicate your entire setup to culinary herbs.
- Succulent Sanctuary: Fill all jars with a variety of succulents for a desert-inspired display.
- Propagation Station: Use some jars with water to root plant cuttings, showcasing the beautiful process of plant propagation.
- Medicinal Plant Display: Grow small medicinal herbs like aloe vera, chamomile, or lavender.
- Additional Embellishments:
- Small Hooks: Add small hooks to the board to hang gardening tools, watering cans, or decorative items.
- Twine or Rope: Weave decorative twine or thin rope around the jars or board for an added rustic or bohemian flair.
By experimenting with these customization ideas, you can transform a simple DIY project into a personalized masterpiece that truly reflects your unique style and passion for plants.
Embrace the Green: Your Journey to a Beautiful Mason Jar Garden Awaits!
The journey from an empty wall to a vibrant, living mason jar garden is incredibly rewarding. It’s a project that marries practicality with profound aesthetic appeal, creating not just a garden, but a focal point of natural beauty and tranquility in your home. From the rustic charm of reclaimed wood to the clear elegance of mason jars holding flourishing life, this DIY endeavor offers a unique blend of bohemian and earthy styles, perfectly suiting modern decor trends and your personal touch.
Whether you’re a seasoned green thumb or just embarking on your plant parenting adventure, the simplicity and versatility of this project make it accessible and enjoyable for everyone. Imagine the delight of plucking fresh herbs for your dinner, or the calming presence of thriving succulents brightening your day. This garden isn’t just about growing plants; it’s about cultivating a more serene, connected, and personalized living space.
I can’t wait for the day I build my own mason jar herb garden in my kitchen, a testament to the joy and vitality that plants bring. I encourage you to gather your materials, follow these steps, and embrace the satisfaction of creating something beautiful with your own hands. Your home will thank you for the touch of green, and you’ll cherish the vibrant finish your new mason jar garden brings to your room. Happy gardening!