
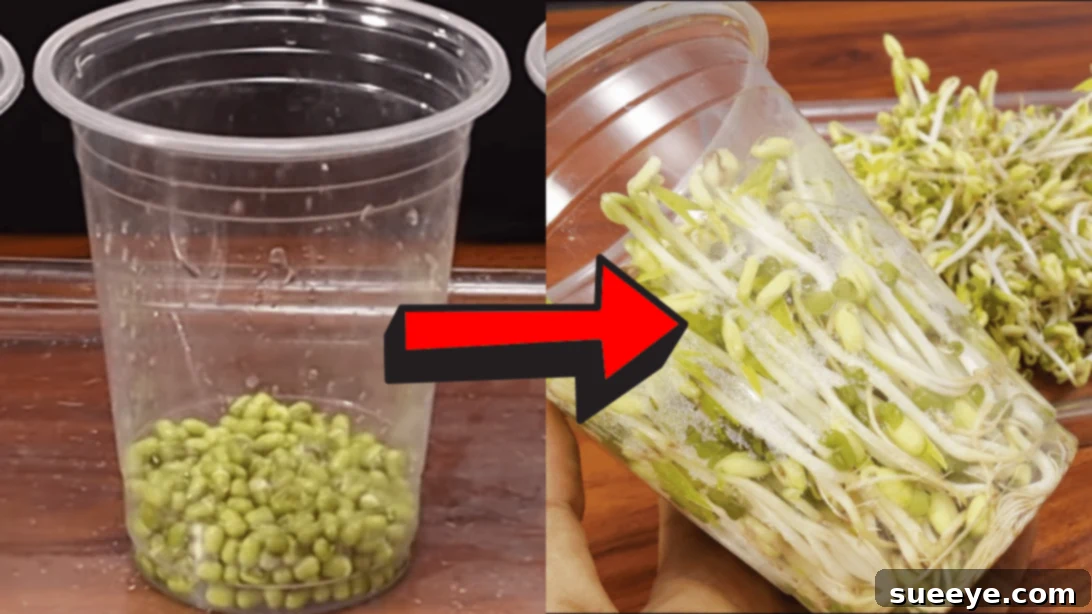
Imagine adding incredibly fresh, crisp bean sprouts to your favorite dishes, knowing exactly where they came from and how they were grown. Whether you love them tossed in a vibrant salad, stir-fried with your preferred proteins, or nestled in a comforting bowl of noodles, bean sprouts are a versatile and nutritious addition to any meal. But what if we told you that cultivating these delicate greens at home is not only possible but also surprisingly simple and cost-effective? You don’t need a fancy sprouting kit or extensive gardening experience; just a few basic household items will do. This comprehensive guide will walk you through the straightforward process of how to grow bean sprouts in plastic cups, a method so easy you’ll wonder why you haven’t tried it sooner. Beyond their culinary appeal, homemade bean sprouts offer a boost of vitamins and minerals, ensuring a healthy and delicious ingredient is always at your fingertips. Get ready to embark on a rewarding journey of home sprouting, transforming humble mung beans into a culinary delight.
Why Grow Your Own Bean Sprouts?
Growing bean sprouts at home offers a multitude of benefits that extend beyond mere convenience. Firstly, freshness is unparalleled. Store-bought sprouts often travel long distances, losing some of their crispness and nutritional value along the way. Homegrown sprouts, however, go directly from your kitchen to your plate, guaranteeing peak flavor and texture. Secondly, it’s incredibly cost-effective. A small bag of mung beans can yield several batches of sprouts, saving you money compared to purchasing them regularly from the grocery store. Thirdly, you gain complete control over the growing environment. This means no pesticides, herbicides, or unknown chemicals; just pure, clean sprouts grown with water and care. Lastly, the process itself is immensely satisfying. Watching tiny beans transform into vibrant, edible sprouts in just a few days is a delightful experience, connecting you more closely with your food source. Bean sprouts are an excellent source of vitamins C and K, folate, and iron, and they are low in calories, making them a superfood you can easily integrate into your daily diet.
Materials for Your Sprouting Project:
Gathering your materials is the first step towards a successful sprouting endeavor. You’ll find that most of these items are likely already in your home, making this an accessible and budget-friendly project. Each item plays a crucial role in creating the ideal environment for your mung beans to thrive.
- 6 Plastic Cups: These will serve as your primary growing vessels. Three cups will be used for the actual sprouting, while the other three will assist in the watering process. Opt for sturdy, reusable cups if possible to minimize waste.
- Mung Beans: The star of our show! Look for high-quality, whole mung beans, preferably organic, from a reputable source. Ensure they are fresh and intended for sprouting, not roasted or split.
- Container: A simple bowl or jar will suffice for the initial soaking phase of the mung beans.
- Water: Clean, filtered water is best for both soaking and rinsing your sprouts. Tap water is generally fine, but if your tap water has a strong chlorine smell, letting it sit out for a few hours before use can help.
- Soldering Iron or Anything to Poke Holes: This tool is essential for creating proper drainage in your sprouting cups. A soldering iron makes quick work of it, but a heated screwdriver tip, a sharp awl, or even a sturdy nail can work with caution.
- Clean Towel or Cloth: A dark, clean cloth or towel is vital for maintaining the dark environment necessary for growing white, tender sprouts. It also helps to retain moisture.
- Black Plastic Bag: This provides the necessary darkness for the sprouts to grow long and white, preventing them from turning green (which indicates bitterness). A thick, opaque bag is ideal.
Step-by-Step Guide: How to Grow Bean Sprouts in Plastic Cups
Follow these detailed instructions carefully to ensure a bountiful harvest of crunchy bean sprouts. The process is straightforward, but attention to detail, especially regarding darkness and moisture, is key to success.
Step 1: Prepare Your Mung Beans for Sprouting
Begin by measuring out the desired amount of mung beans. A good starting point is about 1/4 to 1/2 cup of dry beans per sprouting cup, as they will expand significantly. Place your selected mung beans into a clean container, such as a bowl or jar. Fill the container with clean, room-temperature water, ensuring the beans are fully submerged with plenty of extra water, as they will absorb a lot. Let the mung beans soak for approximately 8 to 12 hours, or overnight. This initial soaking phase is crucial as it kickstarts the germination process, rehydrating the dormant beans and signaling them to awaken. You’ll notice the beans plump up considerably and become noticeably softer to the touch. This indicates they are ready for the next stage of their transformation.
Step 2: Prepare Your Sprouting Cups for Optimal Drainage
While your mung beans are soaking, prepare three of your plastic cups. Drainage is paramount for successful sprouting, preventing waterlogging and mold growth. Using a soldering iron, carefully create several small holes (around 5-7) in the bottom of each of these three cups. The holes should be large enough to allow water to drain freely but small enough to prevent the mung beans from falling through. If you don’t have a soldering iron, a screwdriver or a sturdy nail heated over a candle flame can be used; exercise extreme caution when handling hot tools. The heat helps to melt the plastic cleanly, creating smooth drainage holes. These holes are critical for flushing out waste products and providing essential air circulation, both vital for healthy sprout development.
Step 3: Set Up Your Sprouting Environment
Once your mung beans have softened from their soak, it’s time to set up the sprouting cups. Carefully drain all the soaking water from the mung beans. Rinse the beans thoroughly under cool running water, then drain again. Divide the rinsed mung beans equally among the three plastic cups you prepared with drainage holes. Ensure the beans are spread evenly at the bottom of each cup. Next, place these three sprouting cups into a larger tray or shallow container. This tray will catch any excess water that drains from the cups during the daily rinsing process. Now, take a clean towel or cloth and soak it in water. Squeeze out the excess water until the towel is damp, not dripping wet. Gently place a damp piece of this towel on top of the mung beans in each cup. The damp towel serves a dual purpose: it helps maintain consistent moisture levels for the growing sprouts and provides a gentle weight, encouraging the sprouts to grow thicker and crunchier.
Step 4: Initiate the Dark Growth and Daily Rinsing Cycle
After setting up your cups, it’s time to create the ideal growing environment. Take your black plastic bag and use it to completely cover the plastic cups and the tray. Darkness is absolutely essential at this stage to encourage the sprouts to grow long, white, and tender. Exposure to light will cause them to produce chlorophyll, turning them green and potentially bitter. Leave the cups undisturbed in a moderately warm spot (ideally around 70-75°F or 21-24°C) for several hours. This is where the magic begins! To ensure continuous hydration and to prevent any bacterial growth, your sprouts require regular rinsing. For this, take the three remaining plastic cups and partially fill them with clean water. Three times a day – once in the morning, once at noon, and once in the evening – carefully remove the black plastic bag. Lift each sprouting cup (the ones with the beans) and gently submerge it into one of the water-filled cups for approximately 3 seconds. This quickly rinses the beans and replenishes their moisture. After 3 seconds, lift the sprouting cup out, allowing all the water to drain completely through the holes you made. Repeat this process for all three sprouting cups. Once all cups have been rinsed and drained, immediately return them to the tray and cover them tightly with the black plastic bag to restore the dark environment. Consistency with this daily rinsing schedule is critical for healthy sprout development.
Step 5: Witnessing Growth and Adapting the Cover
By the end of the third day, you will observe significant growth. When you check on your sprouts during their rinsing cycle, you’ll notice the mung beans have developed into impressive sprouts, often several inches long, with tiny rootlets seeking moisture. The damp towel on top will be pushed up by the growing sprouts, indicating their vigor. At this point, you can transition from using the black plastic bag for complete darkness to a slightly more breathable, yet still dark, cover. After pouring water on the cups for their final rinse of the day, instead of replacing the plastic bag, cover the cups with a thick, dark towel (black or brown works best). This allows for a bit more airflow while still maintaining the essential darkness, which helps prevent any potential musty odors or excessive humidity. Continue with the three-times-a-day rinsing and draining routine under the dark towel. This period allows the sprouts to firm up and reach their optimal length and crispness.
Step 6: Harvesting Your Freshly Grown Bean Sprouts
Day 4, or sometimes Day 5 depending on temperature and bean freshness, is typically harvest day! Your bean sprouts should be robust, crunchy, and anywhere from 1 to 3 inches long. They should have a clean, fresh smell. To harvest, gently remove the damp towel and carefully pour water over the sprouts in each cup one last time. This helps to loosen them from the bottom of the cup and rinse away any loose bean hulls. You can then carefully tip the cups over a clean container, allowing the sprouts to tumble out. You might need to gently tease them apart or rinse them further to remove any remaining bean shells. Once harvested, they are ready for immediate use! Enjoy the satisfaction of having grown your own fresh, healthy bean sprouts from scratch.
Tips for Optimal Sprout Growth
- Temperature Control: Sprouts thrive in warm, consistent temperatures, ideally between 70-75°F (21-24°C). Avoid extreme cold or heat, which can slow growth or encourage spoilage.
- Water Quality: Use clean, filtered water if your tap water contains high levels of chlorine or other chemicals. This ensures your sprouts remain pure.
- Darkness is Key: Absolute darkness is crucial for preventing greening and ensuring long, white, tender sprouts. Any light exposure will cause them to photosynthesize and turn green, which is harmless but can make them slightly bitter.
- Proper Drainage: Ensure your cups have sufficient drainage holes. Standing water is the enemy of sprouts, leading to mold and rot.
- Consistent Rinsing: Sticking to a schedule of rinsing 2-3 times a day is vital. This provides necessary moisture and washes away metabolic waste products that can cause sourness or mold.
- Don’t Overcrowd: Give your beans space to breathe. Overfilling the cups can lead to poor air circulation and increased risk of mold.
- Smell Test: Healthy sprouts should have a fresh, slightly earthy smell. If you detect any sour, moldy, or off-putting odors, it’s best to discard the batch.
Troubleshooting Common Sprouting Issues
While growing bean sprouts in plastic cups is relatively simple, you might encounter a few hiccups along the way. Here’s how to address common problems:
- Sprouts Not Growing: This could be due to old or non-viable beans. Ensure you’re using fresh, whole mung beans specifically meant for sprouting. Inconsistent temperature (too cold) or insufficient soaking can also hinder germination.
- Sprouts Turning Green: As mentioned, this is caused by light exposure. Double-check that your black plastic bag or dark towel is completely opaque and covers the cups thoroughly.
- Foul Odor or Sliminess: A sour or musty smell, or a slimy texture, is a clear sign of bacterial growth or mold. This is usually due to inadequate drainage or insufficient rinsing. Increase your rinsing frequency, ensure all water drains completely, and clean your equipment thoroughly. Unfortunately, if this occurs, it’s best to discard the batch and start fresh.
- Short or Thin Sprouts: This might be due to insufficient moisture (not rinsing enough), lack of darkness, or inconsistent warmth. The gentle weight of the damp towel can also help encourage thicker sprouts.
- Tiny Rootlets: These are completely normal and are the sprout’s way of seeking moisture. They are safe to eat.
Storing and Using Your Homemade Bean Sprouts
Once harvested, your fresh bean sprouts are best enjoyed immediately for maximum crispness and nutritional value. However, if you have an abundance, proper storage can extend their shelf life for a few days. To store, rinse them once more, gently pat them dry with a clean paper towel, and place them in an airtight container lined with a damp paper towel. Store them in the coldest part of your refrigerator. They should remain fresh for about 3-5 days. Remember to rinse them again before use.
The culinary possibilities with fresh bean sprouts are endless! Here are a few ideas:
- Salads: Add a delightful crunch to any green salad.
- Stir-fries: A classic pairing! Add them at the very end of cooking to maintain their crisp texture.
- Sandwiches and Wraps: A healthy, crunchy filling.
- Soups and Noodle Dishes: Stir into hot soups or ramen just before serving.
- Omelets and Scrambles: Lightly sautéed sprouts make a great addition to eggs.
- Spring Rolls: A key ingredient for fresh or fried spring rolls.
Conclusion: Your Journey to Homemade Sprouts
Growing bean sprouts in plastic cups is a testament to the simplicity and reward of urban gardening. This easy, low-cost method allows anyone to enjoy the unparalleled freshness and nutritional benefits of homegrown sprouts. From the initial soak of the mung beans to the triumphant harvest of crunchy sprouts, each step is an exciting part of the process. Not only will you enhance your culinary creations with a vibrant, healthy ingredient, but you’ll also gain a deeper appreciation for the food you consume. So, grab those plastic cups, a handful of mung beans, and embark on this incredibly rewarding journey. Your taste buds, and your health, will thank you for it. Happy sprouting!