
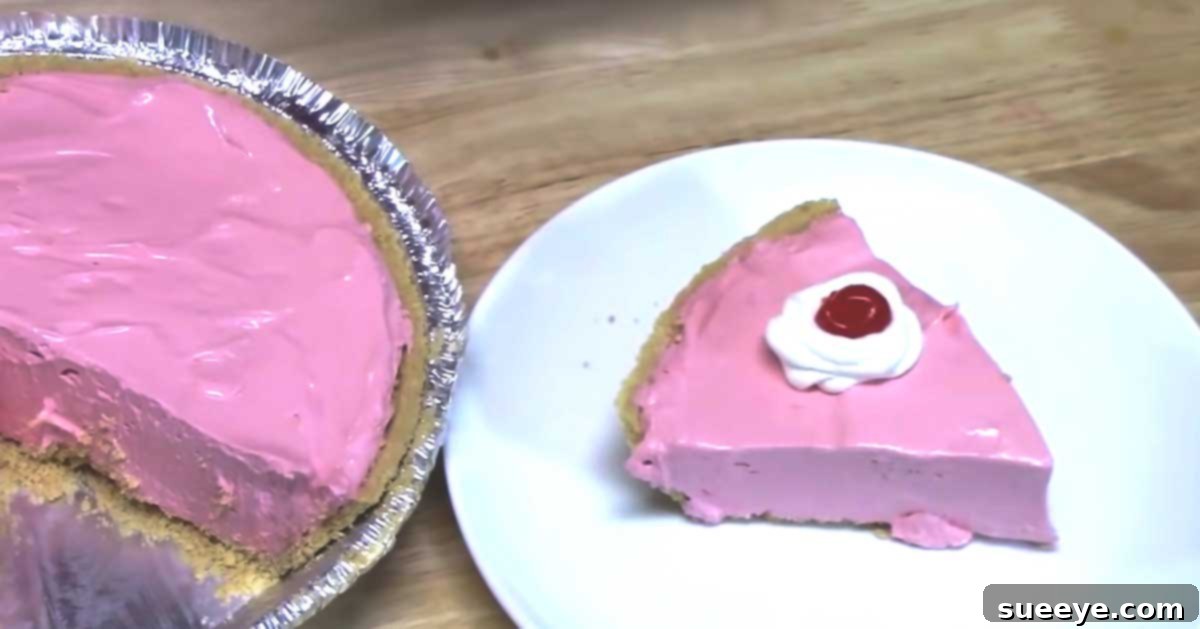
The Ultimate No-Bake Kool-Aid Pie: A Burst of Flavor and Color for Any Occasion
As the days grow warmer and the sun shines brighter, my cravings invariably turn towards light, refreshing, and distinctly fruity flavors. There’s something undeniably charming about a dessert that not only tastes incredible but also boasts a vibrant, eye-catching color without requiring hours in a hot kitchen. That’s precisely why I was immediately captivated when I discovered the brilliant concept of a No-Bake Kool-Aid Pie, originally shared by the talented Catherine’s Plates. This recipe is an absolute game-changer, offering an unparalleled combination of simplicity, speed, and deliciousness, making it an ideal choice for any warm-weather gathering, casual weeknight treat, or a festive holiday dessert.
The beauty of this Kool-Aid pie lies in its incredible versatility. Imagine creating a dessert that perfectly matches your party theme or your favorite fruit flavor with just a change of a single packet! Catherine demonstrated this with a delightful cherry version, and the results were nothing short of spectacular. The pie emerged with a stunning, deep red hue and an irresistibly sweet, tangy taste that left everyone wanting more. This easy recipe has quickly become a staple in my kitchen, and I’m already envisioning countless variations with other exciting Kool-Aid flavors. Beyond its flavor and visual appeal, the fact that it’s a no-bake dessert makes it a dream come true for busy hosts. You can effortlessly prepare it the night before, allowing it to chill and set perfectly, freeing up your precious time on the day of your event. Its remarkably vibrant color ensures it will stand out on any dessert table, making it a festive addition to holidays like Valentine’s Day, Fourth of July, or even a cheerful summer picnic.
Why You’ll Love This Easy No-Bake Pie Recipe
In a world of complicated recipes and lengthy baking times, the No-Bake Kool-Aid Pie stands out as a beacon of culinary simplicity and sheer delight. This dessert is designed for maximum enjoyment with minimal effort, making it a true hero in the kitchen. Here’s why this particular recipe deserves a permanent spot in your dessert repertoire:
- Effortless Preparation: Forget about preheating ovens, precise temperature controls, or complex baking techniques. This pie comes together with just a few ingredients and simple mixing steps, making it perfect for novice bakers and seasoned pros alike.
- No Oven Required: When the mercury rises, the last thing anyone wants is to turn on the oven. This no-bake wonder allows you to whip up a fantastic dessert without heating your kitchen, keeping you cool and comfortable.
- Incredibly Versatile: With an entire spectrum of Kool-Aid flavors available, the possibilities are endless! Customize your pie to suit any preference, season, or occasion. From tropical punch to grape, each flavor offers a unique experience.
- Visually Stunning: The powerful pigments in Kool-Aid create a pie that is not only delicious but also incredibly beautiful. The vibrant colors make it a showstopper on any dessert table, perfect for themed parties or holiday celebrations.
- Budget-Friendly: Made with readily available and inexpensive ingredients, this pie is kind to your wallet without compromising on taste or quality. It’s an economical way to satisfy a crowd or treat your family.
- Family-Friendly Fun: This recipe is so straightforward that it’s an excellent project to get kids involved in the kitchen. They’ll love choosing their favorite Kool-Aid flavor and watching the pie transform into a colorful creation.
- Make-Ahead Convenience: The pie requires a minimum of 4 hours to chill, making it an ideal make-ahead dessert. Prepare it the night before, and you’ll have one less thing to worry about on the day of your event.
Essential Ingredients for Your Vibrant Kool-Aid Pie
One of the many charms of this no-bake pie is its minimal ingredient list. You only need a handful of readily available items to create this spectacular dessert. Each component plays a crucial role in delivering the pie’s signature flavor, texture, and vibrant appeal. Here’s what you’ll need to gather:
- One Packet of Unsweetened Kool-Aid Mix: This is the star of the show, providing both the intense fruity flavor and the dazzling color that makes the pie so visually appealing. The beauty is you can choose *any* flavor you desire – cherry, strawberry, grape, lemon-lime, orange, tropical punch – the possibilities are truly endless! Ensure it’s the unsweetened variety, as sweetened condensed milk will provide all the necessary sweetness.
- One Pre-Made Graham Cracker Pie Crust: For ultimate convenience, a store-bought graham cracker crust is perfect. It offers a wonderfully crisp and buttery base that complements the creamy filling beautifully. If you’re feeling adventurous, you can easily make your own graham cracker crust from scratch, or even explore other types of crusts like an Oreo cookie crust or a Nilla wafer crust for different flavor profiles.
- One 8-Ounce Container of Frozen Whipped Topping (Cool Whip): Thawed and ready to use, Cool Whip is essential for achieving the pie’s light, airy, and fluffy texture. It contributes to the creamy consistency without adding excessive richness, making the pie feel incredibly light on the palate. Make sure it’s fully thawed in the refrigerator before mixing to ensure a smooth, lump-free filling.
- One 14-Ounce Can of Sweetened Condensed Milk: This thick, sweet, and creamy milk product serves multiple purposes in the pie. It acts as the primary sweetener, provides a luxurious, rich base, and helps bind all the ingredients together, ensuring the pie sets firmly without the need for baking. Its distinctive sweetness is perfectly balanced by the tang of the Kool-Aid.
With these simple ingredients in hand, you’re ready to embark on a delightful culinary journey to create a dessert that will impress everyone with its ease, beauty, and unforgettable flavor.
Step-by-Step Directions: Crafting Your Perfect Kool-Aid Pie
Creating this stunning No-Bake Kool-Aid Pie is incredibly straightforward. Follow these simple steps to ensure your pie comes out perfectly set, delightfully fluffy, and bursting with flavor. Precision in mixing and patience during chilling are key to achieving the best results.
Step One: Laying the Sweet Foundation
Begin by taking your 14-ounce can of sweetened condensed milk and pouring its entire contents into a spacious mixing bowl. This rich, thick, and sweet milk forms the creamy base of your pie, providing both structure and sweetness to balance the tartness of the Kool-Aid. Ensure you scrape out all the milk from the can to get the full measurement and consistency.
Step Two: Infusing the Vibrant Flavor and Color
Once the sweetened condensed milk is in the bowl, it’s time for the magical transformation. Carefully open your chosen packet of unsweetened Kool-Aid mix and pour all of the powder directly into the bowl with the condensed milk. Now, using a whisk or a spatula, begin to thoroughly mix the two ingredients together. The goal here is to achieve a completely uniform mixture, ensuring that every speck of Kool-Aid powder is fully dissolved and incorporated into the condensed milk. Continue mixing until the entire mixture is one consistent, vibrant color, without any visible patches or streaks of undissolved powder. This might take a few minutes of vigorous stirring, but it’s crucial for both flavor distribution and the pie’s overall appearance.
Image by. Catherine’s Plates via YouTube video.
Step Three: Creating the Light and Fluffy Texture
With your intensely colored Kool-Aid and condensed milk mixture ready, it’s time to introduce the element that gives this pie its signature light and airy texture: the thawed Cool Whip. Add the entire 8-ounce container of thawed Cool Whip to the bowl. Gently fold the Cool Whip into the Kool-Aid and condensed milk mixture. The key here is to fold, not to aggressively stir or whisk, as you want to maintain as much air as possible in the Cool Whip. Continue folding until the mixture is perfectly combined, resulting in a smooth, uniform, and beautifully fluffy filling. This careful incorporation ensures your pie will have that delightful melt-in-your-mouth quality.
Image by. Catherine’s Plates via YouTube video.
Step Four: Assembling and Chilling to Perfection
Now that your creamy, colorful filling is complete, it’s time to assemble your pie. Carefully scoop the entire mixture into your pre-made graham cracker pie crust. Use a spatula to gently spread the filling evenly across the crust, ensuring it reaches all the edges. Be mindful not to overfill the crust; the mixture should sit neatly within the confines of the crust’s rim. Once the filling is smoothly distributed, place the pie into your refrigerator. This is the most crucial step for setting the pie. Allow it to chill for a minimum of 4 hours. For the absolute best results and a perfectly firm set, chilling it overnight is highly recommended. The refrigeration process allows the sweetened condensed milk and Cool Whip to firm up, resulting in a sliceable, delightful pie. Once it’s thoroughly chilled, your yummy Kool-Aid pie is ready to be enjoyed! Slice, serve, and savor the burst of fruity flavor.
Tips for a Perfectly Set and Delicious Kool-Aid Pie
While the No-Bake Kool-Aid Pie is inherently simple, a few expert tips can elevate your creation from good to absolutely fantastic. Paying attention to these small details will ensure a beautifully set, consistently flavorful, and utterly delightful dessert every single time.
- Ensure Cool Whip is Fully Thawed: This is crucial. If your Cool Whip is still partially frozen, it will be difficult to incorporate smoothly, leading to lumps in your filling and an inconsistent texture. Thaw it in the refrigerator overnight or for several hours before you plan to make the pie.
- Mix the Kool-Aid Thoroughly: When combining the Kool-Aid powder with the sweetened condensed milk, don’t rush it. Stir vigorously until there are absolutely no visible powder clumps or streaks. Undissolved powder can lead to pockets of intense, bitter flavor.
- Fold, Don’t Stir, the Cool Whip: When you add the Cool Whip, use a gentle folding motion with a spatula rather than an aggressive stirring or whisking action. This helps retain the air in the whipped topping, which is essential for the pie’s light and fluffy texture. Over-mixing can deflate the Cool Whip, making the pie denser.
- The Importance of Chilling Time: Four hours is the minimum chilling time, but for the firmest, most sliceable pie, chilling it overnight (8 hours or more) is highly recommended. This allows all the ingredients to meld and set properly, preventing a runny pie. Don’t try to rush this step!
- Garnish for Visual Appeal: While the pie is vibrant on its own, a simple garnish can enhance its presentation. A dollop of extra whipped cream, a few fresh berries matching your Kool-Aid flavor (e.g., cherries for cherry pie), or a sprinkle of colorful edible glitter can make it even more enticing.
- Experiment with Crusts: While a graham cracker crust is classic, don’t hesitate to experiment! An Oreo cookie crust pairs wonderfully with darker Kool-Aid flavors like grape or black cherry. A vanilla wafer crust can add a delicate sweetness, while a pretzel crust offers a delightful salty-sweet contrast.
- Storage: Always store your No-Bake Kool-Aid Pie in the refrigerator. It will typically remain fresh and delicious for 3-5 days when covered loosely with plastic wrap or foil.
Flavor Adventures: Exploring Kool-Aid Variations
The true magic of the No-Bake Kool-Aid Pie lies in its incredible adaptability, primarily driven by the vast array of Kool-Aid flavors available. Each packet opens up a new world of taste and color, allowing you to customize your dessert for any mood, season, or celebration. Don’t limit yourself to just one flavor; unleash your creativity and explore the delicious possibilities!
- Classic Cherry: As featured in the original recipe, cherry delivers a beautiful, deep red hue and a sweet, tangy flavor reminiscent of summer. It’s a timeless choice that appeals to almost everyone.
- Strawberry Sensation: For a slightly sweeter and brighter red pie, strawberry Kool-Aid is an excellent choice. It pairs wonderfully with fresh strawberries as a garnish.
- Zesty Lemon-Lime: If you prefer a more tart and refreshing profile, lemon-lime Kool-Aid creates a wonderfully bright green pie with a zesty kick that’s perfect for summer.
- Tropical Punch Paradise: For an exotic twist, tropical punch offers a medley of fruity flavors and a vibrant, multi-hued appearance. It’s perfect for a luau or beach-themed party.
- Grape Escape: Grape Kool-Aid yields a stunning purple pie with a sweet, classic grape flavor that’s a favorite among kids and adults alike.
- Orange Oasis: A bright orange pie made with orange Kool-Aid is perfect for autumn gatherings or Halloween, offering a sunny, citrusy taste.
- Blue Raspberry Brilliance: For a strikingly blue dessert, blue raspberry is a fun and fruity option, especially great for patriotic holidays or themed parties.
Beyond single flavors, consider mixing and matching! A combination of strawberry and lemon-lime could create a “strawberry lemonade” pie, or grape and blue raspberry for a “berry blast.” The key is to experiment and find your favorite flavor combinations. Each variation promises a unique visual and taste experience, ensuring this simple pie never gets boring.
Beyond the Basics: Customizing Your No-Bake Kool-Aid Pie
While the core recipe is a masterpiece of simplicity and flavor, there’s always room to add your personal touch and elevate your No-Bake Kool-Aid Pie to an even more spectacular dessert. Customizing your pie allows you to tailor it perfectly to your taste preferences, dietary needs, or the aesthetic of your special occasion.
Crust Alternatives:
Don’t feel tied to the traditional graham cracker crust, especially if you’re looking to introduce new textures or flavors:
- Oreo Cookie Crust: For chocolate lovers, a crushed Oreo cookie crust provides a rich, dark base that complements fruity flavors beautifully, especially cherry, strawberry, or raspberry Kool-Aid.
- Nilla Wafer Crust: A crust made from crushed vanilla wafers offers a softer, more delicate vanilla flavor that pairs well with almost any Kool-Aid flavor.
- Pretzel Crust: For an intriguing salty-sweet dynamic, consider a crushed pretzel crust. The saltiness provides a fantastic contrast to the sweet, creamy filling, particularly with lemon-lime or strawberry flavors.
- Ginger Snap Crust: For a hint of spice, a crushed ginger snap crust can add a delightful warmth, especially with fruit flavors like peach or cherry (if you can find those Kool-Aid varieties!).
Creative Topping Ideas:
Once your pie is perfectly chilled, the right topping can transform its appearance and add another layer of flavor and texture:
- Fresh Fruit: Garnish with berries that match your Kool-Aid flavor (e.g., fresh raspberries or sliced strawberries for a red pie, blueberries for blue raspberry, citrus slices for lemon-lime).
- Extra Whipped Topping: A generous dollop of whipped cream or Cool Whip on each slice is a classic and always welcome addition.
- Sprinkles or Edible Glitter: Especially fun for birthdays or holiday-themed pies, colorful sprinkles or shimmering edible glitter can add a festive touch.
- Chocolate Shavings or Chips: A sprinkle of white chocolate or dark chocolate shavings can provide a sophisticated contrast to the fruity filling.
- Shredded Coconut: Toasted or plain shredded coconut can add a lovely texture and tropical hint, particularly with pineapple or tropical punch Kool-Aid pies.
- Citrus Zest: A finely grated zest from a lemon or lime can brighten up any fruity pie, enhancing its freshness.
Individual Servings:
For parties or controlled portions, consider making mini versions of this pie:
- Mini Tartlets: Use pre-made mini pie crusts or bake individual cookie crusts in muffin tins for adorable, single-serving desserts.
- Mason Jar Pies: Layer the filling and crust crumbs in small mason jars for a rustic, portable, and charming dessert option.
By experimenting with these variations, you can unlock a world of new possibilities for your No-Bake Kool-Aid Pie, making it a unique creation every time you prepare it.
Serving Suggestions and Storage Tips
Once your vibrant No-Bake Kool-Aid Pie is perfectly set and ready, it’s time to enjoy the fruits of your effortless labor. Knowing how to serve and store it properly will ensure maximum enjoyment and freshness.
Serving Your Delightful Pie:
- Chill is Key: Always serve this pie chilled. The cold temperature enhances its refreshing quality and ensures it maintains its firm, sliceable texture. If it sits out at room temperature for too long, it may soften.
- Perfect for Any Occasion: This pie is incredibly versatile for serving. It’s a fantastic dessert for summer barbecues, potlucks, picnics, family dinners, or a simple after-school treat. Its vibrant colors also make it a festive option for holidays like Valentine’s Day (cherry or strawberry), the Fourth of July (blue raspberry and cherry with a whipped cream layer), or even Christmas (peppermint stick Kool-Aid, if you can find it, or simply green or red themed).
- Garnish for Impact: As mentioned, a simple garnish can elevate the presentation. A dollop of fresh whipped cream, a few matching fresh berries, a sprinkle of edible glitter, or a sprig of mint can add that extra touch of elegance.
- Clean Slices: For neat slices, run your knife under hot water and wipe it clean between each cut. This will help prevent the filling from sticking and create beautiful, clean portions.
Storing Your Leftovers:
Proper storage is essential to maintain the pie’s freshness, texture, and flavor for as long as possible.
- Refrigeration is Mandatory: Due to its dairy components (sweetened condensed milk and Cool Whip), this pie must be stored in the refrigerator at all times. Do not leave it at room temperature for extended periods.
- Cover Properly: To prevent the pie from absorbing refrigerator odors and to keep it fresh, cover it loosely with plastic wrap or aluminum foil. You can either cover the entire pie in its dish or place individual slices in airtight containers.
- Longevity: When stored correctly in the refrigerator, the No-Bake Kool-Aid Pie will typically remain fresh and delicious for 3 to 5 days. After this period, the texture might begin to degrade slightly.
- Freezing (Optional): While primarily a chilled dessert, this pie can be frozen, though the texture of the Cool Whip might change slightly upon thawing. To freeze, wrap the entire pie (or individual slices) tightly in plastic wrap, then in a layer of aluminum foil. It can be frozen for up to 1-2 months. Thaw in the refrigerator overnight before serving.
By following these simple serving and storage guidelines, you can ensure that every slice of your No-Bake Kool-Aid Pie is as delightful as the first.
Conclusion: Your New Favorite No-Bake Delight
The No-Bake Kool-Aid Pie is more than just a recipe; it’s an invitation to effortless culinary creativity and a promise of vibrant, delicious satisfaction. From its incredibly simple preparation to its stunning visual appeal and customizable flavors, this dessert truly embodies everything we love about easy, impactful baking. It’s the perfect solution for busy schedules, warm weather, or simply when you’re craving a sweet, fruity treat without the fuss of turning on an oven.
Whether you’re a seasoned baker looking for a quick win or a complete novice eager to impress, this recipe, inspired by Catherine’s Plates, offers a foolproof path to dessert glory. Imagine the joy of serving a beautifully colored pie that bursts with the nostalgic, sweet-tart taste of your favorite Kool-Aid flavor, all achieved with minimal effort and maximum charm. It’s a guaranteed crowd-pleaser that brings smiles and a pop of color to any table.
So, why wait? Grab your favorite Kool-Aid packet, a can of sweetened condensed milk, a tub of Cool Whip, and a pie crust. In just a few simple steps, you’ll be on your way to creating a dessert that’s not only incredibly tasty but also wonderfully convenient and utterly charming. Try this No-Bake Kool-Aid Pie today, and get ready to discover your new go-to dessert for every occasion!