
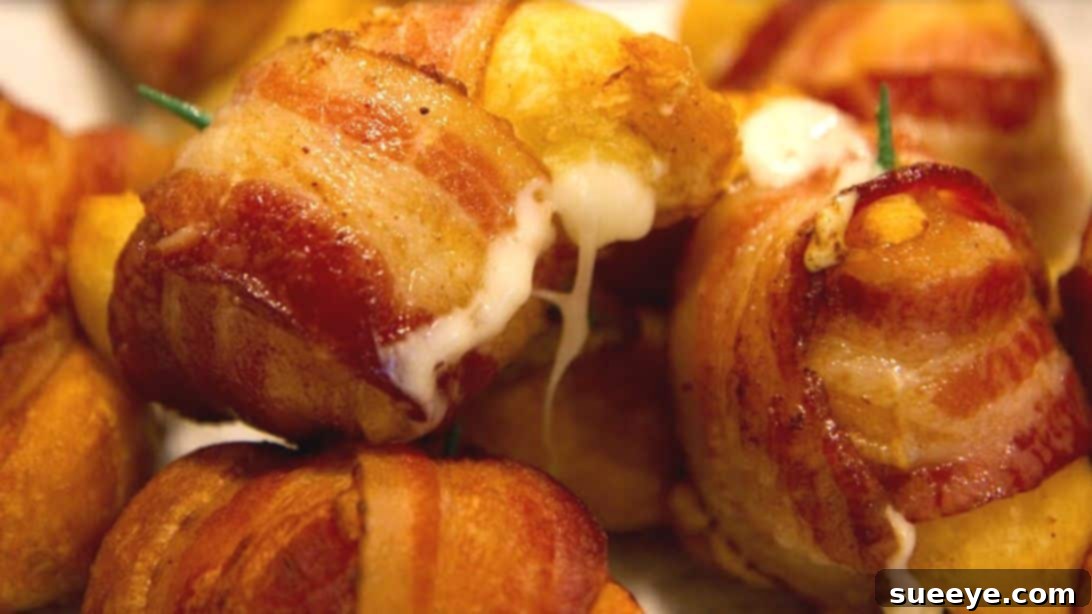
There’s a universally acknowledged truth in the culinary world: few things compare to the magical combination of cheese and bacon. The moment these two legendary ingredients unite in a dish, something truly extraordinary happens. Whether gracing a gourmet burger, topping a sizzling pizza, or infusing a creamy pasta, their combined allure is utterly irresistible. The rich, smoky crispiness of perfectly cooked bacon, harmoniously paired with the salty, melt-in-your-mouth creaminess of mozzarella cheese, creates a symphony of flavors and textures that captivates every palate.
If you’re planning any social gatherings, family events, or simply seeking an unforgettable snack, look no further. These Cheesy Bacon Biscuit Bombs are not just a treat; they’re an experience waiting to happen. Imagine warm, flaky biscuit dough enveloping a core of gooey, melted cheese, all wrapped in a crispy blanket of savory bacon. They’re designed to disappear in a flash, making them the ultimate crowd-pleasing appetizer. This incredibly quick and straightforward recipe, inspired by the culinary genius of StokedOnSmoke on YouTube, promises maximum flavor with minimal effort. Get ready to impress your guests and satisfy your cravings!
Cheesy Bacon Biscuit Bombs: Your New Favorite Easy Appetizer
Welcome to the world of culinary delights where simplicity meets sensational flavor! Our Cheesy Bacon Biscuit Bombs are more than just a recipe; they are a ticket to a delicious adventure that will have everyone asking for more. Perfect for game day, an impromptu get-together, or simply indulging in a comfort food craving, these savory bombs are incredibly easy to make and impossible to resist. Let’s dive into creating these delightful bites.
Ingredients for Irresistible Cheesy Bacon Biscuit Bombs
Crafting these delectable biscuit bombs requires only a handful of readily available ingredients. The key to their success lies in choosing quality components that truly shine. Here’s what you’ll need:
- Grands Flaky Layers Biscuits: One can (typically 8 biscuits). These refrigerated biscuits are perfect for their convenience and their ability to puff up beautifully, creating a soft, tender casing for our cheesy filling. Look for the “flaky layers” variety for that extra delightful texture.
- Block of Mozzarella Cheese: Approximately 8 ounces. While pre-shredded cheese is convenient, a block of whole milk mozzarella will melt more smoothly and offer a creamier, richer texture. Its mild flavor perfectly complements the bacon without overpowering it.
- Thick-Cut Bacon Strips: One package (12-16 ounces). The thickness of the bacon is crucial here. Thick-cut bacon holds its shape better, provides a satisfying chew, and renders perfectly crisp around the biscuit bombs, delivering that irresistible smoky flavor.
- Canola Oil (or other neutral frying oil): Enough to fill your skillet to a depth of about 1-2 inches. Canola oil is ideal due to its high smoke point and neutral flavor, which won’t interfere with the delicious taste of our bombs. Vegetable oil or peanut oil can also be used.
- Wooden Toothpicks: Approximately 8-16, depending on how many biscuits you’re making and if you need more than one per bomb. These are essential for securing the bacon during the cooking process.
Ingredient Selection Tips:
- Biscuits: While Grands Flaky Layers are recommended, you can experiment with other brands of refrigerated biscuit dough. Ensure they are the larger “dinner roll” size rather than the smaller breakfast biscuits.
- Cheese: Feel free to experiment with other melting cheeses like cheddar, Monterey Jack, or a blend. For a spicy kick, pepper jack cheese works wonderfully. Just ensure it’s a good melting cheese.
- Bacon: If you prefer a less fatty option, turkey bacon can be used, but it won’t achieve the same crispiness or render the same rich flavor as traditional pork bacon.
Essential Kitchen Equipment:
Preparing these Cheesy Bacon Biscuit Bombs doesn’t require any fancy gadgets. You’ll likely have most of these items already in your kitchen:
- Large cutting board
- Sharp knife
- Large skillet or deep pot (for frying)
- Tongs or slotted spoon
- Plate lined with paper towels (for draining excess oil)
- Measuring cups/spoons (optional, for other ingredients if adding variations)
Step-by-Step Guide to Crafting Your Biscuit Bombs:
Follow these simple steps to create your batch of delicious Cheesy Bacon Biscuit Bombs. Precision and a little patience will ensure perfect results every time.
Step 1: Prepare the Biscuits and Cheese
Begin by carefully slicing each refrigerated biscuit in half horizontally, effectively creating two thinner biscuit rounds from one. Next, take your block of mozzarella cheese and slice it into approximately 1-inch cubes. Aim for pieces that are small enough to be fully enclosed by a biscuit half, but large enough to provide a satisfying cheesy core.
Step 2: Assemble the Cheese-Filled Biscuits
Take one of your halved biscuit rounds. Place a single mozzarella cheese cube in the center of the biscuit. Carefully wrap the biscuit dough around the cheese cube, pinching the edges firmly to seal the cheese completely inside. It’s crucial that the cheese is fully encased to prevent it from leaking out during frying. Roll the sealed biscuit into a neat ball in your palm. Repeat this process for all remaining biscuit halves and cheese cubes.
Step 3: Wrap with Bacon and Secure
Once your cheese-filled biscuit balls are ready, it’s time for the star ingredient: bacon! Take one strip of thick-cut bacon and carefully wrap it completely around a biscuit bomb. Ensure the bacon is snug against the biscuit, covering as much surface area as possible. To prevent the bacon from unraveling during cooking, secure the ends with one or two wooden toothpicks. Make sure the toothpicks go through both ends of the bacon strip and into the biscuit dough firmly. Continue this process until all your biscuit bombs are wrapped in bacon and secured.
Step 4: Fry to Golden Perfection
Pour canola oil into a large skillet or deep pot, ensuring it reaches a depth of 1 to 2 inches. Place the skillet over medium-high heat and allow the oil to heat up. To test if the oil is ready, drop a tiny piece of biscuit dough into it; if it sizzles vigorously, the oil is hot enough (around 350-375°F or 175-190°C). Carefully place a few Cheesy Bacon Biscuit Bombs into the hot oil. Avoid overcrowding the pan, as this can lower the oil temperature and lead to greasy bombs. Fry them for a couple of minutes on each side, turning occasionally, until the bacon is beautifully crispy and golden brown, and the biscuit dough is cooked through. You’ll notice the cheese inside beginning to melt, indicated by a slight puffiness. Once cooked, use tongs or a slotted spoon to transfer the bombs to a plate lined with paper towels to drain any excess oil.
Step 5: Cool, Remove Toothpicks, and Serve
Allow the Cheesy Bacon Biscuit Bombs to cool for a few minutes on the paper towel-lined plate. They will be very hot directly out of the oil, and a brief cooling period helps the cheese set slightly. Before serving, and this is a critical step, carefully remove all the wooden toothpicks from each biscuit bomb. You definitely don’t want anyone to accidentally bite into a toothpick! Once the toothpicks are removed, these savory, cheesy, bacon-wrapped delights are ready to be served and enjoyed immediately. Watch them disappear!
Expert Tips for Perfect Cheesy Bacon Biscuit Bombs:
- Don’t Overcrowd the Pan: Frying in batches ensures consistent heat and crispy results. Overcrowding drops the oil temperature, leading to soggy, oily bombs.
- Secure Bacon Tightly: Use enough toothpicks to ensure the bacon stays wrapped. Loose bacon can unwrap and cook unevenly.
- Even Cheese Cubes: Uniformly sized cheese cubes will help them melt evenly within the biscuit.
- Oil Temperature: Maintain a consistent oil temperature. If the oil is too cool, the bombs will absorb too much oil; if too hot, the outside will burn before the inside cooks. A deep-fry thermometer can be helpful.
- Drain Thoroughly: Don’t skip the paper towel step. It’s crucial for removing excess oil, ensuring a pleasant texture.
- Remove Toothpicks: Emphasizing this again—it’s a safety essential! Make it the last step before serving.
Delicious Serving Suggestions:
These Cheesy Bacon Biscuit Bombs are fantastic on their own, but they also pair wonderfully with a variety of dips and accompaniments:
- Ranch Dressing: A classic creamy dip that perfectly complements the savory bacon and cheese.
- Honey Mustard: The sweet and tangy notes cut through the richness beautifully.
- Marinara Sauce: For a pizza-like twist, serve with a warm marinara dipping sauce.
- Sriracha Mayo: If you love a bit of heat, mix Sriracha with mayonnaise for a spicy kick.
- Warm Cheese Sauce: For the ultimate cheese lover, an extra warm cheese sauce can elevate the experience.
- Garnish: A sprinkle of fresh chives or chopped green onions adds a touch of freshness and color.
Creative Variations and Customizations:
While the classic recipe is divine, feel free to get creative and personalize your Cheesy Bacon Biscuit Bombs with these exciting variations:
- Spice It Up: Before wrapping the cheese, sprinkle a tiny pinch of red pepper flakes or finely diced jalapeños inside for a fiery kick.
- Herb Infusion: Add a dash of garlic powder, onion powder, or dried herbs like oregano or thyme to the biscuit dough before wrapping for an aromatic twist.
- Different Cheeses: Experiment with sharp cheddar, smoky provolone, spicy pepper jack, or a blend of your favorite melting cheeses.
- Additions:
- Chopped Green Onions: Mix finely chopped green onions into the biscuit dough or sprinkle over the finished bombs.
- Cooked Sausage: A tiny piece of cooked breakfast sausage or chorizo can be added alongside the cheese cube for an extra protein boost and flavor.
- Cream Cheese: Mix a small dollop of cream cheese with the mozzarella for an even creamier, tangier center.
- Baking Option (Healthier Alternative): If you prefer not to deep-fry, these can be baked!
- Preheat your oven to 375°F (190°C).
- Place the assembled biscuit bombs on a baking sheet lined with parchment paper, seam-side down.
- Bake for 15-20 minutes, or until the bacon is crispy and the biscuits are golden brown and cooked through. Keep an eye on them to prevent burning. Baking might result in slightly less crispy bacon than frying, but it’s a delicious alternative.
- Air Fryer Method: For a quick and healthier crunch, preheat your air fryer to 350°F (175°C). Place the bombs in a single layer, ensuring they don’t touch. Air fry for 10-15 minutes, flipping halfway through, until bacon is crisp and biscuits are golden. Cooking times may vary by air fryer model.
Storage and Reheating:
While these Cheesy Bacon Biscuit Bombs are best enjoyed fresh, you might have some leftovers (though it’s unlikely!).
- Storage: Store any cooled leftovers in an airtight container in the refrigerator for up to 2-3 days.
- Reheating: For best results, reheat them in an oven or air fryer to regain some crispiness.
- Oven: Preheat oven to 350°F (175°C). Place bombs on a baking sheet and heat for 10-15 minutes, or until warmed through and bacon is crisp again.
- Air Fryer: Reheat at 325°F (160°C) for 5-8 minutes, checking periodically.
- Microwave: Not recommended, as it will make the bacon soggy and the biscuit soft.
Frequently Asked Questions (FAQ):
Q: Can I prepare Cheesy Bacon Biscuit Bombs ahead of time?
A: Yes, you can! Assemble the biscuit bombs completely (cheese, biscuit, bacon, toothpick) and store them uncooked in an airtight container in the refrigerator for up to 24 hours. When ready to cook, proceed with frying or baking as instructed. Allow them to come to room temperature for about 15-20 minutes before cooking for more even results.
Q: What kind of bacon works best for this recipe?
A: Thick-cut bacon is highly recommended. Its thickness provides a better structure for wrapping and yields a more satisfyingly crispy texture when cooked. Thin bacon might cook too quickly or become brittle. Regular-cut bacon will also work, but keep an eye on cooking times as it may cook faster.
Q: Can I use different types of cheese?
A: Absolutely! While mozzarella is fantastic for its mild flavor and gooey melt, feel free to experiment. Cheddar, Monterey Jack, provolone, or even a spicy pepper jack can be wonderful alternatives or additions. Just ensure it’s a cheese that melts well.
Q: How do I prevent the cheese from leaking out during frying?
A: The key is to ensure the biscuit dough is completely sealed around the cheese cube in Step 2. Pinch the edges firmly, and if necessary, roll it lightly between your palms to create a smooth, sealed ball. If any cheese starts to escape, it will create a delicious crispy crust, but sealing it well ensures a gooey center.
Q: Is there a vegetarian option for these biscuit bombs?
A: To make a vegetarian version, simply omit the bacon. You could wrap the cheese-filled biscuits with a strip of vegetarian “bacon” substitute, or simply fry/bake the cheese-filled biscuits on their own. For extra flavor, sprinkle them with a mix of garlic powder, paprika, and nutritional yeast for a savory, cheesy kick.
The Ultimate Party Appetizer Awaits!
These Cheesy Bacon Biscuit Bombs are a testament to the fact that extraordinary flavor can come from simple ingredients and straightforward techniques. They embody the perfect blend of savory bacon, gooey cheese, and fluffy biscuit, creating an appetizer that is truly unforgettable. Whether you’re hosting a grand celebration or simply treating yourself to a delightful snack, this recipe guarantees satisfaction and smiles all around. So, gather your ingredients, follow these easy steps, and get ready to experience the irresistible magic of Cheesy Bacon Biscuit Bombs. Your taste buds, and your guests, will thank you!