
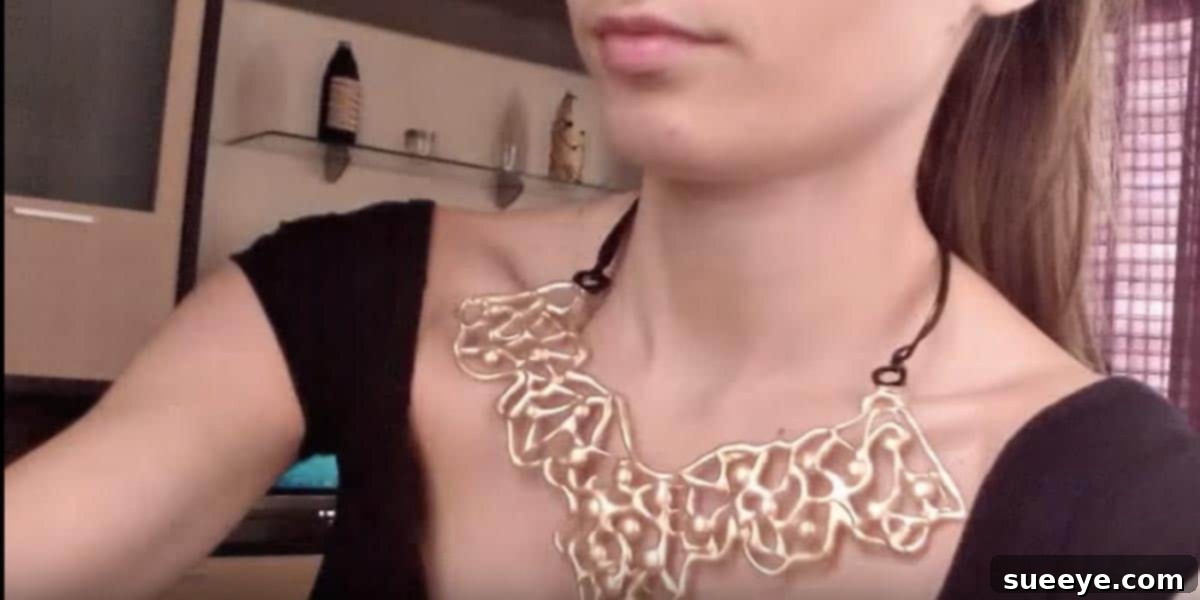
Unleash Your Creativity: Craft Stunning Hot Glue Jewelry! The Ultimate DIY Guide
Prepare to amaze your friends and express your unique style with jewelry that’s as affordable as it is distinctive. Imagine wearing a dazzling necklace or a pair of intricate earrings that sparks endless compliments, only for you to reveal they’re made from… hot glue! This isn’t just a craft project; it’s a revolutionary way to design personalized accessories that truly stand out. Forget expensive materials and complex techniques; the humble hot glue gun is about to become your new best friend in the world of DIY jewelry.
We’ve all seen beautiful, chunky, and artistic necklaces that fetch high prices in boutiques. What if we told you that you could replicate that high-fashion look, or even create something entirely unique to your vision, using materials you likely already have at home? This comprehensive guide will walk you through the magical process of transforming ordinary hot glue into extraordinary pieces of wearable art. Get ready to embark on a creative journey that promises stunning results and a lot of fun!
Why Choose Hot Glue for Your Jewelry Projects?
At first glance, hot glue might seem like an unconventional choice for jewelry making. However, its numerous advantages make it a surprisingly versatile and incredibly rewarding medium for crafters of all skill levels. Here’s why you should embrace hot glue for your next jewelry venture:
- Unbeatable Affordability: Hot glue sticks are incredibly inexpensive, making this one of the most budget-friendly ways to create custom jewelry. You can experiment freely without worrying about costly mistakes, allowing for boundless creativity without financial strain.
- Remarkable Accessibility: Hot glue guns and sticks are readily available at virtually any craft store, hardware store, or even major supermarkets. This means you don’t need to hunt for specialized tools or hard-to-find materials; everything you need is just a quick trip away.
- Limitless Versatility: Hot glue can be molded, layered, cut, painted, and embellished with ease. It has the surprising ability to mimic the look of metal, glass, or even ceramic, offering an endless canvas for your imagination to run wild.
- Beginner-Friendly: Unlike complex processes like soldering metals or intricate beadwork that require specific skills, working with hot glue is intuitive and forgiving. It dries quickly, allowing for fast iteration, immediate gratification, and easy corrections, making it perfect for novice crafters.
- Surprising Durability: Once cured, hot glue is surprisingly robust and flexible, making it suitable for wearable art that can withstand daily use. With proper care, your unique creations will maintain their integrity and beauty for a long time.
- Unique Aesthetic: Hot glue jewelry possesses a distinct, often organic texture and appearance that immediately sets it apart from mass-produced items. Each piece you create will be truly one-of-a-kind, reflecting your personal touch and artistic flair.
Ignite Your Imagination: Design Possibilities with Hot Glue
The true beauty of hot glue jewelry lies in its incredible design flexibility. Whether you prefer bold, eye-catching statement pieces or delicate, intricate accents, hot glue can effortlessly accommodate your artistic vision. Consider these exciting avenues for inspiration as you plan your next masterpiece:
- Abstract & Organic Shapes: Allow the glue to flow freely and spontaneously to create mesmerizing, fluid designs that are inherently artistic. Think swirling patterns, irregular blobs, or interconnected loops that evoke a sense of natural beauty.
- Geometric Patterns: With a steady hand and a reliable non-stick surface, you can craft crisp angles, perfect squares, triangles, or even intricate tessellations for a more structured, modern look.
- Textural Delights: Experiment with different layering techniques to build depth and create fascinating textures. You can achieve raised patterns, stippled surfaces for a matte finish, or smooth, glassy finishes that catch the light beautifully.
- Color Extravaganza: While clear glue is a popular choice for painting, you can also find pre-colored or glitter glue sticks for instant effects. More importantly, hot glue provides an excellent canvas for various paints. Use vibrant acrylics for bold hues, metallic spray paints for a sophisticated sheen, or even nail polish for quick, glossy finishes – just like the stunning silver and gold examples that inspired this craft!
- Embellishment Wonderland: The fun doesn’t stop at glue and paint! Enhance your creations by embedding tiny beads, shimmering rhinestones, glitter, sequins, small charms, or even delicate pieces of fabric directly into the hot glue while it’s still warm, or securely glue them on after it has fully cured.
- Mimicking Expensive Materials: With the right technique and a keen eye for paint application, hot glue can convincingly imitate a wide array of materials. Achieve a faux-metal look with metallic spray paint, a ceramic-like finish with matte acrylics, or even a glass-like appearance with a clear sealant.
My own experience with hot glue necklaces has been nothing short of delightful. I vividly remember crafting a chunky piece and painting it with silver nail polish – it instantly became my go-to accessory. The compliments flowed effortlessly, and the expressions of genuine disbelief when I revealed its humble origins were absolutely priceless! It truly adds a unique flair and a conversation-starting element to any outfit, making it a powerful tool for self-expression.
Step-by-Step Tutorial: Crafting Your Own Hot Glue Necklace
Ready to transform your vision into a tangible piece of art? This detailed guide will walk you through creating a stunning hot glue necklace, from gathering your essential materials to showcasing your finished masterpiece. Remember, practice makes perfect, and joyful experimentation is the key to discovering your unique signature style!
Materials You’ll Need:
- Hot Glue Gun: A standard hot glue gun will suffice. A high-temperature gun typically provides stronger bonds, while a low-temperature gun offers more control for intricate details and delicate layers.
- Hot Glue Sticks: Clear glue sticks are the most versatile choice as they can be painted over easily. However, feel free to experiment with colored or glitter varieties for different base effects.
- Non-Stick Surface: Essential for easy removal of your finished piece. Options include parchment paper, a silicone baking mat, or a smooth glass cutting board.
- Jewelry Findings: These are the hardware components that turn your glue creation into wearable jewelry:
- Necklace Chain: Choose your desired length, thickness, and material (e.g., silver-plated, gold-tone, antique bronze).
- Jump Rings: Various sizes, typically 4mm to 8mm, are useful for connecting components.
- Clasp: A toggle clasp or a lobster clasp with an extender chain will secure your necklace.
- Jewelry Pliers: Essential tools for jewelry assembly: Round-nose pliers for bending loops, and flat-nose pliers for opening and closing jump rings and securely attaching clasps.
- Paints & Brushes: For adding color and personality:
- Acrylic Paints: A range of colors, including metallic options, for vibrant and opaque finishes.
- Small Paintbrushes: For precise detailing and smooth application.
- Optional: Metallic Spray Paint: Gold, silver, or bronze spray paints can provide a wonderfully even, professional-looking metallic finish.
- Optional: Clear Nail Polish or Clear Acrylic Sealant: For added shine, protection, and durability, preventing paint chipping.
- Optional Embellishments: Elevate your design with glitter, stick-on rhinestones, small beads, sequins, fabric scraps, stencils, or permanent markers for fine lines.
- Craft Knife or Scissors: For neatly trimming any excess glue and refining the edges of your design.
- Protective Mat/Surface: To safeguard your workspace from accidental paint drips or glue spills.
The Creative Process: Designing and Gluing
- Prepare Your Workspace: Begin by laying down your protective mat to shield your table. Place your chosen non-stick surface directly on top of the mat. Ensure you are working in a well-ventilated area, especially if you plan to use spray paint or sealant later.
- Sketch Your Design (Optional but Recommended): For more structured or intricate pieces, consider lightly sketching your desired shape or pattern onto your parchment paper, or on a separate piece of paper placed *under* a transparent non-stick surface. This sketch will serve as a helpful guide. For abstract or free-form pieces, simply allow your creativity to flow freehand.
- Start Gluing Your Base: Allow your hot glue gun to heat up sufficiently. Begin by carefully applying the hot glue to create the foundational shape or pendant component of your necklace. Work slowly and with a steady hand. For a “chunky” or dimensional look, apply the glue in layers, allowing each layer to cool and firm up slightly before adding the next. Experiment with swirls, zigzags, concentric circles, or any organic shape that inspires you. Don’t be afraid to overlap and build significant dimension.
- Add Details and Texture: While the glue is still warm and pliable, this is the perfect time to gently press in small beads, rhinestones, or glitter directly into the surface. You can also use the tip of the glue gun to create textured lines, dots, or small patterns. If your design involves multiple distinct components, create them individually and then securely glue them together once they have fully cooled.
- Let it Cool Completely: This step is absolutely crucial for the integrity of your piece. Allow your hot glue creation to cool and harden thoroughly. Attempting to remove it too soon can lead to distortion, breakage, or damage. Depending on the thickness of your glue layers, this usually takes just a few minutes.
- Carefully Remove Your Piece: Once the hot glue is completely cooled and rigid, gently peel your design off the non-stick surface. It should release easily without sticking or tearing.
- Trim Excess Glue: Use a sharp craft knife or a pair of precise scissors to carefully trim any stray glue strands, rough edges, or unwanted bits, refining the overall shape and neatness of your piece.
Adding Color and Embellishments
This is where your hot glue creation truly comes to life and transforms into a unique piece of art!
- Painting:
- Acrylics: Apply acrylic paints with your chosen brushes. For a smooth and even finish, multiple thin coats are often far better than one thick coat. Allow each coat to dry thoroughly before applying the next to prevent smudging or cracking.
- Metallic Spray Paint: For a wonderfully uniform, professional-looking metallic finish (such as gold, silver, or bronze), spray paint works exceptionally well. Apply in light, even coats in a well-ventilated area or outdoors. Remember to protect your surrounding workspace from overspray.
- Nail Polish: For smaller pieces, quick accents, or a glossy pop of color, nail polish is a fantastic and readily available option. It dries quickly and provides a vibrant, shiny finish.
- Sealant (Optional but Recommended): Once your paint is completely dry, you can apply a clear acrylic sealant (available in matte or glossy finishes, depending on your preference). This layer will protect the paint from chipping, add durability, and enhance the overall finish.
- Attaching Additional Embellishments: Use a small dab of hot glue or a stronger adhesive like E6000 to securely attach any rhinestones, beads, or other decorative elements that you did not embed in the initial gluing phase.
Assembling Your Necklace
Now, let’s transform your beautiful hot glue pendant into a wearable and cherished necklace!
- Create Attachment Points: You will need a secure way to connect your hot glue pendant to the chain. The simplest method is to intentionally create small loops, holes, or integrated attachment points within the hot glue design itself while you are making it. If you forgot this step, you can carefully pierce a small hole with a hot needle (exercise extreme caution and use pliers to hold the needle!) or securely glue a small jump ring directly onto the back of your pendant using a strong adhesive like E6000.
- Attach Jump Rings to Pendant: Using your jewelry pliers, carefully open a jump ring by twisting the ends horizontally (never pull them directly apart, as this weakens the metal). Thread the open jump ring through your attachment point on the hot glue piece. If you’re creating a multi-strand necklace or a piece with several components, attach a jump ring to each hot glue element.
- Connect to the Chain: Thread the open jump ring (now attached to your hot glue component) onto your chosen necklace chain. Once in place, securely close the jump ring with your pliers, ensuring there are no gaps.
- Add the Clasp: If your chosen chain does not come with an integrated clasp, use jump rings to attach your preferred clasp (e.g., a lobster clasp or toggle clasp) to one end of the chain. To the other end of the chain, attach an extender chain or another jump ring, creating a complete and functional necklace closure.
- Admire Your Work: Your unique, handmade hot glue necklace is now complete! Put it on, admire your craftsmanship, and prepare to enjoy the inevitable compliments and questions about its origin.
Tips for Success and Longevity
To ensure your hot glue jewelry projects are always successful, look professional, and that your beautiful creations last for years to come, keep these invaluable tips in mind:
- Practice Makes Perfect: Don’t be discouraged if your first few attempts aren’t exactly what you envisioned. Hot glue is a unique medium, and mastering it takes a little practice. Experiment with different glue gun speeds, pressure, and layering techniques.
- Work in Layers: For stronger, more defined, and aesthetically pleasing pieces, always build up your design in layers. Allow each layer to cool and set slightly before adding the next, especially for chunky designs.
- Temperature Matters: A low-temperature glue gun provides more control, which is ideal for intricate details or working with delicate embellishments. A high-temperature gun, however, often provides a stronger, more robust bond for larger, chunkier pieces that need more structural integrity.
- Ventilation for Sprays: Always ensure you are working in a well-ventilated area or, ideally, outdoors when using spray paints or clear sealants. This protects your health and ensures an even finish.
- Thorough Drying: Patience is a virtue here! Ensure all paint and sealant layers are completely and thoroughly dry before handling, assembling, or wearing your jewelry. Rushing this can lead to smudges or damage.
- Proper Storage: Store your precious hot glue jewelry away from direct sunlight and extreme heat sources. Hot glue can soften or warp under high temperatures, compromising the shape and durability of your creation.
- Gentle Cleaning: If your pieces need cleaning, simply wipe them gently with a soft, damp cloth. Avoid using harsh chemicals, abrasive cleaners, or vigorous scrubbing, as these can damage the paint or glue.
- Explore Different Glue Sticks: Don’t limit yourself to clear glue! Try glitter glue sticks for an instant sparkle, or opaque colored glue sticks for different base effects that can peek through your paint layers.
Beyond Necklaces: Other Hot Glue Jewelry Creations
While we’ve focused extensively on crafting stunning necklaces, the creative possibilities with hot glue extend far beyond! Once you master the basic techniques and gain confidence, consider expanding your repertoire to include an array of other exciting accessories:
- Dazzling Earrings: Create small, lightweight, and intricate shapes for earrings. Attach them securely to earring posts or hooks using small jump rings for a personalized touch.
- Stylish Bracelets: Design individual hot glue charms to link together for a unique charm bracelet, or create a larger, flexible cuff bracelet that molds to your wrist.
- Unique Rings: Craft small, intricate designs and securely glue them onto adjustable ring blanks for custom statement rings.
- Decorative Brooches: Fashion larger, more elaborate pieces and attach a sturdy brooch pin to the back, transforming them into eye-catching embellishments for clothing or bags.
Start Crafting Your Signature Hot Glue Jewelry Today!
The world of DIY hot glue jewelry is an open invitation to unleash your inner artist and embrace boundless creativity. It’s an accessible, affordable, and incredibly satisfying way to design and create personalized accessories that truly reflect your unique style and personality. From abstract art pieces that make a statement to elegant, faux-metal designs that defy expectations, your imagination is truly the only limit.
So, grab your hot glue gun, gather your chosen materials, and prepare to be utterly amazed by what you can create with a little imagination and a steady hand. Don’t be shy about sharing your incredible hot glue jewelry with the world – the surprised faces and heartfelt compliments will be your ultimate reward. Happy crafting, and remember to share this fantastic, budget-friendly idea with your friends, family, and fellow crafters on Facebook and all your other favorite social media platforms!