
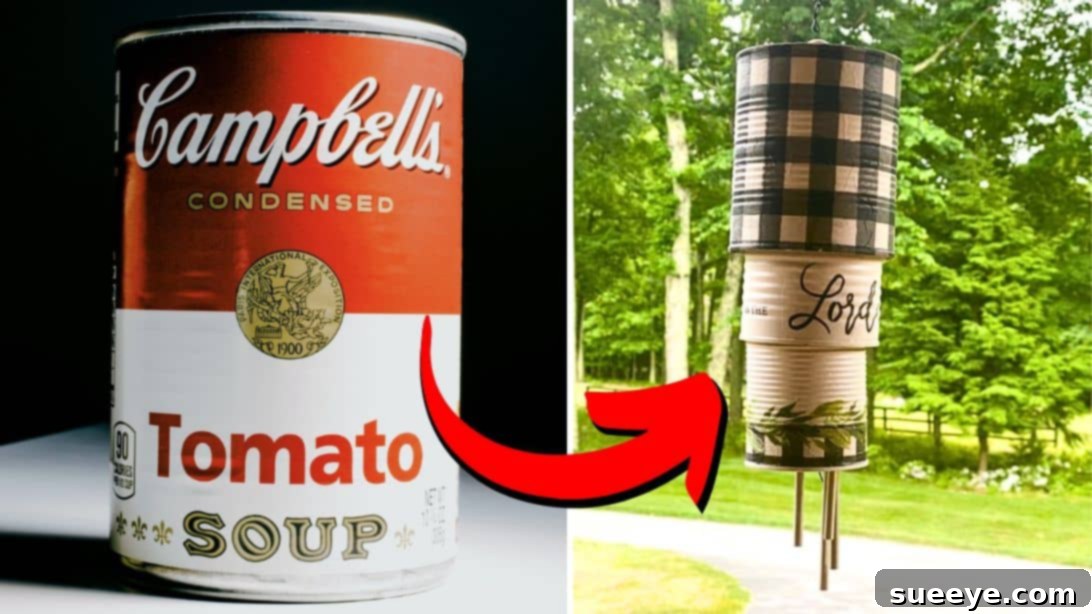
Transform Old Soup Cans into Beautiful DIY Wind Chimes: A Step-by-Step Guide
Are your kitchen cabinets overflowing with empty soup cans, just waiting for a second life? Instead of sending them to the recycling bin, imagine turning them into a charming, melodic wind chime that adds a unique touch to your garden, patio, or balcony! This engaging DIY project is not only incredibly satisfying but also an excellent way to embrace sustainability by upcycling everyday items. With a few simple materials, many of which you might already have or can easily find at your local dollar store, you can create a personalized piece of outdoor decor that’s both beautiful and environmentally friendly.
In this comprehensive tutorial, inspired by the creative ideas of Chalk It Up Fancy on YouTube, we’ll guide you through each step of transforming ordinary tin cans into an extraordinary wind chime. From preparation to decoration and final assembly, you’ll learn all the tips and tricks to ensure your project is a success. Get ready to add some harmonious jingles and visual appeal to your outdoor space with a handmade creation that truly reflects your style and promotes eco-conscious living.
Why Craft a DIY Soup Can Wind Chime?
Beyond the simple joy of crafting, creating your own wind chime from upcycled soup cans offers a multitude of benefits:
- Eco-Friendly Upcycling: This project is a fantastic example of giving new life to discarded items, significantly reducing household waste and contributing positively to a greener planet.
- Budget-Friendly Decor: Achieve stunning and unique outdoor decor without the hefty price tag. You’re utilizing materials that are often considered trash, turning them into treasure.
- Personalized Touch: Unleash your creativity! Customize your wind chime with unique paints, patterns, decoupage napkins, and embellishments to perfectly match your home’s aesthetic or express your individuality.
- Relaxing Ambiance: Enjoy the soothing, gentle sounds that a well-crafted wind chime brings to your garden, patio, or even a quiet corner indoors. The soft melodies can create a peaceful and serene atmosphere.
- Rewarding Craft Project: Experience immense satisfaction from making something beautiful and functional with your own hands. It’s a tangible representation of your effort and ingenuity.
- Unique Gift Idea: A handmade wind chime makes a thoughtful, personal, and heartfelt gift for friends and family members who appreciate unique, artisan creations and sustainable practices.
Materials You’ll Need for Your Upcycled Wind Chime:
Gathering your supplies is the exciting initial step in any DIY adventure. For this charming and melodic soup can wind chime, you’ll need the following:
- 3 Soup Cans: To create an aesthetically pleasing and sonically varied wind chime, select cans of distinct sizes—for example, one small, one medium, and one large. This variation will provide visual interest and allow for different tones when they chime. Ensure they are thoroughly cleaned, with all labels removed, and free from any sharp edges.
- White Paint: A high-quality acrylic or spray paint specifically designed for adherence to metal surfaces will serve as an excellent primer and base coat. This ensures your decorative layers adhere beautifully and vibrantly, providing a clean canvas.
- Foam Paint Applicator or Brush: These tools are ideal for applying smooth, even coats of paint and Mod Podge, minimizing unsightly brush strokes and ensuring a professional finish.
- Decoupage Napkins: Choose decorative paper napkins with patterns, themes, or colors that truly resonate with your personal style. These will be the primary aesthetic element, transforming plain cans into works of art.
- Mod Podge (Matte or Gloss Finish): This versatile, all-in-one glue, sealer, and finish is indispensable for adhering your decoupage napkins securely and providing a durable, protective topcoat.
- Cling Wrap: A surprisingly effective yet simple tool, cling wrap is used for smoothing out decoupage napkins, helping to prevent wrinkles and bubbles without tearing the delicate paper.
- Floral Wire (or Craft Wire): A sturdy yet pliable wire, typically around 20-24 gauge, is perfect for connecting the cans in a durable chain and creating the hanging mechanism. Ensure it’s strong enough to safely support the collective weight of the cans.
- Drill with Small Drill Bit: You will need a power drill equipped with a metal-appropriate drill bit (e.g., 1/8 inch or 3mm) to create precise holes in the bottom of each can for assembly. Always prioritize safety by wearing appropriate eye protection and securing the can firmly.
- Small Chain and Hook: A short length of decorative chain (e.g., 4-6 inches) and an S-hook or ceiling hook will be essential for securely hanging your finished wind chime in your chosen location.
- Wooden Beads: These beads serve a dual purpose: they act as crucial stoppers for the wire connections between cans, preventing them from sliding, and they add a charming, rustic decorative element to the overall design. Choose beads with a hole large enough for your chosen wire.
- Wind Chime Tubes/Elements (Optional but Recommended): While the cans themselves will produce a pleasant sound, incorporating a few small metal tubes, washers, old keys, or small bells to the bottom can significantly enhance the melodic quality and richness of your DIY wind chime.
Step-by-Step Guide to Crafting Your Soup Can Wind Chime:
Follow these detailed instructions carefully to bring your upcycled wind chime to life. Remember, patience and attention to detail will yield the most beautiful and durable results!
Phase 1: Preparation and Decoration of the Cans
Step 1: Meticulously Clean, Prime, and Prepare Your Cans
The foundation of any successful craft project begins with meticulous preparation. Start by thoroughly removing all labels from each of your soup cans. This task is often made easier by soaking the cans in warm, soapy water for 5-10 minutes, which helps dissolve the adhesive. Once the labels are completely gone, scrub the cans clean to eliminate any residual food particles or stubborn glue, then rinse them thoroughly under running water. It is absolutely crucial that the cans are completely dry before you move on to the next step; any moisture can hinder proper adhesion of paint and Mod Podge, leading to a less durable finish. You can allow them to air dry overnight, or expedite the process with a clean towel and a hairdryer on a cool setting.
Next, it’s time to apply your base coat. Using your foam paint applicator or a soft-bristled brush, apply a thin, even layer of white paint all over the exterior surface of each can. White paint serves as an excellent primer, creating a uniform, opaque canvas for your chosen decoupage napkins and ensuring that their colors will appear vibrant and true. Allow the first coat to dry completely for at least 30-60 minutes, or according to the specific paint manufacturer’s instructions. Applying two thin, even coats is always preferable to one thick coat, as this prevents drips, minimizes brush strokes, and creates a smoother, more professional-looking base. Let the final coat of paint dry for a minimum of 1 hour, or until it is no longer tacky to the touch. Adequate drying time is paramount for achieving a durable and high-quality finish.
Step 2: Drill Holes and Thoughtfully Apply the Decoupage Base
Once your painted cans are thoroughly dry and cured, you’ll need to create the essential holes for assembling your wind chime. Carefully position your drill and create a small, precise hole directly in the center of the bottom of each can. Select a drill bit that is slightly larger than the floral wire you plan to use for threading. Always prioritize safety by wearing appropriate safety glasses when operating a power drill, and ensure the can is firmly secured in a vise or held steadily to prevent it from spinning during drilling. After drilling, inspect the holes and gently file down any sharp burrs or rough edges to prevent them from snagging your wire or causing injury. These holes are fundamental for connecting the cans into a cohesive vertical chain.
Now, let’s infuse your cans with decorative flair. Apply a thin, even layer of Mod Podge over the entire painted surface of one can. Work swiftly but meticulously to cover the area. Take one of your chosen decoupage napkins, carefully unfold it (removing any plain backing layers if present), and gently wrap it around the body of the can. Start from one edge and smoothly roll the napkin around, taking your time to precisely position the pattern. Once the napkin is in place, lay a piece of standard kitchen cling wrap over the entire surface of the applied napkin. Using your fingers or a soft cloth over the cling wrap, gently but firmly smoothen out any bubbles, wrinkles, or creases. The cling wrap acts as a protective barrier, allowing you to manipulate and press down on the delicate napkin without tearing it or getting Mod Podge on your hands. Ensure the napkin is completely adhered and perfectly smooth on the can’s surface. Repeat this meticulous process for all three cans, striving for consistency in application.
Phase 2: Assembling Your Melodic Wind Chime
Step 3: Seal the Decoupage and Prepare for Inter-Can Assembly
After the initial Mod Podge and napkin application has had sufficient time to set and become touch-dry (typically 15-20 minutes, depending on your environment), it’s time to apply a generous and even top coat of Mod Podge over the entire decoupage surface of each can. This crucial layer serves multiple purposes: it seals the delicate napkin, protects it from environmental elements such as moisture and UV rays, and provides a durable, attractive finish that can be matte or glossy depending on your Mod Podge choice. While this protective layer is still wet, carefully tear or trim off any excess napkin that extends beyond the top or bottom edges of the can. You can achieve clean edges using your fingers or a small, sharp craft knife. Gently smoothen these edges to ensure a seamless and polished appearance. Allow all three cans to dry completely; this might take several hours, or even overnight, particularly in humid conditions. A fully cured Mod Podge layer will be hard, clear, and offer maximum protection, essential for an outdoor decoration.
Step 4: Connecting the Cans and Thoughtfully Adding Decorative Spacers
Now, let’s bring your wind chime to life by skillfully connecting the cans into a harmonious cascade. Begin with the largest can, as this will form the top of your chime. Cut a suitable length of floral wire, approximately 12-15 inches long, for each connection between cans. Thread one end of the floral wire through the drilled hole in the bottom of the largest can, pushing it from the inside out. On the inside of the can, thread a wooden bead onto the wire, pushing it firmly against the bottom of the can to act as a robust stopper. Then, create a small, secure loop with the wire and twist it tightly to prevent the bead from slipping, ensuring the wire is firmly anchored within the can. Allow a sufficient length of wire to extend from the bottom of the can for the next connection, leaving enough slack for movement and sound.
Next, take the medium-sized can. Thread the free, extended end of the wire from the largest can through the hole in the bottom of the medium can. Before securing it, consider adding another wooden bead *between* the largest and medium cans along the wire. This strategically placed bead serves as a spacer, ensuring the cans hang separately, preventing them from clanking together excessively, and allowing them to move freely to produce their unique sounds. Once you have achieved the desired spacing, thread another wooden bead onto the wire inside the medium can and secure it with a tightly twisted loop, just as you did with the first can. Repeat this precise process for the smallest can, connecting it to the medium can. The wooden beads not only provide crucial structural support and stability to your connections but also add a charming, rustic aesthetic to your overall design. Double-check that each connection is secure and that the cans hang evenly and with appropriate spacing for optimal sound production.
Step 5: Attaching the Hanging Mechanism and Enhancing with Chime Elements
With your cans now beautifully assembled in a vertical cascade, it’s time to add the final touches: the hanging mechanism and any additional chime elements. Take a small piece of decorative chain, approximately 4-6 inches long, and attach one end to the very top of the largest can. You can achieve this by drilling two small holes near the rim on opposite sides of the can, then threading a sturdy piece of floral wire through these holes to create a secure loop for the chain. Alternatively, if your largest can has a particularly sturdy and accessible rim, you might be able to loop the chain directly through a securely punched or drilled hole. Once the chain is firmly attached, insert an S-hook, a sturdy closed loop, or another suitable hanging device at the other end of the chain. This will allow you to effortlessly and securely hang your finished wind chime from a hook on your porch, a sturdy tree branch, a patio pergola, or any desired outdoor location.
Finally, enhance the melodic quality and visual appeal of your wind chime. While the decorated cans themselves will produce a pleasant, soft clinking sound, you can augment this by attaching additional chime elements for a richer auditory experience. Using shorter pieces of floral wire, attach the detached bottom sections of commercial wind chime tubes, small metal washers, antique keys, small bells, or even unique pieces of hardware to the very bottom of the smallest can. You can thread these through additional small holes meticulously drilled into the rim or bottom edge of the smallest can, or even attach them directly to the existing wire loop if it extends far enough. These extra elements will catch the gentlest breeze, creating a more complex, enchanting symphony of sounds that will delight your senses and add character to your outdoor space.
Tips for Success and Creative Customization:
To make your DIY wind chime truly spectacular and long-lasting, consider these additional tips:
- Experiment with Can Types: Don’t limit your creativity to just soup cans! Other metal cans, such as coffee cans, vegetable cans, or even smaller tuna cans, can also be upcycled. Different sizes and shapes will offer varied visual interest and produce unique tonal qualities when they chime.
- Creative Decoration Techniques: Beyond decoupage, explore other artistic avenues. Consider painting intricate freehand designs, using stencils for precise patterns, applying metallic spray paints for a gleaming finish, or even gluing fabric scraps, small pebbles, glass gems, or mosaic pieces onto your cans for varied textures and appearances.
- Sound Exploration: The specific type of floral or craft wire you use, the precise spacing between each can, and the additional elements you attach at the bottom will all profoundly influence the sound profile of your wind chime. Experiment with different lengths of connecting wire and various metal objects or found materials at the very bottom to discover your perfect, personalized melody.
- Weatherproofing for Durability: For significantly increased durability, especially if your exquisite wind chime will be continuously exposed to the unpredictable outdoor elements, it is highly recommended to apply a clear, outdoor-grade sealant over your finished Mod Podge layers. This will provide an extra layer of protection against moisture, humidity, and harmful UV damage, preserving its beauty for seasons to come.
- Prioritize Safety: Always handle tin cans with extreme care to avoid sharp edges that might remain after opening. If necessary, use a metal file or sandpaper to gently smooth down any rough spots before beginning your project. Always wear protective gloves and safety glasses when operating a power drill or working with sharp tools.
- Theme Your Chime: Elevate your creation by designing a themed wind chime. Consider festive colors and motifs for holidays (e.g., vibrant reds and greens for Christmas, pastels for Easter), seasonal inspirations (e.g., earthy tones for autumn, bright blues for summer), or specific garden aesthetics (e.g., rustic charm, whimsical fantasy, sleek modernism).
- Consider an Inner Element: For an even more unique sound, you could suspend a small wooden dowel or a bell on a thread inside the largest can, allowing it to gently strike the sides of the can in the wind.
The Joy of Upcycling and Creating Sustainable Beauty
Crafting a DIY wind chime from old soup cans is far more than just a simple afternoon project; it’s an act of profound creative recycling that beautifully transforms what was once considered waste into a wonder. Each chime you meticulously create is a testament to your ingenuity, your passion for sustainability, and a unique expression of your personal style. It provides a wonderful opportunity to slow down, engage your hands and mind in a rewarding activity, and produce something not only beautiful but also functional, bringing a sense of calm and visual delight to your home and garden. Imagine the gentle clinking sounds on a breezy afternoon, knowing that you personally brought this soothing melody into existence using materials that were once destined for the landfill.
This project is perfectly suited for crafters of all skill levels, offering a deeply rewarding experience that yields a stunning, handcrafted piece of outdoor art. Whether you’re eagerly looking to add a whimsical, personalized touch to your garden, seeking to create a thoughtful and unique handmade gift, or simply exploring the fascinating world of upcycling and sustainable decor, this comprehensive soup can wind chime tutorial provides all the guidance, inspiration, and detailed instructions you need. So, gather your empty cans, unleash your boundless creativity, and get ready to enjoy the harmonious beauty and profound satisfaction of your very own homemade, upcycled wind chime!
*All image credit for this tutorial belongs to Chalk It Up Fancy via YouTube. We sincerely encourage you to follow and subscribe to her channel for more inspiring DIY ideas and creative projects!