
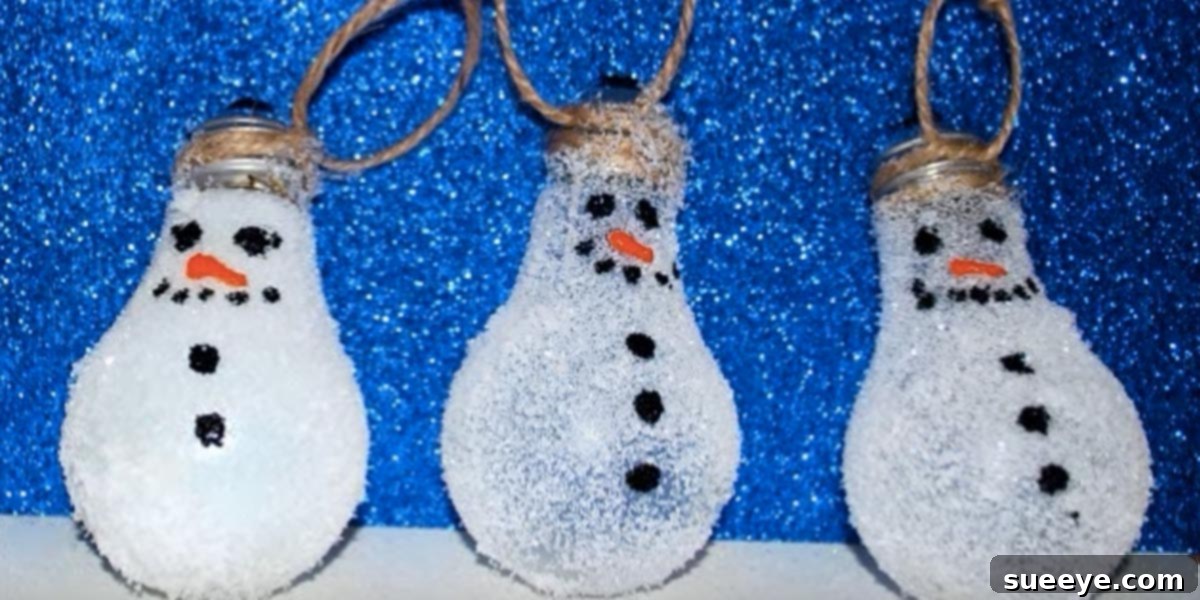
DIY Snowman Light Bulb Christmas Ornaments: Transform Old Bulbs into Festive Treasures
The holiday season is a magical time, brimming with warmth, joy, and the spirit of creativity. For many, it’s an annual tradition to adorn their homes and Christmas trees with decorations that reflect personal style and sentiment. While store-bought ornaments certainly have their place, there’s an unparalleled charm and satisfaction that comes from decorating with handmade creations. Among the myriad of DIY holiday projects, one stands out for its clever use of repurposed materials and its undeniable cuteness: transforming ordinary, burned-out light bulbs into delightful snowman ornaments. This isn’t just a craft; it’s a small yet meaningful act of sustainability, turning potential waste into cherished holiday adornments. If you’re searching for a project that combines artistic expression, eco-consciousness, and festive fun, then start gathering those old bulbs – your next favorite holiday tradition is about to begin!
Why Choose DIY Light Bulb Snowman Ornaments? Embracing Creativity and Sustainability
Opting for DIY projects, especially those that involve upcycling, brings a wealth of benefits during the bustling holiday season. Burned-out light bulbs, often destined for the landfill, are given a beautiful new purpose as twinkling, festive decorations. Here’s why crafting these particular ornaments is a brilliant idea:
- Eco-Friendly and Sustainable: By repurposing old incandescent bulbs, or even larger floodlight bulbs, you are actively participating in reducing waste and promoting recycling. This craft serves as an excellent opportunity to educate both children and adults about the importance of sustainability and resourcefulness, making your Christmas celebrations a little greener.
- Budget-Friendly Decor: Many of the essential materials for this craft are either items you already have on hand (the bulbs themselves, old fabric scraps, string) or inexpensive craft supplies readily available at any discount store. This makes it an incredibly cost-effective project, perfect for families looking to add charm to their decor without breaking the bank, or for crafting in larger quantities for gifts and parties.
- Uniquely Personalized Touch: Each handmade ornament possesses its own distinct character. No two snowmen will ever be exactly alike, reflecting the unique creativity and individual touch of its maker. This personal customization adds significant sentimental value, making these ornaments far more special than mass-produced alternatives.
- Fun for All Ages: The steps involved are straightforward enough for children to participate in (with appropriate adult supervision for tasks like painting and gluing) and engaging enough to captivate adults. It’s a wonderful activity for family bonding sessions, a festive addition to holiday parties, or a relaxing solo project on a quiet winter afternoon.
- Thoughtful and Heartfelt Gifts: Handmade ornaments are exceptionally touching gifts. Whether you’re participating in an ornament exchange party, looking for a thoughtful token for neighbors and friends, or adding a personal touch to a gift basket, a personalized snowman ornament conveys warmth and care, showcasing the time and effort you invested.
Gather Your Crafting Arsenal: What You’ll Need
Before embarking on your creative journey, it’s wise to gather all your materials. The beauty of this craft lies in its simplicity and reliance on easily accessible items. Here’s a comprehensive list to ensure you’re fully prepared:
- Burned-Out Light Bulbs: Start collecting! Standard incandescent bulbs are ideal, but don’t hesitate to experiment with larger floodlight bulbs for more substantial snowmen or smaller, unique bulbs for miniature versions. Ensure all bulbs are clean, dry, and free of any dust or greasy residue for optimal adhesion.
- White Craft Glue: A good quality PVA glue (like school glue) works perfectly for adhering glitter. For attaching heavier embellishments such as fabric or twigs, a stronger craft glue or even a hot glue gun (with adult supervision) will be more effective.
- Fine Glitter: White, iridescent, or silver glitter will give your snowman that magical, fresh-snow sparkle. Feel free to explore other colors if you plan to create different characters or themes.
- Acrylic Paints:
- Black: Essential for painting the snowman’s eyes, mouth, and traditional coal buttons.
- Orange: For crafting the classic carrot nose.
- Optional Colors: Red, green, blue, or other festive hues can be used for scarves, hats, rosy cheeks, or to add unique patterns and designs. Fabric paint pens can also be incredibly useful for achieving fine details.
- Small Paint Brushes: You’ll need a fine-tipped brush for intricate details like facial features and a slightly wider, flat brush for applying glue evenly across the bulb surface.
- Twine, Ribbon, or Ornament Hooks: To create a hanging loop for your ornament. Approximately 6-8 inches of material per ornament is usually sufficient.
- Scissors: For cutting twine, ribbon, or any fabric scraps you might use for embellishments.
- Optional Embellishments for Added Flair:
- Small Twigs: Collect thin, dry twigs from your yard to create realistic snowman arms.
- Fabric Scraps: Pieces of felt, fleece, flannel, or even old socks can be cut into miniature scarves, hats, or ear muffs.
- Small Buttons: Tiny buttons can be glued onto the snowman’s body for a textured, three-dimensional look.
- Mini Pom-poms or Bells: Ideal for decorating hats or adding a playful touch.
- Clear Acrylic Sealant Spray: (Optional but highly recommended) A quick spray helps seal the glitter in place, prevents shedding, and protects your painted details, ensuring your ornaments last for many seasons.
- Newspaper or Drop Cloth: Absolutely essential for protecting your work surface from glue, glitter, and paint spills.
- Small Dish or Tray: For pouring glitter into, making it easier to thoroughly coat the light bulbs.
Step-by-Step Guide: Crafting Your Adorable Snowman Ornaments
Follow these straightforward steps to transform your discarded light bulbs into charming snowman ornaments. Remember, the beauty of DIY lies in creative freedom, so don’t hesitate to personalize each stage!
Step 1: Prepare Your Workstation and Light Bulbs
Begin by laying down newspaper or a protective drop cloth over your crafting area to catch any glitter or paint. Ensure that all your burned-out light bulbs are perfectly clean and dry. A quick wipe with rubbing alcohol can remove any lingering grease or dust, helping your paint and glue adhere more effectively. Always handle the bulbs with care, as they are fragile and can break if dropped or squeezed too hard.
Step 2: Apply the Glitter Base for a Snowy Effect
This crucial step creates the beautiful, sparkling body of your snowman, giving it that fresh, snowy appearance.
- Apply a generous, even layer of white craft glue over the entire glass portion of the light bulb. You can use a wider paint brush for this, or carefully squeeze the glue directly onto the bulb and spread it evenly with your fingers. Ensure the glue covers the bulb uniformly for a consistent glitter application.
- Immediately after applying the glue, hold the bulb over your small dish or tray of glitter. Douse the bulb generously with glitter, rotating it to ensure every part of the glue-covered surface is thoroughly coated. You can also gently roll the wet, glue-covered bulb in a bed of glitter.
- Once completely covered, gently tap off any excess glitter back into the dish. Carefully place the glittered bulb on your protected surface to dry completely. This step requires patience; it may take several hours, or even overnight, depending on the thickness of your glue layer. Resist the urge to touch or move the bulb until it is fully dry to prevent smudges and bare spots.
Step 3: Paint the Snowman’s Face and Buttons
Once your glittered bulbs are absolutely dry and firmly set, it’s time to bring your snowmen to life by giving them unique personalities.
- Using a fine-tipped brush and black acrylic paint, carefully paint two round dots for the eyes. You can keep them simple, or add tiny white highlights for a whimsical twinkle.
- Below the eyes, create the mouth. This can be a series of small black dots for a classic look, or a curved line to suggest a cheerful smile or a surprised expression.
- With orange paint, craft a small, triangular or carrot-shaped nose directly in the center of the face, positioning it appropriately between the eyes and mouth.
- For the snowman’s body, paint two or three black dots down the front to represent coal buttons. Alternatively, you can save this step and glue on small actual buttons later for a more dimensional and tactile finish.
- Allow all the painted details to dry completely before proceeding. Acrylic paints typically dry quickly, but ensuring they are fully cured prevents smudging in subsequent steps.
Step 4: Attach the Hanging Loop
Now that your snowman has a sparkly body and a charming face, you need a way to display your beautiful creation on the Christmas tree.
- Cut a piece of twine, ribbon, or string, approximately 6-8 inches in length.
- Form a loop with the cut material and tie the ends together securely with a knot.
- Apply a strong craft glue or use a hot glue gun (exercising caution and with adult supervision) to the very top metal screw base of the light bulb.
- Press the knotted end of your twine or ribbon loop firmly into the glue. Hold it in place for a few moments until the glue begins to set, ensuring it is securely attached.
- Place the ornament aside and allow the glue to dry completely. This is crucial to prevent your ornament from falling off the tree.
Step 5: Add Optional Embellishments and Finishing Touches
This is where your creativity can truly soar! Adding extra details will make each snowman truly unique and characterful.
- Arms: Carefully snap small twigs into appropriate lengths for arms. Use strong craft glue or a hot glue gun to attach them to the sides of the bulb, creating outstretched or playful poses.
- Hats and Scarves: Cut small strips of felt, fleece, or other fabric scraps to fashion miniature scarves. Wrap these around the ‘neck’ of your snowman (where the glass meets the metal base) and secure with a dab of glue. You can also create tiny hats from fabric, felt, bottle caps, or even small pom-poms, gluing them securely to the very top of the bulb.
- Other Details: Consider adding tiny pom-poms for ear muffs, mini bells for a whimsical touch, or a touch of red paint on the cheeks for a rosy glow. You could also paint the very bottom of the bulb a subtle blue or grey to simulate a shadow or base.
- Sealant (Optional but Highly Recommended): Once all glue and paint are completely dry and all embellishments are firmly attached, you can spray your finished ornaments with a clear acrylic sealant. This not only prevents glitter from shedding but also protects the painted details, making your ornaments more durable and ensuring they last for many festive seasons.
Beyond the Basic Snowman: Creative Variations and Ideas
While the classic snowman ornament is undeniably charming, the fundamental beauty of this craft lies in its incredible versatility. Don’t feel limited to just snowmen; these glittered light bulb blanks are essentially miniature canvases, just waiting for your imagination to bring them to life! Here are some inspiring ideas to spark your creativity and expand your collection:
- Different Characters: Instead of a snowman, why not paint Santa Claus, a cheerful reindeer, a cute penguin, a mischievous elf, or even a grumpy Grinch? The bulb’s shape is surprisingly adaptable to a wide array of holiday figures.
- Glitter Variations: Experiment with a spectrum of glitter colors. Blue or silver glitter can create an ethereal, icy, or frosty look. Red or green glitter can transform your bulbs into vibrant, festive baubles that don’t necessarily need a specific character.
- Painted Designs: Skip the character altogether and opt for intricate patterns directly onto the glittered bulb. Think delicate snowflakes, playful polka dots, bold stripes, elegant swirls, or abstract festive patterns. Use metallic paints for an extra touch of shimmer and luxury.
- Themed Ornaments: If your Christmas tree follows a specific theme, adapt your light bulb ornaments to match. For a rustic, farmhouse-style tree, use burlap for scarves and natural twine for hanging. For a glamorous or vintage-inspired tree, choose metallic gold or silver paints and add small adhesive jewels or pearls.
- Miniature Scenes: With very fine brushes and a steady hand, you could even attempt to paint tiny winter scenes, cozy cabins, or serene landscapes on the bulbs, creating truly unique and artistic pieces.
- Explore Different Bulb Sizes: Don’t limit yourself to standard bulbs. Larger floodlight bulbs offer a more expansive canvas for detailed artwork or more expressive snowman faces. Conversely, smaller specialty bulbs can be crafted into miniature ornaments, perfect for grouping together or for smaller decorative trees.
- Personalized Touches: Make each ornament even more special by writing the year on the bottom with a permanent marker. If you’re creating them as gifts, add the recipient’s name or a small festive message for an extra personal touch.
Caring for Your Handmade Ornaments for Lasting Joy
To ensure your beautiful, handmade light bulb ornaments remain a cherished part of your holiday decor for many seasons to come, a little thoughtful care goes a long way. When packing away your decorations after the holidays, store these delicate ornaments carefully. Individual compartments within an ornament storage box are ideal. If such a box isn’t available, wrap each ornament gently in tissue paper or soft fabric to prevent them from bumping into each other, which could lead to chipping or scratching. Store them in a cool, dry place, away from direct sunlight, as prolonged exposure can cause colors to fade over time. With proper care, these recycled treasures will not only endure but will become a beloved and anticipated element of your family’s annual holiday traditions.
Embrace the Spirit of Giving and Creating This Holiday Season
Making DIY light bulb snowman ornaments is much more than just a simple craft; it’s a heartfelt opportunity to embody the true holiday spirit of creativity, sustainability, and generosity. It’s about taking something old and giving it a vibrant new life, transforming a potential piece of trash into a source of enduring joy and beauty. This holiday season, gather your loved ones, round up those burned-out bulbs, and embark on a crafting adventure that promises to do more than just decorate your tree. It will create lasting memories, foster creativity, and highlight the beauty of repurposing. Your personalized, eco-friendly snowman ornaments will undoubtedly be a cherished highlight of your holiday decor for years to come, sparking warm conversations and joyful smiles every time they catch the festive light.