
Transform Broken Clay Pots into Enchanting DIY Fairy Gardens
The sight of a beloved clay pot, shattered into countless pieces, can be truly disheartening for any gardener. We’ve all been there, and the immediate thought is often to discard the fragments as mere waste. However, what if those seemingly useless shards held the secret to unlocking a world of miniature magic? Instead of throwing them away, imagine harnessing their unique shapes and textures to craft breathtaking, whimsical landscapes right in your own backyard. This comprehensive guide will reveal how those very pieces of broken terracotta can become the foundation for a stunning, unique, and profoundly personal DIY fairy garden, infusing your outdoor space with unparalleled charm and imagination.
Repurposing broken clay pots transcends simple recycling; it’s an invitation to unleash your inner artist and craft a bespoke piece of garden art. These precious miniature gardens do more than just add visual appeal; they narrate a story, create a captivating focal point, and offer an ingeniously sustainable solution to common garden waste. Forget about complex or costly landscaping projects; creating a broken clay pot fairy garden is an unexpectedly simple, immensely rewarding, and wonderfully inexpensive way to infuse your home and garden with character, taste, and a touch of pure enchantment.
Why Embrace the Art of Upcycling Broken Terracotta?
Before we delve into the hands-on creation, let’s explore the compelling and multifaceted reasons why giving new life to your broken terracotta pots is an endeavor that truly enriches both your garden and your spirit:
- Champion Sustainable Gardening: In an era where environmental consciousness is paramount, upcycling broken pots stands out as a highly eco-friendly practice. It significantly diverts materials from overflowing landfills, giving them a beautiful, purposeful second life. This not only reduces waste but also promotes a more thoughtful and sustainable approach to gardening and home decor.
- Cost-Effective Creativity Unleashed: Why invest in mass-produced garden decorations when you possess versatile, free, and readily available materials? Utilizing broken pots, along with items you likely already have around the house or can easily gather from nature, makes this hobby incredibly budget-friendly. It’s a testament to the idea that some of the most beautiful things don’t cost a fortune.
- Cultivate Uniquely Charming Aesthetics: Every broken pot tells its own story through its unique fracture patterns and textures. This ensures that no two fairy gardens you create will ever be exactly alike. The rustic appeal and warm, earthy tones of terracotta shards provide an authentic, organic backdrop for your miniature world, crafting a look that feels both ancient and refreshingly new.
- A Therapeutic and Profoundly Rewarding Hobby: Engaging in creative projects such as designing and building a fairy garden is a wonderful way to unwind, de-stress, and foster a deeper connection with nature. The meticulous process of planning, arranging, and planting offers a deeply satisfying experience, culminating in a powerful sense of accomplishment and genuine joy.
- Inspire Boundless Imagination: Fairy gardens are, by their very nature, magical. They serve as catalysts for imaginative play and storytelling, captivating both children and adults. By transforming a simple collection of plants and objects into a vibrant, miniature realm, you create a space where fantasy thrives and dreams take root.
Understanding the Essence of a Fairy Garden
At its core, a fairy garden is a miniature landscape featuring small plants, tiny structures, and charming figurines, all thoughtfully arranged to create a whimsical, often fantastical scene. These scenes are frequently inspired by folklore, mythical tales, or simply an idealized vision of a miniature world. When ingeniously constructed within a broken clay pot, the shattered pieces themselves become integral design elements, cleverly serving as natural terraces, winding pathways, and dramatic backdrops. This ingenious use of fragments adds a unique, multi-level dimension to the design, with the rough, broken edges artfully mimicking natural rock formations, crumbling ancient ruins, or rugged cliff faces.
These diminutive landscapes can be as minimalist or as elaborate as your imagination desires. Typically, they comprise a harmonious blend of the following elements:
- Miniature Plant Life: Opt for small succulents, various types of moss, creeping thyme, tiny ferns, or other slow-growing, compact plant varieties that thrive in confined spaces and complement each other’s needs.
- Fairy Figurines and Charming Accessories: Adorn your garden with tiny chairs, tables, miniature houses, elegant bridges, rustic fences, or small animal figures that breathe life and personality into the scene.
- Natural Found Elements: Incorporate pebbles, small stones, delicate twigs, fallen acorns, miniature pinecones, soft moss, and decorative shells, all collected from the wild or your garden to enhance the authentic, earthy feel.
- Essential Soil and Drainage: The foundational layer for healthy plant growth, ensuring proper water management and preventing root rot.
Gathering Your Materials for a Magical Creation
One of the most appealing aspects of this project is its accessibility. Most of the required items can be sourced directly from your home, garden, or local nursery. Here’s a comprehensive list of what you’ll need to embark on your broken clay pot fairy garden adventure:
- Broken Clay Pots (Your Primary Building Blocks): These are the stars of your project. Collect terracotta pots that have cracked, chipped, or completely shattered. A variety of sizes and shapes of shards will offer greater versatility and design options. If you don’t have broken pots, you can carefully break an old, unused one. Always remember to wear safety goggles and heavy-duty gloves when breaking pots.
- High-Quality Potting Soil: Choose a well-draining potting mix that is specifically suited for your chosen miniature plants. Many miniature plants, especially succulents, prefer a gritty, fast-draining soil.
- A Selection of Small Plants: Visit your local garden nursery for miniature plant varieties. Succulents (like Sedum or Echeveria), creeping thyme, Irish moss, small ferns, or even tiny herbs (such as oregano or thyme) work wonderfully. Crucially, consider their individual light, water, and soil requirements to ensure they can coexist and thrive together in your miniature ecosystem.
- Drainage Material: A layer of small pebbles, gravel, or even small broken ceramic pieces placed at the bottom of your main pot is essential. This ensures proper drainage, preventing waterlogging and protecting your plants’ roots from rot.
- Diverse Decorative Elements & Accessories:
- Natural Wonders: Collect smooth pebbles, intriguing small stones, delicate twigs, shiny acorns, miniature pinecones, soft moss, various shells, and small pieces of bark to enhance the rustic, authentic feel.
- Miniature Figurines: Introduce charming characters such as fairies, gnomes, tiny animals, whimsical mushrooms, colorful birds, or any other fantastical creatures that will inhabit your miniature world.
- Small Architectural Structures: Add miniature houses, cozy benches, tiny tables, elegant bridges, rustic fences, or charming stepping stones to create pathways and focal points.
- Other Unique Embellishments: Consider incorporating glass beads, small colorful marbles, polished river stones, or even tiny flags to add sparkle and personalized touches.
- Essential Tools for Precision and Protection:
- Gardening Gloves: Absolutely essential for protecting your hands from the sharp edges of broken terracotta shards.
- Small Trowel or Spoon: Ideal for carefully moving and shaping soil in tight spaces without disturbing delicate arrangements.
- Watering Can with a Fine Spout: Allows for gentle and precise watering, preventing soil displacement and protecting miniature plants.
- Small Brush or Old Toothbrush: Useful for cleaning away any excess soil from plants, figurines, and hard-to-reach crevices, ensuring your garden remains pristine.
Crafting Your Cascading Broken Pot Fairy Garden: A Step-by-Step Guide
The process of creating a beautiful tiered or cascading fairy garden from broken clay pots is a truly delightful and engaging experience. Follow these detailed steps to meticulously bring your miniature world to vibrant life:
Step 1: Meticulous Preparation and Prioritizing Safety
Before commencing, ensure your workspace is clean, organized, and that all your materials are readily accessible. Most importantly, always wear sturdy gardening gloves to shield your hands from the potentially sharp edges of the broken terracotta. If you need to further break a pot to achieve specific shard shapes, do so with extreme caution. Wrap the pot in a thick cloth or newspaper, gently tap it with a hammer, and always wear eye protection. Aim to create pieces that can serve as natural-looking steps, charming pathways, or dramatic backdrops.
Step 2: Establishing a Stable and Healthy Foundation
Select your largest, most intact clay pot to serve as the main base container for your fairy garden. Begin by placing a generous layer of drainage material (such as pebbles, gravel, or small broken ceramic pieces) at the very bottom. This crucial layer prevents waterlogging, ensuring proper water flow away from the plant roots. Next, fill approximately one-quarter to one-third of the pot with your chosen potting soil.
Step 3: Ingeniously Constructing the Cascading Levels and Terraces
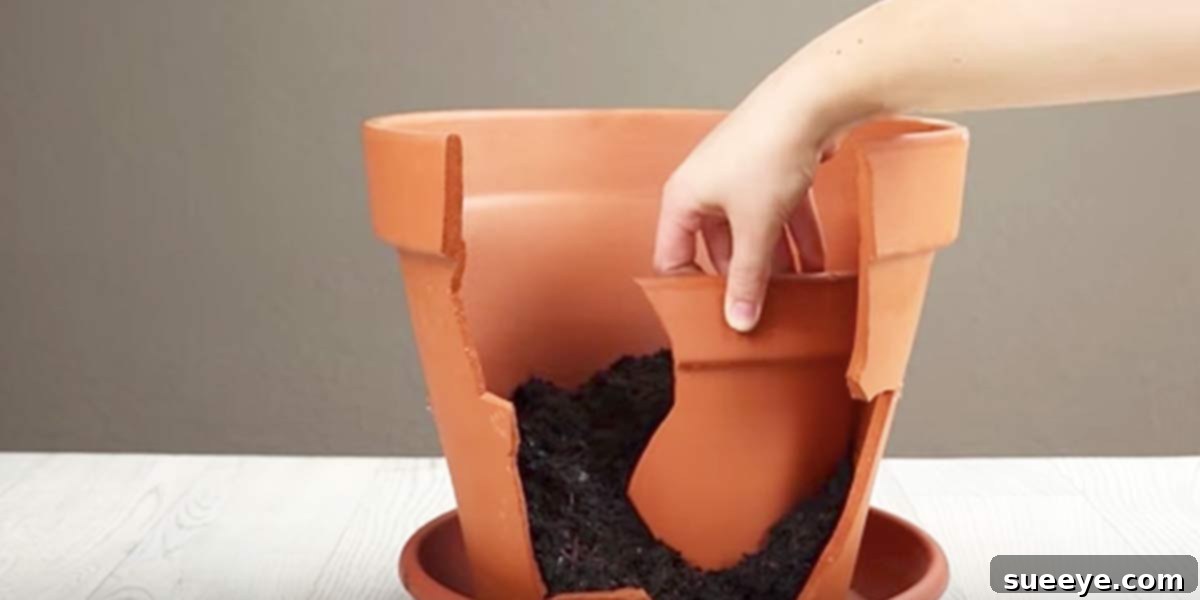
This is where the transformative magic of the broken shards truly unfolds. Carefully select a large, curved shard and embed it vertically into the soil at an angle, creating a natural-looking divider. This piece will form the initial “wall” or “terrace” of your multi-level design. Add more soil behind this shard to provide robust support and establish the base for your next elevated level.
Continue this iterative process, progressively using smaller shards to artfully create additional tiers, gentle steps, or winding pathways. The goal is to evoke the impression of a cascading landscape, featuring distinct levels and secluded pockets perfect for planting. Experiment thoughtfully with the angles, orientations, and precise placements of your shards until you achieve a visually appealing, stable, and harmonious structure. Envision creating a charming miniature staircase, a gently sloping hill, or a series of elevated platforms that flow seamlessly together.
Step 4: Thoughtful Soil Addition and Meticulous Planting
Once your intricate structure of shards is firmly established, carefully fill each tier, pocket, and crevice with potting soil. Gently but firmly press down the soil to eliminate any troublesome air pockets, but avoid compacting it excessively, as this can hinder root growth. Now, it’s time to introduce your miniature plants. Begin with the largest plants, strategically placing them in areas where they have ample room to grow and flourish. Fill in smaller gaps and open spaces with lush moss, vibrant sedum, or delicate creeping plants. Thoughtfully consider the varying heights, textures, and colors of your chosen plants to cultivate a varied, visually engaging, and interesting miniature landscape. Crucially, remember to leave designated spaces for your captivating decorative elements.
Step 5: Artfully Decorating Your Miniature World
This is undeniably the most enjoyable and imaginative phase of the entire project! Begin by carefully positioning your miniature house, castle, or focal point. Placing it at the highest point of your design can create a dramatic and commanding effect, or you might choose to nestle it cozily into a secluded nook. Arrange tiny stepping stones, miniature benches, or elegant bridges along your pathways, guiding the eye through your design. Introduce your fairies, gnomes, or miniature animals, assigning them distinct and charming placements within the scene. Integrate natural elements like smooth small rocks, delicate twigs, fallen acorns, and intricate shells to enhance the rustic, magical, and organic feel of your garden. For an extra touch of wonder, a small piece of mirror can brilliantly simulate a shimmering pond or a gently flowing stream!
Always pay close attention to scale and perspective to ensure your garden feels cohesive, immersive, and truly enchanting. The more intricate and thoughtful details you incorporate, the more intriguing, captivating, and alive your fairy garden will become.
Step 6: The Final Touches and Essential Watering
Once all your plants are securely in place and every decorative element is perfectly positioned, gently water your plants. Utilize a watering can equipped with a fine spout to ensure precise watering, thereby avoiding any disturbance to the freshly arranged soil or delicate miniature components. You can also employ a small, soft brush or an old toothbrush to meticulously clean away any stray soil from your plants or figurines. For a final flourish, add a thin layer of fresh moss around the bases of your plants or along pathways to create a lush, established, and vibrant green look.
Inspirational Theme Ideas for Your Unique Fairy Garden
The true beauty of a DIY fairy garden lies in its limitless potential for diverse and imaginative themes. Here are a few inspiring ideas to ignite your creativity and help you design a truly unique miniature world:
- The Enchanted Forest: Create a mystical woodland using tiny ferns, various types of moss, small twigs resembling miniature trees, and charming woodland animal figurines like deer, owls, or squirrels.
- A Tranquil Coastal Retreat: Evoke the serene beauty of the seaside by incorporating fine sand, a collection of small seashells, shimmering blue glass beads to represent water, and perhaps a tiny lighthouse or an elegant mermaid figurine.
- The Rustic Farmstead: Design a quaint rural scene with miniature farm animals, tiny hay bales (cleverly crafted from straw), a small wheelbarrow, and miniature vegetable plants like tiny carrots or lettuce.
- Whimsical Fairy Village: Build a bustling miniature community featuring several tiny houses, miniature street lamps, and an assortment of little fairy folk going about their daily, magical lives.
- A Serene Zen Garden: Cultivate an atmosphere of calm and contemplation using smooth, polished pebbles, carefully raked sand (using a tiny comb), a miniature Buddha statue or pagoda, and simple, elegant plants like small bonsais or succulents.
- The Mystical Swamp Land: Create an intriguing, mysterious landscape with darker colored soil, murky “water” (perhaps green-tinted resin or glass), tiny cattails, and perhaps a mythical dragon or a unique swamp creature figurine.
Caring for Your Miniature Masterpiece: Ensuring Longevity
Just like any living garden, your broken pot fairy garden will require consistent and thoughtful care to truly thrive and maintain its enchanting appeal over time:
- Mindful Watering: Miniature plants generally have lower water requirements compared to their larger counterparts. Regularly check the soil moisture by gently touching the top inch or two; water only when it feels dry. Be cautious not to overwater, as terracotta can retain moisture, and excessive dampness can lead to root issues.
- Optimal Sunlight Exposure: Most miniature plants, particularly succulents, flourish in bright, indirect light. Position your fairy garden in a spot where it receives ample sunlight throughout the day without being subjected to the scorching intensity of direct afternoon sun, which can damage delicate foliage.
- Gentle Pruning and Maintenance: Periodically trim back any plants that are growing too large or beginning to overwhelm the meticulously designed scene. This helps to maintain the miniature scale and ensures that all elements of your garden remain visible and harmonious.
- Regular Cleaning and Dusting: Gently dust off figurines and carefully wipe down surfaces as needed. You can use a small, soft brush or a gentle puff of air to clean delicate areas and remove any accumulated dust or debris.
- Thoughtful Winter Care: If you reside in a region that experiences cold winters or frost, it is advisable to bring your delicate fairy garden indoors. Place it in a bright, protected spot to shield the sensitive plants from harsh winter conditions and ensure their survival.
The Enduring Joy and Unique Artistry of Your Garden Creation
The journey of creating a broken clay pot fairy garden is far more than just a crafting project; it is a profound expression of personal style, boundless creativity, and a steadfast commitment to sustainable living. Each time you cast your gaze upon your meticulously crafted miniature landscape, you will be reminded of the magic and beauty you have personally brought to life from what was once considered mere waste. These unique garden decorations serve as delightful conversation starters, enchanting both young and old with their intricate details, imaginative worlds, and the compelling story of transformation.
Therefore, never allow a broken pot to signify an end; instead, let it be the vibrant beginning of a beautiful, creative, and profoundly eco-conscious journey. Gather your terracotta shards, unleash the full spectrum of your imagination, and embark on the joyous adventure of crafting your very own broken clay pot fairy garden. The magnificent results will undoubtedly be a charming, wonderfully inexpensive, and utterly adorable addition that imparts tasteful aesthetics and a touch of whimsical magic to your home and garden, proving unequivocally that true beauty can indeed rise, more exquisite than ever, from broken pieces.