
Unlock Woodworking Potential: Genius Hacks That Solve Common Workshop Frustrations
Woodworking, a craft that beautifully blends artistry with precision, can sometimes test even the most patient individuals. From the satisfying thud of a perfectly driven nail to the elegant curve of a finished piece, the journey is often rewarding. Yet, alongside the joy, countless small frustrations can emerge: a nail refusing to stay put, wood splitting at the last moment, or the endless search for a tiny dropped screw. It’s in these moments of challenge that ingenious, simple solutions truly shine, transforming potential headaches into minor inconveniences. This article dives deep into the world of woodworking hacks, inspired by a remarkable tutorial that promises to revolutionize your approach to common workshop dilemmas.
The initial encounter with these solutions often elicits a profound sense of “why didn’t I think of that?” We’ve all been there, struggling with a stubborn task, only to discover a remarkably straightforward trick that simplifies everything. The beauty of these hacks lies in their elegance and accessibility, often utilizing everyday items or slight adjustments to technique. They are not just about saving time or effort; they’re about enhancing safety, improving accuracy, and ultimately, making the entire woodworking process more enjoyable and less daunting for enthusiasts of all skill levels.
The Age-Old Problem: Nailing with Precision and Safety
Consider one of the most fundamental acts in woodworking: hammering a nail. Sounds simple, doesn’t it? Yet, the reality can be far from it. Anyone who has ever attempted to drive a small nail into a piece of wood knows the struggle. The nail wobbles, it bends, it flies off course, and often, it results in a bruised thumb or finger. This common scenario leads to bent nails, marred wood surfaces, and a general sense of exasperation. The conventional wisdom often involves trying to hold the nail steady with your fingers, a method fraught with peril and imprecise results, especially when dealing with delicate finishes or precise alignments.
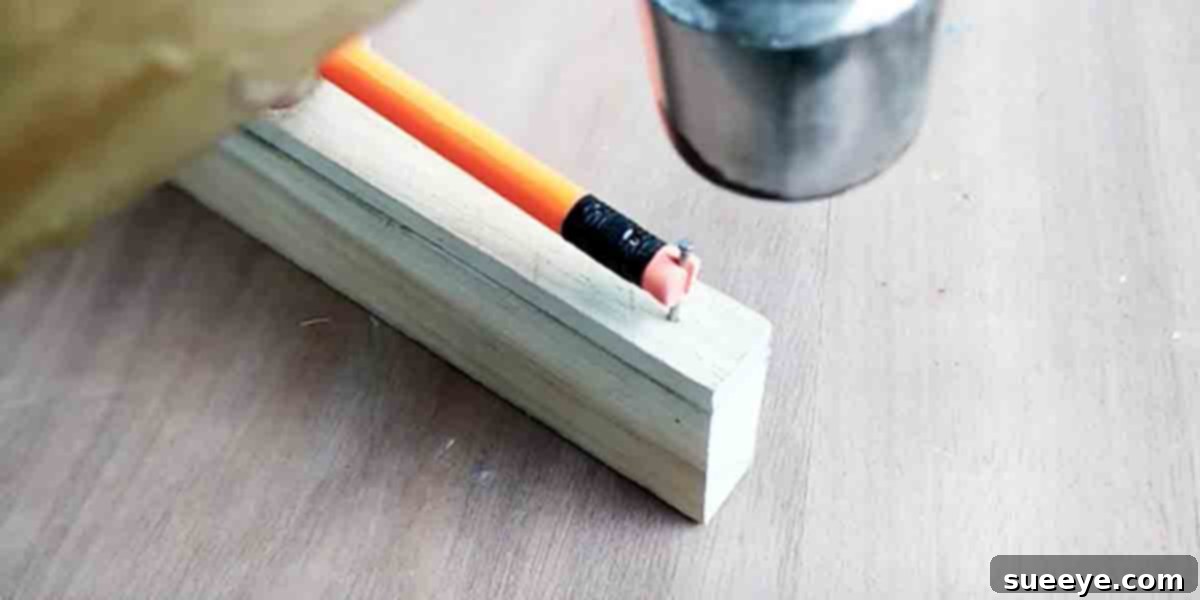
Then comes a revelation so simple, it feels almost magical. Imagine a common household item, repurposed in a way that provides the perfect grip and stability for a nail. The tutorial introduces a brilliant hack: using a small slice of a pencil eraser. Yes, a pencil eraser! By slicing a small piece from an ordinary pencil eraser, you create a soft yet firm grip for the nail. Insert the nail into the eraser slice, hold the eraser, and then proceed to hammer the nail into the wood. The eraser holds the nail perfectly upright, protecting your fingers and guiding the nail straight and true. Once the nail is partially driven, you can simply remove the eraser and finish the job. This trick not only saves your fingers from painful impacts but also ensures cleaner work and significantly reduces the chances of bending nails or marring your project. It’s a testament to how simple innovations can dramatically improve our workshop experience.
Beyond the Nail: Tackling Other Common Woodworking Frustrations
The genius of the nail-holding hack is just the tip of the iceberg. The tutorial, presented by experts like those from Mistry Make Tool, brings to light several other brilliant solutions that address various pain points common in any woodworking shop. These practical tips are invaluable for anyone looking to streamline their workflow and achieve professional-looking results without unnecessary struggle. Let’s explore some categories of common problems and how such simple, yet effective, hacks can provide immediate relief.
Preventing Wood Splitting During Fastening
One of the most disheartening moments in woodworking is hearing that dreaded crack as a screw or nail splits a beautiful piece of wood, especially near an edge or end grain. This often happens when fasteners are driven without proper preparation. While drilling pilot holes is a standard solution, sometimes even that isn’t enough, or the wood is simply too delicate. Ingenious hacks often involve simple material aids. For instance, applying a strip of painter’s tape over the area before drilling or fastening can provide enough surface tension and support to prevent splintering. Another trick involves blunting the tip of a screw slightly before driving it in; this subtle modification allows the screw to cut its way through the wood fibers rather than wedging them apart, significantly reducing the risk of splitting, particularly in hardwoods or near edges.
Achieving Accurate Cuts and Measurements with Ease
Precision is paramount in woodworking. Even a slight inaccuracy in measurement or cutting can throw an entire project off balance. While high-end tools offer incredible accuracy, not everyone has access to them, and sometimes, a quick, reliable method is all you need. Hacks in this area often focus on creating simple jigs or guides. For example, using a scrap piece of wood as a temporary fence against your saw blade can ensure perfectly straight cuts on smaller pieces. For repetitive measurements, creating a “story stick” – a strip of wood with marked dimensions for your project – eliminates the need for repeated tape measure readings, thus minimizing errors. Even a simple technique like marking your cut line with a sharp pencil and then scoring it lightly with a utility knife before sawing can help prevent tear-out and guide your blade more accurately.
Managing Dust and Maintaining a Clean Workspace
Dust is the bane of every woodworker’s existence. It’s not just a cleanliness issue; excessive dust poses health risks and can compromise finishes. While full-scale dust collection systems are ideal, practical hacks can significantly improve shop cleanliness without a massive investment. Simple solutions include creating makeshift dust shrouds for handheld tools using cardboard or plastic containers, or positioning shop vacuums strategically near the source of dust generation. Even laying down old newspapers or drop cloths in areas prone to sawdust accumulation makes cleanup dramatically faster. The key is often about containing the dust at its source rather than trying to clean up after it has dispersed throughout the shop.
Simplifying Glue-Ups and Clamp Setups
Gluing up panels or complex assemblies can be a race against time, requiring multiple clamps and precise alignment. Awkward shapes or large pieces can make this particularly challenging. Hacks here often involve repurposing items or creating simple aids. For instance, using wax paper between your cauls and the glued surfaces prevents squeeze-out from sticking to your clamping blocks. For oddly shaped pieces, creative use of painter’s tape or rubber bands can hold components together while clamps are being applied or even serve as temporary clamping solutions themselves. The goal is to make the glue-up process as stress-free as possible, ensuring tight, strong joints without any frantic rushing.
Cultivating a Problem-Solving Mindset in the Workshop
The true value of these ingenious woodworking hacks extends far beyond the immediate problem they solve. They foster a critical problem-solving mindset, encouraging woodworkers to look at challenges not as insurmountable obstacles, but as opportunities for creative thinking. This approach is beneficial for both beginners, who might feel overwhelmed by the complexities of woodworking, and seasoned professionals, who can always benefit from new efficiencies and perspectives.
These simple solutions highlight several core principles:
- Observation: Paying close attention to the specific points of friction or difficulty in a task.
- Repurposing: Looking at everyday objects not just for their intended use, but for their potential to solve a problem in an unexpected way.
- Simplicity: Often, the best solution is the simplest one, requiring minimal tools or effort.
- Experimentation: Don’t be afraid to try unconventional approaches; sometimes, they lead to breakthroughs.
Embracing this mindset not only makes woodworking more efficient but also more enjoyable. It turns frustration into fascination, and challenges into opportunities for innovation. When you learn to identify a problem and then seek out or devise a clever, simple fix, you’re not just completing a project; you’re evolving as a craftsman.
Conclusion: Empowering Your Woodworking Journey
The impact of practical woodworking hacks cannot be overstated. They are the silent heroes of the workshop, saving countless hours of frustration, preventing injuries, and enabling cleaner, more precise work. The tutorial that inspired these thoughts, often shared by platforms like Mistry Make Tool, serves as a powerful reminder that some of the most effective solutions are incredibly simple, often hidden in plain sight or requiring just a slight shift in perspective.
Whether you’re a seasoned carpenter or just starting your journey into the world of woodworking, incorporating these ingenious tips into your repertoire will undoubtedly elevate your craft. They empower you to tackle projects with greater confidence and less anxiety, ensuring that the creative process remains a source of joy and accomplishment. So, the next time you encounter a stubborn nail, a splitting piece of wood, or any other common workshop woe, remember the power of a simple hack. Seek out resources, watch demonstrations, and most importantly, cultivate that problem-solving spirit. Your fingers (and your projects) will thank you!
Don’t let minor frustrations deter you from the rewarding world of woodworking. Embrace these clever tricks, and you’ll find yourself not only building beautiful pieces but also building a more efficient, safer, and infinitely more enjoyable workshop experience.