
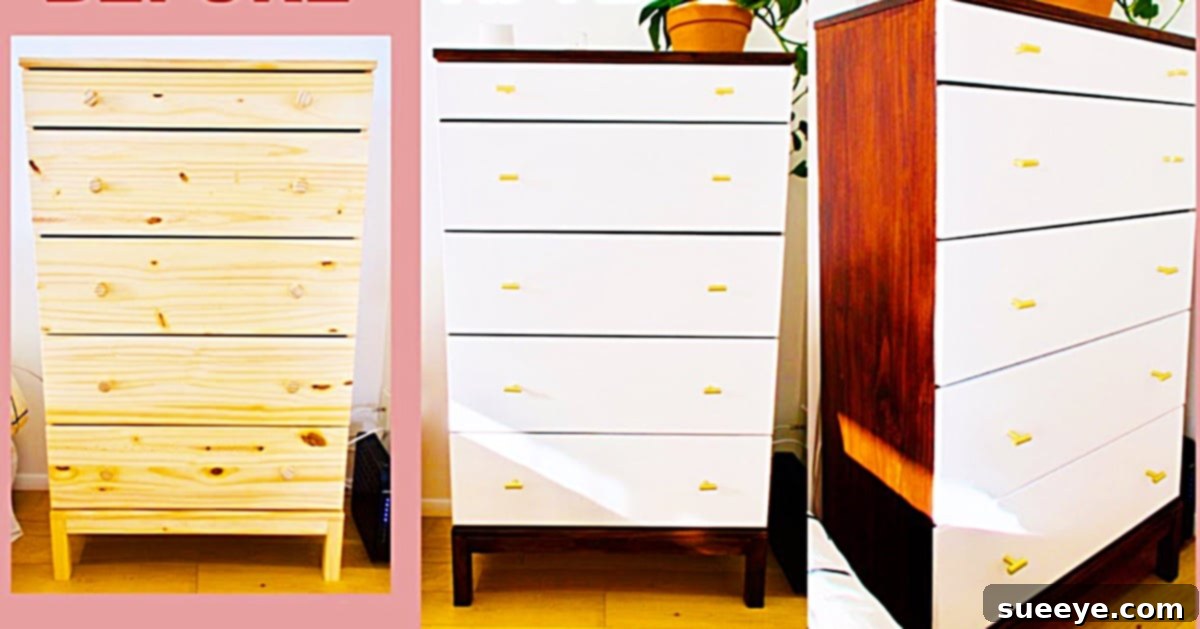
Turn An Ordinary IKEA Dresser Into A Mid-Century Modern Masterpiece
Are you looking to infuse your living space with timeless style without breaking the bank? A simple, raw wood dresser from IKEA might just be your blank canvas for an incredible transformation. The mid-century modern dresser makeover video tutorial by Joanna Spicer on YouTube stands out as one of the most inspiring DIY ideas we’ve encountered recently. Joanna, like many of us, found herself with a perfectly functional yet aesthetically uninspiring IKEA dresser. Recognizing its inherent potential, she saw beyond its plain exterior to a perfect candidate for a stunning custom piece. This project proves that with a few materials and an afternoon’s dedication, you can elevate everyday furniture into a show-stopping design element that truly reflects your personal style.
Mid-century modern design continues to captivate homeowners and designers alike with its clean lines, organic shapes, and functional elegance. Originating from the mid-20th century, this style emphasizes simplicity, practicality, and a harmonious blend of materials, often incorporating wood, metal, and subtle pops of color. Transforming an IKEA dresser into a mid-century modern gem is not just a furniture hack; it’s an opportunity to embrace a classic aesthetic that remains relevant and highly sought after today. The beauty of this particular makeover lies in its straightforward approach, making it accessible even for novice DIY enthusiasts, while promising a high-impact result.
Why Choose an IKEA Dresser for Your Makeover?
IKEA furniture has long been a favorite for DIY projects due to its affordability, simple construction, and often unfinished surfaces, which serve as an ideal foundation for customization. A basic raw wood dresser, while perhaps lacking character initially, offers an unparalleled opportunity for creative expression. Its minimalist design acts as a perfect “blank canvas,” ready to be imbued with any style you desire. For a mid-century modern look, the straightforward lines of many IKEA dressers provide the perfect starting point, allowing the transformation to focus on rich finishes and distinctive hardware, key elements that define the mid-century aesthetic. Moreover, the robust yet adaptable nature of IKEA wood makes it surprisingly receptive to various treatments, from staining to painting, ensuring a durable and beautiful end product.
Essential Materials for a Stunning Transformation
One of the most appealing aspects of this mid-century modern dresser makeover is the minimal number of supplies required. Each item plays a crucial role in achieving that coveted sleek and sophisticated finish. Gathering these materials beforehand will ensure a smooth and efficient crafting process.
- Varathane (Stain + Polyurethane): This all-in-one product is a game-changer. It combines the rich color of a wood stain with the protective qualities of polyurethane, saving you time and simplifying the finishing process. Opt for a warm, natural wood tone to capture the authentic mid-century vibe.
- A Sanding Block: Essential for preparing surfaces and creating a perfectly smooth finish between coats of stain or paint. Fine-grit sandpaper (around 220-grit) attached to a block will provide even pressure and a flawless result.
- White Paint: A high-quality, semi-gloss or satin white paint will provide a crisp, clean contrast to the stained wood frame. Its smooth finish will enhance the modern aesthetic of the drawer fronts.
- A Paint Roller and Tray: A small foam roller is ideal for achieving a smooth, professional-looking finish on the drawer fronts, minimizing brush strokes. A paint tray will help distribute the paint evenly on the roller.
- Brass Mid-Century Modern Looking Pulls: The hardware is arguably the most critical element in defining the mid-century modern style of your dresser. Look for sleek, minimalist brass pulls, often with a subtle curve or geometric shape, to instantly elevate the piece.
Step-by-Step Directions to Your New Dresser
Joanna Spicer’s tutorial guides you through each stage of this transformation, ensuring a successful outcome. The process is designed to be straightforward, allowing you to achieve professional-looking results in just an afternoon.
Step 1: Preparation and Disassembly
Before you begin any staining or painting, proper preparation is key. Start by carefully removing all the dresser drawers from the frame. It’s also wise to remove any existing hardware if your dresser isn’t brand new and already stripped. Lay out your components on a protected surface in a well-ventilated area. Even if your IKEA dresser is raw wood, a quick, light sanding with your sanding block (using fine-grit sandpaper) can help open the wood grain, allowing for better stain absorption and a smoother finish. Wipe away any dust thoroughly with a tack cloth or a damp cloth and allow it to dry completely.
Step 2: Staining the Dresser Frame
With your dresser frame ready, it’s time to apply the Varathane (stain plus polyurethane). This product simplifies the process immensely, as it stains and protects in one step. Using a brush or a clean cloth, apply the Varathane evenly along the dresser frame, working with the grain of the wood. Ensure you get into all crevices. Allow the first coat to penetrate and dry according to the manufacturer’s instructions. Depending on the desired depth of color, you may need to apply a second coat. Remember to lightly sand with your sanding block between coats to achieve a super smooth, professional-grade finish, then wipe away any dust before applying the next layer. This intermediate sanding step is crucial for eliminating any raised wood fibers and ensuring maximum smoothness and adhesion.
Step 3: Painting the Drawer Fronts
Next, turn your attention to the drawer fronts. These will provide a beautiful, clean contrast to the rich stained frame. Apply two thin, even coats of white paint using your roller. Thin coats are always better than one thick coat, as they dry faster and are less prone to drips and brush marks (or roller marks in this case). Allow ample drying time between each coat. Again, a very light sanding with a fine-grit sanding block between coats can help achieve an incredibly smooth, factory-like finish. Ensure the paint is completely dry to the touch before proceeding to the next step, as premature handling can mar the finish.
Step 4: Installing the Mid-Century Modern Hardware
Once both the dresser frame and drawer fronts are thoroughly dry and cured, it’s time for the final, transformative touch: attaching the brass mid-century modern pulls. This step truly brings the entire look together. Carefully measure and mark the placement for your pulls on each drawer front. Use a drill to create pilot holes to prevent splitting the wood, then securely attach the brass pulls. Take your time with this step, as precise placement of the hardware significantly impacts the overall aesthetic. Once all pulls are attached, reinsert the drawers into the stained dresser frame. You’ll be amazed at how quickly your ordinary dresser has been elevated to a bespoke piece of furniture.
Tips for a Flawless Finish and Lasting Beauty
To ensure your mid-century modern dresser makeover stands the test of time and looks as professional as possible, consider these additional tips:
- Patience is Key: Rushing the drying process between coats of stain and paint can lead to tackiness, uneven finishes, or even peeling. Always adhere to the manufacturer’s recommended drying and curing times.
- Test Your Colors: If you’re unsure about your stain or paint color choices, test them on an inconspicuous area of the dresser or a piece of scrap wood that matches your dresser’s material.
- Ventilation is Crucial: Work in a well-ventilated area, preferably outdoors or in a garage with open windows, to avoid inhaling fumes from paints and stains.
- Quality Tools Matter: While this is a budget-friendly project, investing in decent quality brushes and rollers can make a significant difference in the smoothness and uniformity of your finish.
- Cleanliness: Dust and debris are the enemies of a smooth finish. Ensure your workspace and furniture surfaces are meticulously clean before and during application.
Styling Your New Mid-Century Modern Dresser
Once your transformed dresser is complete, integrating it into your home decor is the final step. Pair it with other mid-century elements such as a tripod lamp, a vintage-inspired mirror, or some abstract artwork. Consider placing a small plant, a stack of design books, or a decorative tray on top to complete the look. The contrast between the warm wood and crisp white, accented by elegant brass, makes this dresser a versatile piece that can elevate a bedroom, living room, or even a entryway. It truly embodies the blend of functionality and style that defines mid-century design, proving that stunning home decor doesn’t always come with a hefty price tag.
This DIY mid-century makeover is genuinely that easy. In one afternoon, you can take a plain, unassuming piece of furniture and transform it into a show-stopping masterpiece that looks custom-made. The satisfaction of creating something beautiful with your own hands, while also achieving a high-end aesthetic on a budget, is incredibly rewarding. I personally love this dresser makeover idea so much that I have several other items in my home eagerly awaiting this stylish treatment. What piece will you transform next?