
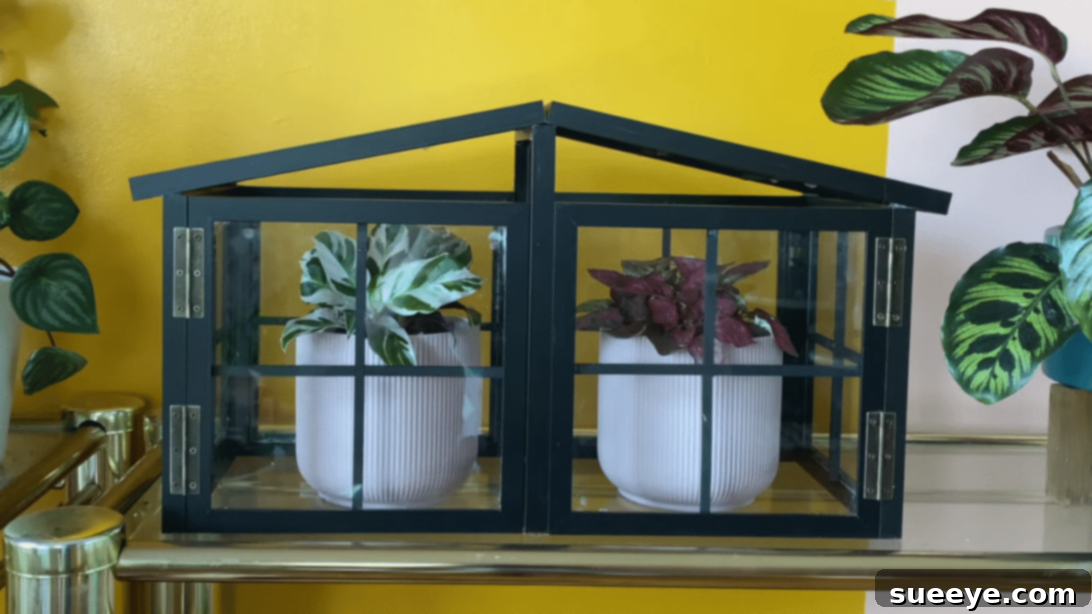
DIY Mini Greenhouse from Picture Frames: An Easy & Affordable Craft for Your Home
Are you looking to add a touch of greenery to your indoor space without breaking the bank? Or perhaps you dream of nurturing delicate seedlings and exotic plants right on your windowsill? This adorable DIY mini greenhouse, inspired by the creative minds at HGTV Handmade on YouTube, is the perfect solution. It’s a surprisingly simple project that transforms ordinary picture frames into a beautiful and functional accent piece for your home. Ideal for displaying your beloved succulents, starting seeds, or providing a humid environment for tropical plants, this mini greenhouse is both practical and aesthetically pleasing.
What makes this project truly appealing is its accessibility. You only need a few inexpensive picture frames, readily available at your local dollar store or discount retailer. With a minimal investment of time and materials, you can craft a unique decor item that brings the charm of a full-sized greenhouse into a compact, indoor setting. We personally loved creating this project and were delighted by how quickly it came together, yielding a stunning result that looks far more intricate than it is.
Get ready to unleash your inner crafter! Gather your supplies from the nearest dollar store and embark on this rewarding DIY journey. Below, you’ll find comprehensive written instructions detailing each step, along with helpful tips to ensure your project’s success. For a visual guide, make sure to watch the full video tutorial. We’re confident you’ll find this mini greenhouse project as enjoyable and satisfying as we did!
RELATED: Looking for more inspiring DIY home decor ideas? Check out our tutorial on How to Make a Stunning DIY Photo Lantern Decor.
Why Build a Mini Greenhouse? Benefits for Your Home & Plants
Before diving into the creation process, let’s explore why a mini greenhouse is such a fantastic addition to your living space:
- Optimized Growing Conditions: Mini greenhouses create a microclimate with higher humidity and stable temperatures. This is crucial for germinating seeds, propagating cuttings, or housing plants that thrive in specific environmental conditions, such as ferns, orchids, or carnivorous plants.
- Protection for Delicate Plants: Young seedlings and tender plants can be vulnerable to drafts, dry indoor air, and curious pets. A mini greenhouse provides a protective barrier, shielding them from adverse conditions and helping them flourish.
- Stylish Home Decor: Beyond its functionality, a picture frame mini greenhouse is an incredibly chic decorative element. It adds a touch of rustic elegance or modern minimalism, depending on your chosen finish, making your indoor planters feel even more special.
- Space-Saving Solution: For urban dwellers or those with limited outdoor space, an indoor mini greenhouse allows you to indulge your green thumb without needing a large garden. It fits perfectly on windowsills, shelves, or desks.
- Budget-Friendly & Sustainable: By repurposing inexpensive picture frames, you’re engaging in a sustainable craft that’s incredibly light on your wallet. It’s an excellent example of upcycling everyday items into something beautiful and useful.
- Year-Round Gardening: Extend your growing season! With a mini greenhouse indoors, you can start seeds earlier in the spring or keep delicate plants happy through the colder months.
Gathering Your Materials for This Charming DIY Project
One of the best aspects of this DIY mini greenhouse is how few and affordable the materials are. Most items can be found at a dollar store, craft store, or hardware store. Here’s what you’ll need:
- 8×10 Picture Frames (quantity depends on design, typically 5-6): These form the walls and roof of your greenhouse. Opt for frames with a sturdy construction, preferably wood or composite, as they will be easier to work with for gluing and painting. The 8×10 size is versatile, creating a perfect compact structure.
- Strong Adhesive (E6000 or similar): Essential for securing the glass panes within the frames and bonding the frame structures together securely. E6000 is known for its industrial strength and flexibility, making it ideal for glass and wood.
- Hot Glue Gun and Sticks: Useful for quick, temporary bonds while the stronger E6000 cures, or for attaching lighter decorative elements.
- Square Wooden Dowels (various lengths): These dowels will be cut to create the decorative grid patterns or “panes” within your greenhouse windows, adding to its classic aesthetic.
- Black Paint (spray paint or acrylic): To give your dowels and optionally the frames a classic, elegant greenhouse finish. Matte or satin black works wonderfully.
- Foam Paint Applicator or Brush: For smooth and even application of paint.
- Small Saw (hand saw or miter box): Necessary for accurately cutting the wooden dowels to size.
- Ruler or Measuring Tape: For precise measurements of your dowels and frame dimensions. Accuracy is key for a professional finish.
- Marking Pen or Pencil: To mark your cutting lines on the dowels.
- Painter’s Tape: Useful for holding pieces together while glue dries, or for masking areas during painting.
- Small Hinges (optional, 2-4): If you want your greenhouse roof or front panel to open for ventilation or easy plant access, small decorative hinges are a great addition.
- Screws and Screwdriver (if using hinges): To attach the hinges securely.
Always prioritize safety when working with tools and glass. Consider wearing gloves and eye protection.
Step-by-Step Guide: Crafting Your Picture Frame Mini Greenhouse
Follow these detailed steps to construct your beautiful and functional mini greenhouse. While we provide comprehensive instructions here, remember to consult the HGTV Handmade video tutorial for visual guidance, especially for assembly nuances.
Step 1: Prepare Your Picture Frames
- Disassemble the Frames: Carefully remove the backing, mat board, and the glass from four of your picture frames. Set the glass pieces aside in a safe place.
- Secure the Glass: For the four frames intended for the greenhouse walls, reinsert the glass pane into each frame. Instead of relying on the flimsy metal supports, use a strong adhesive like E6000 to permanently glue the glass in place along the inner edges of the frame. This ensures durability and a secure structure. Allow these frames to dry completely, following the adhesive manufacturer’s instructions.
- Prepare the Center Support Frame: For one of your remaining frames (which will serve as a crucial structural support), you will remove *both* the glass and the backing. This frame will be an empty rectangular structure, providing stability and a base for your roof elements.
Step 2: Create the Decorative Panes with Dowels
- Measure and Mark: Using your empty center support frame’s backing as a template or carefully measuring the inner dimensions of your secured glass frames, determine the lengths needed for your square wooden dowels. These dowels will create the classic grid pattern of greenhouse windows. You’ll want to cut pieces that fit horizontally and vertically within each glass pane.
- Cut the Dowels: With your ruler and marking pen, carefully mark the cutting points on your wooden dowels. Use a small saw to cut the dowels precisely. Accuracy here will ensure a neat, professional look. You’ll need enough pieces to create a grid (e.g., a cross shape or multiple horizontal/vertical lines) for each of your glass panes.
- Paint the Dowels: Lay out your cut dowel pieces on a protected surface. Using your foam applicator or brush, paint them black (or any color of your choice) to mimic traditional greenhouse frames. Allow them to dry completely. For a smoother finish, you might apply a second coat once the first is dry.
Step 3: Assemble the Greenhouse Structure
- Attach Dowel Panes: Once the painted dowels are dry, carefully hot glue them onto the outer surface of your glass panes to create the desired grid pattern. Hot glue allows for quick setting, but you can also use a small amount of E6000 for a more permanent bond.
- Form the Base: Take your four glass-secured frames. Use E6000 adhesive to join them together at their edges, forming a rectangular or square box. Apply generous amounts of glue, and use painter’s tape or clamps to hold them firmly in place while the adhesive cures. This will form the main walls of your mini greenhouse.
- Integrate the Center Support: Once the base is stable, position the empty frame (from Step 1) onto the top edges of your base structure. This frame acts as a central support and provides a flat surface for attaching your roof elements. Secure it firmly with E6000.
- Construct and Attach the Roof: The roof typically consists of two frames. You can either use two more glass-secured frames, or remove the glass from two frames for a lighter roof. If you want a sloped roof, you might need to cut one edge of these frames at an angle to meet perfectly at the top. Use E6000 to bond these roof frames to the center support frame and to each other at their peak, creating a pitched roof. Again, use tape or clamps to hold everything securely until the glue is fully cured.
Step 4: Finishing Touches & Customization
- Add Hinges (Optional): If you want to make your mini greenhouse functional for ventilation or easy access to your plants, consider adding small hinges. You can attach them to one of the front roof panels or a side panel, allowing it to swing open. Use small screws and a screwdriver for this step.
- Final Curing: Allow all adhesives to cure for the recommended time (often 24-72 hours for E6000) before handling or placing plants inside. This ensures maximum strength and durability for your finished greenhouse.
Tips for Success and Creative Customization
To ensure your DIY mini greenhouse project goes smoothly and to personalize it even further, consider these tips:
- Safety First: Always handle glass with care. Wear gloves to protect your hands from potential cuts, especially when removing existing glass or handling newly secured panes.
- Adhesive Curing Time: Patience is a virtue with adhesives. Allow ample time for the E6000 to cure completely. Rushing this step can compromise the structural integrity of your greenhouse.
- Frame Choice: While dollar store frames are great for budget, thicker, more robust frames will offer greater stability. Consider their weight and material for your desired aesthetic and durability.
- Alternative Materials: For enhanced safety, especially in homes with children or pets, you can replace the glass with clear acrylic sheets (Plexiglass). These are lightweight and shatter-resistant, though they might be slightly more expensive.
- Paint Personalization: Don’t limit yourself to black! Paint your frames and dowels white for a farmhouse look, metallic for a modern touch, or a vibrant color to match your decor. You can also distress the paint for a shabby-chic effect.
- Decorative Accents: Once assembled, consider adding small decorative finials to the top, a tiny knob to the hinged door, or even small LED strip lights inside to illuminate your plants.
- Base Layer: Place a small tray or layer of pebbles at the bottom of your greenhouse before adding plants. This helps with drainage and can contribute to higher humidity levels.
Caring for Your Mini Greenhouse and Its Lush Inhabitants
Your new mini greenhouse is not just a pretty face; it’s a thriving ecosystem for your plants. Here’s how to care for it:
- Placement: Position your mini greenhouse in a spot that receives appropriate light for your chosen plants. A bright windowsill is often ideal, but ensure it doesn’t get excessively hot from direct, intense sunlight, which can scorch plants inside.
- Ventilation: Even humidity lovers need some airflow. If you added hinges, occasionally opening a panel for a short period will prevent stale air and fungal growth. If not, simply lift the entire structure for a few minutes daily.
- Watering: Plants inside a greenhouse retain moisture longer. Always check soil moisture before watering to avoid overwatering, which can lead to root rot.
- Suitable Plants: This miniature environment is perfect for:
- Seedlings: Provides an excellent germination chamber.
- Succulents/Cacti: If you keep the humidity lower, it makes a beautiful display case.
- Air Plants: They thrive on the increased humidity.
- Small Herbs: Great for kitchen windowsills.
- Tropical Plants: Fussy ferns, miniature orchids, or specific mosses will love the consistent humidity.
- Cuttings: An ideal spot for propagating plant cuttings.
- Cleaning: Wipe down the glass panes periodically to remove dust and ensure maximum light penetration. Use a gentle glass cleaner.