
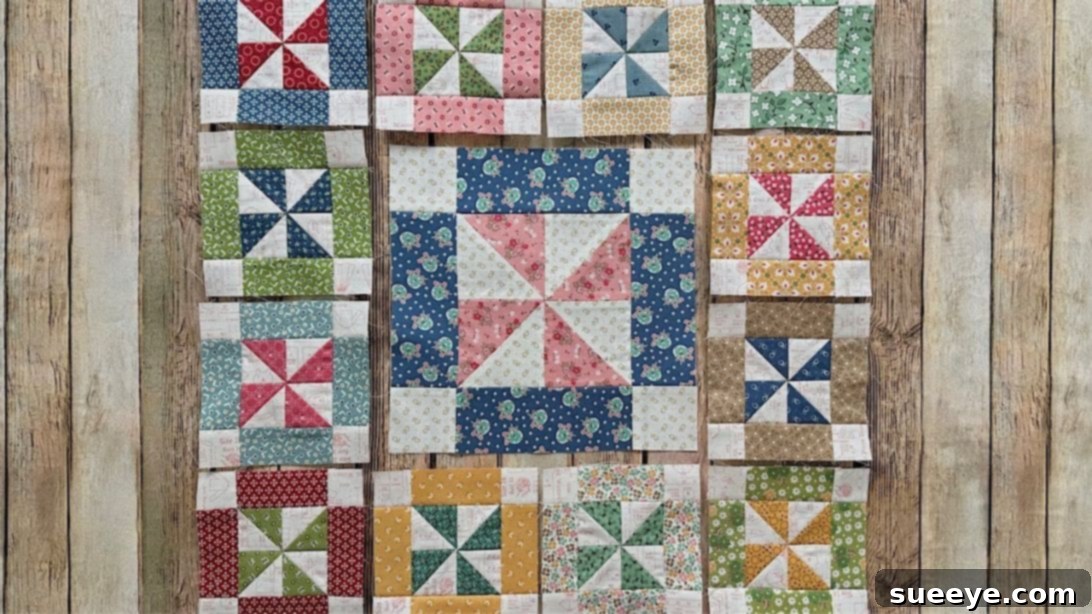
Master the Home Town Quilt Block: A Beginner-Friendly Pinwheel Pattern
Are you a passionate quilter always on the lookout for a new block to add to your collection? Or perhaps you’re just starting your quilting journey and searching for a pattern that’s both beautiful and approachable? Look no further! The Number 4 Home Town Block, a delightful design by the renowned quilter Lori Holt, is the perfect addition to your crafting repertoire. This fun, easy-to-make pattern is part of Lori Holt’s popular “Stash Series” and is incredibly beginner-friendly, promising a rewarding experience as you bring it to life.
This charming block centers around the classic pinwheel, one of the most fundamental and versatile elements in quilting. You’ll learn how to construct precise half-square triangles (HSTs) and combine them with simple rectangles and squares to form a captivating design. Whether you’re using fresh new fabrics or diving into your treasured scrap bin, this project offers endless possibilities for customization and creative expression. Get ready to embark on a fun quilting adventure and add a touch of “home” to your next project!
RELATED: If you love pinwheels, explore another fantastic design with the Friendship Pinwheel Quilt With Jenny Doan for more inspiration and techniques.
Unveiling the Charm of the Home Town Quilt Block
The Home Town Block, specifically number four in Lori Holt’s acclaimed Stash Series, celebrates simplicity and classic quilting aesthetics. At its heart lies the timeless pinwheel, a motif that evokes a sense of movement and joy. This block is ingeniously designed to build upon basic quilting components, making it an excellent choice for those new to the craft while still offering satisfying precision work for experienced quilters.
Lori Holt is celebrated for her whimsical, vintage-inspired designs and her ability to break down complex patterns into manageable, enjoyable steps. Her Stash Series encourages quilters to utilize their fabric scraps, transforming small pieces into cohesive and beautiful blocks. The Home Town Block perfectly embodies this philosophy, inviting you to play with contrasting colors and textures to create a truly unique piece. Its construction focuses on fundamental techniques like creating half-square triangles and carefully assembling units, which are crucial skills every quilter benefits from mastering.
By the end of this tutorial, you won’t just have a beautiful quilt block; you’ll have gained confidence in your ability to follow patterns, achieve accurate seams, and press like a pro. These foundational skills are transferable to countless other quilting projects, opening up a world of creative possibilities.
Essential Materials for Your Home Town Quilt Block
Before diving into the sewing, gather your materials. Precision in cutting is paramount for a successful quilt block, so ensure your fabrics are pressed and cut accurately. While the specific measurements are provided, feel free to choose fabrics that speak to you – whether they are bright and cheerful, muted and vintage, or a mix from your favorite fabric stash.
- 4 pieces of 2″ colored squares (for the pinwheel): These will form the points of your central pinwheel. Choose a color that will contrast nicely with your background fabric to make the pinwheel pop.
- 4 pieces of 1 1/2″ x 3 1/2″ rectangles in contrasting color: These rectangles will frame your pinwheel, adding depth and definition to the block. A color that provides a good visual break from the pinwheel and background is ideal.
- 4 pieces of 1 1/2″ squares (outside corners): These small squares will finish the outer corners of your block, often in a background or accent color to provide a clean edge.
- 4 pieces of 2″ background squares: These squares will be paired with your colored squares to create the half-square triangles, forming the contrasting sections of your pinwheel. A solid or subtly patterned light fabric usually works best here.
Recommended Quilting Tools:
While not explicitly listed as materials, having the right tools will significantly enhance your quilting experience:
- Rotary Cutter, Mat, and Rulers: Essential for accurate and efficient fabric cutting.
- Sewing Machine: A reliable machine with a good 1/4-inch foot is invaluable.
- Iron and Ironing Board: Crucial for pressing seams flat and accurately.
- Fabric Marking Tool: A disappearing fabric marker or chalk pencil for drawing lines.
- Thread: High-quality cotton thread that matches or blends with your fabrics.
- Pins or Wonder Clips: To hold fabric pieces together securely.
How to Make the Home Town Quilt Block: A Detailed Tutorial
Creating the Home Town Quilt Block involves a few straightforward steps, each building upon the last to form the intricate final design. Pay close attention to seam allowances and pressing, as these details are key to a professional-looking finish.
Step 1: Crafting Perfect Half-Square Triangles (HSTs)
Half-Square Triangles (HSTs) are the foundation of many quilt blocks, including our pinwheel. Accuracy here is vital. Begin by taking one of your 2″ colored squares and one of your 2″ background squares. Place them right sides together, ensuring all edges align perfectly.
Using your fabric marking tool and a ruler, draw a diagonal line from one corner to the opposite corner across the lighter (background) fabric. This line will serve as your sewing guide. Now, sew a seam 1/4″ away from this drawn line on both sides. So, you’ll have two parallel stitch lines, each 1/4″ from the central diagonal line.
Once sewn, carefully cut along the drawn diagonal line, separating the two stitched sections. Press each unit open. For best results, you can press the seam open (often called “butterflying”) or press towards the darker fabric to minimize bulk. Trim these units to 1 1/2″ squares, ensuring they are perfectly square. This step is often called “squaring up” and is critical for precise piecing later on. Repeat this process with the remaining three pairs of 2″ colored and 2″ background squares to yield a total of eight 1 1/2″ HSTs. You will only need four for the pinwheel, so you’ll have extras!
Step 2: Assembling the Side Units with Corner Squares
This step involves a technique often referred to as “snowballing” or “creating flying geese corners” on a rectangle. Take one of your 1 1/2″ x 3 1/2″ rectangles. Also, grab two of your 1 1/2″ squares (these are your outside corner squares). Place one 1 1/2″ square onto one end of the rectangle, aligning it in the corner, right sides together. Draw a diagonal line from the outer corner to the inner corner of the small square. Sew directly on this line. After sewing, trim the excess fabric 1/4″ away from your seam line and press the small triangle open.
Repeat this process on the opposite end of the same rectangle with another 1 1/2″ square. Ensure the diagonal line is drawn in the same orientation (e.g., if the first one sloped left to right, the second should also slope left to right) so that the resulting triangles point inwards or outwards as desired. For the Home Town block, these will form clean, squared-off ends. You will create two such units. Press these units flat, taking care to keep the rectangles straight.
Step 3: Constructing the Classic Pinwheel Center
Now it’s time to bring the heart of your block to life – the pinwheel! Take four of the HSTs you created in Step 1. Arrange them on your work surface to form a pinwheel pattern. This means the lighter points of your HSTs should all spiral in one direction (either clockwise or counter-clockwise), and the darker points should spiral in the opposite direction. Refer to the provided photo below for the correct arrangement. It’s crucial to ensure that no two matching colors from your HSTs are directly next to each other in the center where the points meet, as this creates the distinct alternating pinwheel effect.
Once you are happy with the arrangement, sew them together in pairs first. For example, sew the top-left HST to the top-right HST, and the bottom-left HST to the bottom-right HST. Press the seams open or towards the darker fabric (if pressing to the side) to reduce bulk at the center. Then, sew these two pairs together to complete your pinwheel block. When sewing the two halves, carefully align the center seams. You might even want to “nest” the seams (press one seam in one direction, and the other in the opposite direction) to help them lock together, ensuring a perfect point at the very center of your pinwheel. Press the final seam open or to one side.
Step 4: Bringing It All Together: Final Block Assembly
With your pinwheel center and two side units ready, it’s time to assemble the full Home Town Block. Lay out all your pieces on your design wall or table just like in the photo below. You’ll have your pinwheel in the center, flanked by the two rectangle units you made in Step 2. The remaining plain background squares will typically fill the corners, but for this block, the side units already include the corner elements.
Start by sewing the rectangle units (created in Step 2) to the left and right sides of your completed pinwheel block. Ensure they are correctly oriented before stitching. Use pins to align the seams and minimize shifting. Once these are sewn, press the seams open or towards the outer rectangles. This helps to reduce bulk at the intersections and maintain a flat block. Flatten the entire unit.
Next, you’ll attach the top and bottom unit strips (which are the remaining rectangle units, possibly with additional corner squares if the pattern called for more – in Lori Holt’s design, the rectangle units themselves form the top/bottom as well as the sides, creating a unique frame around the pinwheel). Carefully align these final units with the central section. Sew them into place, again taking care to match seams. Press the final seams open or towards the outside of the block to ensure your Home Town Block lays perfectly flat. Give your finished block a final press to sharpen all the edges and points. You’ve done it!
Tips for Quilting Success and Beyond
Mastering any quilt block, especially for beginners, benefits from a few key practices that can elevate your results from good to magnificent.
Precision is Key: Your Seam Allowance Matters
The golden rule in quilting is a consistent 1/4-inch seam allowance. Even a slight deviation can throw off the size and squareness of your block. Practice sewing a perfect 1/4-inch seam by using a 1/4-inch foot on your machine or marking a guide line with painter’s tape. Accurate cutting also goes hand-in-hand with precise sewing; always use a sharp rotary cutter and a reliable ruler.
The Power of Pressing: Not Just Ironing
Pressing is arguably as important as sewing. It’s not just about flattening fabric; it’s about shaping your work. Pressing seams open can reduce bulk, while pressing to one side can help “nest” seams for perfect points. Always press, don’t iron (which involves pushing the iron back and forth, potentially distorting fabric). Use an up-and-down motion and press the fabric gently as you go. Pressing after each seam ensures your block remains flat and square throughout the construction process.
Fabric Selection Wisdom: Play with Your Stash
Lori Holt’s “Stash Series” encourages using fabrics you already own. Don’t be afraid to mix prints, solids, and textures. The Home Town Block looks fantastic with a variety of fabric choices. Consider the contrast between your pinwheel colors and your background fabric. High contrast will make your pinwheel pop, while a lower contrast can create a softer, more blended look. This is where your personal style can truly shine!
Troubleshooting Common Issues: Don’t Give Up!
If your block isn’t perfectly square, don’t panic. Gently pressing and squaring up can often fix minor discrepancies. If seams don’t match exactly, unpick and resew – it’s always worth the extra effort for a beautiful finish. Quilting is a journey of learning, and every “mistake” is an opportunity to improve your skills.
Unleashing Your Creativity: Variations and Project Ideas
Once you’ve mastered the Number 4 Home Town Block, the possibilities for using it are endless!
Personalizing Your Home Town Block
Experiment with different color schemes. Imagine a monochromatic version, a rainbow array, or blocks made from seasonal fabrics. You could also try substituting different fabric types, though ensure they have similar weights for ease of sewing. Each fabric choice will give your block a unique personality.
Beyond a Single Block: Project Ideas
- Quilts: Combine multiple Home Town Blocks with sashing or plain squares to create a full quilt. The repetitive nature of the pinwheel will be mesmerizing.
- Table Runners or Placemats: A smaller number of blocks can create charming table linens, perfect for adding a handmade touch to your dining area.
- Cushion Covers: One or two blocks can form the front of a beautiful decorative cushion, making a lovely gift or home accent.
- Wall Hangings: Frame a single Home Town Block or a small collection of them for unique wall art that showcases your quilting skills.
Connecting with the Quilting Community
Lori Holt’s designs inspire a vibrant community of quilters. Share your finished Home Town Blocks on social media using relevant hashtags (e.g., #LoriHolt, #HomeTownBlock, #QuiltBlockTutorial). Engage with other quilters, ask questions, and celebrate your achievements. The quilting community is incredibly supportive and inspiring!
Your Journey to a Beautiful Quilt Block Begins Now!
The Number 4 Home Town Block offers a fantastic opportunity to build foundational quilting skills while creating something truly beautiful. Its classic pinwheel design, combined with Lori Holt’s accessible approach, makes it a project you’ll love from start to finish. Don’t be intimidated by the steps; take your time, enjoy the process, and watch as your fabric pieces transform into a charming quilt block.
We hope this detailed tutorial has inspired you to add this delightful block to your crafting list. Grab your fabrics, fire up your sewing machine, and let your creativity flow. You’ll be amazed at what you can achieve!
Number 4 Home Town Block Video Tutorial
For a visual guide to complement these written instructions, be sure to watch Lori Holt’s original video tutorial:
Watch the full tutorial on Lori Holt’s YouTube Channel here!