
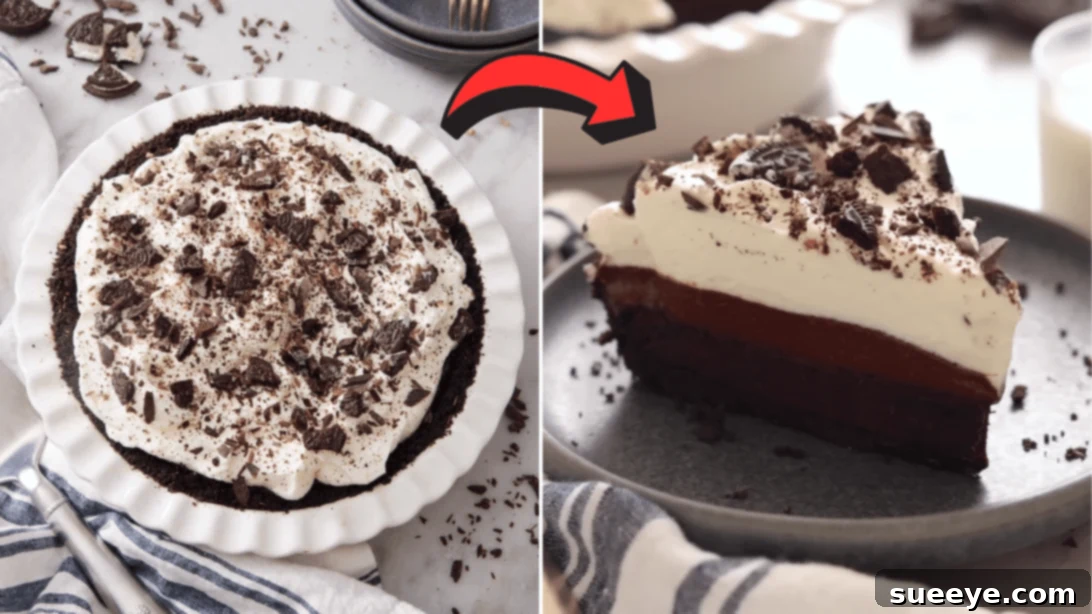
Step into a world of rich, chocolatey bliss with our ultimate Chocolate Mud Pie recipe. This iconic dessert is more than just a treat; it’s a journey back to cherished memories, a comforting embrace for the soul, and a guaranteed showstopper for any gathering. Imagine a perfectly crisp Oreo cookie crust, a dense and fudgy brownie layer, topped with a velvety smooth, intensely chocolatey pudding, all crowned with a cloud of light, sweetened whipped cream. Every single bite is a symphony of textures and flavors, an irresistible invitation to indulge.
Whether you’re celebrating a special occasion, looking for the perfect dessert to impress guests, or simply craving a moment of pure chocolate ecstasy on an ordinary day, this homemade Chocolate Mud Pie delivers. Forget store-bought imitations; crafting this masterpiece from scratch is a rewarding experience that results in a dessert far superior in taste and quality. Get ready to bake a memory and create a new family favorite that will have everyone asking for seconds. We’re inspired by the fantastic guide from Preppy Kitchen on YouTube, and now we’re sharing an expanded, SEO-friendly version to help you master this classic.
RELATED RECIPE: How To Make Old-Fashioned Texas Mud Pie
Ingredients You’ll Need for This Decadent Chocolate Mud Pie
Creating this layered marvel requires a few key components, each playing a vital role in building the perfect chocolate mud pie. We’ve broken down the ingredients for each layer to make your preparation seamless. Using high-quality ingredients will truly elevate the flavor profile of your final dessert, so don’t skimp on the good stuff!
For the Irresistible Oreo Cookie Crust:
- 25 Oreo cookies: The foundation of our pie, providing a deep chocolate flavor and a delightful crunch. Feel free to use double-stuffed for an extra rich crust.
- ¼ cup of unsalted butter, melted: Binds the cookie crumbs together, ensuring a firm and flavorful crust. Unsalted butter allows you to control the salt content in the overall pie.
For the Fudgy Brownie Layer:
- ½ cup of unsalted butter, cubed: Adds richness and moisture to the brownie. Cubing helps it melt more evenly.
- 2 oz of bittersweet chocolate, chopped: The secret to a truly deep chocolate flavor in your brownie. Bittersweet chocolate balances the sweetness perfectly.
- 2 large eggs: Provide structure and richness to the brownie, contributing to its fudgy texture.
- ⅓ cup of granulated sugar: Sweetens the brownie without overwhelming the chocolate.
- 2 tbsp of unsweetened cocoa powder: Enhances the chocolate flavor even further, giving it that dark, inviting color.
- ½ tsp of vanilla extract: A classic complement to chocolate, adding warmth and depth.
- ⅛ tsp of salt: Essential for balancing the sweetness and intensifying all the other flavors. Don’t skip it!
- 2 tbsp of all-purpose flour: Just enough to give the brownie structure without making it cakey, ensuring it remains dense and fudgy.
For the Silky Chocolate Pudding Layer:
- 1½ cups of whole milk: The creamy base for our pudding. Whole milk provides the richest texture.
- ¾ cup of granulated sugar: Sweetens the pudding to perfection.
- 2 tbsp of cornstarch: Our primary thickener, creating a smooth and luscious pudding consistency.
- ¼ tsp of salt: Crucial for enhancing the chocolate flavor and balancing sweetness in the pudding.
- 2 large egg yolks: Add richness, color, and contribute to the pudding’s luxurious texture, acting as an emulsifier.
- 3½ oz of bittersweet chocolate, finely chopped: The star of the pudding, providing intense chocolate flavor. Finely chopping helps it melt smoothly.
- 2 tbsp of unsalted butter, cubed: Adds silkiness and a glossy finish to the pudding, making it extra decadent.
- 1 tsp of vanilla extract: A must-have for depth of flavor in any chocolate dessert.
For the Light and Fluffy Whipped Cream Topping:
- 1½ cups of heavy cream: The foundation for our airy topping. Ensure it’s very cold for best whipping results.
- 3 tbsp of granulated sugar: Sweetens the cream just enough without being cloying.
Optional Garnishes for the Perfect Finish:
- Chocolate shavings: Add an elegant touch and extra chocolatey goodness.
- Chopped pecans: Provides a lovely textural contrast and nutty flavor.
- Cookie crumbs: A delightful echo of the crust, adding visual appeal.
How to Make the Best Chocolate Mud Pie: A Step-by-Step Guide
Crafting this incredible Chocolate Mud Pie might seem like a multi-step process, but each stage is straightforward and contributes to a truly spectacular final product. Follow these detailed instructions carefully, and you’ll be enjoying slices of pure heaven in no time.
Part 1: Preparing the Classic Oreo Crust
- Preheat and Prepare Cookies: Begin by preheating your oven to 350°F (175°C). While the oven heats, place your 25 Oreo cookies into a food processor. Pulse until they transform into fine, even crumbs. The finer the crumbs, the more uniform and sturdy your crust will be. If you don’t have a food processor, place the cookies in a zip-top bag and crush them with a rolling pin.
- Combine and Press: Transfer the cookie crumbs into a small mixing bowl. Pour in the ¼ cup of melted unsalted butter. Mix thoroughly with a fork or your hands until all the crumbs are moistened and resemble wet sand. This ensures the crust holds together beautifully.
- Form the Crust: Gently spoon the crumb mixture into the bottom of a 9-inch deep pie plate. Using the back of a spoon or the bottom of a flat-bottomed glass, firmly press the mixture across the bottom and evenly up the sides of the pie plate. Pressing firmly is key to preventing the crust from crumbling when sliced.
- Bake and Cool: Bake the prepared crust in the preheated oven for approximately 10 minutes. This short bake time helps to set the crust, making it extra crisp and stable. Once baked, remove it from the oven and allow it to cool completely on a wire rack while you prepare the rich brownie layer. Cooling is essential to prevent a soggy brownie layer.
Part 2: Crafting the Fudgy Brownie Layer
- Melt Chocolate and Butter: In a microwave-safe bowl, combine the ½ cup of cubed unsalted butter and 2 oz of chopped bittersweet chocolate. Microwave in 30-second intervals, stirring well after each, until the mixture is completely melted and smooth (this usually takes about 1½ to 2 minutes). Set aside to cool slightly.
- Whisk Eggs and Sugar: In a separate, larger bowl, whisk together the 2 large eggs and ⅓ cup of granulated sugar for about 30 seconds. This step lightens the eggs slightly and begins to dissolve the sugar, contributing to a smoother brownie texture.
- Combine Wet Ingredients: Gradually pour the slightly cooled melted chocolate and butter mixture into the egg and sugar mixture. Whisk them together until thoroughly combined and glossy.
- Add Dry Ingredients and Flavorings: Next, add the 2 tbsp of unsweetened cocoa powder, ½ tsp of vanilla extract, and ⅛ tsp of salt. Whisk again until these ingredients are fully incorporated.
- Gently Fold in Flour: Finally, add the 2 tbsp of all-purpose flour. Using a spatula, gently fold the flour into the batter until it’s just smooth and no dry streaks remain. Be careful not to overmix, as this can develop the gluten and lead to a tougher brownie.
- Bake the Brownie: Pour the luscious brownie batter evenly over the cooled Oreo crust in the pie plate. Bake for approximately 20 minutes, or until the edges are set and the center is slightly puffed, but still looks a little fudgy. A toothpick inserted into the center should come out with moist crumbs, not wet batter. Let the brownie cool completely on a wire rack before proceeding.
Part 3: Preparing the Silky Chocolate Pudding Layer
This pudding layer is the heart of the mud pie, offering a wonderfully creamy and intense chocolate experience. Take your time with the tempering process to ensure a smooth, lump-free pudding.
- Prepare Egg Yolks: In a small, heat-proof bowl, lightly whisk the 2 large egg yolks and set aside.
- Combine Dry Pudding Ingredients: In a medium saucepan, place it over medium-high heat. Add the 1½ cups of whole milk, ¾ cup of granulated sugar, 2 tbsp of cornstarch, and ¼ tsp of salt. Whisk these ingredients together until well combined.
- Heat Milk Mixture: Continue whisking continuously as you slowly pour in the whole milk. Cook for about 5 to 7 minutes, or until the mixture begins to thicken and small bubbles form around the edges. Keep stirring to prevent scorching.
- Temper the Egg Yolks: This is a crucial step! Turn off the heat from the milk mixture. Slowly ladle about ½ cup of the hot milk mixture into the whisked egg yolks, whisking constantly and vigorously. This gradually brings the temperature of the yolks up without scrambling them.
- Combine and Cook Pudding: Pour the tempered egg yolk mixture back into the saucepan with the remaining hot milk mixture. Place the saucepan back over medium heat. Continue to cook, stirring constantly with a whisk or spatula, for another 2 to 3 minutes, or until the pudding visibly thickens and becomes bubbly. It should coat the back of a spoon.
- Finish the Pudding: Remove the saucepan from the heat immediately. Stir in the 3½ oz of finely chopped bittersweet chocolate, 2 tbsp of cubed unsalted butter, and 1 tsp of vanilla extract. Stir until all the chocolate and butter are fully melted and the pudding is smooth, glossy, and perfectly combined.
- Assemble and Chill: Carefully pour the warm chocolate pudding evenly over the cooled brownie layer in the pie plate. Allow the pie to cool at room temperature for approximately 20 minutes. After this initial cooling, transfer the pie to the refrigerator, uncovered, to chill for at least 4 hours. For the best texture and stability, chilling overnight is highly recommended. This allows all the layers to set properly and the flavors to meld beautifully.
Part 4: The Cloud-Like Whipped Cream Topping and Serving
The final touch that completes this magnificent dessert is a generous layer of freshly whipped cream. It provides a delightful contrast to the rich chocolate layers.
- Whip the Cream: In a large mixing bowl (preferably chilled), combine the 1½ cups of very cold heavy cream and 3 tbsp of granulated sugar. Using an electric mixer on high speed, beat the mixture for about 2 to 3 minutes, or until soft peaks form. Be careful not to over-whip, or it will become grainy.
- Top and Garnish: Once the chocolate mud pie is thoroughly chilled and set, spread the freshly whipped cream evenly over the top of the pudding layer. For an extra special presentation, garnish your pie with chocolate shavings, a sprinkle of chopped pecans, or additional cookie crumbs.
- Serve and Enjoy: Slice into generous portions and serve immediately. This decadent dessert is best enjoyed fresh. Each bite offers a harmonious blend of crisp crust, fudgy brownie, creamy pudding, and light whipped cream. Enjoy your homemade masterpiece!
Why This Chocolate Mud Pie Recipe is a Must-Try
There are countless reasons why this particular Chocolate Mud Pie recipe stands out and deserves a spot in your dessert repertoire. It’s not just a dessert; it’s an experience:
- Layers of Decadence: Each layer offers a distinct texture and flavor profile, from the crunchy Oreo crust to the chewy brownie, the silky pudding, and the airy whipped cream.
- Intense Chocolate Flavor: By using both bittersweet chocolate and cocoa powder, we achieve a profound and rich chocolate taste that satisfies even the most discerning chocoholics.
- Perfect for Any Occasion: Elegant enough for special celebrations, yet comforting enough for a casual family gathering, this pie is incredibly versatile.
- Homemade Goodness: There’s an unmatched satisfaction in creating such a spectacular dessert from scratch. The fresh ingredients and homemade care truly make a difference.
- Crowd-Pleaser: This recipe is a guaranteed hit. Prepare for rave reviews and requests for the recipe!
Pro Tips for a Perfect Chocolate Mud Pie Every Time
Achieving a flawless Chocolate Mud Pie is easy with a few expert tips:
- Quality Ingredients Matter: Since chocolate is the star, opt for good quality bittersweet chocolate for both the brownie and pudding layers. It makes a significant difference in flavor.
- Don’t Overmix the Brownie: Overmixing flour develops gluten, leading to a tougher brownie. Fold gently until just combined.
- Temper Egg Yolks Slowly: When making the pudding, slowly adding hot milk to the yolks prevents them from scrambling. Whisk constantly.
- Whisk Pudding Constantly: To avoid lumps and scorching, keep whisking the pudding while it cooks on the stove.
- Chill Thoroughly: The chilling time is crucial for the pudding to set properly and for the flavors to meld. Don’t rush this step; overnight chilling yields the best results.
- Cold Cream for Whipping: Ensure your heavy cream is very cold, and for best results, chill your mixing bowl and whisk attachment beforehand. This helps the cream whip up faster and with more volume.
- Don’t Over-Whip Cream: Stop beating the cream as soon as soft peaks form. Over-whip can turn it grainy and then into butter.
Variations and Customizations for Your Signature Mud Pie
While the classic Chocolate Mud Pie is perfect as is, feel free to get creative and personalize your dessert:
- Crust Alternatives: Instead of Oreos, you could use graham cracker crumbs, digestive biscuits, or even a pretzel crust for a sweet and salty twist.
- Brownie Boosters: Fold in chocolate chips, chopped nuts (like walnuts or pecans), or a swirl of peanut butter into the brownie batter.
- Pudding Flavor Twists: Infuse the milk for the pudding with coffee beans (strain before use) for a mocha mud pie, or add a hint of orange zest for a chocolate-orange variation. A dash of peppermint extract would also be delightful for a festive version.
- Decadent Toppings: Drizzle with caramel sauce, hot fudge, or a sprinkle of sea salt flakes over the whipped cream. Add fresh berries like raspberries or strawberries for a fresh contrast.
- Make it Boozy: A tablespoon of Kahlúa, Baileys, or rum added to the pudding or even the whipped cream can elevate this adult dessert.
- Gluten-Free Option: Use gluten-free sandwich cookies for the crust and ensure your brownie flour is a certified gluten-free blend.
Storage Tips for Leftover Chocolate Mud Pie
If by some miracle you have any leftovers, here’s how to store your Chocolate Mud Pie to maintain its freshness:
- Refrigerator: Cover the pie loosely with plastic wrap or aluminum foil and store it in the refrigerator for up to 3-4 days. The whipped cream might lose some of its stiffness over time, but the underlying layers will remain delicious.
- Freezer (Without Whipped Cream): For longer storage, you can freeze the pie *before* adding the whipped cream topping. Once the pudding layer is fully set and chilled, wrap the pie tightly in several layers of plastic wrap, then an additional layer of aluminum foil. It can be frozen for up to 1 month. Thaw in the refrigerator overnight before topping with freshly whipped cream and serving.
This comprehensive guide provides everything you need to bake a truly unforgettable Chocolate Mud Pie. Get ready to impress your family and friends with a dessert that’s as beautiful as it is delicious. Happy baking!
*All these images are credited to Preppy Kitchen via YouTube. Give his channel a visit and subscribe for more amazing recipes and baking tips!