
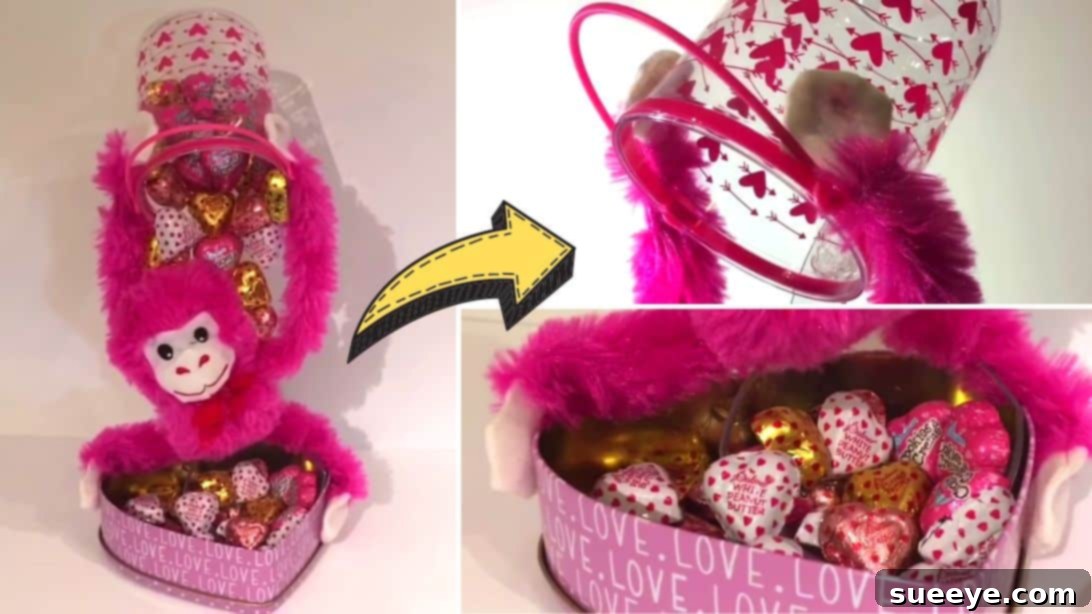
Craft an Adorable DIY Floating Monkey Candy Dish: The Ultimate Dollar Tree Valentine’s Day Project
Valentine’s Day is a time to express love and appreciation, not just to a partner, but to everyone special in our lives – family, friends, and even colleagues. While store-bought gifts are convenient, there’s an undeniable charm and warmth in a handmade present. It speaks volumes of the effort, thought, and affection poured into its creation. Personally, I adore making gifts that are not only filled with delightful treats but can also be cherished as a unique piece of decor long after the sweets are gone. This year, I’m absolutely thrilled to share a project that perfectly encapsulates this philosophy: an adorable and ingenious “Floating Monkey Candy Dish.” This captivating craft, inspired by a fantastic video tutorial from Lisa and Wills hauls on YouTube, is surprisingly simple to make, incredibly budget-friendly, and promises to be a delightful surprise for anyone who receives it.
Imagine a cute monkey seemingly suspended in mid-air, holding a bowl of candies aloft – it’s a whimsical and eye-catching display that’s bound to bring a smile. What makes this DIY project even better is that most of the materials can be sourced from your local Dollar Tree, making it an accessible and affordable option for everyone. Whether you’re a seasoned crafter or just starting your DIY journey, this tutorial will guide you through each step, ensuring you create a stunning gift that looks far more expensive than it actually is. Let’s dive into creating a memorable Valentine’s gift that doubles as charming home decor!
Why Choose This DIY Floating Monkey Candy Dish?
In a world of mass-produced items, a handmade gift stands out. This floating monkey candy dish isn’t just a container for sweets; it’s a conversation starter, a unique decorative piece, and a testament to your creativity. Here’s why this project is a must-try:
- Uniquely Charming: The illusion of the floating monkey is truly captivating and adds a playful touch to any setting.
- Budget-Friendly: Utilizing Dollar Tree finds, this craft proves that you don’t need to spend a fortune to create something special and high-quality looking.
- Perfect for Any Occasion: While ideal for Valentine’s Day, this dish can be customized for birthdays, baby showers, or simply as a whimsical addition to your home decor.
- Personal Touch: The ability to choose your monkey, the colors, and the candies allows for endless personalization, making each gift truly one-of-a-kind.
- Engaging Craft Experience: It’s a fun and rewarding project that even beginners can tackle with confidence.
Materials You’ll Need for Your Charming Candy Dish
Gathering your supplies is the first exciting step in any DIY project. For this charming floating monkey candy dish, you’ll find most items readily available at your local Dollar Tree or craft store. Here’s a detailed list to ensure you have everything on hand before you begin:
- Heart Box: This forms the base of your candy dish. While a heart shape is perfect for Valentine’s Day, you can absolutely choose other shapes like a round or square box for different occasions. Look for sturdy cardboard or plastic options.
- Pink Monkey (or any small plush toy): The star of our “floating” illusion! A small plush monkey, especially one with flexible limbs, works best. The original tutorial features a pink monkey, but feel free to choose any color or even a different small animal that appeals to you or your recipient.
- Clear Punch Ladle: This is the secret to the “floating” effect. A clear ladle is crucial as it becomes almost invisible once the monkey is attached, creating the illusion that the monkey is magically holding the container. Ensure it has a relatively flat handle for easy attachment.
- Small Plastic Container: This will hold the candies that the monkey appears to be cradling. Look for a lightweight, clear plastic bowl or container that fits comfortably in the monkey’s “hands” and isn’t too large for the ladle’s support.
- E6000 Adhesive: A super-strong, multi-purpose adhesive essential for creating a durable bond between different materials. This will provide the long-lasting hold needed for the structural integrity of the dish. Remember to use it in a well-ventilated area.
- Hot Glue Gun and Glue Sticks: Perfect for quick bonds and providing immediate stability while the E6000 cures. You’ll use this for initial positioning and adding extra reinforcement.
- Felt Fabric: A small piece of felt, preferably in a contrasting or complementary color to your heart box, will line the bottom of the box, giving it a neat, finished look.
- Scissors: For cutting the felt to shape.
- Candies: The delicious cargo for your finished dish! Choose an assortment of colorful candies to fill both the floating container and the base heart box.
Having these materials ready will make your crafting process smooth and enjoyable. Double-check your list, and let’s get ready to transform these simple items into something truly extraordinary!
Step-by-Step Guide: Crafting Your Adorable Floating Monkey Candy Dish
Now that you have all your supplies, it’s time to bring this charming vision to life. Follow these detailed steps carefully to construct your delightful floating monkey candy dish:
Step 1: Preparing the Base and Anchoring the Ladle
This initial step focuses on creating a stable foundation for your “floating” element. Precision here ensures the durability and visual impact of your finished piece.
- Prepare the Heart Box: Gently remove the lid from your heart-shaped box. Set the lid aside as it won’t be used for this specific project, though you could repurpose it for another craft!
- Cut and Adhere the Felt Liner: Take your chosen felt fabric. Place the bottom of the heart box onto the felt and carefully trace its outline. Using sharp scissors, cut out a heart shape from the felt that matches the inside bottom of your box. Apply a thin, even layer of hot glue to the bottom interior of the heart box, then carefully place the felt heart on top, pressing down firmly to ensure it adheres smoothly and neatly. This creates a soft, finished base for your candies.
- Positioning the Ladle: Locate the center of the felt-lined heart box. Apply a generous amount of E6000 adhesive directly onto this central spot. This super-strong glue will provide the primary, long-lasting bond.
- Reinforce with Hot Glue: While the E6000 is still wet, immediately add a generous amount of hot glue on top of and around the E6000. Hot glue sets much faster than E6000, which is crucial for holding the ladle in place during the initial curing phase.
- Secure the Ladle: Quickly place the handle of the clear punch ladle onto the mound of E6000 and hot glue, pressing it down firmly. Ensure the scooping part of the ladle is facing upwards and towards the front of the box.
- Stabilize and Cure: This is a critical moment for stability. To prevent the ladle from shifting, immediately add some weight onto the ladle itself (e.g., a small rock, a few coins, or even a full candy bag). Then, strategically place a few small objects around the base of the ladle’s handle within the box. These objects will act as temporary braces, holding the ladle perfectly upright and in place. You might use small jars, heavier craft supplies, or even rolls of tape. Hold everything steady, applying gentle pressure, until the hot glue has completely dried and the ladle feels firmly anchored. It’s best to allow the E6000 to cure for at least a few hours, or even overnight, for maximum strength.
Step 2: Assembling the Floating Container and Attaching the Monkey
With the ladle securely in place, it’s time to create the “floating” candy container and bring your monkey to life!
- Attach the Plastic Container: Once the E6000 has fully cured and the ladle is rock-solid, dab a good amount of E6000 onto the very top, flat part of the ladle’s handle. Immediately follow with a generous application of hot glue. Center your small plastic container on top of this adhesive mix, pressing down firmly. Hold it in place until the hot glue sets, providing an instant bond while the E6000 cures for a stronger, permanent hold. Ensure the container is level.
- Position the Monkey: Now for the star of the show! Position your plush monkey on the edge of the heart box, with its body facing the ladle and the plastic container. The goal is to make it look like the monkey is gracefully holding up the container.
- Glue the Monkey’s Body: Apply a liberal amount of hot glue and a dab of E6000 to the monkey’s back or bottom, depending on its posture. Press the monkey’s body firmly against the handle of the ladle, ensuring a good, stable connection. Hold it in place until the hot glue cools and sets.
- Secure the Monkey’s Hands: Adjust the monkey’s arms so its “hands” are positioned on either side of the plastic container, as if it’s gently cradling or lifting it. Apply hot glue to the monkey’s hands and press them firmly onto the sides of the plastic container. Hold until the glue dries, making sure the pose looks natural and secure. This completes the illusion of the “floating” candy dish.
- Fill with Candies: For an extra touch, hot glue a few candies (perhaps larger, sturdier ones) inside the plastic container to keep them from shifting too much, especially if the dish will be moved. Then, fill the plastic container completely with a delightful assortment of candies. Finally, fill the heart box base with the remaining candies, creating a bountiful display. And just like that, your charming DIY Floating Monkey Candy Dish is complete!
Tips for Success and Customization
To ensure your Floating Monkey Candy Dish turns out perfectly and truly reflects your style, consider these additional tips:
- Adhesive Application: Always use E6000 in a well-ventilated area. For strong bonds, apply both E6000 and hot glue; the hot glue provides immediate hold while the E6000 cures for a permanent bond. Allow ample drying time for maximum strength.
- Monkey Choice: Look for a monkey (or other plush toy) that is lightweight and has flexible arms for easy positioning around the candy container. The size of the monkey should be proportionate to your heart box and ladle.
- Candy Selection: Use individually wrapped candies for hygiene, especially if it’s a gift. Choose candies that complement the occasion – heart-shaped chocolates for Valentine’s Day, colorful jelly beans for Easter, or small festive treats for Christmas.
- Personalization: Don’t limit yourself to Valentine’s Day! This craft can be adapted for birthdays, baby showers (using a teddy bear and baby-themed treats), or as a year-round whimsical accent. You can paint the heart box, add glitter, or attach ribbons to match your theme.
- Stability Check: Before filling with candy, gently test the stability of your floating element. If it wobbles, add more hot glue reinforcement around the ladle’s base and where the monkey attaches.
The Magic of Dollar Tree DIY: Crafting on a Budget
One of the most appealing aspects of this project is its affordability. Dollar Tree, and similar discount stores, are treasure troves for crafters looking to create stunning pieces without breaking the bank. The ability to find a heart box, a plush toy, adhesives, and even candies all in one place for just a few dollars per item is what makes DIY projects like this so accessible and popular. It encourages creativity, resourcefulness, and proves that beautiful, heartfelt gifts don’t require a hefty price tag. Embracing Dollar Tree DIY not only saves money but also fosters a sense of accomplishment and the joy of transforming simple items into something truly unique.
Beyond Valentine’s Day: Versatile Decor for Any Season
While this floating monkey candy dish is absolutely perfect for Valentine’s Day, its charm extends far beyond February 14th. Imagine it as a whimsical centerpiece for a child’s birthday party, filled with colorful lollipops. Or perhaps, decorated with green and gold, holding chocolate coins for St. Patrick’s Day. For a baby shower, substitute the monkey with a tiny plush elephant or lamb, and fill the container with baby-themed sweets or small trinkets. In a child’s bedroom, it can serve as a delightful holder for small toys or hair accessories. The possibilities are truly endless, limited only by your imagination. This craft is an investment in joy and versatility, ready to adapt to any celebration or decor theme you envision.
There’s immense satisfaction in creating something with your own hands, especially when it brings joy to others. This DIY Floating Monkey Candy Dish is more than just a craft; it’s a delightful expression of creativity, a thoughtful gesture, and a charming piece of decor all rolled into one. It demonstrates that with a little imagination and some affordable supplies, you can produce truly remarkable and memorable gifts. So, gather your materials, follow these steps, and get ready to impress your loved ones with a handmade treasure!
Video Tutorial Credit
*A huge thank you to Lisa and Wills hauls via YouTube for this incredibly creative and inspiring video tutorial and for all images used here. Their channel is a fantastic resource for DIY enthusiasts. If you loved this project, we highly recommend giving their channel a visit and subscribing for more brilliant ideas and crafting inspiration!