
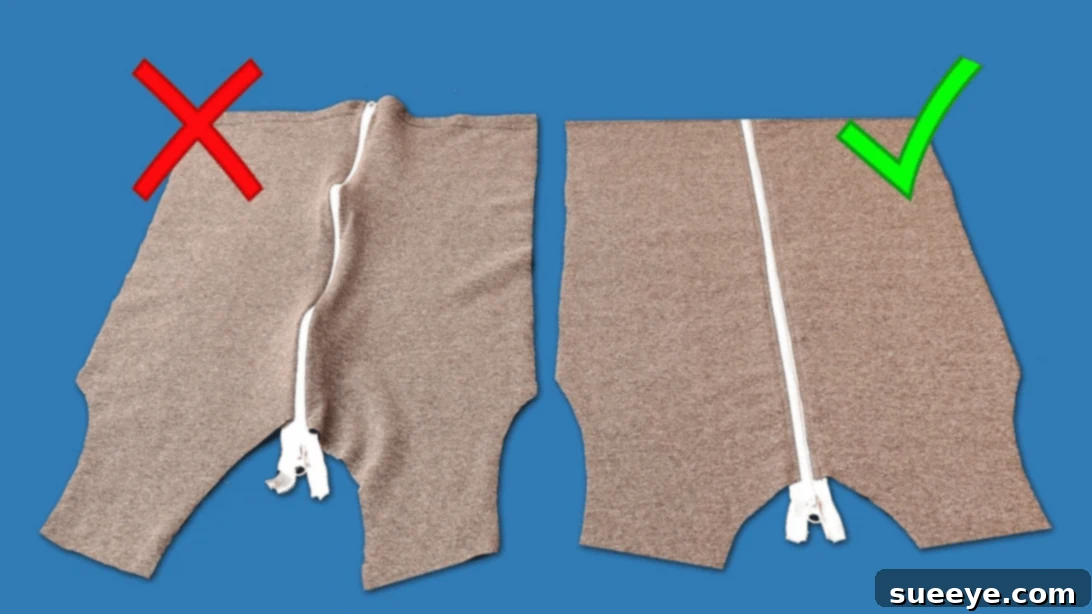
For many sewing enthusiasts, the seemingly simple task of attaching a zipper can quickly turn into a frustrating battle. You’ve likely experienced it: the zipper that ripples, curves, or creates an unsightly wave in your otherwise perfect fabric. This common challenge can undermine the professional finish of any project, leaving you with a sense of disappointment. But what if there was a simple, yet incredibly effective, technique to ensure every zipper you sew is impeccably straight, smooth, and looks like it was installed by a seasoned professional? The good news is, there is!
RELATED: Clever Sewing Hacks Using a Safety Pin
This comprehensive guide, inspired by the brilliant video tutorial from Miarti – Sewing Tips on YouTube, will unveil a game-changing method that utilizes a simple strip of fusible interfacing. This ingenious trick is designed to eliminate common zipper sewing mishaps, transforming your results from wavy and uneven to perfectly pristine. Once you master this technique, you’ll wonder how you ever sewed zippers any other way, and your sewing projects will consistently boast a flawless, professional finish that will impress everyone.
Why Fusible Interfacing is Your Secret Weapon for Perfect Zippers
The key to achieving a perfectly straight zipper lies in understanding and counteracting the inherent stretch of most fabrics. When you sew a zipper directly onto fabric, especially lighter-weight materials, the pressure from the sewing machine’s presser foot and the tension of the stitching can cause the fabric to stretch and warp, leading to those dreaded waves. Fusible interfacing provides a crucial layer of stability, essentially “laminating” the fabric edges where the zipper will be attached. This reinforcement prevents the fabric from stretching during the sewing process, ensuring that the zipper tape lies flat and smooth against the garment.
Using fusible interfacing also offers several other significant advantages. It adds a subtle body to the fabric, making it easier to handle and align the zipper accurately. Furthermore, it helps to create crisp, clean edges around the zipper opening, contributing to a truly polished and professional appearance. This method isn’t just about preventing waves; it’s about elevating the overall quality and durability of your sewn projects. Whether you’re working on dresses, skirts, bags, or cushions, this technique will become an indispensable part of your sewing repertoire, guaranteeing beautiful results every time.
Essential Materials for This Game-Changing Zipper Sewing Hack
Gathering the right tools and materials is the first step towards mastering this professional zipper installation technique. Most of these items are standard in any sewing kit, but the star of the show here is the fusible interfacing, which provides the critical stability needed for a flawless finish. Ensure you have everything laid out before you begin to streamline your process and maintain focus.
- Fabric: The primary material for your sewing project, whether it’s for a garment, accessory, or home decor item. Choose a fabric that is appropriate for your project and suited to your sewing experience.
- Fusible Interfacing: This is the crucial element that will stabilize your fabric. Opt for a lightweight to medium-weight fusible interfacing, compatible with your fabric type, to prevent stretching and waving.
- Zipper: Select a zipper of the appropriate length and type (e.g., conventional, invisible, separating) for your specific project. Ensure it complements your fabric and design.
- Marking Pen, Pencil, or Chalk: Essential for accurately marking your fabric and ensuring precise placement of the zipper. Choose a marking tool that is easily removable or will not show on your finished project.
- Ruler: For precise measurements when cutting interfacing strips and marking stitch lines. Accuracy is key to a perfectly straight zipper.
- Scissors: Sharp fabric scissors are vital for clean, precise cuts on both your fabric and interfacing.
- Fabric Pins: To hold your fabric pieces and zipper securely in place before stitching. Use sharp, fine pins to avoid damaging your fabric.
- Needle and Thread: Matching your thread color to your fabric is essential for a professional look. Ensure your needle is suitable for your fabric type and machine.
- Iron, for Pressing: Absolutely necessary for fusing the interfacing to your fabric, creating a stable foundation. A good iron with adjustable heat settings is critical.
- Sewing Machine: A reliable sewing machine equipped with a zipper foot is highly recommended for stitching close to the zipper teeth.
How to Sew Zippers Like a Pro: A Step-by-Step Guide
Follow these detailed steps carefully to achieve a perfectly straight and neat zipper every single time. This method emphasizes precision and stabilization, ensuring a result that looks expertly crafted.
Step 1: Prepare Your Fabric and Interfacing
Begin by laying your fabric pieces flat on your clean work surface, ensuring they are smooth and wrinkle-free. Measure the length of your zipper carefully. Now, cut two strips of fusible interfacing. Each strip should be exactly the same length as your zipper tape and approximately 1 to 1.5 inches wide, depending on the seam allowance and the desired stability. These dimensions are crucial for providing adequate reinforcement without adding unnecessary bulk. Position these fusible interfacing strips along the edges of your fabric’s opening where the zipper will be installed. Make sure they are centered over the seam line or aligned with the edge, ensuring the area where the zipper will be stitched is fully supported.
Step 2: Fuse the Interfacing to Your Fabric
With the fusible interfacing strips correctly positioned, it’s time to fuse them to your fabric. Following the manufacturer’s instructions for your specific interfacing, use a hot iron to press the interfacing firmly onto the fabric. Avoid gliding the iron; instead, lift and press, holding the iron in place for several seconds to ensure a secure bond. Allow the fabric to cool completely after pressing. This step is absolutely critical because a well-fused interfacing creates a stable, non-stretching foundation for your zipper, directly preventing the dreaded wavy appearance. Without proper fusion, the fabric can still distort during stitching, negating the benefits of the interfacing.
Step 3: Attach the First Side of the Zipper
Once the interfacing is securely fused and the fabric is cool, place your zipper on top of one of the prepared fabric edges, ensuring the right side of the zipper is facing down onto the right side of the fabric. Carefully align the zipper tape edge with the raw edge of your fabric, making sure they match perfectly. Secure the zipper in place with fabric pins at both ends and in the middle to prevent shifting. This initial pinning provides crucial stability. Now, using your sewing machine equipped with a zipper foot (or a narrow presser foot), stitch the zipper to the fabric. Your stitch line should be positioned precisely between the zipper’s edge and the zipper chain (teeth). Remember to backstitch at both the start and the finish of your seam to secure the stitches and prevent unraveling, ensuring a durable attachment.
Step 4: Align and Mark the Second Side for Precision
After attaching the first side, carefully turn the zipper over so that the right side is now visible. Lay it flat on your work surface. With the first half of the zipper securely stitched, you now need to accurately align the second half. Take your marking pen, pencil, or chalk and make a precise mark on the second side of the zipper tape, indicating exactly where the end of the fabric opening lies. This mark is vital for ensuring both sides of your zipper are perfectly symmetrical and aligned. Now, position the other half of your fabric piece, aligning its raw edge with the unmarked side of the zipper. Use your previous mark as a guide to ensure the fabric matches up precisely with the point where the first side ends. Pin the second fabric piece to the zipper, again securing it at the ends and in the middle, making sure everything is flat and perfectly aligned.
Step 5: Stitch the Second Side, Topstitch, and Finish
To facilitate flat stitching, you may find it helpful to separate the zipper, carefully unzipping it until the two halves are detached. This allows you to work with each fabric piece and zipper tape independently, ensuring a smoother sewing path. Stitch the second side of the zipper to the fabric using the exact same method as you did for the first side: stitch between the zipper’s edge and chain, and backstitch firmly at the beginning and end. Once both sides are sewn, reattach the zipper halves together. Now, for that professional finish, perform a topstitch along both sides of the zipper, near the outer edges of the zipper chain. This topstitching not only adds a decorative touch but also further secures the zipper tape and helps it lie perfectly flat, preventing the fabric from catching in the zipper. Finally, trim off any excess zipper tape at the top of your project, being careful not to cut too close to the stopper or the fabric itself. Your zipper should now be perfectly straight and beautifully integrated into your project.
Tips for Success and Common Mistakes to Avoid
While this method significantly simplifies zipper sewing, a few additional tips can further enhance your results and help you navigate potential pitfalls:
- Pre-Press Your Fabric: Always press your fabric thoroughly before you begin any cutting or sewing. This removes wrinkles and ensures a stable, flat surface to work with, which is foundational for straight seams.
- Use the Right Interfacing: The weight of your fusible interfacing should be appropriate for your fabric. For delicate fabrics, choose a lightweight interfacing. For heavier fabrics, a medium-weight option might be better. Avoid very stiff interfacing unless your project specifically calls for it, as it can make the zipper area too rigid.
- Test Your Iron Settings: Before fusing to your project fabric, always test a small scrap of your fabric and interfacing. This ensures your iron temperature is correct and that the interfacing fuses properly without damaging the fabric.
- Slow and Steady Wins the Race: When stitching, especially when using a zipper foot, sew slowly and deliberately. Rushing can lead to uneven stitches and fabric stretching, even with interfacing. Let your machine do the work.
- Employ a Zipper Foot: Using a zipper foot (or an invisible zipper foot for invisible zippers) is non-negotiable for professional results. It allows you to stitch incredibly close to the zipper teeth without hitting them, which is essential for a neat finish.
- Check for Even Tension: Ensure your sewing machine’s tension is correctly adjusted for your fabric and thread. Uneven tension can cause puckering or pulling, which can mimic the appearance of a wavy zipper.
- Pin Extensively: Don’t be shy with pins! While the fusible interfacing provides stability, extra pins, especially in longer zippers, help keep everything perfectly aligned during stitching. Remove pins just before your needle reaches them.
- Practice Makes Perfect: If you’re new to this technique, consider practicing on scrap fabric with a zipper. This will build your confidence and help you get a feel for the process before tackling your main project.
Achieve Professional Results: How to Sew Zippers Without Waves
Gone are the days of struggling with crooked or wavy zippers that detract from your meticulously crafted sewing projects. By incorporating the simple yet powerful hack of using fusible interfacing, as demonstrated in this guide, you unlock the secret to achieving perfectly straight, smooth, and professional-looking zipper installations every single time. This technique addresses the root cause of zipper woes—fabric stretch—and provides a stable foundation that allows you to sew with confidence and precision. Whether you are a beginner or an experienced sewist, embracing this method will undoubtedly elevate the quality and finish of your creations. Try this ingenious trick on your next project, and prepare to be amazed by the flawless results. Your garments and accessories will not only look store-bought but will also feel incredibly well-made, reflecting your enhanced skill and attention to detail. Happy sewing!
*All these amazing images are thanks to Miarti – Sewing Tips via YouTube. Do visit her channel to see more videos like this!