
Unlock the Secret to Flawless Tile Repair: How to Remove Tiles Without Breaking Them
Few things are as frustrating as a chipped, cracked, or awkwardly misplaced tile in your home. Traditional tile removal methods often involve brute force, leading to broken tiles, wasted materials, and unexpected costs for replacements. For rare, discontinued, or expensive tiles, this can be an even more disheartening prospect. But what if there was a simple, yet remarkably effective, method to remove tiles gently and without causing any damage, allowing you to reuse them seamlessly? Imagine being able to repair a single damaged tile or adjust a misaligned section without the need to buy a whole new box of tiles. This innovative technique, shared by experts like The Maker on YouTube, offers a game-changing approach to tile repair that even many seasoned professionals might not know about. It’s a cost-effective, environmentally friendly, and surprisingly easy hack that empowers homeowners and DIY enthusiasts to tackle tile projects with confidence.
This comprehensive guide will walk you through the entire process, from gathering your materials to the final touches of reinstallation. We’ll delve into why this method works so effectively, discuss the benefits of reusing your existing tiles, and provide crucial tips for ensuring a successful and safe project. Get ready to transform your approach to tile maintenance and discover how simple it can be to preserve the integrity and beauty of your tiled surfaces.
Essential Tools and Materials for Non-Destructive Tile Removal
Before embarking on your tile removal project, gathering the right tools and materials is paramount. This method relies on a few specialized items that, when used correctly, make the process surprisingly easy and efficient. Here’s a detailed list of what you’ll need:
- Angled Tile Cleaning Grout Remover: This specialized tool is designed to precisely scrape and remove old, hardened grout from around your tiles. Its angled tip allows for easy access into tight spaces, ensuring thorough grout removal without damaging the tile edges. Look for one with a comfortable grip for extended use.
- Welding Torch (or Heat Gun): This is the key to softening the tile adhesive. A small, handheld welding torch provides focused heat, but a high-quality heat gun can also work effectively, especially for those less comfortable with an open flame. The goal is to apply sufficient heat to the tile’s surface, which transfers to the adhesive beneath, making it pliable.
- Small Putty Scraper (or Thin Metal Spatula): Essential for gently prying the tile up. Choose a scraper with a thin, flexible blade that can easily slide underneath the tile without causing chips or cracks. A sturdy handle will provide better leverage.
- Trowel: Used for applying and spreading new cement or thin-set mortar evenly on the floor before reinstallation. A notched trowel is ideal as it creates ridges in the adhesive, ensuring a strong, consistent bond.
- Tile Spacers: Small plastic crosses or T-shapes used to maintain uniform gaps between tiles during reinstallation. These gaps are crucial for accommodating grout and ensuring a professional finish.
- Rubber Hammer (or Mallet): Used to gently tap tiles into place during reinstallation, ensuring they are level and securely seated without cracking them.
- Tile Grout: The material used to fill the spaces between tiles after reinstallation. Choose a color that matches your existing grout or complements your tiles. Ensure it’s appropriate for your tile type and location (e.g., sanded vs. unsanded, epoxy).
- Cement (or Thin-Set Mortar): This is the adhesive used to reattach the tile to the subfloor. A high-quality thin-set mortar is typically recommended for most tile applications, providing strong adhesion and durability.
- Vacuum Cleaner: To clean up debris and dust effectively during and after grout removal.
- Damp Cloth or Sponge: For wiping away excess grout and cleaning the tile surface.
- Safety Gloves and Eye Protection: Always wear appropriate safety gear, especially when using a welding torch or sharp tools.
Step-by-Step Guide: Effortless Tile Removal and Reinstallation
Step 1: Preparing the Area and Softening the Adhesive
The initial phase of this technique focuses on meticulously preparing the tile for removal and strategically applying heat to loosen the underlying adhesive. Precision and patience are key here to ensure the tile remains intact.
Begin by carefully scraping and removing all the old, hardened grout surrounding the tile you intend to remove. An angled tile cleaning grout remover tool will make this task significantly easier, allowing you to get into the narrow gaps and effectively dislodge the old grout. Work slowly and methodically around all four sides of the tile, ensuring you remove as much of the old grout as possible. Thorough grout removal is crucial, as any remaining grout can hinder the tile’s release and potentially cause it to chip during removal. Once the grout is sufficiently removed, use a vacuum cleaner to clear away all the leftover debris, dust, and broken grout pieces from the area. A clean workspace not only makes the subsequent steps easier but also prevents debris from getting trapped under the tile during reinstallation.
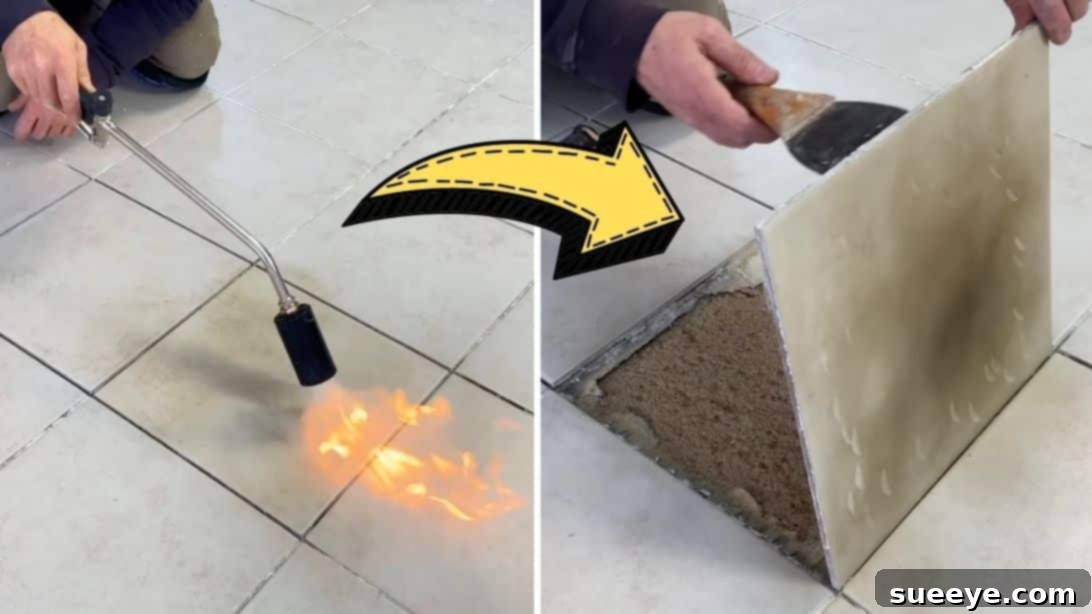
Next, grab your welding torch (or heat gun) and begin to apply heat directly to the surface of the tile. Move the flame or heat gun continuously across the entire surface of the tile, focusing on even distribution. The objective here is not to burn the tile, but to transfer heat through the tile to the adhesive underneath. The heat will cause the adhesive to soften and become pliable, significantly weakening its bond with both the tile and the subfloor. Continue heating for a few minutes, observing for any subtle changes, but be careful not to overheat one spot for too long. After applying heat, lightly tap the tile surface with a rubber hammer. This gentle percussion helps to further break any residual bond and indicate if the tile is starting to loosen.
Now, carefully insert the small putty scraper (or thin metal spatula) into one of the newly cleared grout lines along the side of the heated tile. Angle the scraper slightly and gently tap the handle of the putty scraper with your hand or a rubber hammer to push it further underneath the tile. The softened adhesive should allow the scraper to slide in relatively easily. Once the scraper is partially under, apply gentle, upward leverage. You should feel the tile start to separate from the floor. Repeat this process around all sides of the tile, working your way around and applying gentle pressure. This methodical approach will gradually prop the tile up, making it easier to fully release itself from the floor without cracking or breaking.
Step 2: Gentle Tile Removal and Flawless Reinstallation
With the adhesive softened and the tile propped up, the next stage involves carefully removing the tile, preparing the surface, and meticulously reinstalling it to achieve a seamless finish.
Once the tile has been successfully propped up from all sides, gently lift it completely from the floor. Take care not to force it, allowing the softened adhesive to release its grip. If you notice any dark burn marks on the back or surface of the tile from the torch, these can typically be wiped away easily using a damp cloth or sponge. Clean the tile thoroughly and set it aside in a safe place. If you are removing multiple tiles for retouching or replacement, repeat the exact same process for each tile, ensuring each one is carefully removed and cleaned. This technique is particularly effective for reusing existing tiles, maintaining a consistent aesthetic across your surface.
Now, turn your attention to the floor or area where the tile was previously attached. It’s crucial to remove any leftover hardened adhesive, cement, or grout from the subfloor. A chisel, scraper, or even an abrasive brush can be used to scrape away all residual material, creating a clean, level surface for the new tile. Any bumps or irregularities can prevent the new tile from sitting flush and securely. Vacuum the area again to ensure it’s free of dust and debris.
Prepare your cement or thin-set mortar according to the manufacturer’s instructions. Apply a generous, but not excessive, amount of cement to the cleaned area using your trowel. Spread the cement evenly across the entire surface where the tile will sit. Then, using the notched edge of your trowel, scrape through the wet cement to create parallel ridges or “trowel lines.” These ridges are vital as they allow air to escape when the tile is pressed down, ensuring full coverage of the adhesive and a stronger grip. The direction of the ridges should ideally be consistent for optimal bonding.
Carefully place the cleaned tile or tiles back into their original position, aligning them precisely with the surrounding tiles. Once positioned, use your rubber hammer to gently tap the tile across its entire surface. Start from the center and work your way outwards, ensuring even pressure. This helps to fully seat the tile into the wet cement, forcing out any air bubbles and creating a solid bond. Avoid hitting the tile too hard, which could cause it to crack.
Immediately after setting the tile, insert tile spacers at each corner of the newly laid tile, or between it and the adjacent tiles. These spacers ensure that the grout lines remain consistent and uniform while the cement dries. Allow the cement to cure according to the manufacturer’s recommendations (usually 24-48 hours) before proceeding to the grouting stage. Once the cement has fully set, mix your tile grout according to instructions. Using a grout float, spread the grout diagonally across the tile gaps, pressing it firmly into every crevice. Work in small sections, ensuring all gaps are completely filled. After applying the grout, wait for about 10-15 minutes (or as per grout instructions) for it to set slightly, then use a damp sponge or cloth to wipe away any excess grout from the tile surface. Clean diagonally across the tiles to avoid pulling grout out of the joints. Rinse your sponge frequently and continue wiping until the tile surface is clean and the grout lines are smooth and uniform. Allow the grout to cure completely before exposing it to heavy traffic or moisture.
Why This Tile Removal Method is a Game-Changer
The core genius of this technique lies in its understanding of tile adhesives. Most tile adhesives, particularly thin-set mortar, are thermosetting, meaning they can soften under heat. By applying controlled heat to the tile’s surface, the adhesive beneath warms up, becoming more pliable and losing its strong bond. This allows the tile to be gently pried up without the need for destructive force, preserving its integrity. Traditional methods often involve chiseling or hammering directly at the tile, which almost inevitably results in cracks, chips, or outright breakage. This heat-based approach minimizes risk and maximizes the chance of a successful, reusable tile removal.
Benefits of Reusing Your Existing Tiles
Beyond the satisfaction of a successful DIY project, reusing your existing tiles offers several compelling advantages:
- Cost Savings: The most immediate benefit is avoiding the expense of purchasing replacement tiles. This is particularly valuable for large format, specialty, or handcrafted tiles that can be quite costly.
- Environmental Friendliness: Reusing materials reduces waste, lessening your environmental footprint. By not sending broken tiles to a landfill, you contribute to more sustainable living.
- Aesthetic Consistency: Finding an exact match for an older or unique tile can be incredibly difficult, if not impossible. Reusing the original tile ensures perfect color, pattern, and texture consistency, maintaining the original look of your surface. This is vital for seamless repairs.
- Time Efficiency: While the process requires patience, it can often be quicker than sourcing and waiting for new tiles to arrive, especially for single-tile replacements.
Important Safety Precautions
Working with tools and heat requires diligence and adherence to safety guidelines:
- Eye Protection: Always wear safety glasses or goggles to protect your eyes from flying debris during grout removal and potential sparks from the torch.
- Gloves: Wear work gloves to protect your hands from sharp tools and the heat of the torch.
- Ventilation: When using a welding torch or heat gun, ensure the area is well-ventilated to avoid inhaling fumes.
- Fire Safety: Keep a fire extinguisher or a bucket of water nearby when using an open flame. Be mindful of flammable materials in the vicinity.
- Careful Handling: Exercise caution when using sharp scrapers and chisels. Always direct the force away from your body.
- Heat Gun vs. Torch: If you are uncomfortable with an open flame, a high-quality heat gun is a safer alternative that can achieve similar results.
Conclusion: Empowering Your DIY Tile Projects
Removing a tile without breaking it is no longer a mythical feat reserved for expert craftsmen. Thanks to clever techniques like the one shared by The Maker, you can confidently tackle tile repairs, replacements, or adjustments, saving money, reducing waste, and preserving the original beauty of your home. By understanding the principles behind heat-softened adhesive and applying careful, methodical steps, you can achieve professional-quality results with common DIY tools. So, the next time you face a tile dilemma, remember this innovative trick. You now have the knowledge and the method to perform a truly seamless tile repair, extending the life and appeal of your tiled surfaces.