
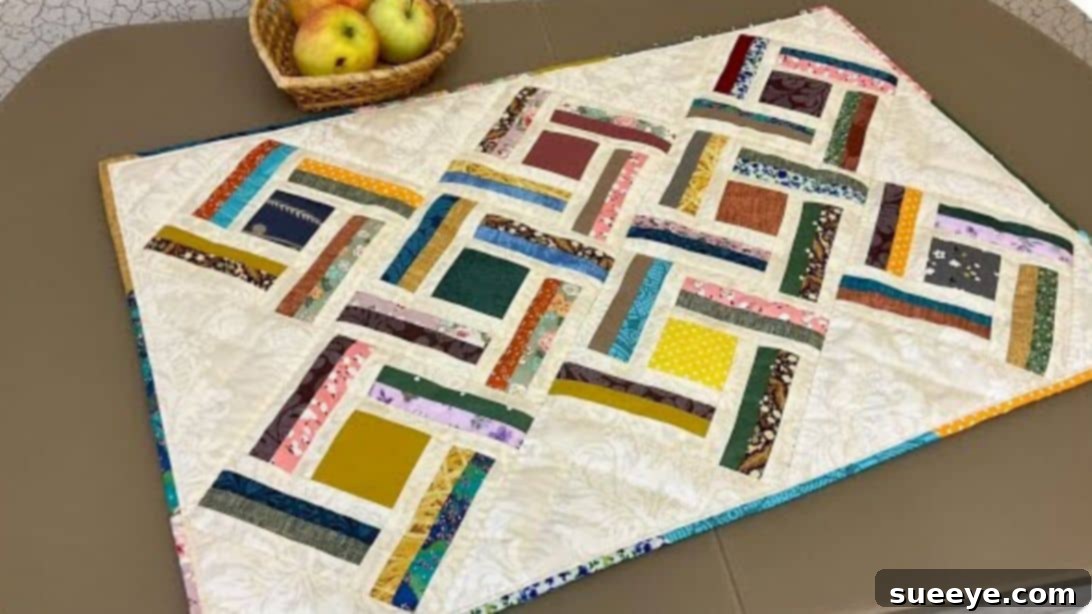
Easy Fabric Scrap Patchwork Block: A Beginner’s Guide to Sustainable Quilting
Quilting is a beloved craft, celebrated for its artistic expression and the warmth it brings to homes. However, any quilter will tell you that the creative process often results in an accumulation of fabric scraps. Not all quilt patterns utilize every inch of fabric from a pack; certain designs inherently require specific cuts, leading to a charming, yet ever-growing, stash of leftover pieces. While some innovative patterns, like the Bohemian Peak Layer Cake Quilt Pattern, are specifically designed for zero waste, most projects leave you with a treasure trove of remnants.
But fear not, these fabric scraps are far from waste! They represent endless possibilities for new, creative projects. For beginners looking to dive into the world of quilting without a significant investment in new materials, or experienced quilters aiming to declutter their stash, fabric scrap projects are the perfect solution. This comprehensive guide will walk you through creating an easy fabric scrap patchwork block, a foundational skill that opens doors to countless quilting adventures. Our inspiration for this simple yet effective tutorial comes from the clear instructions shared by The Melody of Sewing, making it accessible even for absolute novices.
Beyond this specific block, the world of scrap-busting is vast and varied. From intricate designs such as the Scrap Buster Creek Crossing Quilt to smaller, practical items, your fabric remnants can find a new purpose. If you’re seeking additional creative ways to repurpose even the tiniest pieces, be sure to explore 7 Easy and Practical Ways to Use Up Tiny Fabric Scraps for more inspiration.
Why Embrace Fabric Scrap Quilting? The Benefits of Zero-Waste Crafting
Engaging in fabric scrap quilting offers a multitude of advantages that go beyond simply clearing out your sewing room. It’s a practice that fosters creativity, promotes sustainability, and builds essential skills:
- Environmental Responsibility (Zero-Waste Approach): One of the most compelling reasons to use scraps is to reduce textile waste. By repurposing fabric remnants, you contribute to a more sustainable crafting lifestyle, lessening your environmental footprint. Every piece saved from the landfill is a win for the planet.
- Budget-Friendly Creativity: Quilting can be an investment. Utilizing your existing fabric scraps means you don’t have to constantly purchase new yardage for every project. This makes quilting more accessible and allows you to continue creating beautiful pieces without breaking the bank. It’s an economical way to fuel your passion.
- Unleash Unique Designs: Fabric scraps often come in a diverse array of colors, patterns, and textures. Combining these disparate pieces can lead to truly unique, eclectic, and visually stunning designs that you might not achieve with pre-planned fabric collections. Each scrap carries a memory, making your creations deeply personal and full of character.
- Perfect for Skill Development: For quilting beginners, working with smaller fabric pieces is an excellent way to practice fundamental techniques. It hones your precision in cutting, helps you master consistent seam allowances, and refines your pressing skills without the pressure of potentially spoiling expensive, large cuts of fabric. It’s a low-stakes environment for high-skill learning.
- Preserve Sentimental Value: Scraps often originate from cherished past projects, special gifts, or even inherited fabric stashes from loved ones. Incorporating these pieces into new quilts infuses your work with sentimental value and a rich narrative, transforming simple fabric into a woven story.
Essential Tools and Materials for Your Easy Patchwork Block
Before you begin piecing together your beautiful fabric scrap patchwork block, it’s crucial to gather the right tools and materials. Having these essentials on hand will ensure precision, efficiency, and a more enjoyable quilting experience, especially for those new to the craft. Beyond the specific fabric cuts listed below, here are the standard quilting tools you’ll need:
- Rotary Cutter, Mat, and Rulers: These are indispensable for accurate and efficient fabric cutting. A 45mm rotary cutter, a self-healing cutting mat (at least 18″x24″), and a set of clear acrylic rulers (a 6″x24″ for strips and a 6.5″x6.5″ or larger square-up ruler for blocks) are highly recommended.
- Sewing Machine: Any standard sewing machine capable of a straight stitch will work. Ensure it’s well-maintained and threaded correctly.
- Quality Thread: A neutral, 50-weight 100% cotton thread (like light gray, cream, or white) is ideal for piecing. It blends well with most fabrics and provides strong, durable seams.
- Iron and Ironing Board: Absolutely critical for setting and pressing seams. Proper pressing is key to flat, accurate blocks and a professional finish.
- Fabric Scissors: Useful for snipping threads, cutting templates, or making small adjustments.
- Quilting Pins or Fabric Clips: To hold fabric layers securely together before sewing, preventing shifting.
- Seam Ripper: An essential tool for every quilter, regardless of skill level. Mistakes happen, and a good seam ripper makes corrections simple.
Materials for One Easy Fabric Scrap Patchwork Block:
This particular patchwork design creates a striking visual with contrasting strips and a central square. Precision in cutting these pieces is paramount for a successful outcome:
- 8 pieces of 1″ x 5 1/2″ colored strips: These are your opportunity to incorporate a variety of your favorite fabric scraps. Choose coordinating colors, a vibrant rainbow, or a themed selection. Ensure these are cut with utmost accuracy.
- 8 pieces of 1″ x 5 1/2″ background strips: A consistent background fabric (e.g., a solid white, cream, light gray, or a subtle tone-on-tone print) will help highlight your colored scraps and unify the block’s design.
- 1 piece of 2 1/2″ center square: This will be the focal point of your block. Select a fabric that either contrasts sharply or harmonizes beautifully with your chosen strips.
Materials for Assembling Multiple Blocks and the Quilt Sides:
To construct a small quilt top or a larger project using several of your completed patchwork blocks, you’ll need additional background fabric for the surrounding elements that give your quilt its final shape and structure:
- 3 pieces of 7 1/2″ background squares: These larger squares will be cut diagonally to create the substantial corner triangles needed for the overall arrangement of your assembled blocks. They help to square up the layout and define the outer edges.
- 2 pieces of 6″ background squares: Similar to the above, these smaller squares will also be cut diagonally to form the final corner triangles, essential for completing the rectangular shape of your quilt top.
How to Make an Easy Fabric Scrap Patchwork Block: A Step-by-Step Tutorial
Now that you have your materials and tools ready, let’s embark on the hands-on process of constructing your beautiful fabric scrap patchwork block. Remember, taking your time and focusing on precision at each step will yield the best results.
Step 1: Constructing the Strip Units with Precision
Begin by pairing one 1″ x 5 1/2″ colored strip with one 1″ x 5 1/2″ background strip. Place them right sides together, carefully aligning their long edges. Sew them along one long side using a precise 1/4-inch seam allowance. This measurement is standard in quilting and is critical for accurate block construction. Repeat this step for all eight colored and eight background strips, creating eight individual two-strip units. Once these initial units are sewn, you will join them further. Take two of your freshly sewn two-strip units and place them right sides together, ensuring the colored sides are touching (or arranged as desired) and the raw edges are aligned. Sew these pairs together, again maintaining that consistent 1/4-inch seam. You will now have four larger units, each comprising four strips (e.g., colored-background-colored-background). After each seam is sewn, it is crucial to “set the seam” by briefly touching your iron to the stitched line. This melds the threads into the fabric, making the seam more stable. Then, carefully press each seam open or to one side (often towards the darker fabric to prevent seam allowances from shadowing through lighter fabrics). Consistent and careful pressing throughout this stage is paramount for creating flat, accurate units.
Step 2: Accurately Trimming the Four-Strip Units
With your four four-strip units sewn and meticulously pressed, the next step is to square them up. Each unit needs to be trimmed to a precise 5″ square. Position your unit on your cutting mat, aligning a seam line with a line on your square-up ruler. Using your rotary cutter, carefully trim off any uneven edges until you achieve a perfect 5″ x 5″ square. Repeat this for all four units. Accuracy here is vital, as these units form the building blocks of your central design. Take your time to measure from the sewn seams, not just the raw edges, to ensure your patterned elements are correctly centered within each square.
Step 3: Assembling the Central Patchwork Block
Now, it’s time to bring all the core elements together. Take your four precisely trimmed 5″ square strip units and your 2 1/2″ center square. Arrange them on a flat surface, such as your cutting mat or a design wall, to visualize the final block. Typically, the 2 1/2″ center square will be surrounded by the four 5″ strip units, creating a striking “four-patch” or “snowball” type effect where the strip units frame the central element. Once you are completely satisfied with your layout, begin sewing the units together. First, sew the units into horizontal rows (e.g., top row, middle row, bottom row), and then sew those rows together to complete the block. As you sew, maintain your 1/4-inch seam allowance and remember to “nest” your seams where possible (aligning intersecting seams from adjacent units) to reduce bulk and ensure points meet accurately. After sewing each section, set and press your seams flat. Finally, carefully trim the entire assembled block to a precise 7 1/4″ square. This final squaring ensures your block is perfectly dimensioned for joining with other blocks.
Step 4: Creating Multiple Blocks for Your Quilt Top
While one patchwork block is a delightful achievement, a quilt is typically composed of many such blocks. To create a small quilt top, as suggested in the original project, you will need to repeat Steps 1 through 3 to create a total of 8 of these precisely trimmed 7 1/4″ blocks. This repetitive task is an excellent opportunity to utilize the efficient technique of chain piecing. Chain piecing involves sewing multiple units consecutively without cutting your thread between them, creating a “chain.” This method significantly saves time, reduces thread waste, and helps maintain a consistent rhythm, leading to more uniform blocks.
Step 5: Preparing the Large Corner Triangles
To frame your assembled blocks and create a larger, more complete design, you will need to prepare background triangles. Take your three 7 1/2″ background squares. Using your rotary cutter and ruler, carefully cut each square diagonally from one corner to the opposite corner. This will yield six large triangles. These triangles are crucial for shaping the outer edges of your quilt top and providing a cohesive background for your vibrant patchwork blocks.
Step 6: Arranging the Quilt Top Layout for Visualization
Before any final sewing, it is absolutely essential to lay out all your components on a flat surface. This could be your floor, a large design wall, or a spacious table. Arrange your 8 completed 7 1/4″ patchwork blocks and the 6 large background triangles (from Step 5) according to your desired design. The provided image below serves as a clear visual guide for this arrangement. Pay meticulous attention to the orientation of each block and triangle. This step allows you to visualize the final design, make any necessary adjustments to color placement or orientation, and catch potential errors before you commit to sewing. Consider taking a photograph of your finalized layout for easy reference during the assembly stage.
Step 7: Final Assembly of the Quilt Top Structure
With your layout meticulously confirmed, it’s time for the final assembly of your quilt top. First, take your two 6″ background squares and cut them in half diagonally from corner to corner. This will yield four smaller triangles. These smaller triangles are specifically designed to fill in the outermost corners of your entire block arrangement, helping to form a perfectly rectangular or square quilt top. Now, following your carefully planned layout from Step 6, begin sewing the components together. It’s often easiest to assemble the blocks and triangles into horizontal or diagonal rows first. As you sew, carefully match all seams and maintain your consistent 1/4-inch seam allowance. After each row is complete, press the seams. Once all rows are sewn, join the rows together, again taking care to align intersection points for a neat and polished finish. Press your completed quilt top thoroughly and trim any excess fabric from the edges, ensuring your quilt top is perfectly square or rectangular and ready for the next stages of quilting: layering with batting and backing, quilting the layers together, and finally, binding the edges for a durable and attractive finish.
Essential Tips for Beginners: Mastering Your Fabric Scrap Patchwork Project
Quilting is a journey of continuous learning, and for beginners, a few key tips can make all the difference in achieving successful and enjoyable projects:
- Precision in Cutting is Non-Negotiable: The foundation of beautiful patchwork is accurate cutting. Even a slight deviation can cause blocks to not fit together properly. Always use a sharp rotary blade, a non-slip ruler, and a flat cutting surface. Double-check your measurements before making the cut.
- Pressing Matters More Than You Think: In quilting, we “press” seams, rather than “iron” them. Pressing involves lifting and placing the iron gently to avoid stretching the fabric. Consistent pressing (either open or to one side) helps your blocks lay flat and square, which is crucial for overall quilt assembly.
- Verify Your Seam Allowance: Before starting your project, sew two scrap strips together with your standard 1/4-inch seam. Measure the resulting width to ensure your seam allowance is indeed accurate. Adjust your machine if necessary. This small test prevents major headaches later.
- Starch for Stability: Applying a light spray of fabric starch (and pressing dry) to your fabric before cutting can add stability. This makes the fabric easier to cut precisely and reduces stretching, particularly with smaller pieces or bias edges.
- Embrace Chain Piecing: This efficiency booster is a must-learn. Sew multiple identical units consecutively without cutting the threads between them. This creates a “chain” of pieces, saving time and thread while maintaining momentum.
- The Seam Ripper is Your Friend: Every quilter, no matter how experienced, makes mistakes. Do not be afraid to use your seam ripper! It’s far better to unpick a seam and re-sew it correctly than to leave an error that compromises the look or integrity of your entire project.
- Embrace the “Scrappy” Aesthetic: While precision is vital in construction, the beauty of scrap quilting often lies in its spontaneous, eclectic charm. Don’t overthink color theory too much; sometimes the most unexpected combinations create the most delightful and unique results.
- Utilize Video Tutorials: For visual learners, watching video tutorials (like The Melody of Sewing’s original video) can provide immense clarity. Seeing techniques demonstrated in real-time often helps solidify understanding more than written instructions alone.
Beyond the Block: Your Next Steps in the Quilting Journey
Congratulations! Once you’ve successfully created this easy fabric scrap patchwork block and assembled your quilt top, you’ve completed a significant portion of your quilting journey. But the adventure doesn’t have to end here!
To transform your finished quilt top into a complete, functional quilt, you’ll embark on the final stages: adding batting (the fluffy middle layer that provides warmth and dimension), selecting a backing fabric, quilting all three layers together (stitching through the quilt top, batting, and backing to hold them in place and add texture), and finally, binding the edges for a neat, durable, and professional finish.
The skills you’ve gained from this beginner-friendly fabric scrap patchwork block are foundational and highly versatile. You can easily scale this block up or down for different projects, replicate it to create larger and more complex quilts, or even incorporate it into other sewing projects like placemats, tote bags, cushion covers, or wall hangings. So, gather your remaining scraps, let your creativity flow, and enjoy the immensely satisfying process of turning small remnants into something truly magnificent and meaningful!
Fabric Scrap Patchwork Block For Beginners
This project is perfectly suited for those just beginning their quilting journey, offering a gentle introduction to essential techniques while yielding a beautiful and functional outcome. Happy quilting, and enjoy transforming your scraps into treasured works of art!