
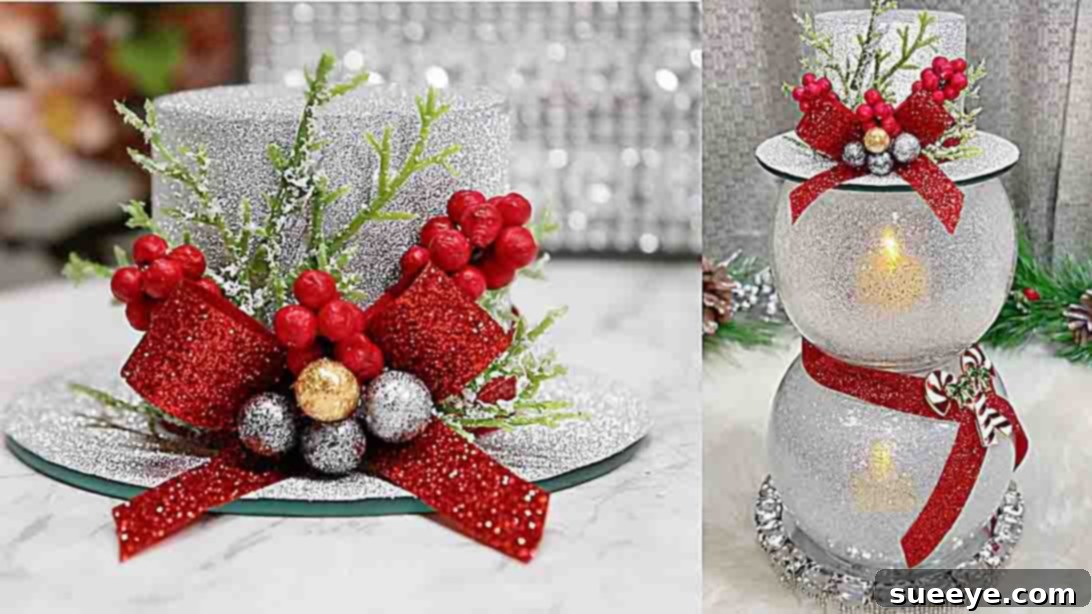
Transform your home into a winter wonderland this holiday season with a charming and elegant DIY snowman candle holder! Inspired by the incredible creativity of Dezi1016 aka Désirée, this project offers a fantastic opportunity to craft a truly unique piece of festive decor. Imagine the warm, flickering glow of a candle emanating from your very own handmade snowman, adding a touch of magic to any room. Not only is this project incredibly satisfying to make, but it’s also wonderfully budget-friendly, relying mostly on items you can find at your local Dollar Tree. Whether you’re looking for a delightful weekend activity with friends and family, a thoughtful handmade gift, or simply want to elevate your holiday display without breaking the bank, this DIY glass snowman is an absolute must-try.
RELATED: Explore More Festive Crafts: DIY Snowy Mason Jar Candle Holder Tutorial
This particular DIY decor has quickly become a personal favorite of mine. The finished product exudes such a professional and polished look, it’s hard to believe it was made from common craft supplies and Dollar Tree finds. It truly captures the essence of sophisticated holiday charm, resembling a high-end store-bought item rather than a simple DIY. If you’re ready to bring this adorable and elegant snowman to life for your holidays, join us as we dive into the detailed step-by-step tutorial. You’ll be amazed at how easily you can achieve such stunning results.
Essential Materials for Your DIY Glass Snowman Candle Holder
Gathering your materials is the first exciting step in any DIY project, and for this adorable snowman candle holder, you’ll find most items are readily available and incredibly affordable. Many of these can be sourced from Dollar Tree, helping you keep costs down while still achieving a high-quality finish. Here’s a detailed list of what you’ll need to create your festive masterpiece:
- Two Glass Vases from Dollar Tree:
- One 4-inch large glass vase (for the snowman’s body)
- One 3 1/2-inch small glass vase (for the snowman’s head)
- Tip: Look for simple, clear glass vases without intricate designs, as they provide the best canvas for glitter.
- One 4-inch Round Mirror: This will form the brim of your snowman’s hat, adding a touch of sparkle.
- Glitter Silver Contact Paper: Perfect for giving your snowman’s hat a shimmering, metallic finish.
- Red Berry Picks with Greenery: Essential for adding traditional festive color and texture to the hat and body.
- Silver Glitter Berries: These will complement the silver theme and add extra sparkle to your decorations.
- Red Glitter Ribbon: To wrap around the hat and the snowman’s “neck,” providing a vibrant accent.
- Silver Glitter: For coating the inside of the vases, creating a beautiful frosted, snowy effect.
- Sparkling Crystal Glitter: An optional addition, but highly recommended for an extra layer of shimmering enchantment.
- Flickering Teapot Candle (or LED Tealight): For a safe and warm glow. An LED candle is recommended for safety, especially if children or pets are around.
- Hot Glue Gun and Glue Sticks: Your primary tool for quick and secure assembly of decorative elements.
- Aleene’s Clear Tacky Glue: Ideal for adhering glitter smoothly to the inside of the glass vases.
- Aleene’s Ultimate Adhesive: A strong, durable glue necessary for securely bonding the glass vases together.
- Silicone Tipped Tweezers: Handy for precise placement of small embellishments.
- Small Thread Cutter Scissors: For clean and accurate cutting of ribbon and other delicate materials.
Step-by-Step Guide: Crafting Your Enchanting Glass Snowman Candle Holder
Embark on this delightful crafting journey with confidence! Each step is carefully outlined to ensure you achieve a professional-looking and incredibly charming glass snowman candle holder. Patience and attention to detail are key, especially during drying times.
Step 1: Preparing the Vases and Applying Glitter
Your first task is to prepare your glass vases. Start by thoroughly cleaning both the 4-inch large vase and the 3 1/2-inch small vase. This includes removing any labels, sticky residue, and smudges. A little warm soapy water and a soft cloth usually do the trick, or for stubborn labels, a product like Goo Gone can be very effective. Once clean, ensure they are completely dry, inside and out.
Next, it’s time to add that magical snowy sparkle! Pour a small amount of Aleene’s Clear Tacky Glue into the larger vase first. Using a damp brush, carefully spread the glue evenly across the entire interior surface, from the top rim down to the bottom. The goal is a thin, consistent layer without any thick clumps. Immediately after applying the glue, gently sprinkle your silver glitter inside the vase. Rotate and shake the vase slowly to ensure the glitter adheres to all the glue-coated surfaces, creating a uniform and sparkling finish. Repeat this process for the smaller vase. If you wish for a more intense sparkle, you can follow up with a layer of the sparkling crystal glitter over the silver. Set these aside to dry completely; this usually takes a few hours.
Step 2: Assembling the Snowman’s Body and Starting the Hat
Once the glitter in both vases is fully dry and secure, it’s time to assemble the snowman’s body. Apply a generous bead of Aleene’s Ultimate Adhesive around the rim of the larger, 4-inch vase. Carefully center the smaller, 3 1/2-inch vase on top of the larger one, ensuring it is perfectly aligned to create a stable and aesthetically pleasing snowman shape. Gently press down for a few seconds to initiate the bond. This adhesive is incredibly strong, but it requires ample curing time. It’s crucial to let the assembled vases dry overnight, or for at least 8-12 hours, to ensure a permanent and secure bond before moving on to further decoration. This drying period is essential for the structural integrity of your candle holder.
While your snowman’s body is curing, you can utilize this time efficiently by beginning the construction of its charming hat. The base of the hat can be a lid from a hairspray bottle, an empty small tin, or any similar cylindrical object you have on hand that fits proportionally on top of your smaller vase. This creativity in finding household items for crafting is part of the fun!
Step 3: Crafting and Decorating the Snowman’s Hat
Take your chosen hat base (e.g., a hairspray lid) and the 4-inch round mirror. Carefully cover the hat base with the glitter silver contact paper, ensuring a smooth, wrinkle-free application. Trim any excess paper with your small thread cutter scissors for a neat finish. Next, cover the “wrong side” (the non-reflective side) of the 4-inch round mirror with the same glitter silver contact paper. This creates a cohesive, sparkling look for the hat’s brim.
Now, using your hot glue gun, attach the covered hat base to the covered mirror, forming the classic top hat shape. The mirror acts as the brim, giving the hat its elegant structure. Once the basic hat structure is complete, it’s time to adorn it with festive embellishments. Wrap the red glitter ribbon around the base of the hat, securing it with dabs of hot glue. Then, arrange some red berry picks with greenery and silver glitter berries on the hat, creating a miniature festive arrangement. Use your silicone-tipped tweezers for precise placement, ensuring everything is securely glued.
Step 4: Adding the Finishing Touches and Display
With the hat beautifully crafted and the snowman’s body fully dry, it’s time for the final decorative flourishes. Take your red glitter ribbon and fashion a charming scarf or a simple accent around the “neck” (the point where the two vases meet) of your snowman. You can also attach small Christmas-themed pins or additional berry clusters to the snowman’s body for extra festive cheer.
For a truly personalized touch, consider adding small black glitter dots or tiny beads for eyes and an orange glitter carrot nose (made from foam or cardstock) to give your snowman a friendly face. These details can be easily applied with a tiny dab of tacky glue.
Finally, carefully place your flickering teapot candle (or LED tealight) inside the larger, bottom vase. The warm, soft glow will beautifully illuminate the glittered interior, creating a captivating display. Gently place the completed hat on top of the smaller vase to finish your magnificent DIY glass snowman candle holder. Your enchanting, handmade decoration is now ready to spread holiday cheer!
Tips for Success and Personalizing Your Snowman
To ensure your DIY glass snowman candle holder project goes smoothly and turns out perfectly, consider these helpful tips:
- Work Area Protection: Glitter can be messy! Lay down newspaper, craft paper, or a disposable tablecloth to protect your workspace.
- Ventilation: When working with glues and adhesives, ensure your area is well-ventilated.
- Patience is Key: Allow adequate drying time for all glues, especially when bonding the glass vases. Rushing this step can compromise the durability of your snowman.
- Glue Alternatives: If Aleene’s brand glues aren’t available, look for other clear-drying, strong craft glues for glass and a good tacky glue for glitter. Always check product instructions.
- Glitter Options: Experiment with different glitter colors (e.g., iridescent, gold, blue) to match your personal holiday theme. You could even use faux snow for a textured effect.
- Hat Variations: Instead of a top hat, you could create a knit cap look using felt or fabric, or even a whimsical Santa hat.
- Facial Features: For a simple face, use permanent markers for dots for eyes and mouth, and a small piece of orange craft foam for the nose. For a more dimensional look, use small black beads for eyes and a tiny clay or fabric carrot for the nose.
- Embellishment Ideas: Besides berries and ribbons, consider adding miniature pinecones, tiny bells, small faux poinsettias, or even a mini snowflake charm.
- Safety First: If using real flame candles, always supervise them and keep them away from flammable materials. LED flickering tealights offer a safer alternative with the same cozy ambiance.
Caring for and Displaying Your Handmade Snowman
Once your magnificent glass snowman candle holder is complete, you’ll want to display it proudly and ensure it lasts for many holiday seasons to come.
- Cleaning: To clean your snowman, gently dust it with a soft, dry cloth. Avoid using harsh chemicals or abrasive cleaners, especially on the glittered interior and delicate embellishments, as these can damage the finish.
- Storage: When the holidays are over, store your snowman in a protective box, wrapped in tissue paper or bubble wrap, to prevent damage to the glass or decorations. Keep it in a dry, temperature-controlled environment.
- Display Locations: This versatile piece looks stunning as a centerpiece on your dining table, perched on a mantelpiece, brightening a console table, or adding a festive touch to a bookshelf. Ensure it’s placed on a stable surface, away from edges where it could be accidentally knocked over.
- Gifting: This DIY snowman makes an exceptionally thoughtful and personalized gift. Package it carefully with a flickering LED candle inside, and it’s ready to bring joy to friends, family, or teachers.
Conclusion: Your Beautiful DIY Glass Snowman Awaits!
There you have it – a comprehensive guide to creating a truly enchanting DIY glass snowman candle holder! This project beautifully combines simplicity with elegance, allowing you to craft a stunning piece of holiday decor that looks far more expensive than it is. The joy of creating something beautiful with your own hands, especially for the festive season, is incredibly rewarding. Whether it becomes a cherished part of your annual decorations or a heartfelt gift, this sparkling snowman is sure to bring warmth and cheer.
We extend a huge thank you to Dezi1016 aka Désirée for sharing this brilliant and inspiring tutorial. Her creativity makes beautiful decor accessible to everyone. If you prefer to watch the crafting process unfold visually, be sure to check out her detailed video tutorial. Get ready to gather your materials, embrace your inner crafter, and illuminate your home with the magic of your very own handmade snowman this winter! Don’t forget to share your creations and inspire others!