
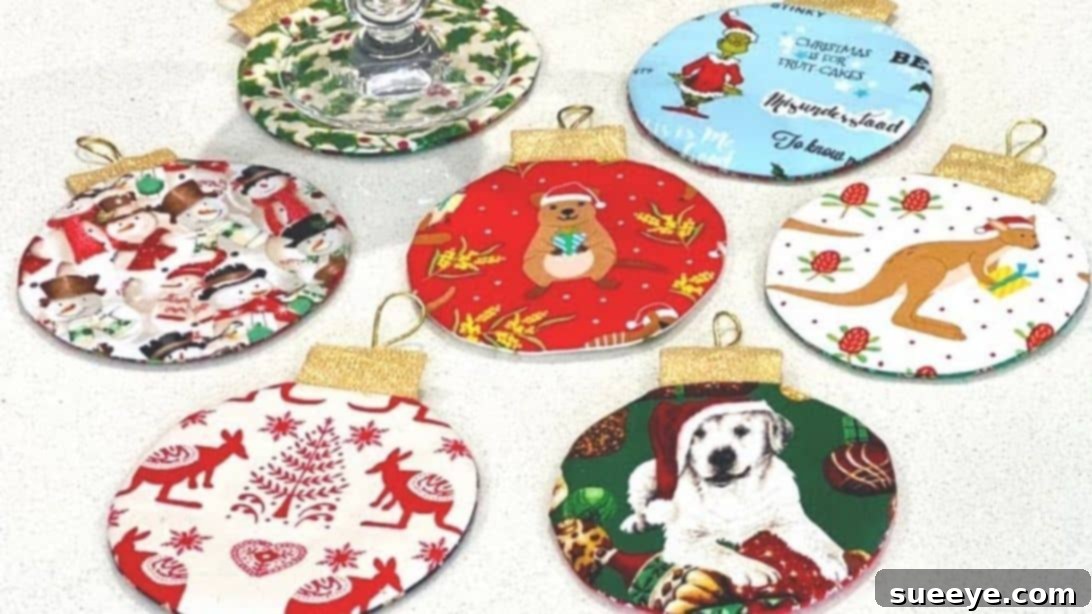
Craft Your Own Festive Magic: Easy DIY Christmas Ornament Fabric Coasters
Are you searching for a delightful and simple holiday craft to add a touch of handmade charm to your home this season? Look no further! These DIY ornament fabric coasters are not only incredibly inexpensive to make but also come with clear, easy-to-follow instructions perfect for crafters of all skill levels. Imagine creating a beautiful set for your own festive gatherings or gifting these unique, handcrafted treasures to friends and family. A personalized, thoughtful gift always leaves a lasting impression, and these fabric coasters are sure to do just that.
Using a variety of fabrics, you can easily whip up several pairs to match different decor themes or to suit individual preferences. This detailed sewing tutorial, inspired by the fantastic work of Notches Sewing on YouTube, will guide you through every step. Get ready to embark on a fun, creative journey and add a personal touch to your holiday decorations or gift-giving!
Why Make Your Own DIY Fabric Coasters?
Handmade crafts offer a unique blend of personal satisfaction and practical utility. Creating your own DIY fabric coasters provides numerous benefits beyond just having a place for your drinks. Here’s why this project is a must-try:
- Personalized Home Decor: Express your individual style by choosing fabrics that perfectly complement your home’s aesthetic. From vibrant holiday prints to elegant minimalist designs, the possibilities are endless.
- Budget-Friendly: Fabric coasters are an economical way to spruce up your home. You can often use fabric scraps from previous projects, reducing waste and saving money compared to buying store-bought alternatives.
- Thoughtful Handmade Gifts: Nothing says “I care” quite like a handmade gift. These coasters make fantastic presents for housewarmings, holidays, birthdays, or just because. They’re unique, functional, and infused with your personal touch.
- Beginner-Friendly Sewing Project: This tutorial is designed for ease, making it an excellent project for those new to sewing. It introduces fundamental techniques like cutting, fusing, stitching, and turning, building confidence for more complex projects.
- Creative Outlet: Engaging in crafts like sewing is a wonderful way to relax, de-stress, and unleash your creativity. It’s a rewarding activity that results in beautiful, tangible items you can be proud of.
- Durable and Practical: When made with quality materials and proper techniques, fabric coasters are surprisingly durable and effective at protecting your furniture from moisture rings and scratches.
Essential Materials You’ll Need
Gathering your materials before you begin ensures a smooth and enjoyable crafting experience. Most of these items are standard sewing supplies, making this a very accessible project.
- Fabric (2 pieces): Choose two coordinating or contrasting fabrics. Quilting cottons are ideal as they are easy to work with and durable. You’ll need enough to cut out your main coaster shapes.
- Fusible Batting (1 piece): This is crucial for giving your coasters body, absorbency, and heat resistance. Fusible batting has adhesive on one side that bonds to your fabric when pressed with an iron, simplifying the quilting process.
- Gold Fabric (1 piece): A small scrap of gold fabric is used to create the decorative “hanger” at the top, mimicking a real ornament. Metallic or shimmery fabrics work best for this festive touch.
- Cardboard: Any sturdy cardboard, like from a cereal box or a shipping package, will work for creating your reusable patterns.
- Elastic String: A small length of thin elastic string will form the loop of your ornament hanger. Choose a color that blends with your gold fabric.
- A Pair of Sharp Scissors: Essential for precise fabric and pattern cutting. Ensure they are fabric-only scissors to keep them sharp.
- Ruler: For accurate measuring and drawing straight lines.
- Sharpie or Fabric Marker: To trace your patterns onto the fabric and batting. A fabric-specific marker is recommended for dark fabrics.
- Sewing Machine: A basic sewing machine with a straight stitch function is all you need.
- Matching Thread: High-quality polyester thread that matches your main coaster fabric.
- Iron and Ironing Board: Indispensable for fusing the batting and pressing seams for crisp results.
- Pins or Fabric Clips: To hold fabric layers together while sewing.
Step-by-Step Directions to Craft Your Ornament Coasters
Step 1: Creating Your Patterns & Initial Cuts
Accurate patterns are the foundation of a well-made coaster. Take your time with this initial step to ensure all your pieces will fit together perfectly.
- Coaster Circle Pattern: On your chosen cardboard, draw a perfect circle with a diameter of 4 inches (approximately 11.5 cm). This will be the main body of your coaster.
- Ornament Top Pattern (Small Rectangle): Next, draw a smaller rectangular pattern on the cardboard, measuring about 3.8 cm long by 5.7 cm wide. This piece will form the metallic top of your ornament coaster.
- Cutting Your Patterns: Carefully cut out both the circle and the small rectangle cardboard patterns. These will be your templates for cutting fabric.
- Prepare Main Fabric Squares: Take one of your main coaster fabrics. Cut a square piece, approximately 5 inches (or 12.7 cm) in size. This gives you ample room to work with.
- Trace the Circle: Place your cardboard circle pattern on top of this 5-inch fabric square and trace around it with a sharpie or fabric marker. This line will serve as your main sewing guide later.
Step 2: Preparing Your Fabrics & Assembling the Hanger Loop
This stage involves preparing your batting and creating the small, yet crucial, ornament hanger loop.
- Cut Fabric Squares: From your two different main fabrics, cut three 5-inch squares from each (total of 6 squares if making multiple coasters). You’ll use these for the front and back of your coasters.
- Cut Fusible Batting: Cut one 5-inch square from your fusible batting for each coaster you plan to make.
- Prepare Gold Fabric for Hanger: Using your small rectangular cardboard pattern (3.8cm x 5.7cm), cut two pieces from your gold fabric for each coaster. These will form the top “cap” of the ornament.
- Cut Elastic String: Cut a piece of elastic string approximately 2.5 inches (or 6.35 cm) long for each coaster. This will be the hanging loop.
- Fuse Batting to Fabric: Place one of your main fabric squares on your ironing board with the wrong side facing up. Lay a fusible batting square on top, ensuring the glue side of the batting is facing down onto the wrong side of the fabric. Press firmly with a warm iron according to the batting manufacturer’s instructions to create a strong bond. This forms the base layer of your coaster.
- Trace Coaster on Batting: On the back (batting side) of this fused fabric square, place your cardboard circle pattern and trace around it with your sharpie. This will be your primary sewing line for the coaster body.
Step 3: Sewing Your Coaster to Life
Now for the exciting part – bringing your coaster to life with your sewing machine!
- Prepare the Ornament Hanger: Take one of your gold fabric rectangles. Fold it in half lengthwise, wrong sides together, and press to create a crease. Form a loop with your 2.5-inch elastic string and insert the raw ends into the middle of this crease, aligning them with the raw edge of the folded fabric. Pin or clip in place.
- Sew the Hanger Loop: Using your sewing machine, sew across the raw edge of the gold fabric, securing the elastic loop in place. Use a small seam allowance, about ¼ inch (6mm).
- Finish the Ornament Top: Place the other gold fabric rectangle on top of the first, right sides together, sandwiching the elastic loop inside. Pin all around. Sew along the two longer sides and one short side, leaving the side where the elastic is still open. Use a ¼ inch (6mm) seam allowance. Trim corners diagonally, then turn the piece right side out. Use a point turner or a blunt object to gently push out the corners. Press flat and set aside.
- Attach Hanger to Coaster Base: Take your fused fabric square with the traced circle (batting side facing up). At the top center of the circle, make two small notches or marks to indicate where the ornament top will be inserted. Slide the raw, open edge of the finished gold ornament top (the side where you left it open) into these notches, making sure the loop faces inwards towards the center of the circle. Clip or pin it securely in place. The raw edge of the gold piece should align with the traced circle line.
- Add Back Fabric: Place another 5-inch square of your main fabric on top of the first fabric, with right sides facing each other. This means the batting side of the first piece is now facing down, and the right side of the second piece is facing up, with the gold hanger sandwiched between the two main fabric layers. Pin all layers together securely.
- Sew the Coaster: Begin stitching around the traced circle pattern you made on the batting. Leave a 1.5 to 2-inch opening at the bottom of the circle for turning. Remember to backstitch at the beginning and end of your stitching line to secure the seams.
- Trim and Notch: Once sewn, carefully cut around the stitched circle, leaving a ¼ inch (6mm) seam allowance from your stitching line. Crucially, make small notches or clips all around the curved edge (don’t cut through your stitches!), especially in tighter curves. This will help the fabric lay smooth when turned right side out.
- Turn Right Side Out: Gently push the fabric through the opening you left at the bottom. Take your time to carefully turn the entire coaster right side out. Use a point turner or a chopstick to gently push out the curves and ensure a smooth, round shape.
- Press and Finish: Give your coaster a quick press with a warm iron to flatten all the seams and achieve crisp edges. Finally, hand-sew the opening closed using an invisible stitch (also known as a ladder stitch) to create a neat, seamless finish.
Tips for Sewing Perfect Fabric Coasters
Even for simple projects, a few expert tips can make all the difference in achieving a professional-looking finish.
- Pre-wash Your Fabric: Always pre-wash and dry your fabrics before cutting and sewing. This prevents shrinking after your coasters are made and ensures they remain a consistent size.
- Use a Walking Foot: If you have one, a walking foot on your sewing machine can be incredibly helpful when sewing through multiple layers of fabric and batting. It helps feed all layers evenly, preventing puckering.
- Press, Press, Press: Pressing your fabric at each stage, especially after fusing batting and turning, is crucial for crisp, clean seams and a professional appearance.
- Clip Curves Generously: Don’t be shy about clipping the curves after stitching. More clips (without cutting through stitches) result in a smoother, rounder edge when turned right side out.
- Take Your Time: Rushing through sewing can lead to mistakes. Enjoy the process, take your time with each step, and focus on precision.
- Use Good Quality Thread: A strong, good-quality polyester thread will ensure your seams hold up well over time and through washes.
- Practice Your Invisible Stitch: If you’re new to the invisible stitch, practice on scrap fabric first. A well-executed invisible stitch makes the closure truly disappear.
Customization Ideas for Your Unique Coasters
While these are designed as Christmas ornaments, the basic pattern is incredibly versatile. Here are some ideas to make them truly your own:
- Seasonal Themes: Swap out Christmas fabrics for spring florals, autumnal leaves, or spooky Halloween prints to create coasters for any holiday or season.
- Everyday Elegance: Use sophisticated prints, solid colors, or even denim scraps for everyday use. You can omit the elastic hanger if you prefer a standard coaster look.
- Personalized Touches: Embroider initials, small motifs, or use fabric paint to add names or special dates, making them even more meaningful as gifts.
- Shape Variations: While the tutorial focuses on circles, you can adapt the technique to other simple shapes like squares, hexagons, or even stars (though sharp points might be trickier for beginners).
- Embellishments: Add small bows, decorative buttons, or fabric appliques for extra flair.
- Different “Hangers”: Instead of gold fabric and elastic, you could use a small piece of ribbon, twine, or even a different contrasting fabric for the hanger.
Caring for Your Handmade Fabric Coasters
To ensure your beautiful DIY fabric coasters last for many seasons to come, proper care is essential. Most fabric coasters, especially those made with quilting cottons and polyester batting, can be machine washed on a gentle cycle with cold water. Lay them flat to air dry to maintain their shape. Avoid high heat in dryers, which can potentially warp the batting or shrink the fabric unevenly. A quick press with an iron after drying will keep them looking fresh and crisp.
*All images used here are credited to Notches Sewing via YouTube. If you loved this tutorial then visit and follow her channel for more amazing sewing projects.
Conclusion: Enjoy Your Beautiful Handmade Creations
Congratulations! You’ve successfully created your own set of charming DIY Christmas ornament fabric coasters. This project is a testament to how simple sewing techniques can transform basic materials into beautiful, functional pieces for your home or thoughtful, personalized gifts for loved ones. Whether you’re decking your own halls or spreading holiday cheer with handmade presents, these coasters are sure to be cherished.
Don’t stop here! The world of fabric crafts is vast and rewarding. We encourage you to experiment with different fabrics, colors, and embellishments to create even more unique coasters. Share your creations, inspire others, and continue to explore the joy of making. Happy crafting!