
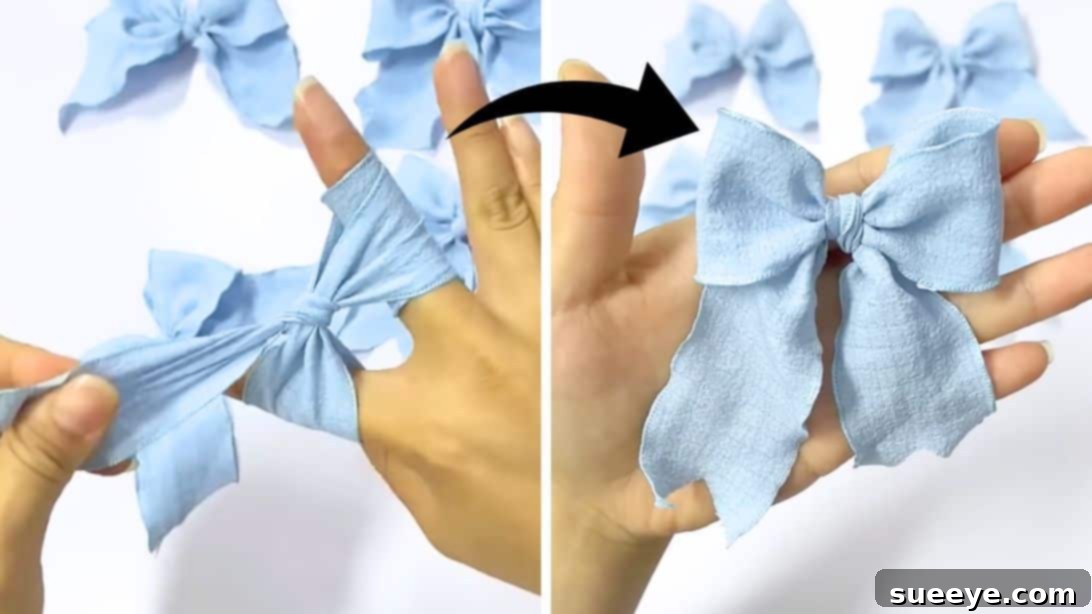
In recent years, the humble bow has experienced an incredible resurgence, transforming from a simple accent into a true statement piece. From delicate hair accessories to elaborate gift adornments, and even unexpected places like fashion runways and elegant cake designs, bows are everywhere. While they’ve always held a special charm, this modern wave of popularity, particularly for those crafted from thin ribbons, has captivated a new generation of enthusiasts and crafters alike. Their timeless appeal lies in their ability to add a touch of whimsy, sophistication, or celebration to almost anything they grace.
RELATED: 3D Bow Tie Quilt Block Tutorial
My own fascination with bows began in childhood. I vividly recall a time when my mother would meticulously choose a different bow hair clip for me to wear each day. We had a rainbow of colors and an array of sizes, offering endless possibilities to match every outfit and mood. Those cherished memories, coupled with the current bow trend, sparked a desire within me to recreate that magic. A few weekends ago, armed with a stash of colorful fabric scraps, I embarked on my own bow-making adventure. Much to my dismay, the results were consistently lopsided and undeniably “wonky.” Despite multiple attempts, my dream of crafting perfect, symmetrical bows remained frustratingly out of reach, leading me to a temporary surrender.
Determined not to be defeated, I decided to seek out a smarter solution. My quest led me to the vast world of online tutorials, where I stumbled upon an absolute gem: an ingenious method shared by Brilliant Art on YouTube. I was utterly astonished by how incredibly easy and lightning-fast this technique was! What had once been a source of crafting frustration quickly transformed into an enjoyable and rewarding experience. My initial plan was to convert these beautifully handmade bows into charming hair clips, but I also envisioned saving a collection of them for future gift embellishments, ready to add a personal, elegant touch to any present.
Whether you’re looking to elevate your gift wrapping, create custom hair accessories, or simply add a touch of handmade charm to your home decor, this finger-wrapping method is an absolute game-changer. It’s a skill that once mastered, you’ll find yourself using again and again. For instance, imagine the festive delight of perfectly tied bows adorning your holiday gifts—be sure to save this article for Christmas time and beyond! This technique is not just about making bows; it’s about unlocking a simple yet powerful way to personalize and beautify countless items with ease and creativity.
Here’s another clever trick you might want to try for elegant gift presentation: How to Close a Gift Bag Without Tape
Mastering the Art of Quick Bow Making: Your Go-To Guide
Creating perfect bows often seems like a daunting task, requiring precise hand-eye coordination and a knack for knot-tying. However, this brilliant finger-wrapping technique demystifies the process, allowing anyone to craft beautiful, symmetrical bows in a matter of seconds. Forget complex tools or intricate instructions; all you need is your ribbon, a pair of scissors, and your own two hands. Let’s dive into the steps that will transform you into a bow-making maestro, ready to add a touch of elegance to any project.
Step 1: The Foundation Wrap – Setting Up Your Bow
Begin by taking one end of your chosen ribbon. Gently lay this end across your middle finger. Then, carefully wrap the ribbon once around your middle finger, ensuring it crosses over itself on the palm side. Continue by wrapping the ribbon a second time, this time around both your index and middle fingers. The goal here is to create two parallel loops on the back of your hand, with the working end of the ribbon extending from underneath your fingers. Maintain a comfortable, consistent tension—not too tight to constrict your fingers, but firm enough to hold the ribbon securely in place.
Step 2: Creating the V-Shape Loop – Preparing for the Knot
With the ribbon securely wrapped around your index and middle fingers, it’s time to form the core of your bow. Gently separate or open your index and middle fingers, creating a distinct V-shape between them. This separation will create a gap that is crucial for the next step. Ensure the loops of ribbon remain neatly stacked on your fingers as you perform this action. The V-shape provides the necessary space to maneuver the working ribbon through, laying the groundwork for a perfectly centered knot.
Step 3: Securing the First Loop – The Critical Cross-Over
Now, take the working end of the ribbon—the part that is still connected to the spool or your remaining ribbon length. Carefully insert this working ribbon between the bottom of your fingers (the base of your index and middle fingers) and the wrapped ribbon loops. Guide it upwards and over the top of the wrapped ribbon, pulling it tightly through the V-shaped gap you created in the previous step. This action essentially creates the first half of your knot, cinching the center of what will soon become your bow. Pulling it tightly here is key to ensuring a secure and well-defined center for your finished bow.
Step 4: The Final Knot – Tying It All Together
Continue with the working ribbon. This time, insert it through the loop you just created in Step 3. Essentially, you are completing a simple knot around the center of your nascent bow. Once inserted, pull the working ribbon tightly to secure the knot. This action will firmly hold the two main loops of your bow in place, forming the classic bow shape. Ensure that both ends of the ribbon are pulled with even tension to prevent the bow from becoming lopsided. This step is where the magic happens, transforming the wrapped ribbon into a recognizable bow form.
Step 5: The Finishing Touches – Perfecting Your Creation
With the knot securely tied, gently slide the bow off your fingers. You’ll now have a beautiful, symmetrical bow. The final step is to fix and trim the ends. Use a sharp pair of scissors to cut the ribbon tails to your desired length. You can cut them straight, at an angle, or create a V-shape for a more polished look. A little fluffing and adjusting of the loops might be needed to give your bow its perfect, voluminous shape. This method yields consistently stunning results, making it an indispensable skill for any DIY enthusiast.
Beyond the Basics: Unleashing Your Bow-Making Creativity
Now that you’ve mastered the quick finger-wrapping technique for making perfect bows, the possibilities are truly endless. This simple skill opens up a world of creative opportunities, allowing you to personalize gifts, enhance your decor, and add unique touches to countless projects. Let’s explore how you can elevate your bow-making game and apply this newfound talent.
Choosing the Perfect Ribbon for Your Project
The type of ribbon you select dramatically impacts the final look and feel of your bow. Each material offers unique characteristics:
- Satin Ribbon: Offers a luxurious, glossy finish, perfect for elegant gift wrapping, wedding decor, or sophisticated hair accessories. It drapes beautifully and holds a soft shape.
- Grosgrain Ribbon: Known for its ribbed texture, grosgrain is sturdy and holds its shape exceptionally well. It’s ideal for projects requiring a firm, defined bow, such as hair clips, keychains, or sturdy embellishments.
- Organza Ribbon: Transparent and airy, organza adds a delicate, ethereal touch. It’s wonderful for light, voluminous bows on sheer gift bags or layered with other ribbons for added texture.
- Wired Ribbon: The ultimate choice for bows that need to maintain a specific shape. The wire along the edges allows you to mold and fluff your loops to perfection, making it excellent for wreaths, large gifts, and home decor.
- Velvet Ribbon: Adds a rich, classic, and tactile feel, perfect for holiday decor, luxurious packaging, or adding warmth to clothing.
Experiment with different widths and textures to see how they transform your bows. Thinner ribbons create delicate bows, while wider ribbons result in bolder, more dramatic statements.
Sizing Your Bows for Every Occasion
The beauty of this finger-wrapping method is its adaptability. You can easily adjust the size of your bow by changing the number of fingers you wrap the ribbon around, or even by using a different object (like a fork for tiny bows, or a wider piece of cardboard for extra-large bows).
- Tiny Bows: Ideal for card making, scrapbooking, doll clothing, or small jewelry boxes.
- Small to Medium Bows: Perfect for hair clips, gift tags, party favors, or cupcake toppers.
- Large Bows: Excellent for wrapping presents, decorating wreaths, tying back curtains, or creating statement hair accessories.
Consider the scale of your project when deciding on your bow’s dimensions. A perfectly proportioned bow enhances the overall aesthetic.
Troubleshooting Common Bow-Making Issues
Even with the easiest method, sometimes a bow might not turn out exactly as planned. Here are some quick fixes:
- Wonky Loops: If your loops are uneven, gently pull each loop from the center knot until they are symmetrical. Consistent tension throughout the wrapping and tying process is key to preventing this.
- Loose Knot: If the bow feels flimsy, carefully re-tighten the knot by pulling both the main ribbon loops and the tail ends. A firm knot holds the structure.
- Fraying Ends: For ribbons prone to fraying, use a sharp pair of fabric scissors for a clean cut. For synthetic ribbons, you can lightly singe the very edges with a flame (carefully!) to seal them. For natural fibers, a dab of clear fabric glue or fray check can help.
Practice makes perfect, so don’t be discouraged by initial imperfections. Each bow you make will refine your technique.
Endless Applications: Where Can You Use Your Handmade Bows?
The versatility of handmade bows is truly astounding. Once you start making them, you’ll find reasons to add them to everything!
- Hair Accessories: Transform plain hair clips, headbands, or ponytail holders into stylish statements. Attach bows to elastic bands for a quick, charming touch to any hairstyle.
- Elegant Gift Wrapping: Elevate any present, from birthday gifts and baby shower favors to elaborate Christmas packages, with a custom-made bow. They add a personal and luxurious feel.
- Home Decor Accents: Use bows to adorn wreaths, garlands, candles, picture frames, or even tie back curtains for a touch of refined elegance. They can instantly refresh any space.
- Fashion & Craft Embellishments: Sew them onto clothing, handbags, or shoes. Incorporate them into scrapbooking, card making, DIY ornaments, or other crafting projects for a unique flair.
- Special Event Decor: Handmade bows are perfect for weddings (bouquets, chair sashes, favors), parties, or any celebration where a personalized, festive touch is desired.
Your creativity is the only limit! These bows are a simple yet powerful way to add beauty and personal touch to the world around you.
Elevate Your Bows: Adding Personal Touches
Once you’re comfortable with the basic technique, consider adding embellishments to make your bows truly unique. You can glue small beads, sequins, or rhinestones to the center of the bow. Layering two different ribbons—a wider one underneath a narrower one—can create a stunning multi-dimensional effect. You can also experiment with different knot styles for the center, though the basic method provides a clean, classic look. Don’t be afraid to mix and match colors and textures to match your project’s theme perfectly.
The joy of creating something beautiful with your own hands is incredibly rewarding. This quick and easy bow-making technique not only saves you money but also allows for endless customization, ensuring your creations are always unique and reflective of your personal style. So, grab your favorite ribbons, follow these simple steps, and prepare to be amazed by the perfect bows you can create in an instant. Happy crafting, and don’t forget to save this guide for all your future bow-making needs!