
The World’s Best Chocolate Chip Cookies: A Recipe for Unforgettable Indulgence
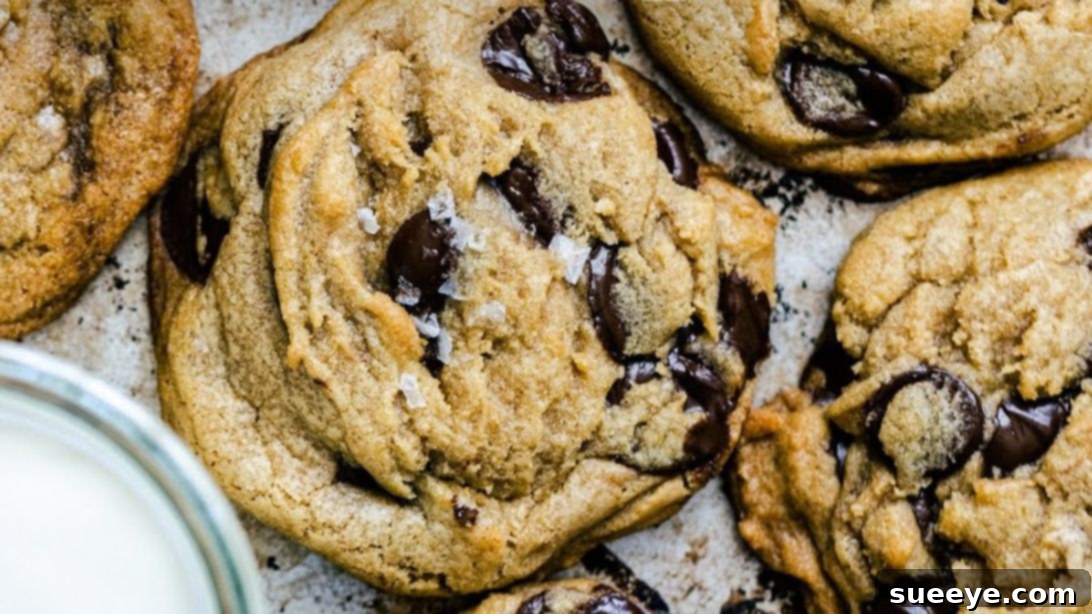
Prepare yourself for a culinary revelation! This isn’t just another cookie recipe; it’s a journey to discovering what might genuinely be the world’s best chocolate chip cookie. Inspired by a fantastic method I encountered, these cookies consistently deliver an unparalleled experience that will make them an instant staple in your home. Forget everything you thought you knew about chocolate chip cookies because these are truly in a league of their own. They strike the perfect balance between contrasting textures and harmonious flavors – an irresistible combination of crisp, golden edges and a wonderfully soft, unbelievably chewy center. With just the right amount of sweetness, complemented by a hint of nutty depth from brown butter, every bite is pure bliss. Get ready to bake a batch that will impress everyone who tries them, yourself included!
What sets this recipe apart? It’s all in the details, starting with the magical transformation of butter into a golden, fragrant elixir that infuses the entire cookie with an extraordinary depth of flavor. Coupled with a thoughtful combination of sugars and a straightforward baking process, even novice bakers can achieve professional-level results. Whether you’re making them for a special occasion, a cozy night in, or simply to satisfy a sudden craving, these cookies are guaranteed to become a cherished favorite. Let’s dive into the simple steps to create these masterpieces.
Ingredients: Crafting Perfection from Simple Components
The secret to extraordinary cookies begins with selecting quality ingredients. Each component in this recipe plays a vital role in achieving that perfect taste and texture profile.
- 1/2 cup (113g) high-quality unsalted butter: This will be browned, lending a deep, nutty flavor that elevates the entire cookie. Unsalted butter allows you to control the salt content precisely.
- 1/2 cup (100g) granulated white sugar: Contributes to crispness, browning, and overall sweetness.
- 1/2 cup (110g) dark brown sugar, packed: Essential for chewiness and moisture. Dark brown sugar also adds a rich, molasses-like flavor that complements the browned butter beautifully.
- 1 large egg (room temperature): A room temperature egg emulsifies better with the fats and sugars, leading to a smoother, more uniform dough and a better cookie texture.
- 1 teaspoon pure vanilla extract: Don’t skimp on quality here! Vanilla enhances the chocolate and butter flavors, adding warmth and complexity.
- 1/2 teaspoon kosher salt: Crucial for balancing the sweetness and bringing out the flavors. Kosher salt has larger crystals that dissolve slower, providing a subtle burst of saltiness.
- 1/2 teaspoon baking soda: Acts as a leavening agent, helping the cookies spread and become tender. It reacts with the acidic brown sugar to create lift.
- 1 1/3 cups (160g) all-purpose flour: The structural backbone of the cookie. Proper measurement is key – spoon and level the flour, don’t scoop directly from the bag.
- 1 cup (approx. 170g) large chocolate chips or chunks: High-quality chocolate makes a significant difference. Large chips or chopped chocolate bars create pockets of molten chocolate throughout the cookie. Feel free to use a mix of milk, semi-sweet, or dark chocolate to suit your preference.
Instructions: Your Step-by-Step Guide to Cookie Bliss
Step 1: The Magic of Brown Butter
Begin by adding your 1/2 cup of high-quality unsalted butter to a light-colored saucepan. The light color allows you to easily observe the browning process. Melt the butter slowly over medium-low heat. Continue to cook, stirring occasionally, until the butter transforms. It will foam, then subside, and eventually, small brown specks will appear at the bottom of the pan, and the butter will turn a rich, amber color with a wonderfully nutty aroma. This process typically takes about 5-7 minutes. Watch it carefully to prevent burning! Once browned, immediately transfer the butter to a heatproof mixing bowl to stop the cooking process. Allow it to cool for approximately 5 minutes – it should still be warm but not scalding hot, which could scramble the egg.
Step 2: Creaming the Sugars
To the cooled brown butter, add 1/2 cup of granulated white sugar and 1/2 cup of dark brown sugar. Using a spatula or wooden spoon, mix vigorously until the sugars are well incorporated into the butter. The mixture should be smooth and creamy. This step helps to dissolve the sugar crystals, contributing to a chewier cookie texture.
Step 3: Integrating Wet Ingredients
Now, crack one room-temperature egg into the butter and sugar mixture. Mix thoroughly until the egg is completely combined and no streaks remain. Next, add 1 teaspoon of pure vanilla extract, 1/2 teaspoon of kosher salt, and 1/2 teaspoon of baking soda. Continue mixing until all these wet ingredients are fully integrated and the mixture is smooth and cohesive. Proper mixing at this stage ensures even distribution of flavors and leavening.
Step 4: Folding in Dry Ingredients and Chocolate
Gently add 1 1/3 cups of all-purpose flour to the wet mixture. Mix with your spatula or wooden spoon until just combined. Be careful not to overmix the dough once the flour is added, as this can develop the gluten too much, resulting in tougher cookies. The dough should still have a few streaks of flour visible. Then, fold in 1 cup of your chosen large chocolate chips or chunks. Mix just enough to distribute the chocolate evenly throughout the dough. You want pockets of chocolate, not a completely homogenous mixture.
Step 5: Preparing for Baking – Scoop and Chill (Optional, but Recommended)
Line a large baking sheet with parchment paper. Using an ice cream scoop (a 2-tablespoon capacity scoop works well for large cookies), scoop generous dollops of the cookie dough onto the prepared baking sheet. Space them approximately 2 inches apart, as the cookies will flatten and spread during baking. For an extra touch of gourmet flair and to enhance the flavor, sprinkle a tiny pinch of flaky sea salt on top of each dough ball before baking. This contrasts beautifully with the sweetness.
Pro Tip for Texture: If you prefer thicker, chewier cookies that hold their mound-like shape better, place the scooped cookie dough balls in the refrigerator for about 5 to 10 minutes. This brief chill allows the butter to firm up slightly, preventing excessive spreading. However, if your preference leans towards flatter, crispier-edged cookies, you can skip the chilling step and bake them immediately. Both methods yield delicious results, so choose what best suits your cookie craving!
Step 6: Baking and Cooling for Perfection
Preheat your oven to 350°F (175°C). Once preheated, place the baking sheet with the cookie dough in the oven and bake for approximately 12 to 14 minutes. Baking times can vary slightly depending on your oven, so keep an eye on them. The cookies are done when their edges are golden brown and slightly crispy, but the centers still look slightly soft and gooey. This ensures that coveted chewy interior.
Once baked to perfection, carefully remove the baking sheet from the oven. Resist the urge to move them immediately! Allow the cookies to cool on the baking sheet for 5 to 6 minutes. This crucial cooling time allows them to set up properly, preventing them from breaking apart when you transfer them. After this initial cooling, gently transfer the cookies to a wire rack to cool completely. Enjoy your masterpiece warm, or cooled – they are truly incredible either way!
Why These Are “The World’s Best” Chocolate Chip Cookies
What makes this particular recipe stand out from the countless others? It boils down to a few key elements that work synergistically to create an unforgettable cookie:
- Brown Butter Magic: The browning of the butter isn’t just a step; it’s a flavor infusion. It introduces complex nutty, caramel-like notes that elevate the base flavor far beyond what regular melted butter could achieve.
- The Perfect Sugar Blend: The combination of white and dark brown sugar is intentional. White sugar contributes to crisp edges and spread, while dark brown sugar is the hero for that signature chewiness and deep molasses flavor.
- Texture Contrast: The delicate balance of crisp edges contrasting with a soft, gooey, and chewy center is precisely what cookie dreams are made of.
- Strategic Salt: Using kosher salt in the dough and a sprinkle of flaky sea salt on top not only balances the sweetness but also enhances all the other flavors, providing a delightful burst of savory contrast with each bite.
- Large Chocolate Pockets: Large chocolate chips or chunks ensure you get substantial pockets of melted chocolate in every single cookie, maximizing that rich, indulgent experience.
Tips for Perfecting Your Chocolate Chip Cookies Every Time
Achieving cookie perfection is within reach with these helpful tips:
- Don’t Overmix the Dough: Once the flour is added, mix only until just combined. Overmixing develops gluten, which can lead to tough, dense cookies instead of tender, chewy ones.
- Room Temperature Ingredients: Ensure your egg is at room temperature. It emulsifies better with the fats and sugars, creating a smoother, more uniform dough.
- Chill the Dough (If Time Allows): While optional, chilling the dough for 30 minutes to 24 hours can deepen the flavors and result in a chewier, more complex cookie. The fats solidify, leading to less spread and a more concentrated flavor profile.
- Don’t Overbake: This is arguably the most crucial tip! Cookies will continue to cook slightly after they are removed from the oven. Pull them out when the edges are set and golden, but the centers still look a bit soft and underdone.
- Use Quality Ingredients: From good butter to excellent vanilla and high-quality chocolate, the better your ingredients, the better your cookies will taste.
- Measure Flour Accurately: Too much flour can make cookies dry and crumbly. Use the spoon-and-level method: spoon flour into your measuring cup and level it off with a straight edge.
- Baking Sheet Material: Use light-colored baking sheets for more even baking. Darker sheets can cause the bottoms of cookies to over-brown or burn.
Variations and Add-ins: Customizing Your Cookies
While the classic recipe is divine, feel free to experiment and make these cookies your own:
- Nutty Additions: Fold in 1/2 cup of chopped walnuts, pecans, or almonds with the chocolate chips for extra crunch and flavor.
- Different Chocolates: Mix and match chocolate types! Try milk chocolate, dark chocolate, white chocolate chips, or even chopped candy bars.
- Toffee Bits: A handful of toffee bits can add a delightful chewiness and buttery caramel flavor.
- Spices: A pinch of cinnamon or a tiny dash of nutmeg can add warmth and complexity, especially during the colder months.
- Espresso Powder: A teaspoon of instant espresso powder can deepen the chocolate flavor without making the cookies taste like coffee.
Troubleshooting Common Cookie Problems
Even the best recipes can present challenges. Here are some common cookie issues and how to fix them:
- Cookies Spreading Too Much: This can be due to butter being too warm, overmixing the dough, or not enough flour. Try chilling the dough, ensuring butter isn’t too hot in step 2, or checking flour measurements.
- Cookies Not Spreading Enough: Your oven might be too cool, or you might have too much flour. Ensure your oven temperature is accurate with an oven thermometer.
- Cookies Are Dry or Crumbly: Usually a sign of too much flour or overbaking. Measure flour carefully and pull cookies from the oven when centers are still slightly soft.
- Cookies Are Too Cakey: This can happen if the baking soda is too active or if there’s not enough fat. Ensure precise measurements and don’t add extra leavening.
- Burnt Bottoms: Your oven might be too hot or your baking sheet too dark. Try reducing oven temperature slightly or using a lighter-colored baking sheet.
Storage Instructions: Keeping Your Cookies Fresh
To enjoy your delicious cookies for longer, follow these storage tips:
- Baked Cookies: Once completely cooled, store the chocolate chip cookies in an airtight container at room temperature for up to 3-5 days. Adding a slice of bread to the container can help keep them soft.
- Cookie Dough: You can prepare the dough in advance! Scoop the dough balls onto a parchment-lined baking sheet and freeze until solid (about 1-2 hours). Once solid, transfer the frozen dough balls to a freezer-safe bag or airtight container. The dough can be stored in the freezer for up to 3 months. When ready to bake, you can bake them directly from frozen, adding a few extra minutes to the baking time.
Indulge in the World’s Best Chocolate Chip Cookies
There you have it – a recipe and comprehensive guide to creating what many will agree are the world’s best chocolate chip cookies. From the rich, nutty notes of brown butter to the perfect balance of crisp and chew, every element works in harmony to deliver an unparalleled taste experience. These cookies aren’t just a treat; they’re an experience, a simple pleasure that brings joy with every bite. Don’t just take my word for it – try this recipe at home and prepare to be amazed. They are guaranteed to be an instant hit and a beloved addition to your baking repertoire. Happy baking!