
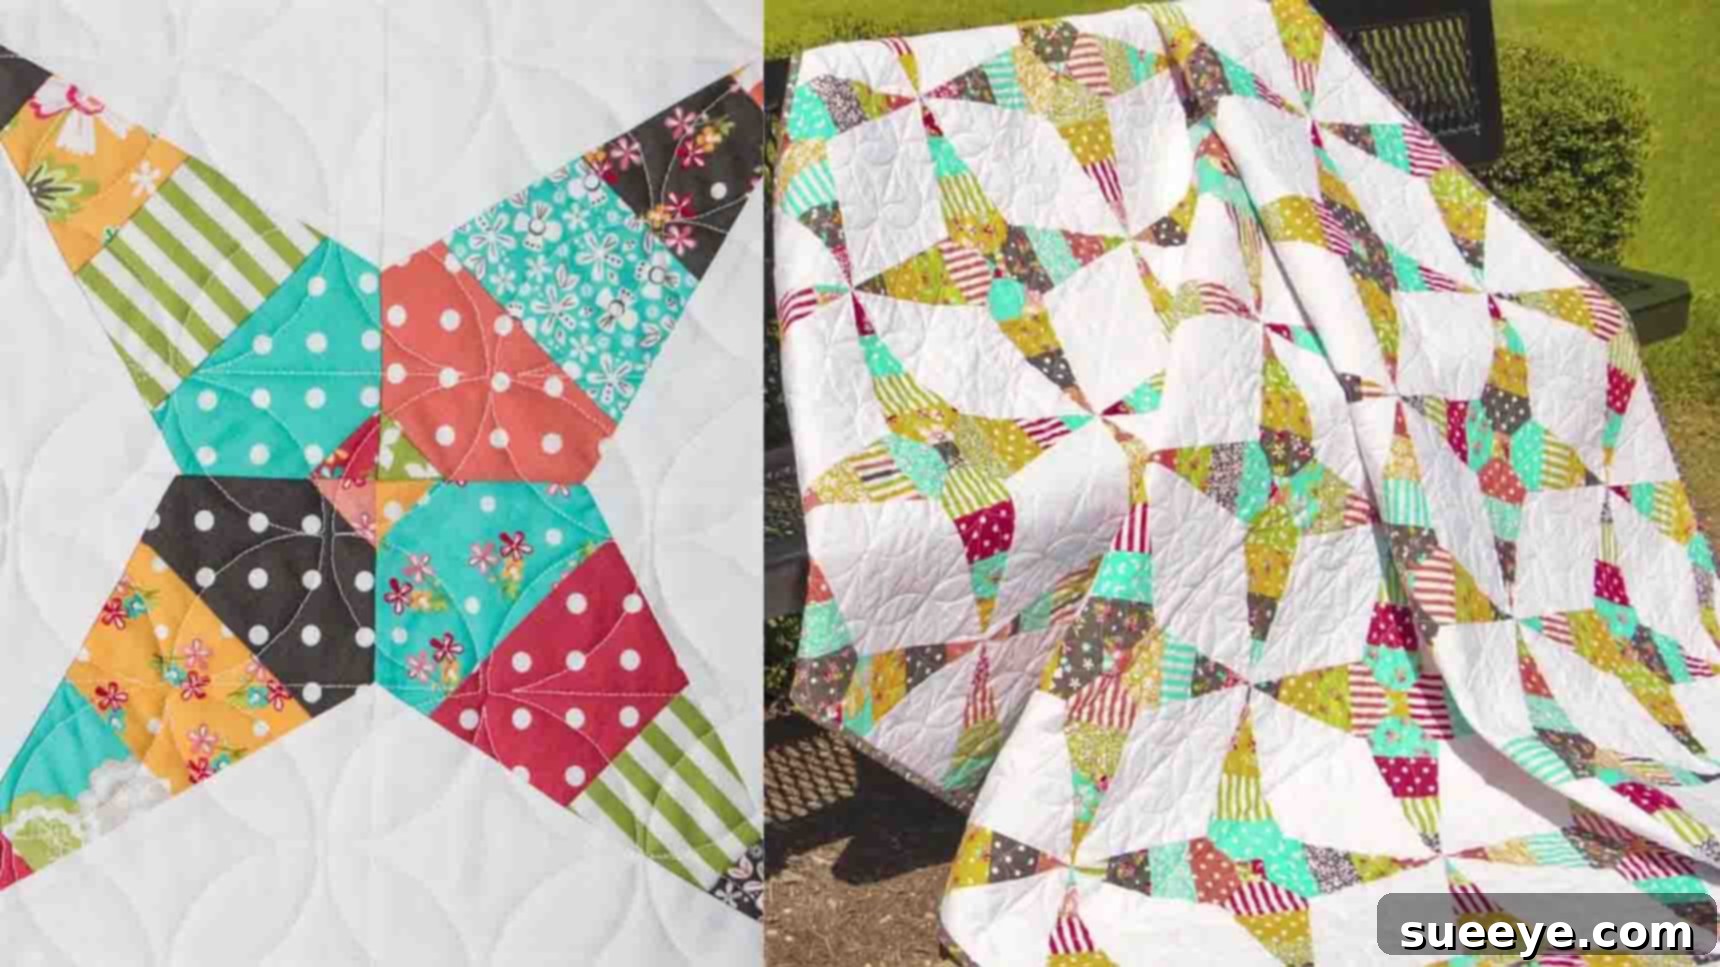
Unleash Your Creativity: Master the Firecracker Quilt Block for Stunning Quilts
Embark on a delightful quilting journey with the mesmerizing Firecracker Quilt Block, a design that effortlessly blends intricate aesthetics with surprising simplicity. Whether you’re taking your first stitches or are a seasoned quilter seeking a fresh, engaging project, this pattern, brilliantly shared by the experts at Fat Quarter Shop on YouTube, is guaranteed to ignite your passion. Don’t let its striking appearance fool you; crafting this stunning block is remarkably straightforward and incredibly rewarding. The resulting pattern is not only gorgeous but also versatile, promising to become a cherished addition to your collection of favorite quilt projects. Dive into our detailed guide below, where we break down every step, ensuring a smooth and enjoyable crafting experience from start to finish. We’ll provide comprehensive instructions, expert tips, and insights to help you achieve a professional-looking quilt that you’ll be proud to display or gift.
Essential Materials and Tools for Your Firecracker Quilt Block
Before we begin, gathering the right materials and tools is crucial for a seamless quilting process. The Firecracker Quilt Block is designed to make excellent use of pre-cut fabrics, simplifying your preparation and allowing you to jump straight into the fun of piecing. Here’s what you’ll need:
- Two Bundles of Jelly Rolls: Jelly rolls are bundles of 2.5-inch wide fabric strips, typically 42-44 inches long. Using jelly rolls saves significant cutting time and provides a beautifully coordinated fabric palette, making them perfect for this project. Choose colors and patterns that appeal to you and will create a dynamic “firecracker” effect against your background.
- Background Fabric: Select a fabric that provides a strong contrast to your jelly roll strips. A solid or subtle print in white, cream, black, or a soft color works best to make your firecracker wedges pop. You’ll need enough to cut 2.5-inch wide strips, approximately 8 inches wide for the initial cuts.
- 30-Degree Triangle Ruler: This specialized ruler is indispensable for accurately cutting the unique wedge shapes required for the firecracker effect. Its precise angles ensure your pieces fit together perfectly.
- 6 & 1/2″ Square Ruler: Essential for squaring up your assembled units, this ruler guarantees that each block is perfectly sized, leading to a flat and professional-looking quilt top.
- Standard Quilting Tools:
- Sewing Machine: A reliable machine with a quarter-inch foot is highly recommended for consistent seam allowances.
- Rotary Cutter: For precise and efficient fabric cutting.
- Self-Healing Cutting Mat: To protect your work surface and prolong the life of your rotary blade.
- Quilting Pins or Wonder Clips: For securing fabric pieces before sewing, especially at critical points.
- Iron and Ironing Board: Crucial for pressing seams open or to the side, ensuring flat and accurate blocks.
- Matching Thread: High-quality polyester or cotton thread that blends with your fabrics.
- Fabric Scissors: For snipping threads and occasional fussy cuts.
Step-by-Step Directions: Crafting Your Firecracker Quilt
Follow these detailed instructions to bring your Firecracker Quilt Block to life. Precision in cutting and sewing is key to a beautiful finished project.
Step 1: Preparing Your Fabric Strips and Cutting Firecracker Wedges
The journey to a spectacular Firecracker Quilt Block begins with careful preparation of your fabric strips and precise cutting of the unique wedge shapes. This initial phase lays the foundation for all subsequent steps, so focus on accuracy.
1.1. Sewing Jelly Roll Strips Together
Begin by selecting five jelly roll strips from your bundles. These strips will form the colorful “firecracker” element of your block. Place two strips right sides together and sew along one long edge using a consistent 1/4-inch seam allowance. Continue adding the remaining three strips in the same manner until you have a five-strip set. After sewing, carefully press your seams open. Pressing seams open helps to reduce bulk, creating a flatter and more stable fabric unit, which is crucial for precise cutting in the next step. Ensure your iron glides smoothly, avoiding stretching the fabric.
1.2. Cutting Ten Firecracker Wedges
Now, grab your specialized 30-degree triangle ruler. This ruler is designed to create the sharp, angular pieces that define the firecracker pattern. Lay your pressed five-strip unit flat on your cutting mat. Position the 30-degree triangle ruler over your strip set. For your first cut, align the tip of the ruler with the top edge of your fabric, ensuring that the bottom edge of the ruler does not need to align with anything specific at this stage—focus solely on the tip. Make your first precise cut. Rotate your strip set 180 degrees or flip the ruler, then align the tip again for the next cut, making mirror image cuts. Repeat this process until you have cut ten firecracker wedges from your strip set. These pieces will form the central design element.
1.3. Creating Complementary Background Wedges
Next, prepare your background wedges. Take an 8-inch wide strip of your chosen background fabric. Using the same 30-degree triangle ruler and technique you applied to the jelly roll strips, align the tip of the ruler at the top edge of the background fabric strip. Make your cuts, rotating or flipping for subsequent cuts, to create 16 background wedges. These wedges will frame your firecracker units and provide crucial negative space, allowing the colorful pattern to truly stand out. Having a few extra background wedges can be helpful in case of any cutting errors.
1.4. Assembling the Initial Firecracker Units
Now it’s time to start bringing your firecracker units together. Take one of your colorful firecracker wedges and sandwich it between two of your background wedges. Ensure the tips of all three wedges align perfectly at the top. This alignment is critical for maintaining the sharp points of your finished block. Secure the tips with a pin, then add additional pins along the seam lines if needed to prevent shifting. Carefully sew these three wedges together using a consistent 1/4-inch seam allowance. Pay close attention as you sew across the angled edges, ensuring your seams are straight. Repeat this process to create all your individual firecracker units.
Step 2: Trimming and Assembling Your Quilt Blocks
With your initial firecracker units sewn, the next phase focuses on squaring them up and assembling them into larger quilt blocks and ultimately, your quilt top. Precision here will ensure all your blocks fit together seamlessly.
2.1. Squaring Up Your Firecracker Units
Once your three-wedge units are sewn, press the seams open or to one side (away from the firecracker wedge is often ideal for reducing bulk). Now, it’s time to trim each unit to a perfect 6 & 1/2″ square. First, create a gentle crease in the center of your unit by folding it in half lengthwise. This crease will serve as a guide for precise centering. Place your 6 & 1/2″ square ruler over the unit, aligning the center line of your ruler with the crease you just made. Trim the excess fabric from all four sides, ensuring your unit measures exactly 6 & 1/2″ square. This squaring-up step is vital for ensuring all your blocks are uniform, which is paramount for a flat and well-aligned quilt top. Make a sufficient number of these perfectly squared firecracker units as required for your desired quilt size.
2.2. Building the Central Quilt Blocks
With your firecracker units perfectly squared, you’re ready to assemble them into larger quilt blocks. Take four of your 6 & 1/2″ firecracker units. Arrange them on your design wall or floor so that the points of the firecracker wedges meet precisely in the center, forming a captivating star-like or pinwheel effect. Carefully sew these four units together, starting by joining them into two pairs. Press the seams in opposing directions within each pair to help with nesting when you join the two pairs together. Then, sew the two pairs together to complete one larger quilt block. Pay close attention to matching the central points for a crisp, professional finish. Repeat this process to create as many full firecracker blocks as your quilt pattern requires.
2.3. Constructing Quilt Rows and the Quilt Top
Once you have created all your individual firecracker blocks, the final step in piecing is to assemble them into rows, and then join those rows to form your complete quilt top. Lay out your completed blocks according to your desired design. For instance, if you are making a throw-sized quilt, you might arrange them five blocks across and six blocks down.
Take two adjacent blocks from your first row, place them right sides together, and carefully pin them at every intersection where seams meet. This precise pinning helps to ensure that your points and seams align perfectly across the block boundaries. Sew them together using a 1/4-inch seam allowance. Continue joining blocks in this manner until you have completed your first row. Press the seams within this row, alternating the direction of your pressing (e.g., press seams to the left for one block, to the right for the next) to facilitate nesting when joining rows.
Repeat this process to create all your desired rows (e.g., six rows if assembling a 5×6 block quilt). Once all rows are complete and pressed, it’s time to join them. Place two adjacent rows right sides together. Again, meticulously pin at every seam intersection, nesting the seams for a smooth join. Sew the rows together. Continue adding rows until your entire quilt top is assembled. Give your finished quilt top a final, thorough press, ensuring all seams lie flat and your design is crisp and even. Your beautiful Firecracker Quilt top is now complete and ready for batting, backing, and quilting!
Essential Quilting Tips for Success
Achieving beautiful results in quilting, especially with intricate-looking patterns like the Firecracker Block, often comes down to a few key practices. Incorporate these tips into your workflow for a more enjoyable and successful quilting experience:
- Precision is Paramount: In quilting, accuracy is everything. A slightly off cut or inconsistent seam allowance can lead to distorted blocks and a wavy quilt top. Always measure twice, cut once, and use a 1/4-inch seam allowance guide on your sewing machine.
- Consistent Seam Allowance: Strive for a perfect 1/4-inch seam allowance every single time. This consistency ensures that all your pieces fit together as intended, making your blocks square and your quilt top flat. Consider using a 1/4-inch foot if your machine has one.
- Pressing Matters: How you press your seams significantly impacts the final look of your quilt. For this block, pressing seams open in the initial strip sets reduces bulk. For block assembly, alternating seam directions allows for “nesting” seams, which helps align points beautifully. Always press, never iron (which can stretch fabric).
- Sharp Tools Are Your Friends: Use a sharp rotary blade for clean, crisp cuts. A dull blade can chew fabric, leading to inaccurate pieces. Replace your blade regularly.
- Stay Organized: Keep your cut pieces organized, perhaps in small piles or trays, to avoid confusion as you assemble your blocks. Laying out your blocks on a design wall or floor before sewing rows helps visualize the final layout and catch any errors.
- Patience and Enjoyment: Quilting is a journey, not a race. Take your time with each step, enjoy the process, and don’t be afraid to unpick and re-sew if a seam isn’t quite right. The satisfaction of a well-made quilt is worth the extra effort.
Unleashing Creativity: Design Variations and Customization
The Firecracker Quilt Block is incredibly versatile, offering endless possibilities for customization. Once you’ve mastered the basic construction, consider these ideas to make your quilt truly unique:
- Color Palette Play: Experiment with different color combinations. For a vibrant, energetic quilt, choose bright, contrasting jelly rolls. For a more subdued or vintage look, opt for pastels or earth tones. Consider a monochromatic scheme for a sophisticated feel, or a holiday-themed palette for a festive touch.
- Fabric Choices: While jelly rolls are convenient, you can also cut your own 2.5-inch strips from fat quarters or yardage. This allows for even greater control over fabric selection and gives you the opportunity to fussy cut specific motifs within your strips.
- Layout Experimentation: The traditional layout with points meeting in the center is stunning, but don’t stop there! Try rotating some blocks to create new secondary patterns. Introduce sashing (strips of fabric between blocks) to give your design breathing room, or add borders to frame your quilt and achieve a larger size.
- Size Adjustments: While this tutorial focuses on a specific block size, you can adapt the pattern to create smaller or larger firecracker blocks by adjusting the width of your initial strip sets and the size you trim your units to. Just remember to adjust your background fabric cuts accordingly.
- Quilting Designs: The quilting stitches you choose can dramatically enhance the firecracker design. Consider straight-line quilting to emphasize the geometric nature of the blocks, or explore free-motion quilting to add texture and intricate details that complement the pattern.
Why the Firecracker Quilt Block is a Must-Try Project
Beyond its visual appeal, the Firecracker Quilt Block offers several compelling reasons for quilters of all levels to give it a try:
- Looks Complex, Easy to Make: This block has a sophisticated, pieced-star look that often intimidates beginners. However, the construction method using strip sets and a 30-degree ruler simplifies the process dramatically, providing a satisfying sense of accomplishment.
- Utilizes Pre-Cuts (Jelly Rolls): For those who love the convenience of pre-cut fabrics, this pattern is a dream. Jelly rolls provide a coordinated color scheme and eliminate much of the initial cutting, allowing you to get straight to sewing.
- Skill-Building: While accessible, this pattern offers opportunities to hone important quilting skills such as consistent seam allowances, accurate cutting with specialty rulers, and precise matching of points and seams.
- Versatile and Customizable: As explored above, the design is highly adaptable to various color palettes, fabric choices, and layout configurations, allowing you to create truly personalized projects.
- Visually Striking Results: The “firecracker” effect is dynamic and eye-catching, making for stunning quilts that are sure to draw compliments. It’s a fantastic way to showcase beautiful fabrics.
Your Quilting Journey Starts Here: Firecracker Quilt Block Pattern Tutorial
We hope this comprehensive guide has illuminated the path to creating your very own Firecracker Quilt Block. This project is a fantastic opportunity to create something truly beautiful, whether for yourself or as a heartfelt gift. Remember, the key to success lies in patience, precision, and allowing yourself to enjoy the creative process. If you’re a visual learner or wish to see these steps in action, we highly recommend watching the original video tutorial from Fat Quarter Shop on YouTube. Their expert demonstration provides an invaluable visual aid, reinforcing the techniques discussed here and ensuring you feel confident at every stage. So, gather your materials, fire up your sewing machine, and prepare to ignite your quilting passion with this spectacular Firecracker Quilt Block! Happy quilting!