
Mastering the French Manicure at Home: Your Guide to Salon-Quality Nails
Who doesn’t adore the classic elegance of a French manicure? It’s a timeless look that exudes sophistication, professionalism, and seamlessly complements any outfit or occasion. For years, like many enthusiasts, I struggled to replicate that coveted salon-perfect finish in the comfort of my own home. My attempts often left me with smudged lines and a sense of defeat rather than polished perfection. The aspiration for those impeccably clean, crisp white tips felt just out of reach, reserved only for professional nail technicians.
The good news? Achieving those crisp, clean, and utterly professional white tips is not only possible but also surprisingly simple with the right approach. After much trial and error, and discovering a “different way” of doing things that focuses on precision and proper technique, I now consistently achieve a flawless French manicure every single time. This guide is dedicated to sharing those insights and practical tips so you too can master this iconic nail art without the salon price tag or time commitment, transforming your home into your personal nail studio.
The Timeless Allure of the French Manicure
There’s a profound reason the French manicure has remained a quintessential staple in the beauty world for decades, transcending fleeting trends. Its understated charm lies in its deceptive simplicity and inherent elegance. The delicate balance of a natural pink or nude base paired with a stark, clean white tip creates a polished appearance that is universally flattering and perpetually in style. Whether you’re preparing for a crucial corporate meeting, enjoying a casual brunch with friends, or stepping out for a glamorous evening event, a French manicure effortlessly elevates your overall aesthetic without ever competing for attention with your attire or accessories.
This unparalleled versatility makes it a perennial go-to choice for countless individuals seeking a sophisticated yet undeniably chic and relatively low-maintenance aesthetic. Unlike more intricate or seasonally specific nail art that can feel trendy and temporary, the French manicure offers a sense of enduring class and refinement. It’s often considered the sartorial equivalent of a perfectly tailored blazer or a classic diamond stud earring – always appropriate, always chic, and always in high demand. Mastering this elegant art at home means you can indulge in this sophisticated look whenever the mood strikes, enjoying salon-quality results without the logistical hurdles and expense of frequent salon appointments.
Why DIY Your French Manicure? The Smart Choice for At-Home Nail Care
As wonderful and pampering as receiving a professional manicure at a salon can be, the reality remains that not everyone can afford to indulge in these luxurious treatments consistently – or perhaps they simply don’t have the precious time to allocate for frequent salon visits. The cumulative cost of regular appointments can quickly become substantial, and juggling a busy schedule to fit in nail care can often feel like another chore rather than a relaxing experience. This is precisely where the undeniable beauty and practicality of the at-home manicure truly shine, offering a compelling alternative.
Performing your own manicure at home offers a multitude of advantages beyond just significant cost savings. You gain complete control over every aspect of the process, from selecting the specific products and polishes used, ensuring they align with your preferences for cruelty-free or non-toxic ingredients, to tailoring the timing of your nail care session to your convenience. Whether it’s a late-night unwind, an early morning ritual, or a tranquil afternoon activity, your nail salon is always open. The process itself can transform into a relaxing, meditative self-care ritual, providing a moment of peace and creativity in your day. While it’s challenging to entirely replicate the full spa experience, the immense satisfaction of achieving a professional-looking manicure with your own hands is incredibly rewarding and a testament to your newfound skill. This comprehensive guide aims to empower you with the knowledge and confidence to create that salon-quality finish right in your living room, transforming frustration into flawless execution.
From Frustration to Flawless: Mastering the Home French Manicure
The journey to a perfect French manicure at home often begins with a few frustrating attempts. Achieving that crisp, even white tip without smudges, shaky lines, or uneven coverage can seem like an elusive art form, solely reserved for those with years of professional training. Many enthusiastic individuals give up after a couple of tries, resigning themselves to the expense of salon visits or opting for simpler, less detailed nail polish styles. However, the secret to consistent success isn’t necessarily innate artistic talent or an incredibly steady hand; rather, it lies firmly in meticulous preparation, precise technique, and a healthy dose of patience.
My personal journey mirrored this common struggle for quite some time. I consistently longed for that clean, professional, high-end look that French manicures offer but repeatedly failed to achieve it with my own efforts. My turning point came when I started experimenting with different methods, tools, and sequences, eventually discovering what truly works and what doesn’t. The key insight was realizing that a perfect French manicure isn’t about rushing through the steps; it’s about building it up methodically, layer by layer, with an unwavering attention to detail at each critical stage. It’s about understanding that minor imperfections can always be corrected and that practice truly makes perfect. This detailed section will guide you through the fundamental principles and practical tips that transform those tricky tips into triumphs, ensuring your homemade French manicure looks as though it was meticulously crafted by a seasoned expert, radiating confidence and style.
Essential Preparations for a Perfect Base: The Foundation of Flawless Nails
A truly stunning and long-lasting French manicure starts long before the white tip polish even makes an appearance. The foundation, or the condition of your natural nails, is everything. Neglecting proper nail preparation can lead to a less polished final look, contribute to premature chipping, and ultimately shorten the lifespan of your beautiful manicure. Here’s a detailed guide on how to meticulously set the stage for unparalleled success:
- Thorough Cleansing and Sanitization: Begin your manicure ritual by thoroughly washing your hands with soap and water, ensuring all dirt and grime are removed. Follow this by sanitizing your nails with a cotton pad soaked in rubbing alcohol or a specialized nail prep solution. This crucial step eliminates any natural oils, hand lotions, or residues that could potentially prevent your polish from adhering properly, ensuring a clean canvas for your artistry.
- Precision Nail Shaping: Carefully file your nails into your desired shape. A classic French manicure traditionally features a neat square, a softened squoval, or an elegant oval shape, designed to gently mirror the natural curve of your nail bed. Use a gentle, consistent motion in one direction rather than harsh back-and-forth filing, which can weaken the nail plate and lead to breakage. Aim for uniformity across all nails for a truly professional appearance.
- Gentle Cuticle Care: Apply a high-quality cuticle remover and allow it to work for a minute or two as per product instructions. Then, gently push back your cuticles using a soft cuticle pusher (wooden or rubber-tipped is ideal). It’s vital to avoid cutting your cuticles, as this can lead to painful nicks and potential infections. Healthy, hydrated cuticles significantly contribute to a cleaner, more refined, and professional overall nail appearance.
- Smooth Nail Surface Buffing: Lightly buff the surface of your nails using a fine-grit buffer. This step helps to create a perfectly smooth, even canvas by removing minor ridges and imperfections. A smooth surface ensures that your base coat applies flawlessly, promoting better adhesion and a sleek finish. Be gentle and avoid over-buffing, which can thin your natural nails.
- Application of a Quality Base Coat: A good base coat is an absolutely non-negotiable step in any lasting manicure. It serves multiple vital functions: protecting your natural nails from potential staining, enhancing polish adhesion, and significantly extending the wear time of your entire manicure. Apply a thin, even layer of base coat, ensuring full coverage, and allow it to dry completely until it’s tacky but not wet before proceeding.
- The Nude or Pink Base Layer: Once your base coat is thoroughly dry, apply one or two very thin, even coats of your preferred sheer pink or nude polish. This creates the quintessential classic French manicure undertone, providing a healthy, natural look to your nails. Additionally, this base color offers greater forgiveness and flexibility if your subsequent white tip isn’t perfectly opaque on the first application. Ensure each coat dries fully before applying the next to prevent smudging and achieve optimal durability.
Crafting the Iconic White Tip: Techniques for Precision and Perfection
This phase is often perceived as the most daunting part of the French manicure process, yet with the right technique and a bit of practice, it becomes surprisingly manageable and even enjoyable. The ultimate goal is to achieve a crisp, clean, and evenly curved white line along the free edge of your nail, mimicking its natural smile line. Here are several popular and effective methods to help you achieve that coveted professional finish with confidence:
- The Adhesive Guide Method (Beginner-Friendly): This is arguably the easiest and most forgiving method for those new to DIY French manicures. Once your nude or pink base polish is absolutely bone-dry, carefully place a French manicure guide sticker (available at most beauty stores) just below where you envision your white tip beginning. Ensure the sticker is firmly pressed down across the entire width of the nail to prevent any polish from bleeding underneath. Apply a thin, even coat of white polish to the exposed tip, extending slightly over the sticker for full coverage. Allow the polish to dry for a minute or two until it’s set but still slightly tacky, then gently peel off the sticker in one swift motion. This technique minimizes error and creates a remarkably clean line.
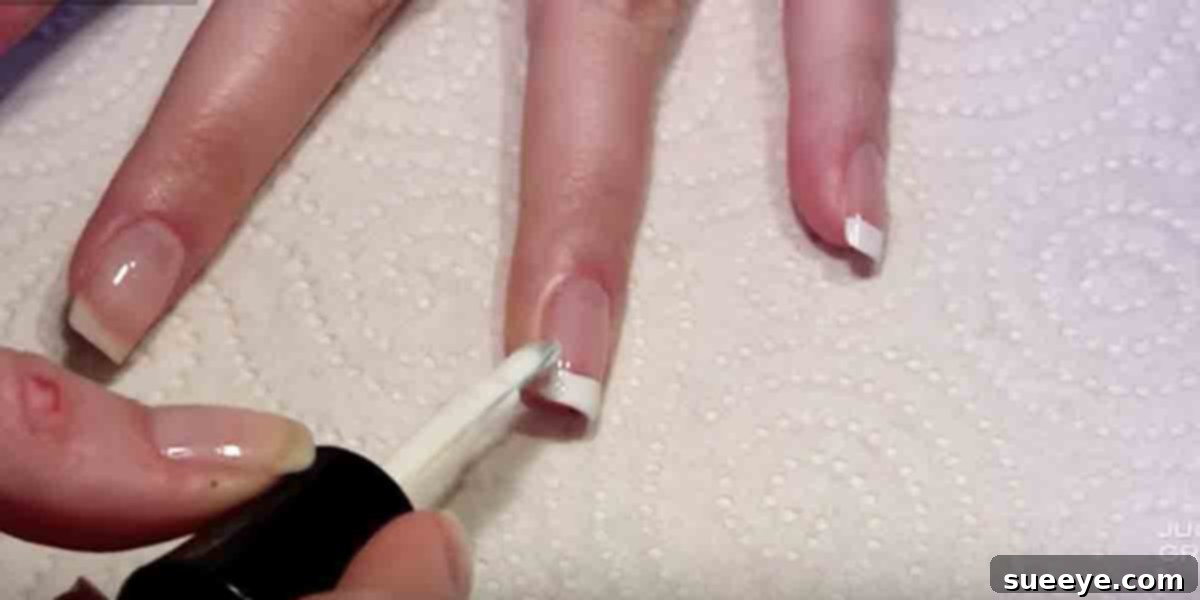
- The Freehand Brush Method (For a Steady Hand): For those with a naturally steady hand or who have developed better brush control, painting freehand offers the most natural and customized look. The key is to provide maximum stability: rest your hand on a flat, stable surface (like a table) and brace your painting hand against it. Dip a fine-tipped nail art brush (or carefully use the side of the brush that comes with the polish, wiped almost clean) into your white polish. Draw a thin, controlled line across the free edge of your nail, meticulously following its natural curve. You can rotate your finger slightly as you paint to facilitate a smoother, more continuous motion. Build up the line with two thin coats rather than attempting to achieve full opacity with one thick, messy layer.
- The “Dip” or “Stamping” Method (For Consistency): For a quick and remarkably consistent curve, some enthusiasts prefer to apply white polish directly to a silicone nail stamper or a dense makeup sponge. Then, gently press the very tip of your nail directly onto the white polish on the stamper or sponge, rocking your finger slightly from side to side to transfer the perfect, uniform curve. This method requires a bit of practice to get the angle and pressure just right but can yield incredibly consistent and crisp results across all nails once mastered.
- The Nail Polish Brush ‘Wipe’ Method (Leveraging the Bottle’s Edge): Utilize the natural curve of your nail and the edge of the polish brush. Take a generous amount of white polish on the brush, then carefully wipe one side of the brush against the inside rim of the polish bottle, creating a clean, thin edge of polish on the brush. Now, holding the brush almost perpendicular to your nail, carefully trace the curve of your nail’s free edge using this precise edge of the brush. This technique allows for greater control over the thickness and shape of the white tip.
- The Cleanup Crew (Essential for Perfection): Even with the most meticulous technique, minor smudges or slight imperfections can and often will occur. Do not despair! This is where precision cleanup comes into play. Dip a thin, angled nail art brush or a specialized cleanup brush (or even a very fine-tipped cotton swab) into nail polish remover. Carefully and precisely clean up any stray polish, smudges, or uneven edges along the smile line. This crucial cleanup step is paramount for achieving that coveted salon-perfect, crispness and definition that truly distinguishes a professional-looking French manicure.
A golden rule for all polish applications: thin coats are always superior to thick ones. Thick coats are significantly more prone to chipping, smudging, taking an eternity to dry, and often resulting in an uneven, lumpy finish. Always allow each layer of white polish to dry significantly (to the point of being mostly set) before applying the next, especially if you’re layering to achieve full opacity. Patience in drying time is your greatest ally here.
The Finishing Touches: Sealing the Deal for Lasting Beauty
Once your meticulously crafted white tips are perfectly dry and impeccably clean, it’s time for the final, yet absolutely crucial, step in your French manicure process: applying the top coat. A good quality top coat serves multiple vital functions: it not only adds an incredible, glass-like glossy shine that instantly elevates the entire look but also acts as a robust protective shield, significantly extending the life of your beautiful manicure and valiantly preventing unsightly chips and wear. Apply a generous, even layer over the entire nail surface, ensuring you “cap” the free edge (by painting a thin line along the very tip of the nail) to effectively seal in all your hard work and prevent premature chipping. For an extra quick finish, especially if you’re short on time, consider using a specialized quick-dry top coat or a quick-dry spray immediately after your final top coat application.
Tips for Longevity and Sustained Shine
To ensure your DIY French manicure stays pristine, vibrant, and chip-free for as long as humanly possible, incorporate these simple yet highly effective habits into your daily routine. These small efforts will go a long way in maintaining the salon-quality look you’ve worked hard to achieve:
- Moisturize Regularly: Keep your hands and cuticles consistently hydrated throughout the day with a nourishing hand cream and a dedicated cuticle oil. This prevents dryness, cracking, and peeling around the nail bed, which can compromise the integrity and appearance of your manicure. Healthy cuticles mean healthier, more resilient nails.
- Wear Protective Gloves: When engaging in household chores, especially those involving prolonged exposure to water (like washing dishes) or harsh cleaning chemicals, always remember to wear protective gloves. This is perhaps the simplest and most effective way to prevent premature chips, dullness, and maintain the glossy shine of your polish.
- Reapply Top Coat Periodically: Every two to three days, apply a fresh, thin layer of your top coat. This simple trick works wonders by refreshing the high-gloss shine of your manicure and adding an additional protective barrier against daily wear and tear, effectively extending its lifespan.
- Be Gentle with Your Nails: Treat your beautifully manicured nails kindly. Avoid using them as makeshift tools to open cans, scrape labels, or pry things open. Such actions put unnecessary stress on the nail polish and can lead to immediate chipping or breakage.
A Glimpse into History: The French Manicure’s Enduring Journey
The fascinating story of the French manicure is as elegant and enduring as the nail style itself. While its evocative name strongly suggests a definitive origin in France, its true historical roots are a bit more nuanced and widely debated among beauty historians. Some compelling historical accounts suggest that the core concept of subtly enhancing natural nail tips dates back as far as the 18th century, a period in European aristocratic fashion where understated elegance and natural beauty were highly prized. However, it was truly in the glamorous and transformative decades of the 1920s and 1930s that the French manicure cemented its iconic status and began its widespread popularity.
During the illustrious Golden Age of Hollywood, movie stars and actresses were frequently required to undergo myriad costume changes for different scenes, often multiple times a day. Makeup artists and nail technicians faced a significant challenge: they needed a versatile nail look that would complement a vast array of costumes, eras, and aesthetics without necessitating a full nail polish redo for every single scene. The brilliant and practical solution eventually emerged: a clear or natural pink base adorned with a subtle yet distinct white tip. This revolutionary look quickly transcended the silver screen, rapidly becoming a powerful symbol of sophisticated charm, timeless elegance, and chic fashion for women across the globe. The powerful allure of French culture, renowned worldwide for its undeniable sense of style and fashion leadership, further popularized the name “French manicure,” cementing its identity as the quintessential choice for any truly stylish woman seeking a polished, professional, and endlessly classic aesthetic. Its inherent ability to convey understated luxury and effortless sophistication ensured its continued dominance through various fashion eras, solidifying its place as a truly global and beloved beauty phenomenon that shows no signs of fading.
Learning from the Experts: The Power of Visual Tutorials
While comprehensive written instructions, like those provided here, offer a solid foundational understanding of the techniques, sometimes seeing a specific method or intricate detail in action can make all the difference, especially for visual learners. For many, a dynamic, step-by-step video tutorial can unlock understanding and significantly accelerate the learning curve. Renowned beauty content creators and experienced nail artists frequently share their invaluable secrets and practical tips for achieving flawless French manicures through accessible online videos.
For instance, you can find numerous excellent demonstrations and detailed guides from popular YouTubers and nail enthusiasts, much like how Julia Graf elegantly executes a French manicure in her detailed, easy-to-follow, step-by-step videos. These visual guides offer indispensable insights into precise brush control, optimal hand positioning, correct pressure application, and effective troubleshooting for common issues like smudges or uneven lines. They provide an invaluable visual complement to written instructions, making the learning process even smoother, more engaging, and ultimately more successful for aspiring home nail artists.
Conclusion: Embrace Your Inner Nail Artist and Shine
Gone are the days when achieving a professional-looking French manicure was exclusively the domain of expensive salons and trained technicians. With a little dedicated practice, the right essential tools, and the proven techniques meticulously outlined in this comprehensive guide, you can confidently create stunning, impeccably clean, and elegantly polished white tips right in the comfort and convenience of your own home. Embrace the rewarding journey of becoming your very own nail artist, enjoying the significant cost savings, the unparalleled convenience of anytime nail care, and the immense satisfaction that comes with adorning your hands with perfectly polished nails.
Your hands will not only look impeccably groomed but will also silently thank you for the personalized care. You’ll always be ready, no matter the occasion, to showcase a timeless, sophisticated look that speaks volumes about your refined taste and newfound skill. So gather your polishes, find your perfect technique, and prepare to flaunt beautiful, salon-quality French manicures with pride!