
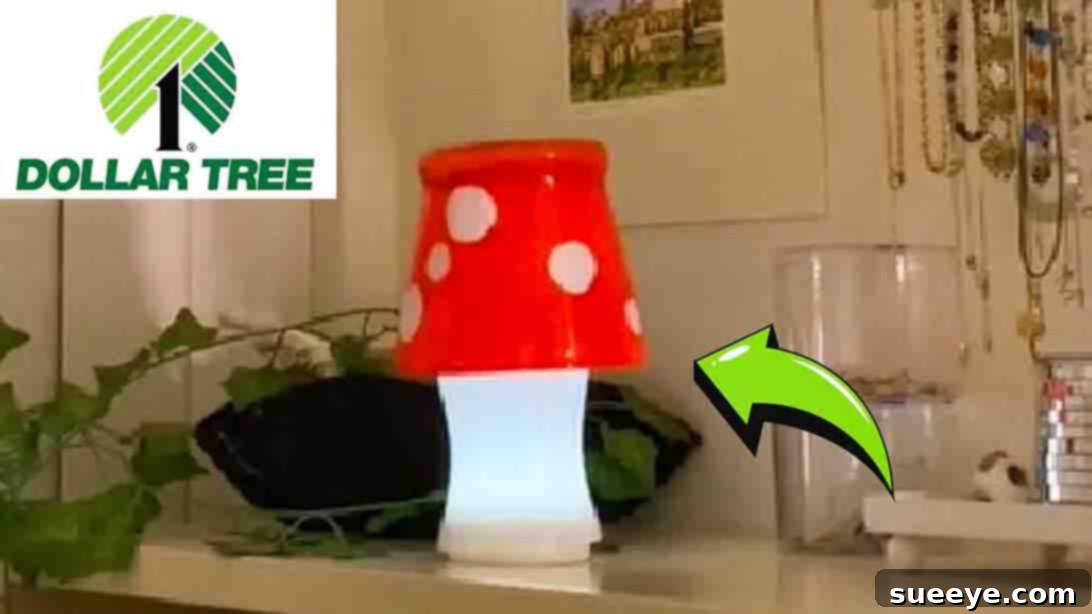
Illuminate Your Space: The Ultimate DIY Dollar Tree Mushroom Lamp Tutorial
Are you searching for a delightful and affordable DIY project to brighten your weekend? Look no further! The internet, especially platforms like TikTok, is a treasure trove of creative ideas, and one particular project has captured hearts with its undeniable charm: the DIY mushroom lamp. Inspired by the ingenious @melanie_locke on TikTok, this project promises not only a super cute addition to your home decor but also an incredibly budget-friendly crafting experience. Imagine transforming simple, inexpensive items found at your local Dollar Tree into a whimsical, glowing mushroom that adds a touch of enchantment to any space. It’s the perfect activity to enjoy solo, with friends, or as a fun family bonding session. Plus, a handmade mushroom lamp makes for a truly unique and personalized gift that recipients are sure to adore. Ready to dive into this magical world of DIY? Let’s get crafting!
Why This DIY Mushroom Lamp is a Must-Try Project
In a world where unique and personalized home decor often comes with a hefty price tag, finding a project that delivers on charm, quality, and affordability is a true gem. The Dollar Tree mushroom lamp ticks all these boxes and more, making it an incredibly popular and rewarding DIY:
Unbeatable Affordability
One of the most appealing aspects of this project is its cost-effectiveness. By sourcing the main materials from Dollar Tree, you can create a beautiful, custom lamp for a fraction of the cost of store-bought alternatives. This makes it an ideal choice for students, budget-conscious decorators, or anyone who loves getting great value for their money. You can craft stunning decor without breaking the bank, proving that creativity doesn’t have to be expensive.
Beginner-Friendly and Accessible
You don’t need to be an experienced crafter to successfully complete this project. The steps are straightforward, and the materials are easy to work with, making it perfect for beginners of all ages. It’s a fantastic way to introduce yourself or others to the joy of DIY without feeling overwhelmed, building confidence with every brushstroke.
Endless Customization Possibilities
While the classic red and white mushroom design is iconic, this DIY offers a blank canvas for your creativity. Experiment with different paint colors, patterns, and even types of glass containers to match your personal style or room aesthetic. The possibilities are only limited by your imagination, allowing you to create a truly one-of-a-kind piece.
Versatile Decor and Gift Idea
Once completed, your DIY mushroom lamp isn’t just a craft; it’s a functional piece of art. It can serve as a charming night light in a child’s room, a whimsical accent on a bookshelf, a quirky desk lamp, or a unique centerpiece. Its handmade nature also makes it an incredibly thoughtful and personalized gift for birthdays, holidays, or just because, carrying a special touch that store-bought items can’t replicate.
Materials You’ll Need for Your DIY Mushroom Lamp
Gathering your supplies is the first exciting step in any DIY adventure. For this enchanting mushroom lamp, you’ll be delighted to find that everything you need is readily available and budget-friendly. Here’s a detailed breakdown of the essential items:
- Two Glass Containers: You’ll need one for the mushroom’s cap (top) and another for its stem or body (bottom). Dollar Tree offers a fantastic variety of glass jars, bowls, or vases that can work perfectly. Look for shapes that fit together nicely and create a cohesive mushroom silhouette. For example, a wider, flatter bowl for the cap and a taller, narrower jar for the stem. Ensure they are clean and free of labels or residue.
- Glass-Friendly Paint: This is crucial for ensuring the paint adheres properly and lasts on the glass surface. Acrylic enamel paints or multi-surface acrylic paints are excellent choices. They are designed for use on non-porous surfaces like glass and ceramic, offering good coverage and durability. While the original design uses classic red and white, feel free to explore other colors to match your decor. Always check the label to confirm it’s suitable for glass.
- Paintbrushes: A small, fine-tipped brush will be essential for delicate details like the white circles on the mushroom cap, allowing for precision. A larger, flat brush will be helpful for broader strokes and achieving even coverage on the mushroom stem, ensuring a smooth finish. Having a couple of sizes on hand will make the painting process much easier.
- Attachable Light Source: The magic of your lamp comes from within! Battery-operated LED puck lights or small strings of fairy lights (also often available at Dollar Tree) are ideal. Ensure it’s a light source that can safely sit within the base of your glass container and provides the desired glow. Look for options with an adhesive back for easy attachment, or ones that fit snugly without toppling.
Optional but Recommended Materials for Enhanced Results:
- Rubbing Alcohol or Glass Cleaner: For thoroughly cleaning the glass containers before painting, ensuring optimal paint adhesion. This step is vital for a long-lasting finish.
- Clear Glass Sealer/Topcoat: To protect your painted design, especially if the lamp will be handled frequently or if you want to ensure longevity. Look for a clear, non-yellowing spray or brush-on sealant specifically designed for glass to lock in your artwork.
- Adhesive for Glass (e.g., E6000): If you want to permanently secure the mushroom cap to the stem or the light source to the base, a strong, clear adhesive designed for glass can be beneficial. This adds stability, especially if the lamp will be moved often.
- Newspaper or Drop Cloth: To protect your work surface from paint spills and ensure easy cleanup.
- Protective Gloves: To keep your hands clean and free from paint while crafting.
Step-by-Step Guide: Crafting Your Enchanting Mushroom Lamp
Now that you have all your materials ready, let’s get down to the fun part: creating your very own charming mushroom lamp. Follow these detailed instructions, inspired by @melanie_locke’s viral TikTok tutorial, to ensure a stunning result.
Step 1: Prepare Your Workspace and Glass Containers
Start by laying down newspaper or a drop cloth to protect your work surface from paint spills. This makes cleanup a breeze. Next, thoroughly clean both glass containers, inside and out, with rubbing alcohol or glass cleaner. This crucial step removes any dust, grease, or fingerprints that could prevent the paint from adhering properly. Allow them to air dry completely before moving on to ensure a perfectly clean canvas.
Step 2: Painting the Mushroom Cap (The Top Piece)
Take the glass container you’ve designated as the mushroom cap (typically the wider, shallower one). Using your fine-tipped paintbrush and white, glass-friendly paint, carefully paint several evenly spaced white circles on the inside surface of the glass. Painting on the inside gives a smoother, more professional finish and protects the paint from scratches. Ensure the circles are uniform in size and placement. Allow these white circles to dry completely according to the paint manufacturer’s instructions (this could take 1-4 hours, or even longer, so patience is key).
Step 3: Painting the Mushroom Stem/Body (The Bottom Piece)
While the white circles on your cap are drying, take the second glass container intended for the mushroom’s body (usually the taller, narrower one). Using your larger paintbrush and white, glass-friendly paint, paint the entire inside surface of this container white. Aim for smooth, even strokes, ensuring full coverage. You might need to apply two or three thin coats to achieve opaque coverage, allowing each coat to dry thoroughly before applying the next. This creates the classic, clean white stem of the mushroom.
Step 4: Completing the Mushroom Cap
Once the white circles on your mushroom cap are fully dry to the touch and no longer tacky, it’s time to add the iconic red. Using your red, glass-friendly paint, carefully paint the remaining unpainted space on the inside of the mushroom cap, filling in around the dried white circles. Take your time to ensure clean, crisp edges around the white dots. Again, multiple thin coats are better than one thick coat to prevent drips, streaking, and ensure rich, even color saturation. Allow this red paint to dry completely, which might take several hours or even overnight, depending on the paint type and humidity levels.
Step 5: Optional Sealant Application for Durability
For added durability and to protect your beautiful paintwork, consider applying a clear glass sealant or topcoat to the painted interior surfaces of both the cap and the stem once all paint layers are completely dry. This step provides an extra layer of protection against wear and tear. Follow the product’s instructions carefully for application and drying time, ensuring adequate ventilation.
Step 6: The Grand Assembly
With all your painted pieces thoroughly dry and sealed (if applicable), it’s time to assemble your charming mushroom lamp.
- First, place your attachable light source at the bottom of the mushroom stem glass container. If your light has an adhesive back, secure it firmly to prevent shifting. If not, simply place it centered at the bottom.
- Next, carefully place the painted mushroom stem (the all-white container) directly over the light source, ensuring it sits stable and level.
- Finally, gently place the painted mushroom cap (red with white dots) on top of the stem, ensuring it sits securely and creates a cohesive mushroom shape. If you wish for a more permanent fixture, you can apply a small amount of glass adhesive to the rim of the stem before placing the cap on top, allowing it to cure as per adhesive instructions.
And just like that, your whimsical DIY Dollar Tree mushroom lamp is complete! Turn on your light and marvel at your creation – a functional piece of art crafted by your own hands.
@melanie_locke last one i promise… #mushroomlamp #mushroom #diy #diyroomdecor #dollartree #decor #dollartreediy
♬ flowers (sped up) – accelerate & creamy & 11:11 Music Group
Pro Tips for a Flawless DIY Mushroom Lamp
Even though this project is beginner-friendly, a few insider tips can elevate your finished product from good to absolutely stunning. Keep these in mind as you embark on your crafting journey:
- Cleanliness is Paramount: Any dust, lint, or oil residue on your glass will prevent paint from adhering smoothly, leading to patchy results. Always clean your glass thoroughly with rubbing alcohol and let it air dry completely before painting to ensure a pristine surface.
- Patience is a Virtue: The biggest mistake crafters make is rushing the drying process. Glass paints require adequate drying time between coats and before assembly. Rushing can lead to smudges, peeling, or an uneven finish. Always refer to your paint’s instructions for recommended drying times and be prepared to wait.
- Thin Coats Over Thick: While it might seem faster to apply one thick coat of paint, it often results in streaks, bubbles, and uneven drying. Multiple thin, even coats will always yield a smoother, more professional, and durable finish with vibrant color.
- Work in a Ventilated Area: Paints and sealants can emit fumes. Ensure you’re working in a well-ventilated space, or even outdoors if weather permits, to ensure your comfort and safety. Open windows or use a fan to circulate air.
- Practice Makes Perfect (Optional): If you’re new to painting on glass, consider doing a small test on a scrap piece of glass or an inconspicuous area of one of your containers first. This helps you get a feel for the paint consistency, drying time, and how it behaves on glass.
- Handle With Care: Once painted, especially before a sealant is applied, the painted surfaces can be delicate. Handle your pieces carefully by the unpainted exterior or edges to avoid smudging or scratching your freshly applied designs.
Beyond the Classic: Customizing Your Mushroom Lamp
While the red and white design is undeniably charming, don’t feel limited! This DIY project is a fantastic canvas for your personal creativity. Here are some ideas to inspire a unique twist on your mushroom lamp, allowing you to tailor it perfectly to your aesthetic:
- Color Palettes: Instead of classic red, try vibrant blues, forest greens, whimsical purples, or soft pastel shades like mint or lavender. Imagine an “alien mushroom” lamp with neon colors, or a sophisticated version with metallic gold or silver accents.
- Pattern Play: Experiment with different patterns for the cap. Instead of polka dots, try elegant stripes, swirling lines, or even abstract splatters for a modern look. You could also use stencils for more intricate designs like leaves, stars, or geometric shapes.
- Textural Elements: Add fine glitter to the wet paint for a sparkling effect that catches the light beautifully. Or, explore textured paints designed to create a tactile, dimensional surface on the mushroom cap, adding another layer of interest.
- Themed Lamps: Create a “fairy garden” mushroom lamp with delicate floral patterns and iridescent paints, or a “galaxy” lamp with deep blues and scattered silver stars for a cosmic touch. Consider holiday themes or seasonal designs.
- Different Glass Shapes: Dollar Tree often carries a variety of glass items. Explore different sizes and shapes of containers to create mushrooms of varying proportions – a tall, slender mushroom, a wide, squat one, or a cluster of different sizes for a dynamic display.
- Light Variations: While a white LED puck light is standard, consider using color-changing LED lights for a dynamic effect that cycles through hues, or warmer-toned fairy lights for a cozier, more inviting ambiance. You could even use a light with a flickering flame effect for a unique glow.
Displaying Your Whimsical Creation
Once your beautiful DIY Dollar Tree mushroom lamp is complete, the next exciting step is finding the perfect spot to showcase it! Its charming glow and whimsical design make it a versatile accent piece for almost any room. Here are some ideas to inspire its placement:
- Bedside Table: As a soft, enchanting night light that adds a touch of fantasy and warmth to your bedroom, perfect for late-night reading.
- Desk Decor: Brighten up your workspace or study area with a unique, handmade accent that provides a gentle glow and a burst of personality.
- Shelving Unit or Bookshelf: Nestled among books or other decorative items, it becomes a delightful focal point, drawing the eye and adding character to your display.
- Nursery or Child’s Room: Its gentle glow and playful design make it ideal for a child’s bedroom, providing comfort, a sense of security, and a touch of magic.
- Living Room Accent: On an end table, coffee table, or mantelpiece, it can add a quirky and personal touch to your living space, sparking conversation and admiration.
- Bathroom Ambiance: Used safely away from direct water sources, it can provide a soft, calming light for relaxation during a bath, creating a spa-like atmosphere.
- Party or Event Decor: These lamps can be grouped together to create a magical, ethereal atmosphere for themed parties, baby showers, or intimate gatherings, adding a truly custom touch.
- Unique Gift Packaging: Instead of just a gift, your mushroom lamp can *be* the gift, or even serve as a decorative element for presenting another small gift underneath its cap, making the presentation extra special.
Frequently Asked Questions About Your DIY Mushroom Lamp
What kind of paint works best on glass?
For durability and adhesion, acrylic enamel paints or multi-surface acrylic paints are highly recommended. Look for brands that explicitly state they are suitable for glass and ceramic, as these are formulated to bond well with non-porous surfaces. These paints often require curing (either air drying for an extended period or baking, depending on the brand) to become permanent and dishwasher-safe, though for a lamp, strong air-drying is usually sufficient.
Do I need to prime the glass before painting?
While some glass paints claim to not require priming, it’s always best practice to thoroughly clean the glass with rubbing alcohol or glass cleaner to ensure a clean, grease-free surface for optimal paint adhesion. This step is more crucial than a separate primer. A specific glass primer isn’t typically necessary for most glass-friendly acrylic paints.
How long does the paint take to dry?
Drying times can vary significantly based on the type of paint, thickness of application, and environmental humidity. Surface dry, meaning it’s dry to the touch, usually takes 1-4 hours. However, for full cure and maximum durability, many glass paints recommend 24-72 hours of air drying, or even several days. Always read the specific instructions on your paint bottle for the most accurate drying and curing times.
Can I wash the lamp once it’s painted?
For a painted lamp, gentle cleaning is advised. Wipe the exterior with a soft, damp cloth if necessary. Since the paint is on the inside, it’s generally more protected, but avoid submerging the lamp in water or using harsh abrasive cleaners, especially if you haven’t applied a sealant or cured the paint to its maximum durability. Treat it as a decorative item rather than functional dinnerware.
Is this lamp suitable for outdoor use?
Generally, no. The materials (glass containers, paint, and especially the battery-operated light) are not designed to withstand outdoor elements like rain, extreme temperatures, or direct sunlight for extended periods. Moisture can damage the light source and cause paint to peel over time. This DIY mushroom lamp is best enjoyed as charming indoor decor.
How do I change the battery of the attachable light?
Most attachable LED puck lights or fairy lights are designed for easy battery replacement. The beauty of this lamp’s assembly (stacking components) means you can simply lift the mushroom cap and stem to access the light source in the base. This allows for hassle-free battery changes without damaging your painted creation, ensuring your lamp can glow for years to come.
DIY Dollar Tree Mushroom Lamp Tutorial: Your Next Weekend Project!
Isn’t it amazing what you can create with a little imagination and a trip to Dollar Tree? This enchanting DIY mushroom lamp is more than just a decorative item; it’s a testament to the fact that creativity doesn’t have to break the bank. With its whimsical glow and personalized charm, it’s sure to bring a smile to your face every time you see it. Whether you’re crafting it for yourself, a friend, or a family member, the process is as rewarding as the final product. So, what are you waiting for? Grab your budget-friendly supplies, follow our detailed guide, and illuminate your space with your very own handmade masterpiece. We can’t wait to see your adorable creations – share them and inspire others!