
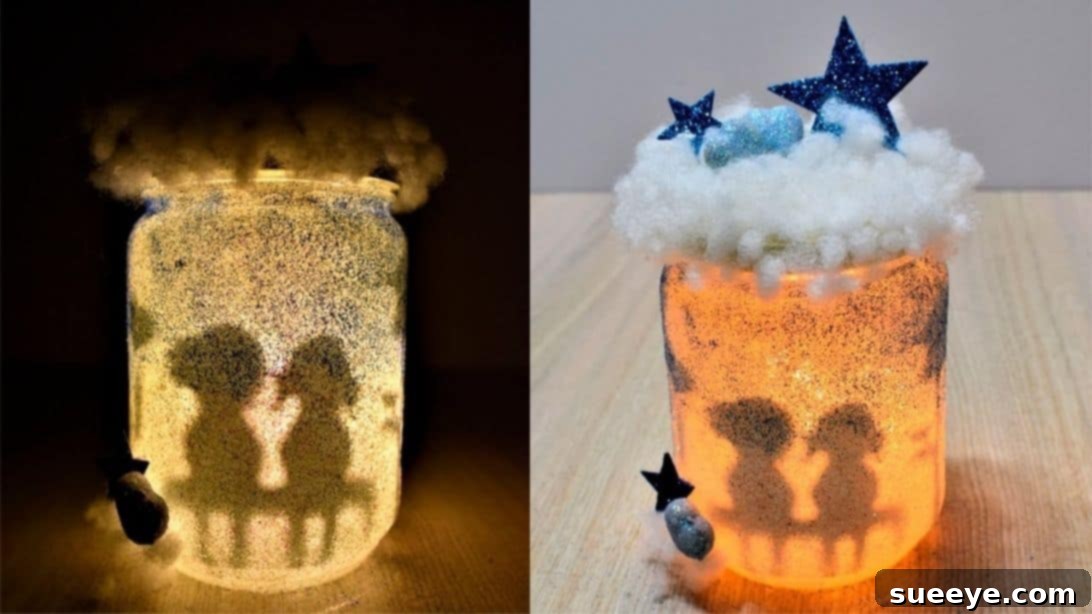
Create Enchanting Ambiance: Your Guide to DIY Glowing Mason Jar Fairy Lights
There’s a unique satisfaction that comes with crafting your own home decor. It’s not just about saving money, though that’s certainly a perk; it’s about infusing your living space with personality, creating pieces that resonate with your individual style, and engaging in a rewarding creative process. In a world saturated with mass-produced items, DIY projects offer a refreshing escape, allowing you to design and build something truly one-of-a-kind. Among the myriad of DIY crafts, projects involving mason jars and delicate fairy LED lights hold a special place for their ability to transform ordinary spaces into magical havens. These versatile jars, often found tucked away in our kitchens, become canvases for imagination, capable of holding shimmering light and captivating scenes.
Recently, I embarked on a delightful journey of redecorating my own room, with a strong emphasis on handcrafted elements. My latest obsession has been crafting glowing mason jar fairy lights, a project I discovered through an inspiring tutorial by Decor Crafts on YouTube. This particular craft captured my heart immediately. It’s incredibly charming, surprisingly simple to execute, and adds an undeniable cozy, dreamlike quality to any room. The gentle glow emanating from these personalized jars creates an atmosphere of warmth and tranquility, perfect for unwinding after a long day or setting a soft mood for an evening gathering. I loved making them so much that I ended up crafting several, gifting some to my younger cousins and niece, who were absolutely thrilled with their new magical nightlights.
Why Choose DIY Mason Jar Decor?
Mason jars are unsung heroes of the crafting world. Their sturdy glass construction, classic shape, and availability make them an ideal foundation for countless DIY projects. Opting for DIY decor, especially with repurposed items like mason jars, offers a multitude of benefits:
- Personalization: You get to choose every detail, from colors and textures to themes and embellishments, ensuring the final product perfectly reflects your taste and complements your existing decor.
- Cost-Effectiveness: Crafting your own decor is often significantly cheaper than purchasing similar items from retail stores, allowing you to beautify your space without breaking the bank.
- Sustainable Living: Repurposing old jars reduces waste and promotes a more eco-friendly lifestyle, giving new life to items that might otherwise be discarded.
- Therapeutic Activity: The act of crafting itself can be incredibly relaxing and meditative. It provides a wonderful opportunity to disconnect from digital distractions and engage in a fulfilling hands-on activity.
- Unique Gifts: Handmade gifts carry a special sentiment. A glowing mason jar fairy light makes a thoughtful and memorable present for birthdays, holidays, or just because.
Materials You’ll Need to Craft Your Magical Jar
Gathering your supplies is the first exciting step in bringing your glowing mason jar to life. Most of these items are readily available at craft stores, discount retailers, or even around your home. Choose materials that inspire you and align with the aesthetic you envision for your finished piece.
Essential Supplies:
- Mason Jar: A clean, dry mason jar of any size will work, but a standard pint or quart-sized jar is ideal for this project, offering ample space for your silhouette and lights.
- White Acrylic Paint: Choose a good quality, opaque white acrylic paint that will provide even coverage and a solid base for your glitter.
- Small Sponge or Foam Brush: Essential for applying thin, even layers of paint to the curved surface of the jar, ensuring a smooth finish.
- Glitters (White and Blue): Fine glitters work best for a subtle, ethereal shimmer. The white glitter will enhance the snowy or cloudy effect, while blue adds a touch of frosty magic.
- Polyester Fiberfill: Often used for stuffing pillows or toys, this fluffy material will create the cloud-like effect on the lid and inside the jar.
- Glue Stick (standard) or Liquid Craft Glue in a Tube: For securely attaching paper cutouts without causing wrinkles or bleeding.
- Hot Glue Gun and Glue Sticks: Indispensable for adhering the fiberfill to the lid and other structural elements. Always exercise caution when using a hot glue gun.
- Permanent Black Marker Pen: A fine-tipped or medium-tipped marker is best for coloring your silhouette cutout, ensuring a deep, opaque black.
- Paper: Both thin printer paper (for tracing templates) and slightly thicker cardstock or construction paper (for the final silhouette cutout) will be needed.
- Scissors: A sharp pair of scissors is crucial for precise cutting, especially for intricate silhouette designs.
- Fairy LED Lights: Battery-operated fairy string lights are perfect. Look for warm white lights for a cozy glow or cool white for a more ethereal look. Ensure the battery pack is small enough to be concealed or placed discreetly.
Optional Enhancements:
- Ribbons or Twine: To adorn the neck of the jar for an extra decorative touch.
- Small Charms or Embellishments: Tiny stars, moons, or other themed charms can be added to the lid or ribbon.
- Stencil Set: If you prefer stenciling a design directly onto the jar instead of a cutout.
- Glow-in-the-Dark Paint: For an added magical effect when the lights are off.
- Different Colored Paints: To customize the jar’s base color to match your decor.
Step-by-Step Guide: Crafting Your Enchanted Mason Jar
Now that you have all your materials ready, let’s dive into the creative process. Take your time with each step, and remember that slight imperfections often add to the handmade charm!
Step 1: Preparing and Painting Your Mason Jar for a Dreamy Base
Begin with a clean, dry mason jar. Ensure there’s no dust, grease, or moisture, as this can prevent the paint from adhering properly. Using your small sponge or foam brush, apply a thin, even coat of white acrylic paint all over the exterior body of the jar. Avoid painting the very top rim where the lid screws on, as this might interfere with closing it. Allow the first coat to dry completely – this usually takes about 15-20 minutes, or longer depending on humidity. Apply a second thin coat if necessary to achieve opaque coverage. The key here is thin, even layers to prevent streaks or a clumpy finish.
Once the white paint is mostly dry but still slightly tacky, generously sprinkle white glitter over the entire painted surface. Gently roll and tap the jar to ensure the glitter adheres evenly. For an added magical touch, take your blue glitter and lightly sprinkle it around the top third of the jar, creating a beautiful gradient effect that suggests a starry night or frosty winter sky. Allow the paint and glitter to dry completely, ideally for a few hours, or even overnight, to ensure the glitter is fully set and won’t rub off easily.
Step 2: Designing and Attaching Your Silhouette Scene
This step allows for immense creativity. You can either search online for a silhouette image that speaks to you (think fairies, castles, trees, animals, or even cityscapes) and print it out, or you can sketch your own design. Once you have your desired silhouette image, place a thin sheet of paper (like regular printer paper) over it and carefully trace the shape. This creates your initial template. For instance, a silhouette of a whimsical fairy playing amidst tall grass or a majestic deer in a forest would be enchanting.
Next, transfer your traced pattern onto a slightly thicker piece of paper, such as cardstock or construction paper. Thicker paper will provide better opacity and durability inside the jar. Carefully cut out your silhouette using sharp scissors, paying close attention to any intricate details. Once cut, take your permanent black marker and color the entire cutout shape solid black. This will ensure it stands out sharply against the glowing background. Apply a thin, even layer of glue (a glue stick or liquid craft glue in a tube works well here) to the back of your black silhouette cutout. Carefully place and attach the cutout to the inside wall of your mason jar, pressing gently to ensure good adhesion. Position it strategically so it’s easily visible through the painted and glittered exterior. You might need a long stick or tweezers to precisely place it inside the jar.
Step 3: Creating the Cloud Top and Assembling the Magic
Now for the magical finishing touches! Heat up your hot glue gun. Once ready, apply a generous amount of hot glue to the top of the mason jar lid. Immediately take small tufts of polyester fiberfill and press them onto the hot glue, covering the entire lid surface. Repeat this process, adding more layers of fiberfill, gently shaping it to create a soft, cloud-like, or snowy mound. Be mindful of not making it too heavy or obscuring the ability to screw on the lid.
Once the lid is covered with fiberfill, you can decorate the top with extra glittered embellishments. A dusting of white or blue glitter, or even tiny star-shaped confetti, can enhance the dreamy effect. Next, take a small amount of fiberfill and attach it to the very bottom inside of the mason jar with a dab of hot glue (or even white craft glue). This creates a soft base, similar to a cloud or snowdrift, and helps to anchor the fairy lights. You can also add a few subtle glittered embellishments to this bottom layer.
Finally, carefully insert your fairy LED lights into the mason jar. Gently unspool the string of lights and arrange them artfully inside, making sure they surround your silhouette and illuminate it beautifully. If your battery pack is small, try to tuck it discreetly into the fiberfill at the bottom or near the top rim of the jar so it’s hidden when the lid is closed. Once satisfied with the arrangement, screw the decorated lid onto the mason jar securely. Turn on the lights and watch your enchanted glowing jar come to life!
More Ideas to Personalize Your Fairy Jar
The beauty of DIY lies in its infinite possibilities for customization. Don’t stop at just one design! Here are a few ideas to inspire further creativity:
- Seasonal Themes: Create a spooky Halloween jar with bat or ghost silhouettes, a festive winter wonderland jar with snowmen or sleighs, or a spring-themed jar with blooming flowers and butterflies.
- Colored Lights: Experiment with fairy lights that offer different color options to change the mood of your jar. Blue for a cool, serene glow; red for a warm, romantic feel.
- Ribbon & Twine Accents: Tie a rustic twine bow around the neck of the jar for a farmhouse look, or a satin ribbon for elegance.
- Aromatherapy Jar: Add a few drops of essential oil (like lavender or cedarwood) to a cotton ball hidden within the bottom fiberfill layer for a subtle, pleasing scent.
- Jar Sizes: Play with different sized mason jars to create a tiered display, or use smaller jars as charming party favors.
Caring for Your DIY Creation
To keep your glowing mason jar looking its best, gently dust the exterior with a soft cloth as needed. If the lights dim, it’s likely time to replace the batteries in your fairy light string. Avoid submerging the jar in water or using harsh cleaning agents, as this could damage the paint, glitter, or electronic components.
Unleash Your Inner Crafter
Creating these glowing mason jar fairy lights is more than just a craft project; it’s an opportunity to bring a touch of magic and personalized warmth into your home. It’s a testament to the idea that beauty doesn’t have to be expensive or complicated. With a few simple materials and a dash of creativity, you can transform an everyday item into an enchanting piece of decor. So, gather your supplies, let your imagination take flight, and enjoy the process of crafting something truly special. Happy crafting!
*These amazing images are all credited to Decor Crafts via YouTube. Check their other content and follow for more inspiring DIY projects!