
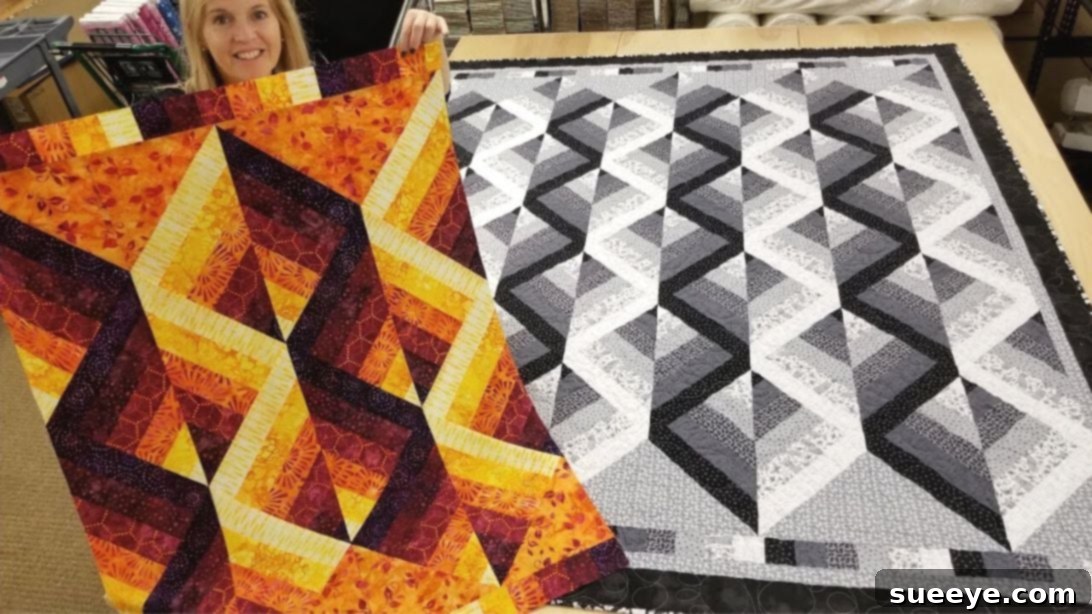
Embark on a captivating quilting journey with the “Mirror Mirror on the Wall” quilt pattern, a masterful design by Jordan Fabrics. This remarkable pattern is an ingenious play on color and contrast, meticulously arranged to create a breathtaking 3D-like illusion that will mesmerize anyone who beholds it. More than just a quilt, it’s a piece of art that brings depth and dimension to your home decor. Whether you’re a seasoned quilter looking for your next exciting project or an enthusiastic beginner ready to tackle something truly unique, this guide will walk you through every step of crafting this visually stunning quilt. Prepare to be amazed by the magic of fabric as you transform simple strips into a complex, eye-catching design that truly gets everyone’s attention.
The beauty of the “Mirror Mirror” quilt lies in its clever use of gradient fabrics, transitioning from light to dark to form the optical illusion. This comprehensive tutorial will ensure your quilting experience is both enjoyable and rewarding, resulting in a finished product you’ll be incredibly proud to display or gift. Get ready to gather your materials, sharpen your rotary cutter, and dive into the world of dimensional quilting!
Essential Materials for Your “Mirror Mirror” Quilt
Before beginning any quilting project, having all your materials ready is paramount. For the “Mirror Mirror on the Wall” quilt, the choice of fabric is especially crucial as it dictates the effectiveness of the 3D illusion. Here’s a detailed list of what you’ll need, along with some helpful tips for selection:
- Six (6) Prints, 1 Yard Each: The heart of this quilt’s illusion lies in its fabric selection. It is absolutely essential that these colors vary distinctly from light to dark. Think of a beautiful gradient: a very light shade, a slightly darker one, a mid-tone, a darker mid-tone, a dark shade, and finally, a very dark shade. High-quality quilting cotton is recommended for its durability and ease of handling. Consider how the colors will interact; a consistent color family (e.g., various shades of blue, green, or even neutrals like grays) can create a cohesive look, while contrasting colors can add drama.
- Quilter’s Ruler: A long, clear acrylic ruler (at least 6 x 24 inches) is indispensable for accurate cutting. Precision is key in quilting, and a good ruler will ensure your strips and blocks are cut perfectly straight.
- Fabric for Fill-in Triangles: You’ll need additional fabric for these crucial elements. A solid or subtle print that complements your chosen gradient fabrics often works best. This fabric will frame your dimensional blocks, enhancing the overall effect. Ensure you have enough to cut several 9-inch squares.
- Cutting Mat: A self-healing cutting mat protects your work surface and provides a stable base for accurate cutting with a rotary cutter.
- Rotary Cutter: A sharp rotary cutter (45mm or 60mm) is highly recommended for efficient and precise cutting of multiple fabric layers. Always use it with a proper cutting mat.
- Sewing Machine: A reliable sewing machine capable of a consistent quarter-inch seam allowance is vital.
- Thread: All-purpose polyester or cotton thread that matches or blends with your fabrics.
- Iron and Ironing Board: Essential for pressing seams flat and preparing fabric.
- Fabric Scissors: For smaller cuts or trimming threads.
- Pins or Fabric Clips: To hold fabric pieces together securely before sewing.
Crafting Your “Mirror Mirror” Masterpiece: Step-by-Step Guide
Follow these detailed instructions carefully to bring your “Mirror Mirror on the Wall” quilt to life. Precision in cutting and sewing is your best friend throughout this project.
Step 1: Meticulous Fabric Preparation – Ironing and Layering
The foundation of any successful quilting project begins with well-prepared fabric. Begin by thoroughly ironing all six of your 1-yard fabric prints. This critical step removes any wrinkles, creases, or folds, ensuring that your measurements will be accurate and your cuts precise. Wrinkled fabric can lead to uneven strips and ultimately, a distorted quilt top. Once your fabrics are crisp and smooth, carefully layer them on your cutting mat. You can layer as many fabrics as you feel comfortable cutting accurately at once, usually 2 to 4 layers is manageable. Align all raw edges perfectly, making sure there are no shifts or puckers between layers. This layered approach not only saves time but also promotes consistency across all your fabric strips.
Step 2: Precision Cutting and Initial Strip Assembly
From each of your six carefully prepared fabrics, cut twelve (12) strips, each measuring 2-1/2 inches wide. Take your time with this step, using your quilter’s ruler and rotary cutter to ensure straight and consistent cuts. Once all your strips are cut, arrange them systematically based on their color, transitioning smoothly from the lightest fabric to the darkest. Now, begin assembling your strip units. Take the lightest fabric strip and place it on your work surface. Next, take the second lightest fabric strip and place it to the right of the first. With right sides together, carefully align the long edges of these two strips. Using a quarter-inch seam allowance, sew them together along the aligned edge. After sewing, finger press the seam allowance toward the darker strip. This technique helps to “lock” the seam in place and reduces bulk. Repeat this process for all subsequent strips, continuously adding the next darker shade to the right, always pressing the seam allowance towards the darker fabric. Continue until all six strips are sewn together into one long, gradient unit.
Step 3: Creating Blocks and Border Pieces from Strip Units
Once you have completed your gradient strip units, lay them flat on your ironing board or a large, smooth surface. Gently smooth out the fabric, ensuring there are no wrinkles or distortions, and then press them thoroughly with an iron. A well-pressed strip unit is crucial for accurate subsequent cuts. From one end of your pressed strip unit, cut 2 inches off the edge to square it up and remove any unevenness. Next, measure and cut segments that are 12-1/2 inches long. From each complete strip unit, you will yield three (3) precisely sized blocks. These 12-1/2 inch blocks are the foundation of your 3D illusion. The remaining excess fabric from your strip unit, after cutting your blocks, should be cut into 2-1/2 inch strips. These shorter segments will be reserved to form the elegant border of your quilt, providing a cohesive frame for your stunning design.
Step 4: The Diagonal Cut – Unlocking the Illusionary Effect
This step is where the magic truly begins to take shape. Take all the 12-1/2 inch blocks you’ve created and divide them evenly into two distinct sets. For the first set of blocks, position your ruler diagonally across each block and cut them from one corner to the opposite corner. This will yield two large triangles from each block. For the second set of blocks, perform the diagonal cut in the *opposite* direction. For example, if your first set was cut from top-left to bottom-right, your second set should be cut from top-right to bottom-left. This careful distinction in diagonal cutting is absolutely essential for creating the mirrored 3D effect. Once all blocks are cut diagonally, separate the resulting triangles into four distinct sets: two sets containing triangles predominantly featuring the darker shades of your gradient, and two sets containing triangles showcasing the lighter shades.
Step 5: Assembling the Darker “V” Rows for Dimensionality
Now, let’s begin to form the distinct rows that will build your quilt. Take one triangle from your first set of darker shades and place it flat on your work table. Next, select a triangle from your second set of darker shades. Critically, turn this second triangle around (rotate it 180 degrees) before placing it on top of the first. When correctly positioned, the darkest strip of the second triangle should align with the darkest strip of the first, forming a striking “V” shape with the darkest color at the apex. This creates the illusion of depth. For each row you create in this manner, you will use a total of eight (8) of these paired triangles, forming a series of “V” shapes across the length of your row. Ensure consistent alignment as you lay out each pair.
Step 6: Constructing Lighter Rows and Preparing Fill-in Triangles
Once you’ve completed your rows using the darker fabric sets, repeat the exact same process (as described in Step 5) to create another set of rows using your lighter fabric sets. Remember to turn the second triangle of each pair to form the “V” shape. By the end of this step, you will have a total of four (4) distinct rows: two made primarily from the darker fabric sets and two from the lighter fabric sets. These rows will eventually alternate to enhance the illusion. Next, take your chosen fill-in fabric. From this fabric, cut several 9-inch squares. These squares are crucial for creating the clean, straight edges of your quilt and for visually “filling in” the spaces around your angled blocks. Cut each of these 9-inch squares diagonally from one corner to the opposite, yielding two fill-in triangles from each square. These fill-in triangles will be strategically placed at the ends of each row you’ve constructed, providing a neat finish and enhancing the framed appearance of your dimensional blocks.
Step 7: Sewing the Rows – Bringing the Illusion to Life
With your rows laid out and fill-in triangles prepared, it’s time to sew them together. Begin with your first row. Carefully overlap each triangle piece, aligning the raw edges precisely. Use pins generously to secure each overlap, preventing any shifting during the sewing process. With your sewing machine, stitch these triangles together using a consistent quarter-inch seam allowance. After each seam is sewn, press the seam allowance away from the patchwork. This technique helps to reduce bulk where multiple seams meet and ensures a flatter, smoother quilt top. Continue this precise sewing and pressing process for all the triangles within your first row. Once the first row is complete and pressed, proceed to do the same for all the remaining rows, ensuring each one is perfectly pieced and pressed.
Step 8: Joining the Rows – Forming the Quilt Top
Now that your individual rows are beautifully pieced and pressed, it’s time to join them together to form the complete quilt top. Take the first two rows you’ve completed. Place them right sides together, carefully aligning all the seams and raw edges. Pin generously along the entire length of the seam to prevent any shifting. Sew these two rows together using your consistent quarter-inch seam allowance. After sewing, gently press the seam open or to one side, whichever creates the least bulk and the flattest finish. Exercise extreme caution when ironing these joined rows; the bias edges created by the diagonal cuts can stretch easily, distorting your patchwork. Use an up-and-down pressing motion rather than pushing the iron across the fabric. Repeat this process for the remaining rows, joining them one by one until your entire quilt top is assembled. Ensure that each row aligns perfectly with the previous one to maintain the integrity of your 3D illusion.
Step 9: Adding the Borders – Framing Your Masterpiece
The final step in constructing your quilt top is to add the border strips. Retrieve the 2-1/2 inch strips you cut earlier from the excess fabric of your strip units (from Step 3). These strips will serve as the top and bottom borders, elegantly framing your “Mirror Mirror” design. Measure the exact width of your assembled quilt top and cut two border strips to this precise length. Place one border strip right sides together along the top edge of your quilt top, aligning all raw edges. Pin securely and sew with a quarter-inch seam allowance. Repeat this process for the bottom edge of your quilt top. Press the seams towards the border strips for a clean finish. Adding these borders not only provides a beautiful frame but also helps to stabilize the quilt top, completing the striking visual effect of your “Mirror Mirror on the Wall” quilt.
Tips for a Flawless “Mirror Mirror” Quilt
Achieving a professional-looking quilt requires attention to detail. Here are some extra tips to ensure your “Mirror Mirror on the Wall” quilt is nothing short of perfect:
- Consistent Seam Allowance: The quarter-inch seam allowance is paramount in quilting. A consistent seam ensures your blocks match up perfectly. Consider using a quarter-inch foot on your sewing machine.
- Pressing vs. Ironing: Remember that “pressing” means lifting and placing the iron down, while “ironing” involves sliding it. Pressing is crucial for quilting to avoid stretching fabric on the bias.
- Sharp Tools: A sharp rotary blade and sewing machine needle make a huge difference in precision and ease. Change them regularly.
- Chain Piecing: For repetitive steps like sewing strips, consider chain piecing. This involves feeding one set of pieces into your machine right after another without cutting the thread in between, saving time and thread.
- Check Your Square: Regularly check your blocks for squareness after each major cutting or sewing step. This helps catch and correct errors early.
- Fabric Pre-Washing: While optional, pre-washing your fabrics before cutting can prevent shrinkage and color bleeding, especially important with varying shades.
Customizing Your “Mirror Mirror” Quilt
While the Jordan Fabrics pattern is stunning as is, quilting is an art form, and there’s always room for personalization. Here’s how you can make your “Mirror Mirror” quilt uniquely yours:
- Color Palette Exploration: Don’t limit yourself to one color family. Experiment with cool gradients (blues, greens, purples) or warm gradients (reds, oranges, yellows). You could even try a monochromatic scheme using different values of a single color for a subtle yet sophisticated effect, or a rainbow gradient for a vibrant statement.
- Fabric Textures: While quilting cotton is standard, consider introducing subtle textural differences. Perhaps a linen blend for one of the darker shades, or a fabric with a slight sheen for a lighter one, to add another layer of visual interest.
- Quilting Designs: Once your quilt top is assembled, the quilting itself offers another opportunity for creativity. Simple straight lines that echo the diagonal cuts will enhance the geometric illusion, while free-motion quilting with swirls or feathers can provide a beautiful contrast.
- Size Adjustments: The instructions here generally produce a throw-sized quilt. To make it larger for a bed, simply create more strip units and blocks, then assemble additional rows. For a smaller piece like a table runner or wall hanging, you could reduce the number of strips in each unit or create fewer rows.
Caring for Your Handmade Quilt
After investing your time and creativity into making this beautiful “Mirror Mirror on the Wall” quilt, proper care will ensure it remains a cherished heirloom for years to come:
- First Wash: For the initial wash, especially if you didn’t pre-wash your fabrics, consider using a color catcher sheet to absorb any potential dye bleeding. Wash on a gentle cycle with cold water.
- Gentle Washing: Always wash your quilt on a gentle cycle with cold water and a mild detergent. Harsh chemicals or hot water can fade colors and weaken fabric fibers.
- Drying: Tumble dry on a low heat setting or, ideally, lay flat to dry. Hanging a wet quilt can cause distortion due to the weight of the water. Avoid direct sunlight for extended periods to prevent fading.
- Storage: When not in use, store your quilt folded in a breathable cotton bag or pillowcase. Avoid plastic bags, which can trap moisture and lead to mildew. Store in a cool, dry place away from direct sunlight.
Your Finished Mirror Mirror On the Wall Quilt
Congratulations! You have successfully crafted the mesmerizing “Mirror Mirror on the Wall” quilt. This project, while requiring precision, is incredibly rewarding, yielding a quilt that is truly a work of art. The clever use of gradient fabrics and diagonal cuts creates an optical illusion that makes the quilt appear to shift and move, drawing the eye into its unique 3D depths. It’s a testament to the power of design and your skill as a quilter. Whether draped over a sofa, spread across a bed, or hung as a striking wall art piece, this quilt is sure to be a conversation starter and a source of immense pride. Enjoy the beauty and warmth of your handmade creation, and perhaps inspire others to discover the joy of quilting with this spectacular Jordan Fabrics pattern!