
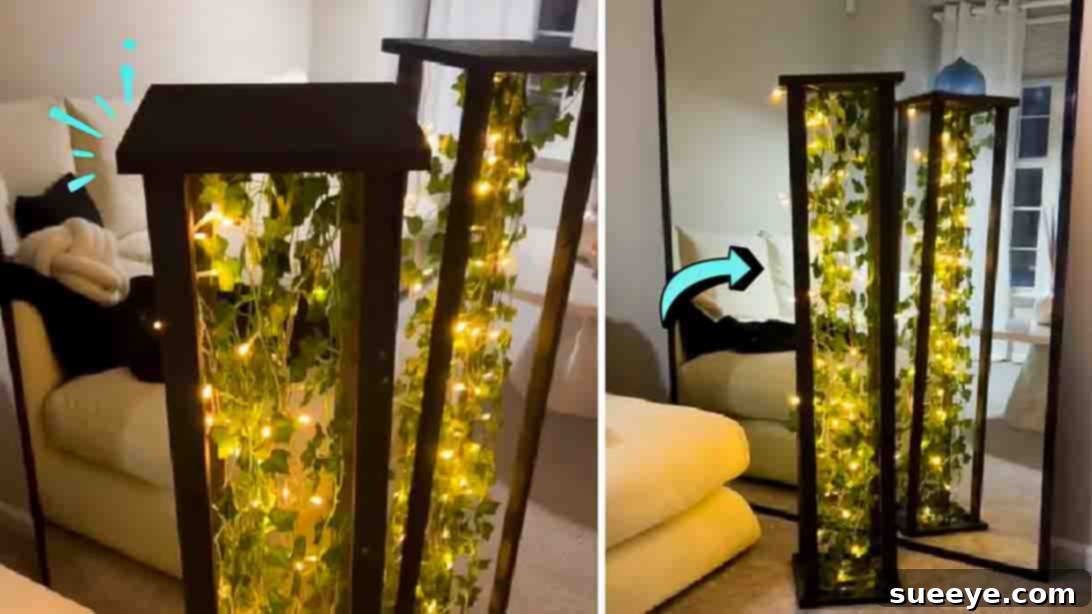
As a passionate DIY enthusiast, there’s nothing I enjoy more than infusing my home decor with a personal touch. The satisfaction of crafting something beautiful and unique for my living space is unparalleled. So, when I stumbled upon this mesmerizing DIY Ivy Lamp tutorial from @my_home_by_kendra on TikTok, I was instantly captivated. This project immediately resonated with my love for creative, accessible home decoration. What makes this DIY particularly appealing is its straightforward design, making it perfectly manageable for a single person to complete with ease. The final product is undeniably stunning, so much so that I’m already envisioning crafting a pair – one to illuminate my bedroom with its serene glow and another to bring a touch of natural elegance to my living room.
RELATED: DIY LED Corner Lamp Tutorial
Beyond its aesthetic appeal and ease of assembly, another significant advantage of this DIY Ivy Lamp is its affordability. The majority of the required materials are readily available and incredibly inexpensive, often found at local dollar stores or craft shops, making this a truly budget-friendly project. This accessibility also opens up fantastic possibilities for turning this craft into a profitable venture. Imagine gathering your friends for a creative session, each crafting their own beautiful lamp, or even producing a small batch to sell at local markets or online! The potential is as bright as the lamp itself. To embark on this delightful crafting journey, simply follow along with the detailed step-by-step instructions provided below. A huge thank you to @my_home_by_kendra for sharing this brilliant and inspiring DIY!
Why Choose a DIY Ivy Lamp? The Allure of Handmade Ambiance
In a world saturated with mass-produced decor, creating your own pieces offers a unique sense of individuality and warmth. A DIY Ivy Lamp isn’t just a light source; it’s a statement piece that blends the tranquility of nature with modern lighting, all crafted by your own hands. This project is perfect for anyone looking to:
- Personalize Their Space: Tailor the lamp to perfectly match your home’s aesthetic, from the paint color to the type of faux ivy.
- Save Money: Achieve a high-end look without the high-end price tag, utilizing readily available and inexpensive materials.
- Embrace Sustainability: By repurposing simple items and giving them a new life, you contribute to a more sustainable approach to home decor.
- Enjoy a Rewarding Craft: The process itself is therapeutic and the finished product brings immense satisfaction. It’s a fantastic project for beginners and seasoned crafters alike.
- Add a Unique Touch: Stand out with a custom lighting fixture that guests are sure to admire and inquire about. The soft glow of fairy lights intertwined with faux greenery creates an incredibly cozy and inviting atmosphere, perfect for any season.
Unveiling the DIY Ivy Lamp: A Fusion of Nature and Light
The beauty of the DIY Ivy Lamp lies in its elegant simplicity and the harmonious blend of elements. It captures the essence of indoor plant decor without the maintenance, combined with the magical twinkle of fairy lights. This lamp style can seamlessly integrate into various interior design themes, from bohemian and rustic to minimalist and contemporary. Its organic form and gentle illumination make it ideal for creating focal points, adding soft background lighting, or enhancing a cozy reading nook. Whether you’re aiming for a lush, overgrown look or a more subtle, delicate touch of green, this lamp provides the perfect canvas to express your vision. It truly transforms a simple space into a sanctuary of peace and beauty.
Gather Your Essentials: Materials for Your Enchanting Ivy Lamp
One of the best aspects of this DIY project is the accessibility and affordability of its components. You won’t need specialized tools or expensive supplies. Here’s a breakdown of what you’ll need, along with some tips for selection:
- 2 pcs blank wood panels: These will form the top and bottom of your lamp frame. Look for lightweight, sturdy options. Common sizes might be 6×6 or 8×8 inches, depending on your desired lamp size. You can often find these in the craft section of stores or even cut them from larger pieces of plywood.
- 4 pcs strips of wood: These will connect your top and bottom panels, forming the vertical supports of the lamp. Ensure they are straight and of uniform length. Their thickness should be appropriate for screwing into the panels without splitting the wood.
- Ceiling command hooks: While labeled ‘ceiling,’ these adhesive hooks are perfect for securing the ivy and lights inside the lamp frame without damaging the wood. They are strong enough to hold lightweight garlands. Consider clear hooks for a less noticeable look.
- Screws: Small wood screws suitable for joining your wood strips to the panels. Make sure they are not too long, so they don’t protrude through the panels, and not too short, so they provide a secure hold.
- LED fairy lights: Opt for battery-operated LED fairy lights for safety and flexibility in placement. Warm white lights create a cozy ambiance, but cool white or even color-changing options could add a different vibe. Consider the length based on how dense you want the lighting to be – typically a 10-20 foot strand is sufficient for a modest lamp.
- Faux ivy garland: The star of the show! Choose a garland that looks realistic and has a good amount of fullness. You might need one or two strands depending on the length and desired density. There are various types of faux ivy, from deep green to variegated, allowing for further customization.
- Black paint: Or any color you desire! Black provides a striking contrast against the green ivy and warm lights, making them pop. Consider matte or satin finishes for a modern look. Acrylic paint or spray paint can both work effectively.
- Paintbrush: A medium-sized brush will work well for painting the wood frame. If using spray paint, ensure you have proper ventilation and cover your work area.
Step-by-Step Guide: Crafting Your Own Enchanting DIY Ivy Lamp
Creating this beautiful lamp is a straightforward process that yields impressive results. Here’s how you can bring your vision to life:
@my_home_by_kendra ✨DIY Ivy Lamp✨ #diy #diycrafts #diyhomedecor #diyideas #diylamp #diylighting
♬ ROCK THE ESSENCE (MASHUP) – Ombre2Choc Remix
Step 1: Building the Foundation (Frame Assembly & Painting)
Begin by constructing the sturdy frame for your lamp. Take your four strips of wood and securely screw them onto the blank wood panels. You’ll attach two strips to each panel, forming a rectangular or square box structure. It’s often helpful to pre-drill pilot holes to prevent the wood from splitting, especially if you’re working with thinner wood strips. Ensure that the frame is level and stable. Once the frame is fully assembled, it’s time to add some color. Carefully paint the entire lamp frame black, or any color that complements your home decor. Black provides a striking contrast that really makes the vibrant green ivy and the warm glow of the fairy lights stand out. Apply an even coat, and if necessary, a second coat after the first has dried, to achieve a rich, consistent finish. Allow the paint to dry completely before proceeding to the next step. Patience here ensures a professional and long-lasting result.
Step 2: Adorning with Greenery and Glow (Ivy & Lights Installation)
Once your lamp frame is thoroughly dry, it’s time to add the magical elements. Carefully attach the command hooks to the underside of the top wood panel. Strategically place these hooks, considering how you want the ivy garland and fairy lights to hang and drape. A few hooks spaced evenly will allow for a natural distribution. Next, take your faux ivy garland and begin to drape and secure it within the lamp frame, utilizing the command hooks. Experiment with different arrangements to achieve your desired look – whether you want a dense cascade of leaves or a more sparse, delicate touch. The beauty of faux ivy is its flexibility; you can wrap it, loop it, and even trim it to fit perfectly. After the ivy is in place, gently weave the LED fairy lights through the garland. Ensure the lights are evenly scattered among the faux ivy to create a consistent, enchanting glow. Distribute the battery pack discreetly, perhaps by securing it to the top panel or tucking it behind the ivy. Once both the ivy and lights are arranged to your satisfaction, your captivating DIY Ivy Lamp is complete! Now, you can proudly place your handmade masterpiece anywhere in your home to instantly elevate the ambiance.
Creative Variations & Customization Ideas for Your DIY Ivy Lamp
While the original design is beautiful, the true joy of DIY lies in customization. Here are some ideas to make your ivy lamp truly unique:
- Alternative Plants: Instead of ivy, consider other faux greenery like eucalyptus, fern, or even delicate floral garlands for a different aesthetic.
- Color Palette: Experiment with different paint colors for the frame. A crisp white frame could offer a modern, airy feel, while a distressed wood finish could enhance a farmhouse or shabby chic vibe.
- Light Options: Explore different types of LED lights – perhaps tiny globe lights for a more defined glow, or even solar-powered lights if placing the lamp near a window during the day.
- Added Embellishments: Integrate small decorative elements like faux birds, butterflies, tiny bells, or even miniature photos clipped onto the garland for a truly personal touch.
- Size & Shape: Adjust the dimensions of your wood panels and strips to create lamps of various sizes, from small accent pieces to larger floor-standing versions. You could even try a cylindrical frame!
- Textural Elements: Wrap part of the wood frame with twine or burlap before adding the ivy for an extra layer of rustic charm.
Displaying Your Masterpiece: Placement & Styling Tips
Once your DIY Ivy Lamp is complete, the final step is to find its perfect home. This versatile piece can enhance almost any room:
- Bedroom: Place it on a bedside table or dresser for a soft, calming nightlight that evokes a serene garden feel.
- Living Room: Use it as an accent light on a side table, console table, or even a bookshelf to add warmth and a natural element. It’s a great conversation starter!
- Nursery or Kids’ Room: The gentle glow and natural elements can create a soothing environment, perfect for bedtime stories. Ensure battery packs are safely out of reach.
- Home Office: Bring a touch of the outdoors into your workspace, helping to reduce stress and improve focus with its tranquil ambiance.
- Entryway: Welcome guests with a cozy and inviting glow as they step into your home.
Consider placing your lamp against a contrasting wall color to make it pop, or integrate it with other natural elements like real potted plants or wooden decor to create a cohesive theme.
DIY Ivy Lamp: Your Next Crafting Adventure Awaits!
The DIY Ivy Lamp is more than just a lighting fixture; it’s a testament to the beauty of handmade creations, an expression of personal style, and a source of cozy comfort in any home. Its simplicity in design belies the enchanting effect it has on a space, transforming ordinary corners into magical havens. From its budget-friendly materials to the immense satisfaction of its creation, this project offers a rewarding experience for crafters of all skill levels. So, why wait? Gather your supplies, unleash your creativity, and embark on this delightful journey to craft your very own enchanting faux plant LED light fixture. We can’t wait to see the beautiful ivy lamps you bring to life! Share your creations and inspire others in the DIY community.