
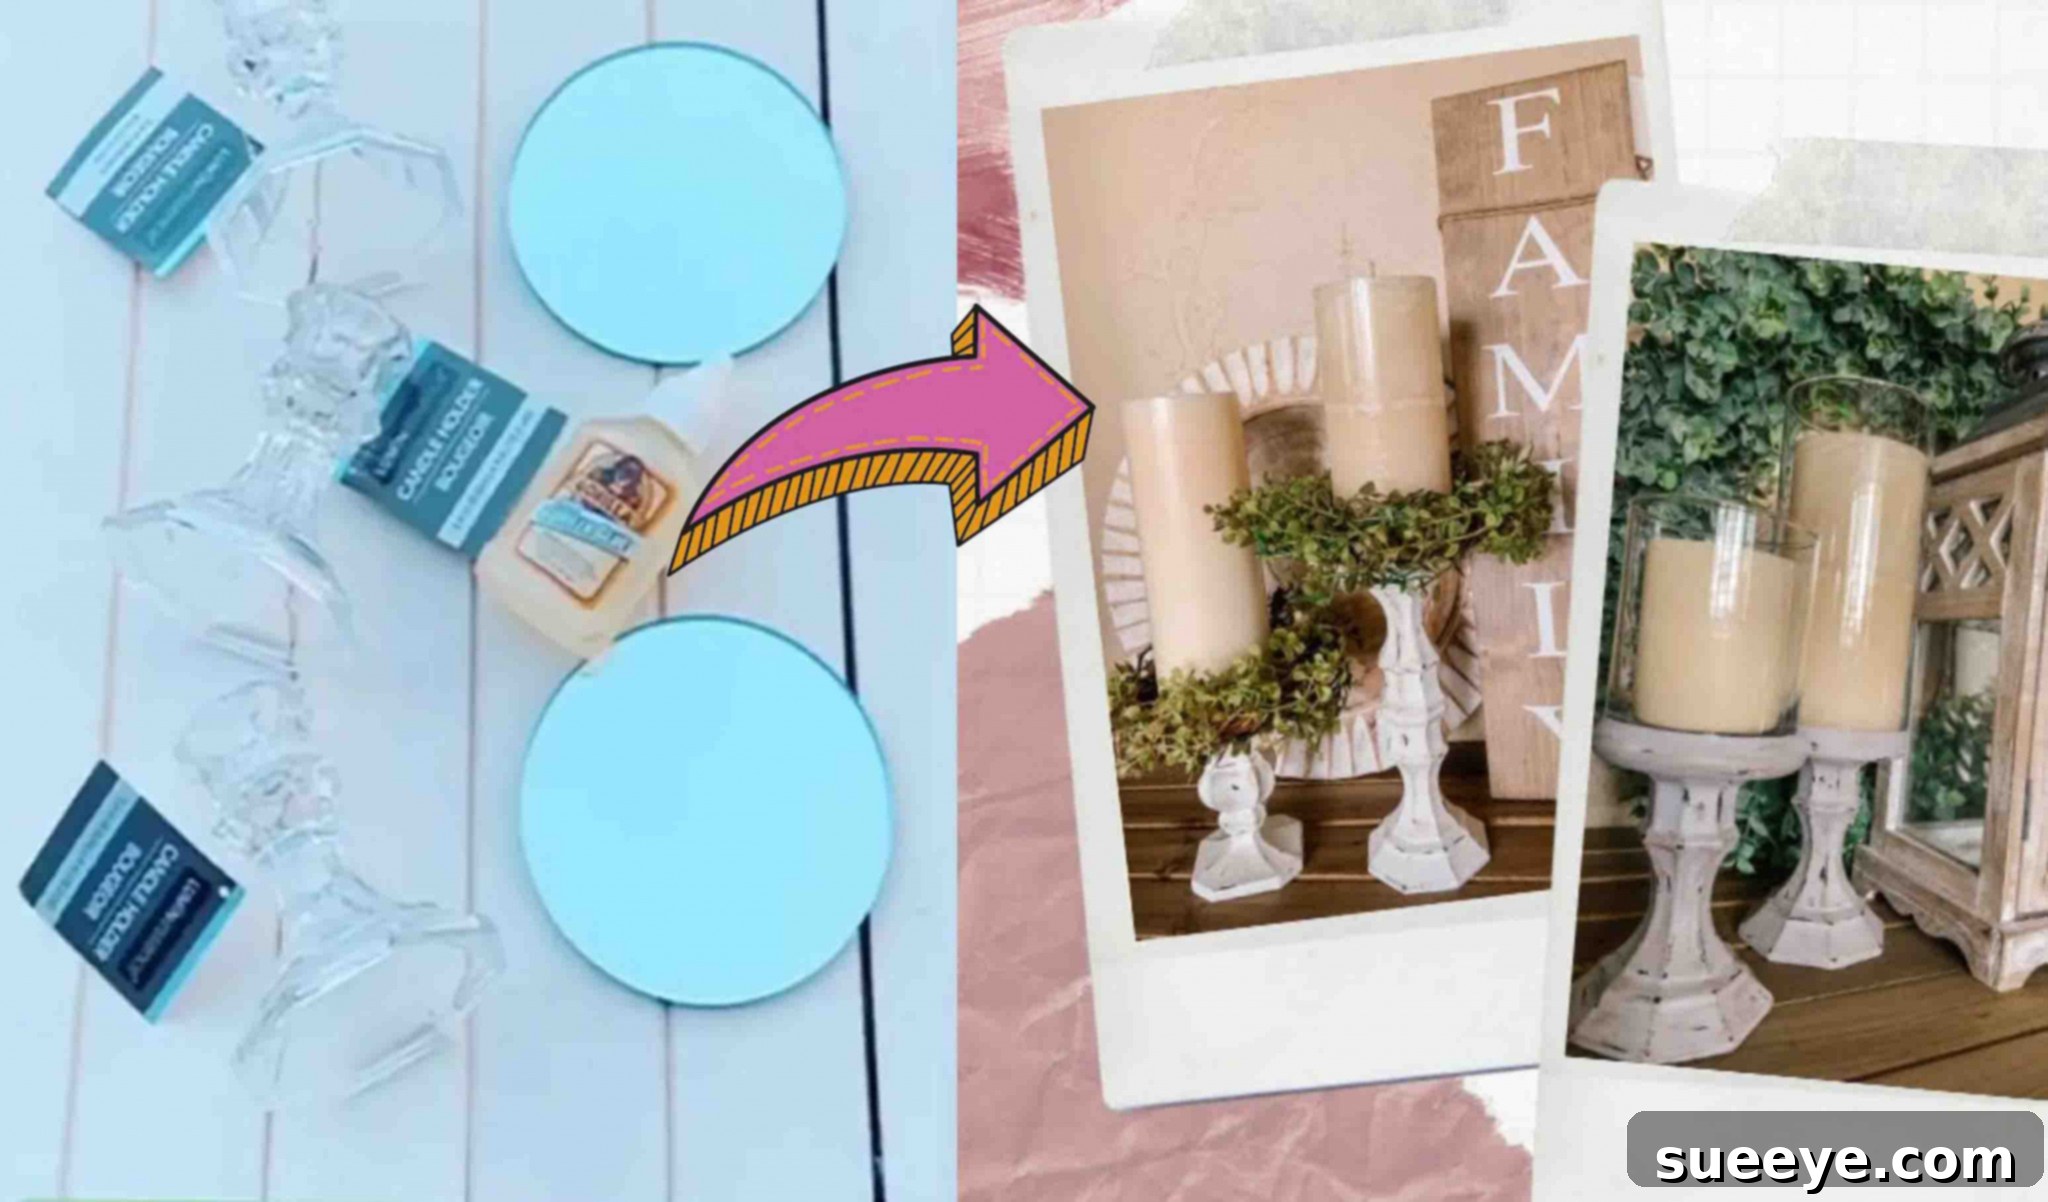
Are you captivated by the elegant candle holders displayed in high-end department stores, only to be deterred by their hefty price tags? Imagine creating those same sophisticated pieces yourself, for a fraction of the cost! We’ve discovered an incredible DIY candle holder tutorial from Peony Accents on YouTube that reveals how to craft stunning, upscale candle holders using materials sourced entirely from your local dollar store. This comprehensive guide will walk you through transforming simple, affordable items into beautiful home accents that look far more expensive than they are. Get ready to unleash your inner crafter and adorn your living space with these breathtaking, budget-friendly creations.
Create Elegant DIY Dollar Tree Candle Holders: Upscale Decor on a Budget
Embrace the satisfaction of crafting beautiful home decor pieces that perfectly reflect your style without breaking the bank. This detailed tutorial provides everything you need to know to assemble two distinct, elegant candle holder designs using everyday items from the Dollar Tree. From the essential supplies to the step-by-step instructions for assembly, painting, and finishing, you’ll gain the skills to enhance any room with personalized, handcrafted charm. Let’s dive in and transform ordinary dollar store finds into extraordinary decor.
Why Choose DIY Dollar Tree Candle Holders?
Opting for DIY projects, especially those using incredibly affordable materials from stores like Dollar Tree, offers a multitude of benefits that extend beyond just saving money:
- Unbeatable Affordability: High-end candle holders can cost upwards of $50-$100 each. With dollar store supplies, you can often create multiple elegant pieces for less than $10, making luxurious decor accessible to everyone. This significant saving allows you to decorate more lavishly without financial strain.
- Complete Customization: Unlike store-bought items, DIY projects grant you full creative control over color, finish, and style. You can tailor your candle holders to perfectly match your existing home decor, seasonal themes, or unique personal aesthetic, ensuring they truly complement your space.
- Creative Satisfaction: There’s immense joy and pride in displaying something you’ve made with your own hands. These projects are not just about saving money; they’re about nurturing your creativity, developing new skills, and adding a deep sense of personal accomplishment to your home.
- Unique Home Accents: Your handcrafted candle holders will be truly one-of-a-kind, adding an exclusive charm and a fascinating talking point to any room. Say goodbye to mass-produced decor and hello to personalized elegance that stands out.
- Eco-Friendly Repurposing: Giving new life to inexpensive items by transforming them into beautiful decor is a sustainable and environmentally conscious way to decorate, reducing waste and encouraging resourcefulness.
Essential Tips for Successful Dollar Store Crafting
Before you begin your creative journey, consider these expert tips to ensure your DIY candle holder project goes smoothly and yields professional-looking results. A little preparation goes a long way in achieving a flawless finish:
- Patience is Key: Allow ample drying time for glues and paints. Rushing these crucial steps can lead to weak bonds, smudges, uneven finishes, and ultimately, a less durable product. Always follow manufacturer instructions for drying times.
- Work in a Well-Ventilated Area: Especially when using strong adhesives, paints, or waxes, good airflow is crucial for your safety and to ensure quicker, more effective drying. If working indoors, open windows or use a fan.
- Prepare Your Workspace: Lay down newspaper, old sheets, or a dedicated drop cloth to protect your tables and floors from accidental spills, drips, and paint splatters. Having all your tools readily accessible before starting will also streamline the process.
- Clean Your Materials Thoroughly: Before applying any glue or paint, ensure all glass items are impeccably clean and free of dust, grease, or fingerprints. A quick wipe with rubbing alcohol and a lint-free cloth can significantly improve paint adhesion and the longevity of your project.
- Apply Thin Coats of Paint: This is a golden rule for painting. Multiple thin coats are always superior to one thick coat. Thin layers dry faster, adhere more evenly, prevent drips, and result in a smoother, more professional finish.
- Test Your Paint and Glue: If you’re unsure about how a specific product will react or dry, it’s wise to test it on a scrap piece of glass or an inconspicuous area first. This helps avoid potential disappointment on your main project.
Materials for Your Elegant Candle Holders
Gathering your supplies is the first exciting step in bringing these beautiful designs to life. The core components for both styles are readily available at your local dollar store, ensuring a truly budget-friendly craft experience. For high-quality and lasting finishes, we’ll be using specific paints and glues that can be found at craft stores or hardware stores, guaranteeing durability and a polished, professional look.
For Style #1: The Classic Stacked Elegance
This design creates a grand, traditional look, perfect for a refined and sophisticated ambiance. The following items will help you achieve this timeless aesthetic:
- 3 Dollar Tree Glass Candle Stick Holders: These inexpensive finds will form the foundational structure of your elegant design, providing height and a sturdy base. Look for simple, classic shapes that can be easily stacked.
- Gorilla Glue (or a strong, clear, fast-drying adhesive): Essential for creating a robust and lasting bond between the glass pieces. Its powerful hold ensures structural integrity and durability for your finished candle holder.
- Waverly Chalk Paint (in Plaster color recommended): Chalk paint offers a beautiful, velvety matte finish with excellent adhesion to glass, often requiring minimal surface preparation. The “Plaster” shade provides a versatile, neutral base that evokes a high-end, classic feel.
- Foam Brush: Ideal for applying chalk paint smoothly and evenly, minimizing visible brush strokes for a flawless and professional-looking finish on your glass surfaces.
- Caulking (from Dollar Tree or hardware store): Used to fill any small gaps or seams between joined glass pieces, giving your finished piece a seamless and professionally crafted appearance, as if it were a single, sculpted item.
- Antique Wax and Sandpaper (Optional, for a distressed or aged look): These materials allow you to add character, depth, and a touch of vintage charm, giving your new candle holders a beautiful, aged aesthetic. Fine-grit sandpaper (e.g., 220-grit) works best for subtle distressing.
- Small Round Mirrors (Optional, if you wish to add a reflective top): While not explicitly in the original material list for Style 1, if you want a reflective top similar to the inspiration, small round mirrors (e.g., 2-3 inches in diameter) can often be found at craft stores or dollar stores to add an extra touch of glamour.
For Style #2: Modern Geometric Charm
This design offers a contemporary aesthetic with clean lines and contrasting textures, perfect for modern or minimalist decor schemes. Here’s what you’ll need:
- 2 Dollar Tree Glass Candle Stick Holders: These will serve as the stable base and a key connecting element for this unique, multi-level design.
- 1 Dollar Tree Glass Drinking Cup: This item adds a distinctive mid-section to your candle holder, contributing to its modern silhouette and varying visual interest.
- 1 Dollar Tree Small Glass Vase: The vase forms the top section, creating an interesting contrast in shape and height, and completing the contemporary structure.
- Gorilla Glue (or a strong, clear adhesive): A robust adhesive is once again critical for securely joining the various glass components, ensuring a stable and long-lasting piece.
- Martha Stewart Chalkboard Paint (in Gray recommended): This specific paint provides a stylish, contemporary matte finish. Chalkboard paint often offers excellent coverage and a unique texture that enhances the modern look.
- Blue Painter’s Tape: Crucial for achieving crisp, clean lines and defined sections when painting, ensuring a professional, two-tone appearance that is characteristic of modern designs.
- Foam Brush: For smooth, even paint application on all glass surfaces, helping to achieve that desired sleek finish.
- Antique Wax and Sandpaper (Optional): To add a subtle aged or textured effect, enhancing the modern design with a touch of sophisticated vintage flair, especially on the painted surfaces.
Step-by-Step Directions: Crafting Your Elegant Candle Holders
Follow these detailed instructions carefully to transform your dollar store finds into stunning, high-end decor pieces. Remember to allow adequate drying time between each step for the best results and to ensure the longevity of your handcrafted treasures.
Style #1: The Classic Stacked Elegance Tutorial
This design creates a grand, traditional look reminiscent of vintage candelabras, perfect for adding a touch of timeless sophistication to your home or special events.
Step 1: Assembling the Foundation and Adding Mirrors
Begin by taking two of your Dollar Tree glass candle stick holders. Apply a generous, yet even, layer of Gorilla Glue to the top rim of one candle stick holder. Carefully place the second candle stick holder on top, but in an inverted or upside-down position, ensuring their bases align perfectly. This strategic stacking creates a visually appealing inverted silhouette. Apply firm but gentle pressure for about 30 seconds to initiate the bond, then allow it to rest. If you’ve decided to incorporate small round mirrors for a reflective top, apply glue to the top of both the assembled candle sticks and carefully center a round mirror on each. If adding a second mirror to the first candlestick, ensure it’s placed securely and symmetrically. The goal here is utmost stability and visual symmetry. Allow this entire assembly to dry undisturbed for a minimum of 45 minutes, or ideally, longer (e.g., 2-4 hours), to ensure a strong, stable bond. Gorilla Glue expands as it dries, so use sparingly and promptly wipe away any excess that may seep out. Once sufficiently dry and stable, carefully examine the joints where the glass pieces meet. If there are any visible small gaps or seams between the two mirrors or along the joined glass, use Dollar Tree caulking to fill them in smoothly. This step is crucial for achieving a seamless, professional finish, making your candle holder appear as a single, cohesive unit rather than separate pieces glued together. Smooth out the caulking with a wet finger or a small spatula for a clean, integrated look, and then let it dry completely according to its specific instructions, which may take several hours.
Step 2: Painting for a Flawless Finish
Once your glue and caulking are completely dry and the structure is stable (ideally after 24 hours for full cure), it’s time to apply the paint. Using a foam brush, carefully apply your Waverly chalk paint in the “Plaster” color. Chalk paint is an excellent choice for glass as it adheres exceptionally well and provides a beautiful, opaque, matte finish with minimal prep work. Apply your first thin, even coat over all the glass surfaces of your assembled candle holder. Don’t worry if this initial layer looks streaky or uneven; subsequent coats will build coverage. Allow this layer to dry completely to the touch, which typically takes 15-30 minutes depending on humidity levels and paint thickness. Repeat this process, applying a second and then a third thin coat, ensuring each layer is thoroughly dry before adding the next. Aim for complete, opaque, and even coverage across the entire piece, making sure there are no visible drips or pooling of paint. Three coats typically provide a rich, robust, and opaque finish that completely transforms the clear glass into a solid, elegant, and expensive-looking piece. Ensure the final coat is thoroughly dry and cured before considering any optional finishing steps.
Step 3: Adding an Optional Antique or Distressed Effect
For those who desire a more rustic, vintage, or charmingly aged aesthetic, this optional step will add significant character and depth to your candle holders. Once the paint is fully cured (allow at least 24-48 hours for chalk paint to harden sufficiently), lightly apply antique wax with a clean, lint-free cloth or a small, soft brush to specific areas. Concentrate the wax application particularly around edges, raised details, and any crevices where natural wear and tear would occur. Immediately wipe off any excess wax with a separate clean cloth, allowing it to settle only in the depressions and textures to create a subtle shadowed, aged effect. For a more pronounced distressed look, you can also gently sand down certain areas with fine-grit sandpaper (e.g., 220-grit or higher). Focus on edges and prominent areas that would naturally show wear, allowing glimpses of the original glass or primer beneath the paint. This technique adds incredible depth and makes your new candle holders appear as if they’ve been cherished heirlooms for many years. If you choose not to antique, your solid painted candle holders will retain a crisp, clean, and classic elegance, which is equally beautiful.
Style #2: Modern Geometric Charm Tutorial
This design offers a contemporary aesthetic with clean lines and contrasting textures, perfect for modern or minimalist decor schemes. Its unique structure is sure to be a focal point.
Step 1: Assembling the Multi-Component Base
For the second style, we’ll be combining three different glass items to create a unique, tiered structure. Start by taking one of your Dollar Tree glass candle stick holders. Apply a strong, even layer of Gorilla Glue to the top rim of the candle stick holder. Carefully center and attach the Dollar Tree glass drinking cup onto the candle stick holder, ensuring it is perfectly upright, level, and stable. Apply gentle pressure to secure the initial bond. Next, apply Gorilla Glue to the bottom rim of the Dollar Tree small glass vase. Carefully place this vase on top of the drinking cup, again ensuring perfect alignment and stability. This layered approach creates a visually interesting, multi-tiered structure that defines this modern design. Allow this entire assembly to dry for a substantial period, at least 45 minutes to an hour, or preferably longer (e.g., overnight), to ensure all bonds are completely secure before handling further or moving to the next steps. Stability is absolutely paramount for this multi-piece design, so don’t rush the drying process.
Step 2: Masking for Precision Painting
Once your stacked glass pieces are fully bonded and dry (allowing for the recommended cure time of the glue), it’s time to prepare for painting. This style features a distinctive painted bottom half, which requires clean, crisp lines for a professional, modern look. To achieve this, carefully apply blue painter’s tape around the mid-section of your assembled candle holder, precisely defining where you want your paint line to end. Ensure the tape is pressed down very firmly along all its edges to prevent any paint bleed-through, which can ruin a clean line. Take your time with this step; neat and accurate taping is absolutely essential for a professional finish. Use a ruler or measuring tape to ensure the line is level and consistent around the entire circumference of the piece for the most polished result.
Step 3: Painting with Modern Chalkboard Paint
With the painter’s tape securely in place and all exposed surfaces clean, use your foam brush to apply Martha Stewart chalkboard paint in the recommended gray color to the bottom half of the candle holder, specifically below the tape line. This particular paint offers a unique, sophisticated matte finish with a subtle texture, which is perfect for a modern aesthetic. Apply your first thin, even coat, ensuring good coverage over the designated area. Allow this layer to dry completely to the touch before applying the next coat. You will likely need 3-4 thin coats to achieve a fully opaque, rich, and vibrant gray finish that truly transforms the glass. Remember, thin coats prevent drips, minimize brush marks, and provide a much smoother, more professional result. Be patient and allow adequate drying time between each application for the best adhesion and finish quality.
Step 4: The Finishing Touch – Removing Tape and Optional Antiquing
Once your final coat of paint is completely dry to the touch (ideally, wait a few hours or even overnight for the paint to fully cure and harden), it’s time for the revealing step. Carefully and slowly peel off the painter’s tape. Pulling the tape at a 45-degree angle away from the painted surface can help ensure a clean, sharp line without pulling up any of the dried paint. If there are any minor imperfections or slight bleeds, you can carefully touch them up with a small detail brush and a steady hand. Again, for an optional aged or textured effect, you can gently apply antique wax to the painted gray section. Use a clean, lint-free cloth to apply a very small amount of wax and immediately wipe off the excess, allowing it to subtly darken crevices and corners. This process can enhance the texture of the chalkboard paint and add a sophisticated depth to your modern design. This antiquing step is entirely optional; your candle holder will look sleek and modern even without it.
Personalizing Your Handcrafted Candle Holders
While this tutorial provides two fantastic styles, the true beauty of DIY lies in customization. Here are some inspiring ideas to make your candle holders truly unique, perfectly reflecting your personal taste and home decor:
- Color Variations: Don’t limit yourself to the suggested colors. Experiment with different paint colors entirely! Metallic gold, silver, or bronze can add undeniable glamour and luxury, while soft pastel shades bring a delicate, romantic feel. Bold black or deep navy can create a dramatic, moody, and very chic aesthetic.
- Stenciling and Decals: Once your paint is thoroughly dry and cured, you can elevate your designs further. Use stencils to add intricate patterns, a personalized monogram, or sophisticated geometric designs. Small vinyl decals with quotes, motifs, or artistic elements can also add personalized and professional-looking touches.
- Glitter and Embellishments: For a touch of dazzling sparkle, apply a thin layer of glitter glue or sprinkle fine craft glitter onto wet paint or a thin layer of Mod Podge. You can also adorn your candle holders with rhinestones, pearls, small decorative beads, or elegant ribbons and twine, especially around the base or top sections.
- Texture Play: Instead of relying solely on smooth chalk paint, consider exploring different finishes. Textured spray paints can add a stone-like or hammered effect, while applying a crackle finish topcoat over your base paint can create a beautifully aged and distinct look.
- Seasonal Decor: Easily adapt your candle holders for different seasons or holidays. Use festive colors (e.g., red and green for Christmas, pastels for spring, oranges and browns for autumn), add small seasonal charms, or wrap them with appropriate ribbons or faux floral accents to match the theme.
Caring for Your Handcrafted Treasures
To ensure your beautiful DIY Dollar Tree candle holders remain stunning and last for years to come, proper care and maintenance are essential. A little attention will keep them looking their best:
- Gentle Cleaning: Dust your candle holders regularly with a soft, dry cloth or a feather duster to prevent buildup. If they need a deeper clean, use a lightly damp cloth with plain water. Avoid harsh chemical cleaners, abrasive sponges, or strong detergents, as these can damage the paint finish, alter the wax coating, or weaken the glue bonds over time.
- Avoid Submersion: Do not immerse your candle holders in water. This can severely weaken the adhesive, cause paint to peel, or introduce moisture into areas that are difficult to dry, potentially damaging the finish.
- Safe Candle Use: Always place candles securely in the holders, ensuring they fit snugly and are stable. If using real flame candles, ensure the flame is far from any painted surfaces or decorative embellishments to prevent fire hazards or discoloration. For ultimate safety and to preserve the finish of your handcrafted pieces indefinitely, consider using high-quality LED flameless candles – they offer the same ambient glow without the risks.
- Handle with Care: Although designed to be robust, remember that your candle holders are still made of glass and can be fragile. Handle them gently to prevent chips, cracks, or breaks, especially when moving or cleaning them.
Elevate Your Home Decor with DIY Dollar Tree Candle Holders
There you have it – two incredibly stylish and surprisingly simple ways to create stunning candle holders that look straight out of a high-end boutique, all from the humble Dollar Tree. This project isn’t just about saving money; it’s about unleashing your creativity, customizing your living space to perfectly suit your taste, and enjoying the immense satisfaction of crafting something truly beautiful with your own hands. Whether you choose the timeless classic elegance of Style #1 or the clean, modern charm of Style #2, these DIY candle holders are sure to become cherished accents and conversation starters in your home.
So, why wait? Gather your affordable materials, follow these detailed steps, and embark on your own dollar store decor transformation. Impress your guests, enjoy the serene ambient glow, and take immense pride in your beautifully handcrafted creations. Happy crafting, and enjoy the new, upscale look of your personalized home!