
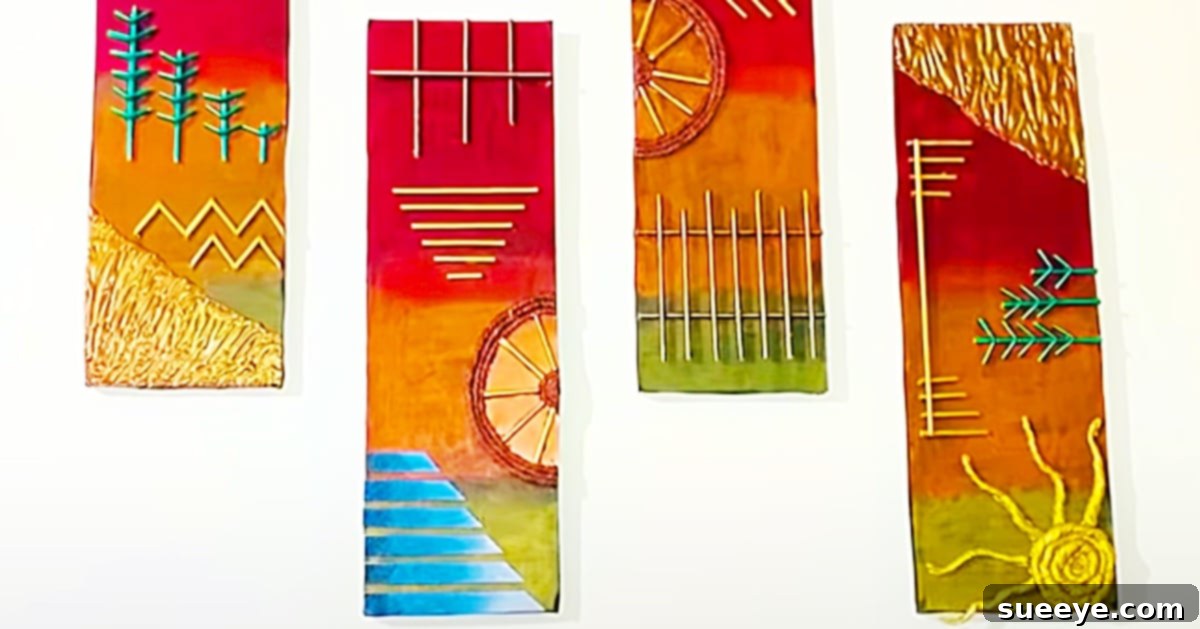
Are you searching for an ingenious way to infuse vibrant personality and artistic flair into your living space? Look no further than the captivating world of DIY embossed wall decor. This innovative crafting technique allows you to transform ordinary materials into extraordinary, three-dimensional works of art that command attention and breathe life into any blank wall. Inspired by the brilliant video tutorial from GADAC DIY on YouTube, this project offers a remarkably clever and accessible approach to creating stunning, sculptural wall plaques that are both beautiful and incredibly satisfying to make.
The beauty of embossed wall decor lies in its unique ability to add depth and texture, moving beyond flat prints or canvases. Imagine a collection of vibrant, custom-designed pieces that reflect your personal style, all crafted with the surprisingly versatile hot glue gun. This guide will walk you through the concept, materials, and steps involved, ensuring you’re well-equipped to embark on your own creative journey and bring these magnificent art objects to life in your home.
Unlock Your Creativity: Crafting Unique Embossed Wall Decor
Embossed wall decor is more than just a craft project; it’s an opportunity to create custom art that resonates with your home’s aesthetic. The technique involves creating raised, textured patterns on a surface, which are then painted to highlight their three-dimensional nature. While traditional embossing might involve special tools, this DIY method brilliantly leverages everyday items, particularly the humble hot glue gun, to achieve a similar dramatic effect.
Why Choose DIY Embossed Wall Art for Your Home?
In a world of mass-produced decor, creating your own wall art offers a multitude of benefits:
- Personalization: You have complete control over the design, colors, and overall aesthetic, ensuring the final pieces perfectly complement your existing decor and personal taste.
- Cost-Effectiveness: Many of the required materials are inexpensive or items you might already have around the house, making this a budget-friendly way to achieve high-impact decor.
- Uniqueness: Each piece you create will be truly one-of-a-kind, adding an exclusive touch that store-bought items simply cannot replicate.
- Therapeutic Process: The act of crafting can be incredibly relaxing and rewarding, offering a creative outlet that results in tangible beauty.
- Transformative Impact: A grouping of these vibrant, textured plaques can dramatically change the feel of a room, turning a dull, blank wall into a dynamic focal point.
Gather Your Tools: Essential Materials for Your Embossed Wall Art Project
One of the most appealing aspects of this project is the accessibility of its materials. Most items can be found at local craft stores or even repurposed from household supplies. Here’s what you’ll need to get started:
- Black Posterboard: This will serve as the base layer for your wall plaques, providing a sturdy surface.
- Cardboard: Used to add extra rigidity and thickness, ensuring your plaques maintain their shape and durability.
- Craft Paint: A selection of vibrant colors is crucial for bringing your designs to life. Consider red, orange, green, and gold, but feel free to choose colors that match your home’s palette.
- Bamboo Skewers: Handy for applying glue, mixing paint, or adding fine details.
- Strips of Newspaper: Essential for adding texture and creating a papier-mâché-like layer over your hot glue designs.
- Rope (Twine): Perfect for creating decorative borders, loops for hanging, or additional textual elements.
- Glue (Elmer’s or similar craft glue): Used for adhering the poster board and cardboard, as well as for applying newspaper strips.
- A Hot Glue Gun: The star of the show! This tool will allow you to create the raised, sculptural designs that define embossed decor.
- Glue Sticks: Ensure you have an ample supply to fuel your hot glue gun throughout the creative process.
- Tissue Paper: Can be used interchangeably with or in addition to newspaper strips for creating different textures and surface finishes.
Crafting Your Masterpiece: Step-by-Step Embossed Wall Decor Directions
While the GADAC DIY video tutorial on YouTube offers a comprehensive visual guide, understanding the fundamental steps will empower you to tackle this project with confidence. The process involves layering and texturizing to achieve that coveted sculptural effect.
1. Building the Foundation: Cutting and Assembling Your Plaques
Begin by deciding on the size and shape of your wall plaques. You can opt for traditional squares or rectangles, or get creative with circles, ovals, or abstract forms. Carefully cut out your chosen shapes from both the black poster board and the cardboard. For maximum durability and a professional finish, securely glue these two layers together using Elmer’s or a similar craft glue. Allow ample time for the glue to dry completely before moving to the next stage. This initial step creates a robust base for your intricate designs.
2. Sculpting with Hot Glue: Creating the Embossed Effect
This is where the magic truly happens! Plug in your hot glue gun and let it heat up. With a steady hand, begin to apply hot glue directly onto your prepared plaque bases. This is your opportunity to unleash your inner artist. You can create intricate patterns like swirls, geometric shapes, floral motifs, or abstract textures. Don’t be afraid to experiment with layering the glue to achieve varying degrees of height and depth. The beauty of hot glue is its quick drying time, allowing you to build up designs efficiently. Safety is paramount here; always be mindful of the hot nozzle and molten glue. The video tutorial provides excellent visual examples of various hot glue techniques.
3. Adding Texture and Strength: Newspaper and Tissue Paper Application
Once your hot glue designs have cooled and solidified, it’s time to add a layer that will unify the texture and prepare the surface for painting. Tear strips of newspaper or tissue paper into small, manageable pieces. Using craft glue, apply these strips over your entire plaque, including the hot glue designs. The goal is to create a papier-mâché-like layer that contours to the embossed patterns, adding strength and a consistent, paintable surface. This step effectively blends the different materials, transforming the hot glue into a cohesive part of the artistic surface. Ensure all areas are covered smoothly and allow it to dry completely.
4. Bringing Color to Life: Painting Your Embossed Art
Now for the most visually impactful stage: painting! Choose your craft paint colors. Start with a base coat that covers the newspaper/tissue paper layer, getting into all the crevices of your embossed design. Once dry, you can begin to add layers of color, dry-brushing lighter shades over the raised areas to accentuate the three-dimensional texture. For a truly striking effect, consider adding metallic accents like gold paint to highlight specific patterns or edges. The interplay of light and shadow on the painted embossed surfaces will create a dynamic and rich visual experience. Don’t be afraid to experiment with color blending and contrasting hues to achieve your desired look.
5. Finishing Touches and Display
To complete your decorative wall plaques, you might consider adding elements like rope or twine. This can be glued along the edges for a rustic frame effect, or used to create a hanging loop on the back of the plaque. Once all paint has dried and any additional embellishments are securely attached, your unique pieces are ready to adorn your walls! These beautiful, handmade creations are perfect for filling large blank walls, creating a vibrant gallery, or adding a pop of color and texture to any room.
Design Inspiration and Customization for Your Hot Glue Wall Art
The beauty of this hot glue wall art project lies in its endless customization possibilities. While the GADAC DIY tutorial provides a fantastic starting point, feel free to let your imagination soar:
- Pattern Play: Experiment with different hot glue patterns. Think organic swirls, sharp geometric lines, floral outlines, or abstract squiggles. Practice on scrap paper first if you’re unsure.
- Color Palettes: Move beyond the suggested red, orange, green, and gold. Consider monochromatic schemes for subtle elegance, or bold primary colors for a modern, playful vibe. Ombre effects with paint can also add sophistication.
- Size and Shape Variations: Create plaques of various sizes and shapes to form an eclectic gallery wall. A mix of large focal pieces and smaller accent plaques can create visual interest.
- Themed Collections: Design a series of plaques around a specific theme – perhaps nature-inspired motifs for a bohemian feel, or symmetrical, angular designs for a contemporary look.
- Functional Art: While primarily decorative, you could even consider attaching small hooks to some plaques after they are completed, turning them into unique key holders or jewelry organizers near an entryway.
The ones I envision for my own living room, which currently boasts a rather large, unassuming blank wall, will certainly be a vibrant testament to personal style. I truly believe these homemade embossed wall decor pieces will look absolutely gorgeous, adding not just color, but a palpable sense of craftsmanship and warmth. Furthermore, one of the most satisfying aspects of this creative endeavor is realizing that most of the materials needed were already on hand, testament to the project’s accessibility and eco-friendly potential.
Embracing this DIY project means not only creating stunning decor but also engaging in a fulfilling creative process. These decorative wall plaques are not just visually appealing; they are a conversation starter, a reflection of your ingenuity, and a testament to the fact that beautiful art doesn’t always come with a hefty price tag. So, gather your materials, watch the inspiring GADAC DIY tutorial, and prepare to transform your walls into a vibrant gallery of personalized, embossed masterpieces!