
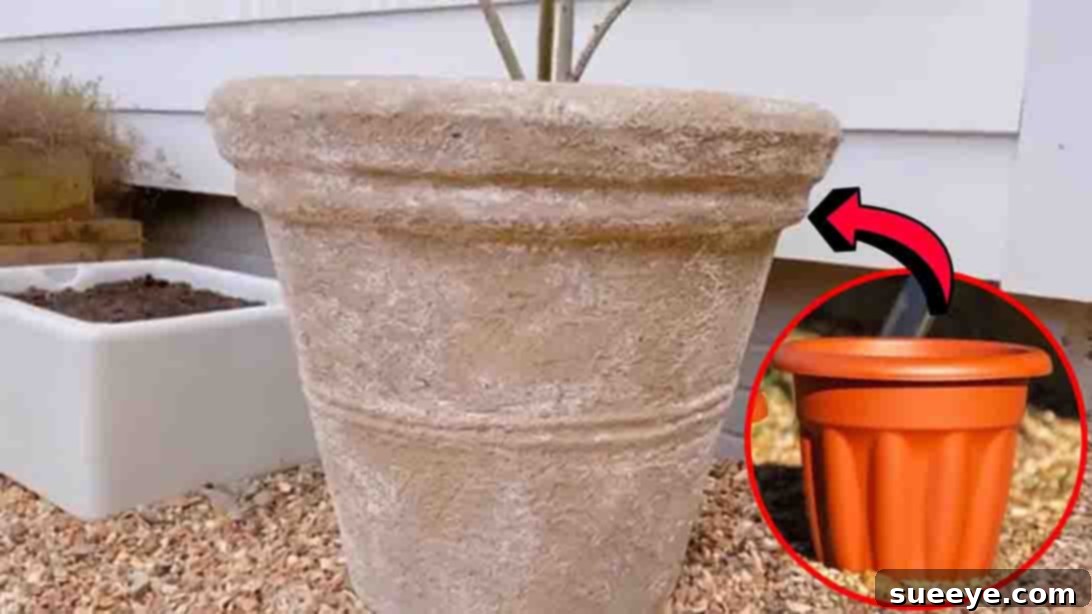
DIY Stone-Look Outdoor Planter: Crafting Elegance on a Budget
Are you captivated by the timeless beauty and robust presence of natural stone planters but deterred by their often hefty price tags? Imagine infusing your outdoor space with that same classic elegance, not by investing a fortune, but by unleashing your creative spirit right in the comfort of your home. This innovative DIY project, inspired by the brilliant insights of Rural Refurb on YouTube, offers a transformative solution.
We’re talking about crafting a stunning, stone-look outdoor planter that is not only remarkably budget-friendly but also provides a stylish and durable stage for your most cherished plants and vibrant flowers. This project is meticulously designed to be easy and accessible for beginners, serving as the perfect answer for anyone who adores the aesthetic of stone planters without wanting to break the bank. It’s an opportunity to elevate your garden or patio’s aesthetic, showcasing your green thumb with a touch of sophisticated, handcrafted charm.
RELATED: DIY Cinder Block Outdoor Bar With Planters
With just a few readily available materials and a dash of creative flair, you can embark on a journey to craft a planter that beautifully mimics the rugged, enduring beauty of natural stone. This bespoke creation will undoubtedly add a unique character and refined charm to any outdoor setting, from a cozy balcony to an expansive backyard garden. This comprehensive guide will walk you through the step-by-step process of making a truly stunning stone-look planter, perfect for enhancing the ambiance of any garden or patio.
Ready to embark on this rewarding DIY adventure and create your own impressive stone-effect planter? Dive into the detailed instructions below, and for a visual walkthrough, be sure to watch the full video tutorial from Rural Refurb.
Why Choose a DIY Stone-Look Planter?
Before we delve into the how-to, let’s explore the compelling reasons why a DIY stone-look planter is an excellent choice for any home gardener or decor enthusiast.
Unmatched Cost Savings
Authentic stone planters, particularly those of a substantial size, can command premium prices. By repurposing an inexpensive plastic planter and applying a clever faux finish, you dramatically reduce your expenditure without compromising on aesthetic appeal. This project allows you to achieve a high-end look on a budget, freeing up resources for more plants or other garden enhancements.
Endless Customization Possibilities
Unlike store-bought stone planters, which often come in limited designs and colors, your DIY project offers boundless opportunities for customization. You can choose the exact size and shape of your plastic base, experiment with different textures using various sanding and application techniques, and select paint colors that perfectly match your existing outdoor decor or desired aesthetic. Want a weathered granite look? Or perhaps a smooth, slate-like finish? The creative control is entirely in your hands.
Sustainable and Eco-Friendly
This project is a fantastic way to practice sustainability by giving a new lease on life to old or basic plastic planters that might otherwise end up in landfills. Repurposing these items contributes to reducing waste and promoting a more eco-conscious approach to home and garden decor.
Enhanced Durability and Weather Resistance
The application of cement-based tile grout and adhesive doesn’t just create a stone appearance; it also adds a layer of strength and rigidity to the plastic planter. This means your transformed planter will be more resilient against the elements and less prone to tipping or cracking compared to its original lightweight plastic form. With proper sealing, it can withstand various weather conditions for years.
Personal Satisfaction and Unique Appeal
There’s immense satisfaction in creating something beautiful and functional with your own hands. A DIY stone-look planter isn’t just a piece of decor; it’s a testament to your creativity and effort. It adds a unique, handcrafted element to your outdoor space that mass-produced items simply cannot replicate, making your garden truly one-of-a-kind.
Materials You’ll Need
Gathering all your supplies before you begin will ensure a smooth and enjoyable crafting process. Here’s a detailed look at the materials required:
- Plastic Planter: Choose a sturdy plastic planter of any size or shape that suits your preference. The original color doesn’t matter, as it will be completely covered.
- Sandpaper: Medium-grit sandpaper (around 80-120 grit) will be ideal for creating a rough surface for better adhesion.
- Surface Primer: An all-purpose or bonding primer specifically designed for plastic will ensure the grout mixture adheres firmly and durably.
- Cement-Based Tile Grout: This is the star ingredient for creating the stone texture. Choose a standard grey grout for a natural stone base.
- Coarse Builder’s Sand: Mixing sand with the grout adds bulk, improves workability, and enhances the gritty, natural stone feel.
- Water: For mixing the grout and sand into a workable paste.
- White Tile Adhesive: A small amount of white tile adhesive will be used to create additional textural variations and enhance the stone-like finish.
- Black Paint: A small amount of black acrylic or exterior paint for creating depth and flecked stone effects.
- Brown Paint (Optional): A touch of brown paint can be used to add warmth, age, and a more complex, natural stone coloration.
- Old Toothbrush or Stiff Brush: Essential for the splatter painting technique.
- Mixing Containers and Stirring Sticks: For preparing your grout mixture and paints.
- Protective Gloves: To protect your hands while working with grout and paint.
- Drop Cloth or Tarp: To protect your workspace from spills and splatters.
- Spatula or Trowel: For applying the grout mixture evenly.
- Damp Sponge: For smoothing surfaces and cleaning up.
Step-by-Step Transformation Guide
Now, let’s get into the exciting part – transforming your ordinary plastic planter into an extraordinary stone-look masterpiece.
Step 1: Prepare Your Plastic Planter
The foundation of a successful faux stone finish lies in proper preparation. Begin by thoroughly washing your plastic planter. Use soap and water to remove any dirt, dust, grease, or residue that might prevent proper adhesion. Rinse it well and allow it to dry completely. Once dry, take your medium-grit sandpaper and give the entire exterior surface of the planter a good, vigorous sanding. This creates micro-scratches, providing the necessary “tooth” for the primer and subsequently the grout to grip onto. After sanding, wipe away any sanding dust with a clean, damp cloth and let it dry.
Next, apply a high-quality surface primer designed for plastic. Evenly coat the entire exterior of the planter. For added durability and a seamless look, extend the primer application a few inches down the inside rim of the planter, reaching just below where the soil level will typically sit. This ensures that even visible interior edges have a consistent finish. Allow the primer to dry completely according to the manufacturer’s instructions, which typically takes around 20 minutes to an hour, depending on humidity and product type. This priming step is crucial as it creates a robust bonding layer for the subsequent materials.
Step 2: Mixing and Applying the Grout Mixture
In a mixing container, combine your cement-based tile grout with coarse builder’s sand. The exact ratio can vary, but a good starting point is approximately 2 parts grout to 1 part sand. Gradually add small amounts of water, mixing thoroughly until you achieve a thick, peanut-butter-like consistency that is firm enough to hold its shape but still spreadable. Avoid making it too watery, as this will make it difficult to apply and prolong drying times.
Once your mixture is ready, carefully turn the primed plastic pot upside down. Begin applying the grout mixture to the base of the planter and around the bottom rim. Use a spatula or trowel to spread the mixture evenly, ensuring good coverage. Work your way up the sides of the planter, covering the entire exterior surface. Don’t worry too much about perfection at this stage; focus on achieving a relatively even layer. As you cover the main body of the pot, turn it upright onto its base. Then, apply some of the mixture around the inside rim, extending it down to the line where the soil level will typically rest. This creates a continuous stone effect both inside and out, especially when viewed from above.
Step 3: Texturing and Smoothing for a Natural Look
As the grout mixture begins to slightly set and firm up – typically within 15-30 minutes, depending on ambient conditions – it’s time to refine the texture. Using a damp sponge or your gloved hands, gently start smoothing off the surface. The goal here isn’t to make it perfectly smooth like glass, but rather to knock off any large lumps, eliminate prominent tool marks, and intentionally leave behind a varied, organic texture. Think about the natural imperfections found in real stone – subtle ridges, slight dips, and variations in the surface. This step allows you to sculpt the “stone” to your desired look. Continue working around the planter until you are satisfied with the general texture and form.
Step 4: Enhancing the Stone-Like Texture and Color
Once the grout layer has had some time to partially dry (it doesn’t need to be fully cured), you can enhance its stone-like appearance. Take a small amount of white tile adhesive and, using your fingers or a sponge, dab and lightly spread it across various areas of the planter. This adds lighter highlights and a slightly different texture, mimicking the mineral variations found in natural stone. Work it into the existing grout texture for a seamless blend. Allow this layer to dry sufficiently.
Now comes the artistic touch that truly brings the faux stone to life. In a separate small container, mix a small amount of black paint with a bit of water to create a thin, inky consistency. Take an old toothbrush or a stiff-bristled brush, dip it into the watered-down black paint, and then gently flick the bristles over the entire surface of the pot. This creates a speckled, variegated effect that beautifully simulates the natural flecks and inclusions found in many types of stone like granite or basalt. Don’t be shy – aim for an even distribution of splatters, but avoid oversaturating any one area.
Finally, to add depth, warmth, and a weathered, aged appearance, dab some brown paint onto a separate sponge or cloth. Gently and sparsely dab this brown color across the planter, particularly in recessed areas or where natural aging might occur. This helps to knock off any stark brightness from the white adhesive and black flecks, creating a more realistic, earthy stone tone. Stand back and assess your work, adding more black or brown as needed to achieve your desired stone effect. Once satisfied, let the paint layers completely dry and cure. This final drying process might take several hours, or even overnight, depending on the paint type and environmental conditions.
Tips for Success & Advanced Techniques
To ensure your DIY stone-look planter project is a resounding success, consider these additional tips and techniques:
Work in a Well-Ventilated Area
Grout and paint can emit fumes. Always work in an area with good air circulation, preferably outdoors or in a well-ventilated garage.
Protect Your Workspace
This project can be messy. Lay down a drop cloth or old newspapers to protect your floors and surfaces from grout and paint splatters.
Experiment with Textures
Don’t be afraid to experiment with different tools to create varied textures. Besides a sponge, you could use a stiff brush, a crumpled piece of plastic wrap, or even natural elements like small pebbles to press into the setting grout for unique patterns.
Consider Drainage Holes
If your plastic planter doesn’t already have drainage holes, it’s crucial to drill some before you begin. Proper drainage is vital for plant health, preventing root rot. Drill a few holes in the bottom using an appropriate drill bit for plastic.
Apply a Sealant (Highly Recommended)
For maximum durability, weather resistance, and to protect the painted finish, consider applying a clear, matte or satin exterior sealant once your planter is completely dry. A good quality acrylic or polyurethane sealant will protect against UV rays, moisture, and general wear and tear, significantly extending the life of your planter.
Achieve Different Stone Looks
- Granite Effect: Vary the size and density of your black (and possibly white) paint flecks.
- Slate Effect: Aim for a smoother grout base, then use darker gray and subtle blue/green paint washes.
- Sandstone Effect: Use a lighter base grout, incorporate more coarse sand, and use warmer tones like buff, tan, and light brown paints.
- Mossy/Aged Look: After the main paint layers dry, you can lightly sponge on very diluted green paint in subtle areas to mimic moss growth.
Plant Selection
Once your planter is complete, choose plants that will complement its new stone aesthetic. Succulents, ferns, ornamental grasses, or vibrant flowering annuals can all look stunning against a natural stone backdrop. Consider plants with foliage that cascades over the edges for an even more organic feel.
Caring for Your DIY Stone-Look Planter
Your newly transformed planter is designed for durability, but a little care can go a long way in preserving its beauty:
- Cleaning: For general cleaning, simply wipe down the exterior with a damp cloth. Avoid harsh abrasive cleaners that could damage the faux finish or sealant.
- Winter Storage: While the grout adds resilience, extreme freeze-thaw cycles can still be hard on any outdoor decor. If you live in an area with harsh winters, consider bringing your planter indoors or storing it in a sheltered area like a shed or garage to prolong its life.
- Minor Repairs: Should you experience a chip or crack in the grout layer, it can often be repaired with a small amount of leftover grout mixture and touched up with paint.
Conclusion: Your Masterpiece Awaits
Creating your own DIY stone-look outdoor planter is a rewarding project that combines practicality with artistic expression. It’s a fantastic way to achieve a high-end, elegant look for your garden or patio without the prohibitive cost of genuine stone. By following these detailed steps and leveraging the creative inspiration from Rural Refurb, you can transform a simple plastic planter into a durable, aesthetically pleasing piece of garden art.
Embrace the satisfaction of crafting something beautiful with your own hands, customize it to perfectly suit your outdoor aesthetic, and enjoy the admiring glances your unique faux stone planter will undoubtedly attract. Your green space deserves a touch of elegance, and this project offers the perfect path to achieving it. So, gather your materials, clear your workspace, and get ready to create a stunning focal point for your outdoor oasis!