
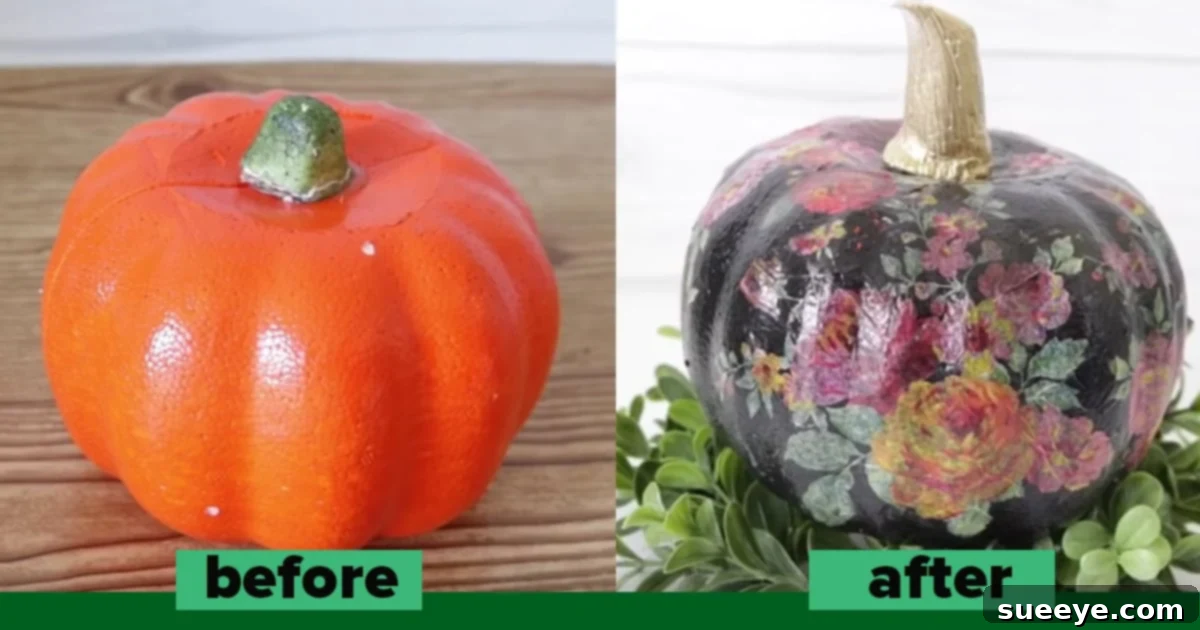
Transform Your Dollar Store Foam Pumpkins into Stunning Fall & Halloween Decor
As the leaves begin to turn and the crisp autumn air signals the arrival of the festive season, many of us are eager to infuse our homes with the warm spirit of fall and the spooky charm of Halloween. While navigating the aisles of craft stores and dollar stores, you’ve likely come across those ubiquitous plain orange foam pumpkins. Stocked in abundance at places like Dollar Tree and other budget-friendly retailers, these humble craft pumpkins often leave shoppers pondering: “What on earth can I do with these?” Their simple, often ‘cheap-looking’ appearance can be a deterrent, making a dollar spent feel like a dollar wasted, despite the initial bargain. But what if these unassuming foam pumpkins were actually hidden gems, waiting for a touch of creativity to unlock their full potential?
Gone are the days when cheap craft supplies meant settling for mediocre decor. With a little imagination and some clever DIY techniques, these inexpensive foam pumpkins can be transformed into magnificent works of art, adding a personalized and stylish touch to your seasonal displays. Far from being relegated to basic, uninspired decorations, they serve as the perfect blank canvas for your artistic endeavors. Whether you’re aiming for sophisticated elegance, modern chic, or rustic charm, the possibilities for transforming these dollar store finds are truly endless. This guide will delve into creative DIY pumpkin decorating ideas, offering inspiration and practical tips to help you craft beautiful, high-end looking decor without breaking the bank.
Unlocking the Potential: Why Foam Pumpkins Are Your Best Crafting Secret
Before diving into specific decorating techniques, let’s appreciate the inherent advantages of using foam pumpkins for your seasonal decor projects. Unlike real pumpkins, which are prone to rotting, attracting pests, and are essentially a one-time use item, foam pumpkins offer remarkable durability and reusability. They can be stored and brought out year after year, making them an eco-friendly and economically smart choice for savvy crafters. Their lightweight nature makes them easy to handle, move, and display, whether perched on a mantelpiece, nestled in a centerpiece, or scattered across your porch. Moreover, the smooth, uniform surface of most craft foam pumpkins provides an ideal foundation for various embellishment techniques, from painting and gluing to carving and distressing.
The accessibility and affordability of these foam pumpkins, especially from stores like Dollar Tree, mean you can stock up without guilt. This allows for experimentation with different styles and colors, encouraging you to unleash your inner artist without the pressure of ruining an expensive item. For beginners, they offer a low-stakes way to practice new crafting skills, while experienced DIYers will appreciate their versatility as a starting point for more intricate designs. Essentially, these plain orange forms are more than just cheap novelties; they are an open invitation to creative expression, ready to be adorned with your unique vision.
Creative DIY Pumpkin Decorating Ideas: A Guide to Stunning Transformations
Last week, while searching for fresh pumpkin decorating ideas, I stumbled upon a truly inspiring online tutorial that perfectly showcased how to elevate those humble dollar store foam pumpkins. This fantastic guide demonstrated precisely how to give these “cheap-o” craft pumpkins a high-end makeover, infusing them with an abundance of creative flair. With clear, step-by-step instructions, the vlogger meticulously walked viewers through the process of transforming basic craft pumpkins into impressive mini works of art. The tutorial covered three distinct and incredibly appealing ways to embellish, paint, and decorate, resulting in inexpensive yet remarkably cool Halloween and fall decor. My personal favorite was the elegant floral painted pumpkin, though the chic textured pink ones also stole my heart. I’m already planning to create all three styles this coming weekend – how about you?
Let’s explore these captivating decorating styles and delve into how you can recreate them, along with some essential tips for a successful DIY crafting experience. While the specific video demonstrated these techniques, the principles are universal, allowing you to adapt and personalize each design to suit your taste and home aesthetic.
1. Elegance in Bloom: The Floral Painted Pumpkin
Imagine a pumpkin that exudes grace and sophistication, adorned with delicate botanical patterns that seem to blossom right from its surface. The floral painted pumpkin trend transforms a simple foam gourd into a piece of art suitable for even the most refined autumnal displays. This style moves beyond traditional spooky themes, embracing natural beauty and a soft, artistic touch. It’s perfect for those who prefer a more understated yet elegant fall aesthetic rather than overt Halloween kitsch.
How to Achieve the Look:
- Base Coat: Begin by priming your foam pumpkin with a coat of white or a light, neutral acrylic paint. This creates a clean canvas for your floral designs and helps your chosen colors pop.
- Design Selection: You can opt for intricate hand-painted flowers, simpler folk-art inspired blossoms, or even modern abstract floral patterns. Consider the size of your pumpkin and the complexity of your chosen design.
- Techniques:
- Freehand Painting: For those with a steady hand, acrylic paints and fine brushes allow you to paint intricate petals and leaves directly onto the pumpkin.
- Stenciling: If freehand painting feels daunting, floral stencils are an excellent tool. Secure the stencil with low-tack painter’s tape and dab paint through the cutouts using a sponge or stencil brush.
- Decoupage: For a truly effortless floral look, find beautiful floral napkins or thin patterned paper. Cut out individual flowers or sections and adhere them to your pumpkin using Mod Podge. Once dry, seal with another layer of Mod Podge for a smooth, durable finish.
- Color Palette: While classic autumn hues like deep reds, oranges, and golds are beautiful, don’t shy away from softer palettes like pastels, muted greens, blush pinks, or even monochrome black and white for a contemporary edge.
- Finishing Touches: Once your paint is dry, consider adding a clear sealant spray for protection and a subtle sheen. You might also glue small faux flowers or delicate sprigs around the stem for added dimension and charm.
These floral pumpkins are ideal for creating sophisticated centerpieces, gracing a mantelpiece, or adding a touch of natural beauty to a tablescape. Their timeless appeal makes them a versatile decor choice that can transition seamlessly from early fall through Thanksgiving.
2. Tactile Charm: The Textured Pink Pumpkin
For a truly contemporary and chic twist on pumpkin decor, the textured pink pumpkin offers a refreshing departure from traditional autumnal palettes. This style embraces tactile surfaces and unexpected color choices, resulting in a modern, artistic statement piece. The “textured pink” concept introduces an element of surprise and sophistication, proving that pumpkins aren’t just for classic orange and black. It’s perfect for those who love modern farmhouse, bohemian, or minimalist aesthetics with a touch of playful elegance.
How to Achieve the Look:
- Prepare Your Surface: As always, ensure your foam pumpkin is clean and dry. A base coat of white primer can help the pink color truly pop.
- Creating Texture: There are several creative ways to add texture to your pumpkin:
- Joint Compound/Spackle: This is a popular and effective method. Apply a thin, even layer of joint compound or spackle all over the pumpkin using a putty knife or even your fingers. Create swirls, ridges, or irregular patterns for an organic, plaster-like finish. Let it dry completely – this can take several hours or overnight.
- Textured Spray Paint: Various brands offer textured spray paints (e.g., stone finish, crackle finish). While these provide a specific look, they might not achieve the same hand-crafted, sculptural texture as joint compound.
- Fabric or Yarn Wraps: For a softer texture, wrap your pumpkin with strips of burlap, lace, or chunky yarn, securing with a hot glue gun. This creates a cozy, tactile surface.
- Salt or Sand Coating: For a subtle, granular texture, paint the pumpkin with a layer of craft glue (like Mod Podge) and then roll it in fine salt, sand, or even coarse sugar. Seal with a clear spray.
- The Pink Palette: Once your texture is dry (if applicable), it’s time for color. Choose your preferred shade of pink: soft blush, dusty rose, vibrant fuchsia, or even a metallic rose gold. Apply with a brush for an even coat, or use a sponge for a more mottled effect. You can also dry brush a lighter pink over a darker pink base to highlight the texture.
- Embellishments (Optional): For extra flair, consider adding metallic accents, small pearl beads, or a velvet ribbon around the stem.
These textured pink pumpkins are fantastic as standalone decor, nestled among other neutral-toned items, or grouped together for an impactful display. They are particularly striking when paired with gold or copper accents, bringing a contemporary edge to your fall and Halloween decor.
3. Rustic Refinement: The Distressed or Farmhouse Pumpkin
Embracing the charm of yesteryear and the cozy appeal of rural aesthetics, the distressed or farmhouse pumpkin style offers a weathered, vintage look that feels both authentic and inviting. This design often features muted colors, subtle aging techniques, and natural materials, making it a perfect fit for rustic, farmhouse, or shabby chic interiors. It celebrates imperfections and the beauty of natural wear, providing a comforting warmth to your autumn decor.
How to Achieve the Look:
- Color Choices: Start with a base coat of chalk paint or matte acrylic paint in muted, earthy tones. Think creamy whites, soft grays, sage greens, light blues, or even a pale orange. You can layer a contrasting color underneath if you plan to sand for a “peeking through” effect.
- Distressing Techniques:
- Dry Brushing: Dip a brush in a small amount of contrasting paint (e.g., a darker brown or gray for an aged look) and wipe most of it off onto a paper towel. Lightly brush the remaining paint over the pumpkin, focusing on raised areas, crevices, and edges to simulate wear.
- Layering and Sanding: Paint your pumpkin a darker color first (e.g., dark orange or brown), let it dry, then paint a lighter color over it (e.g., cream or white). Once the top coat is dry, use fine-grit sandpaper to gently distress areas where natural wear would occur – around the stem, bottom, and ridges – revealing the darker color underneath.
- Dark Wax/Glaze: Apply a thin layer of dark furniture wax or a dark antiquing glaze over a light-colored pumpkin. Wipe off the excess, allowing the dark pigment to settle into the texture and crevices, creating an aged, grimy effect.
- Crackle Medium: Apply a crackle medium between two layers of paint to create a naturally aged, crackled finish.
- Natural Embellishments: Enhance the farmhouse vibe with natural elements. Tie burlap ribbon, jute twine, or even a small sprig of dried lavender around the stem. You can also glue small, dried leaves or faux berries for an organic touch.
- Matte Finish: A matte or satin clear sealant spray will help preserve the distressed look without adding an artificial shine.
These rustic pumpkins are ideal for creating charming vignettes on console tables, as part of a cozy fireplace display, or scattered across a dining table for a harvest-themed feast. They embody a sense of comfort and tradition, making any space feel more inviting.
Essential Tips for Your Pumpkin Crafting Journey
To ensure your DIY pumpkin makeover is a resounding success, keep these practical tips in mind:
- Clean Your Canvas: Always start with a clean, dry foam pumpkin. Wipe it down with a damp cloth to remove any dust or debris, then let it dry completely.
- Prime Time: For best results, especially when painting lighter colors over the orange foam, apply a coat of white or gray primer. This provides a uniform base, prevents the original color from showing through, and helps subsequent paint layers adhere better.
- Patience is Key: Allow each layer of paint, glue, or texture medium to dry thoroughly before applying the next. Rushing the process can lead to smudging, peeling, or an uneven finish.
- Ventilation: When using spray paints, sealants, or strong adhesives, always work in a well-ventilated area, preferably outdoors.
- Protect Your Workspace: Lay down newspaper, a drop cloth, or old cardboard to protect your surfaces from paint spills and glue drips.
- Experiment with Brushes: Have a variety of brush sizes on hand – larger brushes for base coats, smaller detail brushes for intricate designs, and foam brushes for smooth applications.
- Sealing for Longevity: Once your pumpkin is fully decorated and dry, apply a clear sealant (matte, satin, or glossy, depending on your desired finish). This protects your artwork from dust, moisture, and wear, ensuring your beautiful creations last for many seasons to come.
- Incorporate the Stem: Don’t forget the stem! You can paint it, wrap it with twine, or even replace it with a real dried pumpkin stem for an authentic touch.
Beyond the Basics: Unleash Your Inner Artist
While the three styles explored above offer fantastic starting points, the world of DIY pumpkin decorating is boundless. Don’t be afraid to mix techniques or invent your own unique designs. Consider incorporating glitter for a touch of sparkle, using metallic paints for a glamorous effect, or decoupaging old book pages or comic strips for a quirky, personalized look. Ombré effects, chalkboard paint for customizable messages, or even glow-in-the-dark paint for a spooky night display are all wonderful avenues to explore.
Making these DIY pumpkins can also be a wonderful family activity. Gather the kids, spread out the supplies, and let everyone create their own masterpiece. It’s an excellent way to foster creativity, spend quality time together, and build lasting memories, all while creating unique decorations for your home.
Why Dollar Store Finds Are Your Ultimate Crafting Companions
The beauty of starting with dollar store foam pumpkins lies not only in their low cost but also in the freedom they provide. For just a dollar (or a few), you can experiment with trends, make mistakes without financial regret, and craft entire collections of customized decor for a fraction of the price of store-bought alternatives. This accessibility makes high-end looking decor attainable for everyone, proving that elegance and style don’t have to come with a hefty price tag. Whether you’re decorating a small apartment or an entire house, these budget-friendly craft supplies empower you to transform your space with creativity and personal flair.
Conclusion: Transform Your Space This Season with DIY Pumpkin Charm
The humble plain orange foam pumpkins from your local dollar store are far more than just cheap craft items; they are gateways to endless creative possibilities. With a dash of inspiration and some simple DIY techniques, you can transform these overlooked objects into breathtaking pieces of seasonal decor that truly reflect your style. From elegant floral patterns and chic textured finishes to cozy rustic looks, the power to personalize your fall and Halloween decorations is now at your fingertips.
So, are you ready to give these humble craft pumpkins a magnificent makeover? Grab a few from your nearest Dollar Tree, gather your paints and tools, and prepare to embark on a fun, rewarding, and incredibly stylish crafting adventure. Which design will you try first – the charming floral, the modern textured pink, or perhaps a rustic distressed beauty? Whatever you choose, your home is sure to be infused with unique, handcrafted charm this autumn season!