
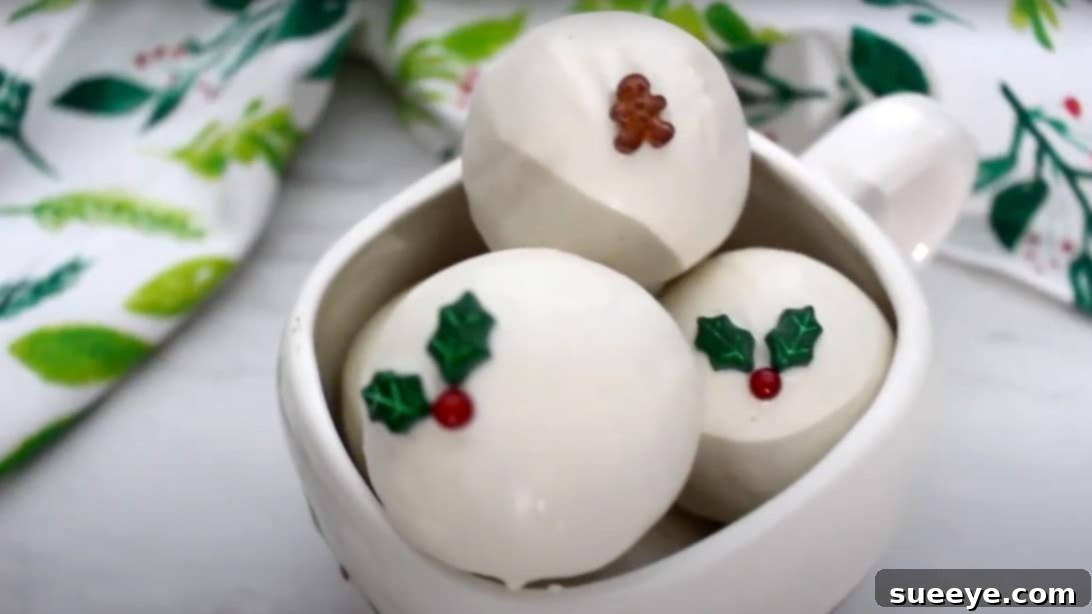
Easy No-Bake Sugar Cookie Truffles: Your Ultimate Holiday Treat
As the holiday season draws near and the magical countdown to Christmas begins, there’s an undeniable need for comforting, festive snacks to fill our homes and hearts. Imagine the pure delight of waking up on Christmas morning, surrounded by loved ones, unwrapping gifts from Santa, and indulging in sweet treats that taste like pure North Pole magic. This nostalgic feeling, like a warm hug on a frosty morning, is exactly what these easy no-bake sugar cookie truffles deliver.
I stumbled upon this incredible recipe by Baker Girl Steph on YouTube, and it was an instant game-changer. These delightful bites are not only incredibly simple to make but also burst with that classic sugar cookie flavor, elevated to a truffle-like richness. They truly taste like a spoonful of holiday cheer, offering a perfect crunch in every bite. Forget the oven and complicated steps; these no-bake wonders are here to simplify your festive preparations and bring joy to every palate.
Why These Sugar Cookie Truffles Are a Holiday Must-Have
There are countless reasons to fall in love with this particular truffle recipe, especially during the bustling holiday season:
- No Baking Required: Perfect for busy schedules or for involving little helpers who can’t yet operate an oven. This aspect saves time, energy, and reduces stress during an already hectic period, making them an ideal easy holiday dessert.
- Irresistibly Delicious: Combining the beloved taste of sugar cookies with the rich texture of a truffle creates a truly decadent experience. Each bite is a concentrated burst of buttery, sweet, vanilla goodness.
- Quick and Easy: With minimal ingredients and straightforward steps, these truffles come together in a flash, making them ideal for last-minute party contributions or sudden sweet cravings for no-bake truffles.
- Customizable: From the type of coating to the festive decorations, these truffles are a blank canvas for your creativity. Tailor them to any holiday theme or personal preference, making them versatile Christmas cookie truffles.
- Perfect for Gifting: Beautifully presented, these homemade truffles make thoughtful and much-appreciated gifts for friends, family, teachers, and neighbors.
- A Taste of Childhood: The classic sugar cookie flavor evokes fond memories of childhood Christmases, bringing a comforting and nostalgic touch to your holiday spread.
Crafting Your North Pole Delights: The Recipe
Gathering your ingredients is the first exciting step towards creating these magical truffles. For optimal results, ensure your butter is softened to room temperature for the buttercream frosting, as this will result in a much smoother and more workable consistency.
Ingredients for Sugar Cookie Truffles:
For a truly no-bake experience, we recommend using good quality store-bought sugar cookies. This streamlines the process and ensures a quick and easy preparation. If you prefer a homemade cookie base, simply bake your favorite sugar cookie recipe ahead of time and allow them to cool completely before proceeding.
- Approximately 12-15 oz. (about 20-24 standard cookies) of pre-made vanilla or plain sugar cookies.
Ingredients for Rich Buttercream Frosting:
This luscious buttercream is what binds the cookie crumbs together, adding a creamy texture and extra sweetness. Making it from scratch ensures a fresh, delightful flavor, but you can also use about 1-2 tubs (16 oz each) of store-bought vanilla frosting for an even quicker preparation. If using store-bought, ensure it’s at room temperature for easy mixing.
- 6 oz. (1 ½ sticks) unsalted butter, softened to room temperature
- 6 to 8 cups of powdered sugar (confectioners’ sugar), sifted to avoid lumps
- ¼ cup heavy whipping cream or whole milk, plus more if needed
- 2 teaspoons of pure vanilla extract
For Coating and Decoration:
This is where the truffles truly come to life! Choose your favorite type of chocolate or candy melts, and let your imagination run wild with festive embellishments to create stunning DIY truffles.
- 10-12 oz. candy melts (white, milk chocolate, dark chocolate, or festive colors like red/green for a true Christmas vibe)
- OR 10-12 oz. good quality chocolate chips or chopped chocolate (milk, semi-sweet, or white)
- Optional: ½ teaspoon almond extract (for the cookie crumb mixture, if desired, for an extra flavor dimension)
- Assorted edible decorations: festive sprinkles, crushed peppermints or candy canes, edible glitter, mini chocolate chips, cocoa powder, finely chopped nuts (pecans, walnuts), or even a contrasting melted chocolate drizzle.
Step-by-Step Directions: Crafting Your Festive Truffles
Follow these simple steps to create your delightful no-bake sugar cookie truffles. Precision isn’t as critical as enjoyment here, so have fun with the process of making these sweet snacks!
- Prepare Your Cookies: Start by transforming your sugar cookies into fine crumbs. Place the cookies into a food processor and pulse until they form a consistent, fine crumb texture. If you don’t have a food processor, an excellent alternative is to place the cookies in a sturdy plastic freezer bag, seal it tightly, and crush them with a rolling pin, meat tenderizer, or the bottom of a heavy pan until finely ground. The finer the crumbs, the smoother and more luxurious your truffles will be.
- Make the Buttercream Frosting (if not using store-bought): In a large mixing bowl, beat the softened unsalted butter with an electric mixer on medium speed until it’s light and creamy, about 2-3 minutes. Gradually add the sifted powdered sugar, alternating with small amounts of heavy cream (or milk) and pure vanilla extract. Continue beating until the frosting is light, fluffy, and smooth. If the frosting is too thick, add a tiny bit more liquid; if too thin, add a bit more powdered sugar until it reaches a spreadable consistency.
- Combine Cookie Crumbs and Frosting: Pour all the finely crushed sugar cookie crumbs into a large mixing bowl. If you’re adding the optional almond extract for an extra layer of flavor, now is the time to stir it into the crumbs. Next, add your prepared buttercream frosting to the cookie crumbs, starting with about half to two-thirds of the frosting.
- Mix Until Combined: Using a hand mixer on low speed, or even your clean hands (which can be more effective for sensing the right consistency), blend the frosting and cookie crumbs together. Continue adding more frosting, a tablespoon at a time, until the mixture is moist enough to hold together when firmly pressed between your fingers, but not overly sticky or greasy. You’re aiming for a cohesive, dough-like consistency that can be easily rolled into balls. The exact amount of frosting needed can vary based on the type of cookies, so adjust as necessary.
- Form the Truffle Balls: Once the truffle dough is ready, use a small cookie scoop (a 1-inch diameter scoop works perfectly for bite-sized truffles) or a tablespoon to portion out the mixture. Roll each portion between your palms to form smooth, uniform spheres. Place these formed truffle balls onto a parchment paper-lined quarter-sheet pan or baking sheet.
- Chill Thoroughly: This is a crucial step for achieving perfect, firm truffles. Place the sheet pan with the truffle balls into the refrigerator for at least 30 minutes, or even an hour. Chilling allows the truffles to firm up significantly, making them much easier to dip and coat without losing their shape or falling apart.
- Prepare Your Coating: While the truffles are chilling, prepare your chosen coating. Melt your candy melts or chocolate in a microwave-safe bowl in 30-second intervals, stirring well and thoroughly after each, until completely smooth and fluid. Alternatively, you can use a double boiler method for gently melting chocolate. If using chocolate (not candy melts), you can add a tablespoon of coconut oil or vegetable shortening to thin it slightly, which helps create a smoother, thinner coating that’s easier to work with.
- Dip and Decorate: Once the truffle balls are thoroughly chilled and firm, it’s time for the fun part – dipping! Using a fork or a specialized dipping tool, carefully submerge each truffle into the melted coating, ensuring it’s fully covered. Lift the truffle out and gently tap the fork against the side of the bowl to allow any excess coating to drip off, preventing puddles at the base.
- Place and Decorate: Carefully transfer the coated truffle back to the parchment-lined sheet pan. While the coating is still wet and pliable, immediately add your desired edible decorations – whether it’s festive sprinkles, crushed candy canes, or a delicate drizzle of contrasting melted chocolate. Work quickly, as the cold truffles will cause the coating to set quite rapidly.
- Final Chill and Enjoy: Once all truffles are dipped and decorated, return the sheet pan to the refrigerator for another 15-20 minutes. This final chill allows the coating to set completely and harden, ensuring a perfect finish. Once firm, they are ready to be served! Enjoy every sweet, delightful crunch. Don’t forget to share these incredible treats with your loved ones – anything this sweet and delicious is definitely worth sharing!
Expert Tips for Perfectly Irresistible Sugar Cookie Truffles
Achieving bakery-quality truffles at home is easier than you think with these helpful tips, ensuring your holiday baking experience is a success:
- Cookie Consistency is Key: Ensure your sugar cookies are crushed into very fine crumbs. Any larger pieces can make the truffles lumpy and harder to roll smoothly, affecting the final texture.
- Don’t Over-Mix the Dough: Mix just until the cookie crumbs and frosting come together and form a cohesive, rollable dough. Over-mixing can lead to a dense or greasy texture in your truffles.
- Chill, Chill, Chill: The chilling steps are non-negotiable! Cold truffles are firm truffles, which means they hold their shape better, are less sticky to handle, and prevent the melted coating from immediately softening them, resulting in a cleaner dip.
- Working with Melted Coating: If your candy melts or chocolate start to thicken while dipping, reheat them gently for a few seconds in the microwave or over a double boiler. Work in small batches if needed to keep the coating warm and fluid for a smooth finish.
- Dipping Technique: Use a fork or a specialized dipping tool for a clean, even coating. Submerge the truffle completely, lift it, and gently tap the fork against the edge of the bowl to let excess coating drip off before placing it on parchment paper. This prevents thick “feet” around the base of the truffle.
- Decorate Immediately: Sprinkles, crushed peppermints, and other decorations adhere best when the chocolate or candy melt is still wet and unset. Have all your decorations ready and within reach before you start dipping.
- Uniform Sizing: Using a small cookie scoop or an ice cream scooper helps ensure all your truffles are roughly the same size. This not only looks more professional but also ensures even chilling and coating.
Creative Variations and Flavor Enhancements
One of the joys of this recipe is its versatility. Feel free to experiment and make these sugar cookie truffles uniquely yours, perfect for any occasion!
- Flavor Boosters: For a festive twist, add a drop or two of food-grade peppermint extract to the cookie mixture or the white chocolate coating. Orange zest, a hint of almond extract, or even a dash of cinnamon can also add delightful nuances.
- Different Cookie Bases: While classic sugar cookies are wonderful, try this recipe with gingerbread cookies for a spicier holiday treat, chocolate wafer cookies for a darker, richer truffle, or even graham crackers for a s’mores-inspired bite.
- Coating Options:
- White Chocolate: A classic choice that allows colorful sprinkles or vibrant drizzles to pop beautifully.
- Milk or Dark Chocolate: For a richer, more intense chocolate flavor that pairs wonderfully with the sweet cookie base.
- Colored Candy Melts: Use red and green for a truly festive Christmas look, blue and silver for a winter wonderland theme, or pastels for Easter.
- Compound Coatings: Experiment with butterscotch, peanut butter, or even caramel-flavored candy melts for unique and delicious combinations.
- Decadent Drizzles: After the main coating sets, drizzle contrasting melted chocolate (e.g., white chocolate over dark truffles, or vice versa) for an elegant and professional finish.
- Textural Toppings: Beyond traditional sprinkles, consider finely chopped nuts (pecans, walnuts, pistachios), shredded coconut, a dusting of cocoa powder, or even edible gold/silver dust for a luxurious touch.
Perfect for Gifting and Sharing
These no-bake sugar cookie truffles are not just a treat for your own family; they make exceptional homemade gifts. Package them in small decorative boxes, clear cellophane bags tied with festive ribbons, or arrange them on a beautiful platter. They’re perfect for:
- Holiday party favors or hostess gifts
- Teacher appreciation gifts
- Thoughtful neighborly treats
- Adding to cookie exchange platters
- A sweet gesture for friends and colleagues
To keep your truffles fresh, store them in an airtight container in the refrigerator for up to one week. For longer storage, you can freeze them for up to a month; simply bring them to room temperature for about 15-20 minutes before serving for the best texture and flavor. These easy holiday treats are sure to be a hit!
Embrace the Holiday Spirit, One Truffle at a Time!
There’s something truly special about homemade treats during the holidays. These easy no-bake sugar cookie truffles are more than just a dessert; they’re a symbol of warmth, sharing, and the joyful spirit of the season. They’re simple enough for beginners, yet impressive enough to wow any crowd. So, gather your ingredients, put on some festive music, and let the magic unfold in your kitchen. We guarantee these delightful truffles will become a cherished part of your annual holiday traditions. Happy “baking” and even happier holidays!