
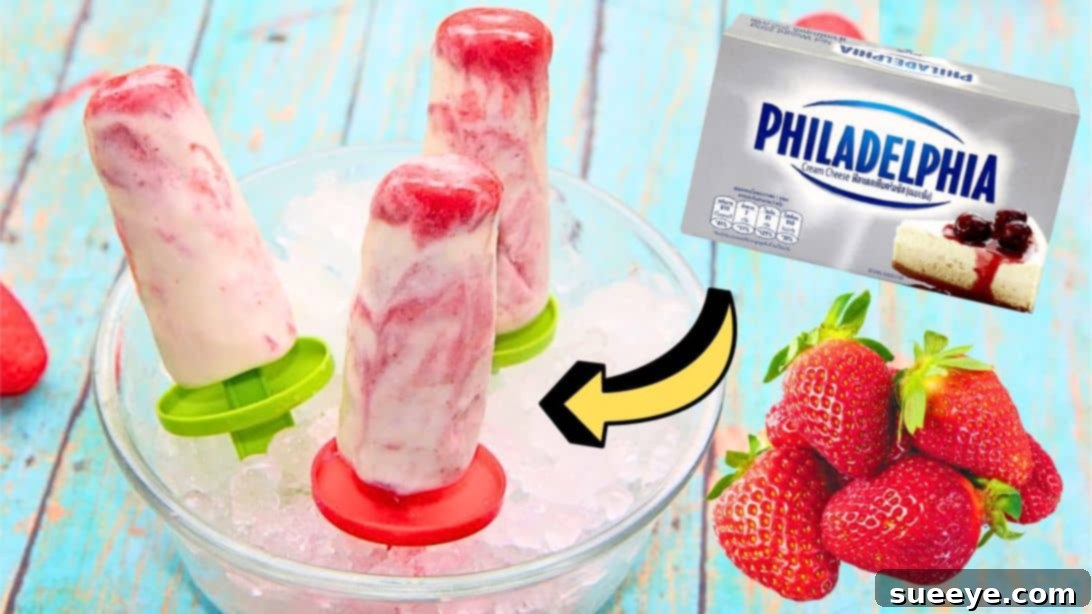
There’s nothing quite like a refreshing, frosty treat to cut through the summer heat. As the days grow longer and temperatures rise, my thoughts invariably turn to cool, creamy delights that offer both comfort and exhilaration. Among the vast array of cold desserts, few capture the essence of summer quite like the humble popsicle, especially when it transforms into something truly extraordinary. Imagine the luscious flavor of ripe strawberries dancing with the rich, tangy creaminess of cheesecake, all conveniently packaged in a handheld frozen bar. This isn’t just a dream; it’s exactly what you get with these incredible Strawberry Cheesecake Popsicles.
Inspired by the fantastic recipe from Divas Can Cook on YouTube, this recipe is a true game-changer for anyone looking to elevate their summer dessert game. What makes it so special? It’s remarkably simple, requiring just 7 to 8 straightforward ingredients, many of which you likely already have in your pantry. Forget complex baking or hours spent in the kitchen; these popsicles are designed for ease and maximum flavor impact. Whether you’re hosting a backyard BBQ, looking for a delightful treat for the kids, or simply craving something sweet and refreshing after a long day, these Strawberry Cheesecake Popsicles are your perfect solution. Plus, their versatility means you can easily adapt them to your taste, exploring various fruit flavors and mix-ins to create your signature frozen masterpiece.
Why You’ll Love These Strawberry Cheesecake Popsicles
This recipe isn’t just about making popsicles; it’s about crafting a memorable summer experience. Here’s why these Strawberry Cheesecake Popsicles will quickly become a household favorite:
- Effortless Preparation: With simple steps and common ingredients, this recipe is perfect for both novice and experienced home cooks. No fancy equipment or intricate techniques are needed.
- Unforgettable Flavor: The combination of sweet, slightly tart strawberries with a rich, velvety cheesecake base creates a taste sensation that’s both indulgent and incredibly refreshing. It’s a dessert that truly captures the best of both worlds.
- Perfect for Summer: Chilled to perfection, these popsicles are the ultimate antidote to warm weather. They’re light enough not to feel heavy, yet satisfying enough to curb any sweet craving.
- Kid-Friendly & Crowd-Pleasing: Who doesn’t love a popsicle? These treats are a hit with children and adults alike, making them ideal for family gatherings, parties, or just a fun afternoon snack.
- Customizable Delights: While strawberry is a classic, the base recipe is incredibly adaptable. Experiment with different berries, tropical fruits, or even chocolate to create endless flavor combinations tailored to your preferences.
- Homemade Goodness: Knowing exactly what goes into your treats brings peace of mind. You control the sweetness and ingredients, ensuring a healthier and more wholesome dessert than many store-bought options.
Ingredients for the Perfect Strawberry Cheesecake Popsicles
Crafting these delectable popsicles starts with a handful of fresh, quality ingredients. Each component plays a vital role in achieving that perfect balance of fruity sweetness and creamy tang. Gather these items, and you’ll be well on your way to a batch of irresistible frozen treats.
- 1¾ cups strawberries, fresh, ripe, and diced
- 1 tbsp water
- 1-3 tbsp granulated sugar, or more, adjusted to your desired sweetness and the ripeness of your strawberries
- 4-6 oz cream cheese, full-fat, softened to room temperature for a smooth mixture
- ¾ cup sweetened condensed milk, provides sweetness and a silky texture without adding extra liquid
- ¼ cup milk, whole milk recommended for richness, but any milk will do
- 1 tbsp fresh lemon juice, brightens the flavors and adds a essential tangy kick, mimicking classic cheesecake
- ½ tsp vanilla extract, optional, but enhances the overall dessert flavor profile
Step-by-Step Directions to Your Frozen Bliss
Creating these strawberry cheesecake popsicles is a straightforward process, broken down into three easy stages: preparing the strawberry puree, whipping up the cheesecake base, and finally, assembling and freezing. Follow these detailed instructions for a perfect batch every time.
Step 1: Crafting the Vibrant Strawberry Puree
The foundation of our delicious popsicles begins with a vibrant, flavorful strawberry puree. This step ensures a burst of natural fruitiness in every bite.
- Begin by placing a medium saucepan on your stove over medium heat. Add the diced strawberries, a tablespoon of water, and 1 to 3 tablespoons of sugar. The amount of sugar can be adjusted based on the natural sweetness of your strawberries and your personal preference.
- Cook this mixture gently, stirring occasionally, until the strawberries soften and begin to break down, typically about 5-7 minutes. The goal is to release their juices and create a tender consistency.
- Once softened, remove the saucepan from the heat. Using a potato masher or the back of a spoon, thoroughly mash the cooked strawberries. You want a relatively smooth consistency, but a few small chunks can add a lovely texture. At this point, taste the mashed strawberries and adjust the sweetness if needed by adding a little more sugar, stirring until dissolved.
- Allow the mashed strawberries to cool completely. This is crucial to prevent them from heating the creamy cheesecake mixture later. Once cool, transfer the mashed strawberries to a blender or food processor.
- Blend the strawberries until you achieve a smooth, pourable puree consistency. Ensure there are no large lumps remaining. This step ensures a silky texture throughout your popsicles.
- Pour the strawberry puree into a separate container, cover it, and place it in the refrigerator. Allow it to chill thoroughly until it is cold. This chilling step is important for both the final texture and to maintain the coolness of the cheesecake base when combined.
Step 2: Preparing the Creamy Cheesecake Base
While your strawberry puree is chilling, it’s time to create the rich, velvety cheesecake portion of your popsicles. This mixture forms the heart of the “cheesecake” experience.
- In a large mixing bowl, add the softened cream cheese. Ensure your cream cheese is at room temperature; this makes it much easier to beat smooth and prevents lumps in your final mixture.
- Using an electric mixer (handheld or stand mixer with a paddle attachment), beat the cream cheese on medium speed until it is light, fluffy, and completely smooth, with no lumps remaining. This might take 2-3 minutes.
- Next, pour in the sweetened condensed milk, milk, fresh lemon juice, and the optional vanilla extract.
- Continue to beat the mixture on medium-low speed until all the ingredients are fully incorporated and the mixture is smooth and uniform. Scrape down the sides of the bowl as needed to ensure everything is well combined. The mixture should be thick, creamy, and pourable.
- Taste the cheesecake base and make any final adjustments. If you prefer it sweeter, a tiny dash more condensed milk can be added, though be mindful not to make it too thin. The lemon juice is vital for that authentic cheesecake tang, so don’t skimp on it!
Step 3: Assembling, Freezing, and Enjoying Your Treat
With both the strawberry puree and cheesecake base ready, it’s time for the fun part: assembling your popsicles and letting the freezer work its magic.
- Retrieve your chilled strawberry puree and the creamy cheesecake mixture. Now, you can begin filling your popsicle molds. You have creative freedom here! For a layered effect, alternate spoonfuls of strawberry puree and the cheesecake mixture. For a swirled look, fill the mold partially with one, then add the other, and gently swirl with a skewer or a thin knife. Or, if you prefer, you can lightly mix a portion of the puree into the cheesecake base for a uniform pink color with strawberry flecks.
- Once your molds are filled to just below the rim (leaving a little space for expansion during freezing), insert the popsicle sticks or secure the molds with their designated lids, which often include a slot for the stick.
- Carefully transfer the filled popsicle molds to your freezer. Ensure they are placed on a flat, stable surface where they won’t be disturbed.
- Allow the popsicles to freeze overnight, or for a minimum of 6-8 hours, until they are completely solid. Patience is key here; under-frozen popsicles can be messy and less enjoyable.
- Once thoroughly frozen and you’re ready to serve, run the outside of each popsicle mold under warm water for about 10-20 seconds. This gently loosens the frozen treat from the mold, making it easy to release without breaking the popsicle.
- Carefully pull out your beautiful Strawberry Cheesecake Popsicles. Serve immediately and savor every creamy, fruity bite!
Tips for Cheesecake Popsicle Perfection
To ensure your strawberry cheesecake popsicles turn out perfectly every time, keep these helpful tips in mind:
- Use Ripe Strawberries: The flavor of your popsicles heavily relies on the quality of your fruit. Opt for fresh, deeply red, and fragrant strawberries for the best taste.
- Soften Cream Cheese Thoroughly: Room temperature cream cheese is non-negotiable for a smooth, lump-free cheesecake base. Take it out of the fridge at least 30 minutes to an hour before you start.
- Chill Your Puree: Ensuring the strawberry puree is cold before mixing or layering with the cheesecake base helps maintain the cool temperature of the mixture and prevents it from thinning out too much.
- Adjust Sweetness to Taste: Everyone has a different preference for sweetness. Taste both the strawberry puree and the cheesecake mixture before freezing and adjust the sugar/condensed milk accordingly. Remember, flavors can be slightly muted when frozen.
- Don’t Overfill Molds: Liquids expand when frozen. Leave about ¼ inch of space at the top of your popsicle molds to prevent overflow and ensure neat popsicles.
- Freeze Completely: While it’s tempting to pull them out early, allow the popsicles to freeze solid for at least 6-8 hours, or preferably overnight. This ensures a firm texture that won’t melt too quickly.
- Easy Release: The warm water trick is your best friend for unmolding. A quick rinse under the tap will release them effortlessly.
- Storage: Once frozen solid, you can remove the popsicles from their molds and store them individually wrapped in plastic wrap or parchment paper in an airtight freezer bag or container. This prevents freezer burn and allows for easy grab-and-go treats.
Creative Variations & Customization Ideas
While strawberry cheesecake popsicles are undeniably delicious, this recipe serves as a fantastic foundation for endless flavor experiments. Don’t be afraid to get creative and make these treats truly your own!
- Berry Bliss: Swap out strawberries for other berries like raspberries, blueberries, or a mixed berry medley. Each will bring its unique flavor profile to the cheesecake base.
- Tropical Twist: Replace strawberries with pureed mango, passion fruit, or even pineapple for an exotic, sunny variation. A hint of lime juice can complement these tropical flavors beautifully.
- Chocolate Lover’s Dream: Stir in mini chocolate chips or finely chopped dark chocolate into the cheesecake mixture before freezing. You could also drizzle melted chocolate over the finished popsicles for an extra indulgent touch.
- Graham Cracker Crunch: For an authentic cheesecake experience, mix some finely crushed graham cracker crumbs into the cheesecake base or layer them into the molds. Alternatively, dip the frozen popsicles in melted white chocolate and then roll them in graham cracker crumbs for a “crust” effect.
- Nutty Notes: If you enjoy a bit of crunch, finely chop some pecans, walnuts, or almonds and swirl them into the mixture.
- Dairy-Free Option: For those with dietary restrictions, use dairy-free cream cheese (often made from cashews or almonds), a dairy-free condensed milk alternative, and plant-based milk (like almond or oat milk). Ensure all ingredients are suitable for your dietary needs.
- Reduced Sugar: If you prefer less sugar, reduce the amount of granulated sugar in the strawberry puree and use a sugar-free condensed milk alternative. Taste and adjust as you go.
- Extra Zest: Grate a little lemon or orange zest into the cheesecake mixture for an added aromatic lift and brighter flavor.
Frequently Asked Questions (FAQ)
Can I use frozen strawberries instead of fresh?
Yes, absolutely! Frozen strawberries work wonderfully for the puree. You won’t need to add the tablespoon of water in Step 1, as frozen strawberries release plenty of liquid as they cook down. Simply cook them until softened and then proceed with mashing and blending as directed.
How long do these popsicles last in the freezer?
When stored properly in an airtight container or individually wrapped to prevent freezer burn, these Strawberry Cheesecake Popsicles can last for up to 2-3 weeks in the freezer. Beyond that, while still safe to eat, their texture and flavor might start to degrade slightly.
Do I need special popsicle molds?
While dedicated popsicle molds are ideal for their shape and ease of release, you can get creative if you don’t have them. Small paper cups with wooden sticks inserted after an hour or two of freezing can work as an alternative. Just be prepared to peel the paper cup away before serving.
Can I make these dairy-free or low-sugar?
Yes, both are possible! For a dairy-free version, substitute cream cheese with a dairy-free cream cheese alternative, and use a plant-based milk (almond, oat, or soy milk) and a dairy-free condensed milk. For low-sugar, reduce the added granulated sugar in the strawberry puree and use a sugar-free condensed milk alternative. Always taste and adjust to your preference.
Why aren’t my popsicles freezing properly?
Several factors can affect freezing. Ensure your freezer is set to a sufficiently cold temperature (0°F / -18°C or colder). Also, make sure your popsicle mixture isn’t too warm when you put it in the molds. If the mixture contains too much alcohol (not applicable here) or too much sugar/fat in relation to water content, it can also impact freezing time and hardness. Always give them ample time, preferably overnight, to freeze solid.
The Ultimate Summer Treat Awaits
There you have it – a comprehensive guide to crafting the most irresistible Strawberry Cheesecake Popsicles. This recipe transcends the ordinary, offering a delightful fusion of fruity freshness and creamy indulgence that is simply perfect for any warm day. Easy to make, versatile, and incredibly satisfying, these popsicles are sure to become a cherished part of your summer traditions. So, gather your ingredients, follow these simple steps, and prepare to embark on a delicious journey to frozen bliss. Your taste buds will thank you!
All image credit belongs to Divas Can Cook via YouTube. Follow and subscribe to her channel for more amazing recipes!