
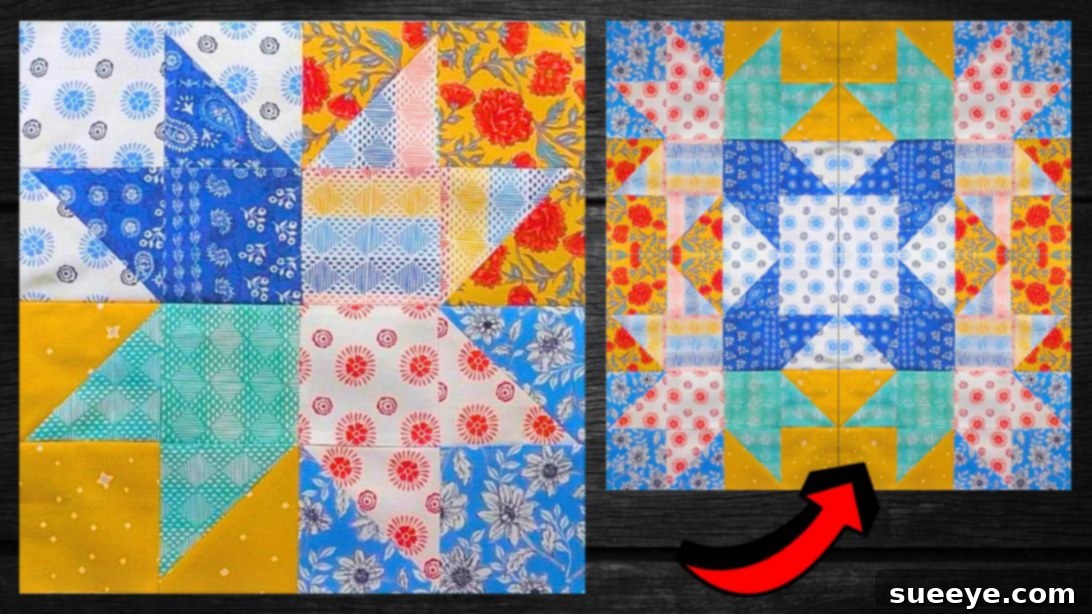
Welcome to the wonderful world of quilting, where creativity meets comfort! If you’re searching for an engaging yet achievable project, look no further than the charming **Quarter Star Quilt Block**. This timeless design, expertly presented by the talented Carol Thelen on YouTube, is the perfect starting point for beginners and a delightful quick make for seasoned quilters. Its simplicity, requiring only basic squares and triangles, makes it an accessible and rewarding venture. Follow our comprehensive guide, complemented by Carol’s excellent video tutorial, to master this beautiful block. Prepare to transform your fabric stash into stunning, handcrafted pieces that will be cherished for years to come.
The Quarter Star Quilt Block isn’t just easy; it’s incredibly versatile. It offers a fantastic opportunity to experiment with your favorite fabric combinations, creating a vibrant, scrappy star block or a coordinated design with a refined palette. This tutorial will walk you through each step, ensuring you understand not just *how* to make the block, but also *why* certain techniques are used. Precision in quilting leads to breathtaking results, and we’ll emphasize those crucial details.
Ready to embark on your next quilting adventure? Let’s gather our materials and dive into crafting a beautiful Quarter Star Quilt Block that you’ll be proud to showcase.
Why the Quarter Star Quilt Block: A Beginner’s Delight and Quilter’s Staple
The Quarter Star Quilt Block holds a special place in the quilting community for several compelling reasons. Its symmetrical design and straightforward construction make it an ideal choice for anyone new to quilting, providing a solid foundation in essential techniques without overwhelming complexity. For experienced quilters, it’s a go-to pattern for quick projects, scrap busting, or adding a classic touch to a larger design.
- Simplicity and Accessibility: Unlike intricate patterns that might intimidate newcomers, the Quarter Star relies on basic geometric shapes – squares and triangles. This simplifies the cutting process and makes piecing much more manageable. You won’t need advanced rulers or complex cutting mats; standard quilting tools suffice.
- Skill Building: While simple, this block is an excellent teacher. It refines your skills in accurate cutting, consistent seam allowances, and, most importantly, precise pressing. Mastering these fundamentals early on will significantly enhance the quality of all your future quilting projects.
- Design Versatility: The beauty of the Quarter Star lies in its adaptability. You can create striking contrasts using dark and light fabrics, or opt for a harmonious blend of prints and solids. When multiple Quarter Star blocks are joined, they can form larger, more complex star patterns or abstract designs, making them perfect for quilts, wall hangings, table runners, and even decorative pillow covers. It’s an ideal block for “scrappy” quilts, allowing you to use up smaller fabric pieces you might have collected.
- Instant Gratification: Because it’s a relatively small and quick project, you’ll experience the satisfaction of completing a beautiful block in a short amount of time. This boost of confidence is invaluable, especially for beginners who are just getting their feet wet in the quilting world.
Essential Materials for Your Quarter Star Quilt Block
Before you begin, gathering all your materials is key to a smooth and enjoyable quilting experience. Having everything ready saves time and ensures you can focus on the creative process. Here’s a detailed look at what you’ll need for your Quarter Star Quilt Block:
- Assorted Print and Solid Fabrics: This is where your creativity truly shines! You’ll need a selection of fabrics that contrast well to make the star design pop. Consider using two distinct fabric sets for each block: one for the star points and another for the background. Scraps are perfect for this project, allowing you to create a unique and vibrant block. Ensure your fabrics are 100% quilting cotton, as this will give you the best results for durability and ease of sewing.
- Marking Pen, Pencil, or Chalk: Essential for drawing diagonal lines or marking precise points on your fabric. A water-soluble pen or tailor’s chalk is recommended as it can be easily removed after sewing.
- Quilting Ruler (Acrylic): A clear acrylic ruler, typically 6×12 inches or 6×24 inches, is indispensable for accurate cutting. Look for one with clear markings, including a 45-degree line, to help you make precise cuts.
- Rotary Cutter and Cutting Mat: While not explicitly listed in the original, these are standard quilting tools that significantly improve accuracy and efficiency when cutting fabric. A sharp rotary blade is crucial for clean, straight edges.
- Fabric Pins or Clips: To hold fabric pieces together securely before and during stitching. Good quality, sharp pins will glide through fabric without snagging. Wonder Clips are also a popular alternative, especially for thicker seams.
- Needle and Thread: A universal sewing machine needle (size 80/12 or 90/14) and good quality 100% polyester or cotton quilting thread that blends with your fabrics are ideal.
- Iron and Ironing Board: Crucial for pressing seams open or to one side. A hot, dry iron is often preferred for pressing quilting seams, as steam can sometimes distort fabric, though many quilters use steam successfully.
- Sewing Machine: Any basic sewing machine capable of a straight stitch will work perfectly. Ensure it’s in good working order and has a fresh needle. A quarter-inch presser foot can be incredibly helpful for maintaining consistent seam allowances.
- Downloadable Pattern: Don’t forget to click here to download the free pattern provided by Carol Thelen. This will give you the precise measurements for cutting your fabric squares and triangles. Ensure you print it at 100% scale to guarantee accuracy.
Crafting Your Quarter Star Quilt Block: A Step-by-Step Guide
Creating the Quarter Star Quilt Block is a delightful process that emphasizes precision and careful pressing. Follow these detailed steps to bring your beautiful block to life. Remember to refer to Carol Thelen’s video tutorial for visual guidance throughout the process.
Step 1: Preparation and Unit Assembly
Your journey begins with careful preparation and the construction of the foundational units of your quilt block.
- Download and Print the Pattern: Access the pattern here and print it at 100% scale. Verify the scale with a ruler to ensure your pieces will be the correct size.
- Accurate Fabric Cutting: Based on the pattern, cut your assorted fabric pieces. This block typically uses a combination of squares and triangles. For star points, you might cut squares and then slice them diagonally to create triangles, or use methods like the “half-square triangle” (HST) technique where two squares are sewn together and then cut. Precision here is paramount; even slight inaccuracies can affect the final block’s shape. Use a rotary cutter and a clear quilting ruler for the cleanest, most precise cuts.
- Arrange Your Block Units: Mentally (or physically, on a design board) arrange your cut fabric pieces into the desired “block units.” For a Quarter Star, you will typically combine two different sets of fabric within each unit – one often serving as the background, and the other forming parts of the star. Visualize how these units will eventually come together to form the distinct quarter star shape.
- Stitch the Triangles Together (Forming Half-Square Triangles or Similar Units): Take two fabric pieces designated to form a star point (often a background square and a star-color square). Layer them with their right sides facing each other. Using your marking tool, draw a diagonal line from one corner to the opposite corner. Stitch a quarter-inch seam allowance on both sides of this drawn line.
- Cut and Press Seams: After stitching, cut along the drawn diagonal line, separating the two stitched halves. You now have two half-square triangle units! Carefully press the seams. For flatter, more accurate blocks, many quilters choose to press seams open. Alternatively, you can press them to the darker fabric side. Consistency in your pressing direction throughout the entire block is vital for achieving flat seams and precise points. Trim these HSTs to the exact size specified in the pattern, using your ruler and rotary cutter, making sure the diagonal seam runs perfectly through the corners.
Step 2: Assembling the Quarter Star Block
With your individual units prepared, it’s time to bring them together to form the complete Quarter Star.
- Stitch Half-Square Triangles (HSTs) to Squares: The Quarter Star block is typically constructed in a grid (often a 3×3 grid). Lay out your finished half-square triangles and your plain fabric squares according to the pattern’s diagram for the Quarter Star. Carefully align the HSTs with the plain squares that will form the center and corners of your block. Pin them together, right sides facing. Stitch these components together using a consistent quarter-inch seam allowance.
- Assemble Rows: Once the smaller units are stitched, begin forming rows. Depending on your layout, you might have three horizontal rows, each comprising three individual units. Stitch the pieces within each row together, ensuring that your seam allowances are precise. After stitching each row, take it to your ironing board and press the seams. Pressing “as you go” is a golden rule in quilting; it helps maintain accuracy and keeps your fabric from stretching or distorting. Consider pressing seams in alternating directions for adjacent rows (e.g., press seams in row 1 to the left, row 2 to the right), which helps “nest” the seams when you join the rows.
- Repeat for Remaining Units: Continue this process, repeating the stitching and pressing for all remaining block units until all your rows are completed and pressed flat.
- Join the Rows to Form the Block: Now, it’s time to assemble the full Quarter Star Quilt Block. Take your prepared rows and carefully align them, right sides facing. Pay close attention to how the seams meet, especially where points are formed. “Nesting” your seams (where seams pressed in opposite directions lock together) will help you achieve perfectly matched points. Pin generously at these intersection points.
- Stitch and Final Press: Stitch the rows together with your quarter-inch seam allowance. Once all rows are joined, take your complete Quarter Star block to the ironing board for a final, crucial press. Press the entire block flat, removing any wrinkles and setting the seams. You can press the final seams open or to one side, whichever results in the flattest block. Admire your perfectly constructed Quarter Star!
Pro Tips for a Perfect Quarter Star Quilt Block
Achieving a professional-looking quilt block is all about attention to detail. Here are some invaluable tips to help you master the Quarter Star and any future quilting projects:
- “Measure Twice, Cut Once”: This old adage is especially true in quilting. Always double-check your measurements before cutting. Even a tiny discrepancy in cutting can lead to points not matching up and wavy seams.
- Consistent Quarter-Inch Seam Allowance: This is the cornerstone of accurate piecing. Practice stitching a perfect 1/4-inch seam on scrap fabric. Many sewing machines have a 1/4-inch presser foot, or you can use painter’s tape as a guide on your machine bed.
- Pressing is Crucial: Pressing is not ironing. When pressing, you lift and place the iron, rather than sliding it, to avoid distorting the fabric. Press seams after every stitching step to ensure flat, precise blocks. Whether you press seams open or to one side, maintain consistency.
- Starch Your Fabric: Applying a light starch or fabric sizing before cutting can make your fabric stiffer and easier to handle, preventing stretching and ensuring more accurate cuts and stitches.
- Use a Fresh Needle: A dull needle can cause skipped stitches, pulled threads, and fabric damage. Change your sewing machine needle regularly, ideally for every new project or after about 8-10 hours of sewing.
- Chain Piecing: For efficiency, especially when making multiple blocks, use chain piecing. Stitch units one after another without lifting the presser foot or cutting threads in between. This saves time and thread.
- “Square Up” Your Blocks: After assembling your entire Quarter Star block, use your quilting ruler and rotary cutter to “square it up” to the desired final dimension. This ensures all your blocks are uniform in size, making final quilt assembly much easier.
- Don’t Fear the Seam Ripper: Everyone makes mistakes. Embrace your seam ripper as a valuable tool. It’s always better to unpick and re-stitch a section than to leave an inaccurate seam that will detract from the final beauty of your project.
Project Ideas and Variations for Your Quarter Star Block
The Quarter Star Quilt Block is just the beginning! Once you’ve mastered the basic construction, you’ll discover a world of possibilities for incorporating it into various projects and experimenting with different looks.
Combining Blocks for Larger Quilts
- Traditional Setting: Arrange multiple Quarter Star blocks in a grid, perhaps alternating them with solid squares or other simple blocks, to create a classic quilt top.
- Dynamic Designs: Rotate every other Quarter Star block by 90 or 180 degrees to create intriguing secondary patterns, such as larger stars or geometric shapes emerging from the negative space between the blocks.
- Sashings and Borders: Frame your Quarter Star blocks with narrow strips of fabric (sashings) and add outer borders to create a visually striking design and increase the quilt’s size.
Creative Color Play
- Scrappy Delight: Utilize a diverse collection of fabric scraps for each block, creating a truly unique and vibrant quilt that tells a story through its varied textiles.
- Monochromatic Elegance: Choose different shades and tints of a single color for a sophisticated, understated look. The texture and pattern in the fabrics will become more prominent.
- High Contrast Drama: Pair very dark fabrics with very light ones to make the star points pop dramatically, creating a bold and modern aesthetic.
- Analogous or Complementary Colors: Experiment with color theory. Analogous colors (next to each other on the color wheel) create harmony, while complementary colors (opposite each other) provide vibrant contrast.
Beyond the Quilt: Other Projects
A single Quarter Star block, or a small grouping, can be transformed into a variety of useful and decorative items:
- Pillow Covers: Stitch a single block onto the front of a throw pillow for a charming accent.
- Tote Bags or Pouches: Embellish the front of a handmade bag with your beautiful block.
- Table Runners or Placemats: A series of blocks sewn together can create an eye-catching table runner, or individual blocks can become unique placemats.
- Wall Hangings: Frame a beautifully pieced Quarter Star block to create a small piece of textile art for your home.
- Mug Rugs: Make a miniature version of the block for a delightful coaster.
Caring for Your Finished Quilted Projects
After investing time and love into creating your Quarter Star Quilt Block, it’s important to know how to care for it, whether it’s part of a larger quilt or a smaller decorative item. Proper care ensures its longevity and keeps it looking beautiful.
- First Wash: For your first wash, especially with projects that use a mix of fabric colors (particularly reds or dark blues), consider using a “color catcher” sheet to absorb any bleeding dyes. Wash gently in cold water on a delicate cycle, or hand wash.
- Detergent Choice: Use a mild, pH-neutral detergent. Avoid harsh chemicals, bleach, or fabric softeners, as these can break down fabric fibers and thread.
- Drying: Tumble dry on a low heat setting, or preferably, lay flat to air dry. Air drying helps prevent shrinkage and maintains the integrity of your stitches and fabric. If hanging, ensure the weight is evenly distributed to prevent stretching.
- Storage: Store quilts flat or rolled, rather than folded for extended periods, to prevent permanent creases. Keep them in a cool, dry place away from direct sunlight to prevent fading. Use breathable cotton sheets or bags for storage, avoiding plastic, which can trap moisture.
- Spot Cleaning: For small spills or stains, gently spot clean with a damp cloth and mild soap, dabbing rather than rubbing, to avoid spreading the stain or damaging the fabric.
Frequently Asked Questions About the Quarter Star Quilt Block
Here are some common questions quilters, especially beginners, often ask about making the Quarter Star Quilt Block.
What makes the Quarter Star Quilt Block unique?
The Quarter Star block is characterized by having only one “point” of a star visible within its square boundaries, typically in one corner. When multiple Quarter Star blocks are arranged and rotated, they can combine to form a full star, half star, or other intriguing patterns, making it a versatile component in larger quilt designs.
Is this project truly suitable for absolute beginners?
Absolutely! The Quarter Star Quilt Block is often recommended for beginners because it uses fundamental quilting techniques: straight seams, precise cutting of squares and triangles, and consistent pressing. It’s an excellent way to practice these core skills without being overwhelmed by intricate curves or complex piecing. Carol Thelen’s tutorial makes it even more accessible.
How can I ensure my star points are sharp?
Sharp points are a hallmark of well-made quilt blocks. The key lies in accurate cutting, consistent quarter-inch seam allowances, and careful pressing. When joining units where points meet, try “nesting” your seams (pressing adjacent seams in opposite directions so they interlock) and pin them precisely at the intersection. Always press your seams after each step, never iron!
What’s the best way to choose coordinating fabrics?
For the Quarter Star, selecting fabrics that provide good contrast between the star points and the background will make your design stand out. You can use a color wheel for inspiration (e.g., complementary colors for high contrast, analogous for harmony) or simply choose fabrics whose light and dark values are distinct. Don’t be afraid to audition fabrics by laying them out together before cutting.
Can I make this block in different sizes?
Yes! Once you understand the basic construction, you can easily scale the block up or down by adjusting the initial cut sizes of your squares and triangles, maintaining the same proportions. Just remember that changing the size will require recalculating all component piece dimensions. The provided pattern is a great starting point for a standard size.
*A special thank you to Carol Thelen via YouTube for sharing her expertise and all the inspiring images used in this tutorial. Her clear instructions and visual demonstrations are invaluable resources for quilters of all levels. If you’ve enjoyed making this Quarter Star Quilt Block, we highly recommend visiting her amazing channel for more fantastic quilting ideas and to subscribe for her latest tutorials. Happy quilting!*