
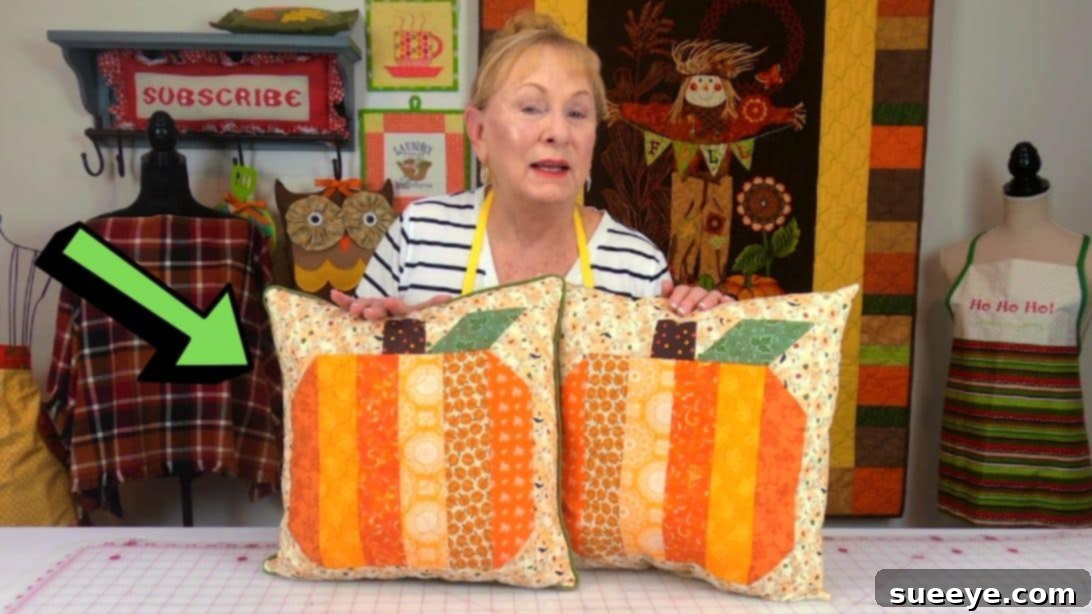
Sew Your Own Charming Fabric Pumpkins: An Easy DIY Tutorial for Fall Decor
Are you searching for fresh inspiration for your next sewing projects? Look no further! This delightful fabric pumpkin pattern, brought to life by The Sewing Room Channel on YouTube, is an absolute gem. Perfect for adding a touch of cozy autumnal charm to your home, this fun and scrappy project offers incredible versatility. Whether you envision it as a snuggly pumpkin pillow or a decorative pumpkin placemat, the final result is guaranteed to be utterly lovely and brimming with handmade character. Dive into our comprehensive instructions below, and for a visual walkthrough, be sure to watch the accompanying video tutorial. Let’s start crafting your perfect DIY fabric pumpkin today!
Why Sew a Fabric Pumpkin: Versatility and Charm
Fabric pumpkins are more than just a craft project; they are a delightful addition to any home, especially as the seasons shift towards autumn. There’s an undeniable warmth and personality that a handmade item brings, and these quilted pumpkins are no exception. They serve as fantastic fall decor sewing accents, seamlessly blending with Thanksgiving, Halloween, or general autumn themes. Imagine them nestled on your sofa, gracing your dining table, or adding a festive touch to your entryway. The “scrappy” nature of this specific pattern encourages the use of various fabric pieces, making it an excellent opportunity to utilize your existing fabric stash and engage in sustainable crafting. Not only does this reduce waste, but it also results in a truly unique piece with a rich tapestry of colors and patterns. This easy pumpkin sewing pattern is suitable for sewists of all levels, offering a rewarding experience and a beautiful finished product.
Gathering Your Materials: What You’ll Need for Your Scrappy Pumpkin Project
Before you embark on your sewing adventure, it’s crucial to gather all your materials. Having everything ready ensures a smooth and enjoyable crafting process. This project is particularly satisfying as it allows for a wonderful mix-and-match approach with fabrics, making each pumpkin truly one-of-a-kind.
Fabric Choices: Body, Stem, and Leaf
- For the Pumpkin Body: You’ll need approximately ⅛ yard of fabric, ideally fat quarters. The beauty of this pattern lies in its scrappy design, so feel free to choose up to 6 different colors or coordinating patterns. Think about autumnal hues like oranges, browns, creams, greens, and reds, or go for a more whimsical palette. The key is to select fabrics that complement each other and bring out the festive spirit of a pumpkin.
- For the Stem: A single square fabric measuring 2½” is perfect. Consider a contrasting color like a deep brown, forest green, or even a metallic gold to mimic a real pumpkin stem. This small detail adds significant character.
- For the Leaf: You’ll need one rectangle fabric measuring 2½ x 5½”. A vibrant green or a subtle mottled green would work wonderfully to represent a pumpkin leaf. This piece adds a natural, organic touch to your finished handmade fabric pumpkin.
Essential Sewing Supplies
- Backing Fabric: If you’re creating a pumpkin pillow or placemat, you’ll need a piece of fabric for the back. Choose something complementary in color or pattern to your pumpkin body.
- Batting Fabric: This is essential for giving your pumpkin structure and a soft, plush feel, especially if making a pillow or a quilted placemat. A thin cotton batting works well.
- Poly-fil Stuffing: For a plump, squeezable pumpkin pillow. Ensure you have enough to achieve your desired level of firmness.
- Scissors or Rotary Cutter and a Cutting Mat: Accurate cutting is vital for precise seams. A rotary cutter and mat offer speed and precision, but sharp fabric scissors will also do the job beautifully.
- Fabric Pins: To hold your fabric pieces securely in place before sewing.
- Marking Pen or Chalk: For transferring pattern markings or drawing lines on your fabric, which will disappear or be hidden in seams.
- Needle and Thread: Matching thread color to your fabric is usually best, though a neutral color like cream or grey can also work for piecing.
- Sewing Machine: A reliable sewing machine will make this project quick and enjoyable.
Step-by-Step Guide: Crafting Your Adorable Fabric Pumpkin
Now that you have all your materials, let’s get into the heart of the project: sewing your pumpkin! Take your time with each step, paying attention to detail for the best results. Precision in cutting and sewing will make a big difference in the final look of your quilted pumpkin project.
Preparation and Cutting Your Fabric Strips
Before you even touch your scissors, it’s a good practice to pre-wash and iron all your fabrics. This prevents shrinkage later and ensures your fabric is smooth and easy to work with. Once prepared, it’s time for cutting. From your selected body fabrics (up to 6 different colors), carefully cut six strips, each measuring approximately 2½ x 10½ inches. Using a rotary cutter and mat with a ruler will yield the most accurate cuts, which is crucial for clean seams. If using scissors, mark your lines clearly with chalk or a fabric pen before cutting. Remember, consistency in your cuts will lead to a more professional-looking finished pumpkin.
Assembling the Pumpkin Body
Take four of your 2½ x 10½ inch strips and sew them together lengthwise, using a ¼-inch seam allowance. When sewing, try to maintain a consistent seam allowance to keep your fabric pieces aligned. After sewing, press the seams. You can press them open for a flatter finish or press them to one side, depending on your preference and fabric weight. Pressing is a vital step in quilting; it sets the stitches and ensures your fabric lies flat, making subsequent steps much easier. This completed four-strip panel will form the central part of your pumpkin body.
Next, take the two remaining 2½ x 10½ inch strips. These will be transformed to create the curved shape of the pumpkin. On each of these two strips, you will attach two small squares (which you will cut from your body fabric scraps, ensuring they are at least 2½ x 2½ inches). Position these small squares at the top and bottom corners of the strip, diagonally across from each other, as demonstrated in the video tutorial. Sew along the diagonal line, then trim off the fabric outside the stitching line, leaving a ¼-inch seam allowance. Press these seams open. When you open up these fabric pieces, you’ll see a distinctive shape forming, which will give your pumpkin its characteristic rounded edges. Set these two specially prepared strips aside.
Now, return to your main pumpkin body (the four-strip panel you sewed earlier) and give it a good press to ensure it’s perfectly flat. Take the two strips with the diagonal squares you just prepared and attach one to each side of the main four-strip body. Again, use a consistent ¼-inch seam allowance. Press these seams open as well. Once all pieces are sewn and pressed, you will have a roughly rectangular panel that begins to resemble the shape of a pumpkin. Finally, trim the edges of this entire pumpkin body panel evenly, squaring it up and making sure all sides are straight and tidy.
Crafting the Stem and Leaf
Let’s move on to the charming details that will bring your pumpkin to life: the stem and the leaf. Take your 2½” square fabric designated for the stem. You’ll fold and sew this piece to create a three-dimensional stem. The video tutorial will guide you on the specific folding and stitching method, usually involving folding it in half or quarters and sewing along an open edge to create a tube or a more flat, textured stem. Once sewn, press the seam open to reduce bulk.
For the leaf, take your 2½ x 5½” rectangle. This can be folded in half lengthwise, right sides together, and then shaped. You can draw a leaf shape on the wrong side of the fabric before sewing, or simply sew a curved edge, leaving an opening for turning. Sew around the edges, leaving a small gap, then clip the curves, turn it right side out, and press. The goal is to create a soft, appealing leaf shape. Again, press the seam open nicely to give it a neat finish.
Bringing It All Together: Attaching the Elements
With your stem and leaf pieces ready, it’s time to assemble them. Sew the stem and the leaf together at their bases. This can be done by overlapping them slightly and stitching them securely. Once they are joined, lay this combined stem and leaf strip onto the top edge of your main pumpkin body panel, ensuring the stem and leaf are facing inward (towards the center of the pumpkin). Pin them securely in place. Now, sew them to the top edge of the pumpkin body, using a ¼-inch seam allowance. Make sure to catch all layers. After sewing, carefully press this seam open or towards the body of the pumpkin. This completes the basic structure of your DIY quilted pumpkin!
Transforming Your Pumpkin: Pillow or Placemat?
This is where your creative vision truly comes into play! The finished pumpkin panel can be transformed into two distinct and equally charming items: a cozy pillow or a practical placemat. Both options offer a fantastic way to incorporate your homemade pumpkin into your home decor.
Making a Cozy Pumpkin Pillow
If you’ve decided on a pumpkin pillow, you’ll need your backing fabric, batting, and Poly-fil stuffing. Start by layering your fabrics: place the backing fabric right side down, then lay a piece of batting on top of it, and finally, place your completed pumpkin panel right side up on the batting. Pin all three layers together securely. Quilt the layers together if desired, by stitching along some of the seam lines or creating a simple grid pattern to add texture and stability. Once quilted, place another piece of backing fabric on top of your pumpkin panel, right sides together. Stitch all around the outer edge of the pumpkin shape, leaving a 4-5 inch opening along one straight edge (usually the bottom) for turning and stuffing. Trim the excess fabric, clip the curves to ensure a smooth turn, and then carefully turn your pumpkin pillow right side out through the opening. Gently push out all seams and corners. Now, begin stuffing your pumpkin with Poly-fil. Take small handfuls and distribute the stuffing evenly, ensuring the pumpkin is plump and firm without being overstuffed. Once you’re happy with the fullness, hand-stitch the opening closed using a ladder stitch for an invisible finish. You’ve now created a beautiful, soft pumpkin pillow!
Creating a Charming Pumpkin Placemat
For a pumpkin placemat, the process is similar to the initial pillow steps but with a different finishing touch. Layer your fabrics: backing fabric (right side down), batting, and your pumpkin panel (right side up). Pin these layers together. You can quilt these layers together by stitching along the seam lines of your pumpkin strips or adding some decorative quilting stitches. This not only secures the layers but also adds to the placemat’s durability and visual appeal. Once quilted, you have a few options for finishing the edges. You can trim the edges evenly and then bind them with a coordinating fabric binding strip, which gives a very professional and durable finish. Alternatively, you could place another piece of backing fabric right sides together with your quilted pumpkin panel, stitch around the edges, leaving an opening, clip curves, turn it right side out, press, and then topstitch close to the edge all around, also closing the opening in the process. This creates a reversible placemat. Whichever method you choose, your homemade pumpkin placemat will be a delightful and festive addition to your dining table.
Tips for Success and Customization
- Seam Allowance: A consistent ¼-inch seam allowance is key to ensuring your pieces fit together perfectly. Use a quilting foot or mark your machine bed with tape as a guide.
- Pressing Matters: Always press your seams after each step. This makes a huge difference in the neatness and overall quality of your finished project.
- Fabric Selection: Don’t be afraid to experiment with different fabric textures and prints! Cottons are easiest for beginners, but linen blends or even flannel could create unique effects.
- Embellishments: Consider adding small details to personalize your pumpkin. A little embroidery on the leaf, decorative buttons, or even fabric paint could add extra charm.
- Sizes: Adjust the initial strip dimensions to create pumpkins of various sizes. Smaller strips for mini pumpkins, larger for a grand statement piece!
- Gifting: These handmade fabric pumpkins make wonderful gifts for friends and family, perfect for housewarmings or as holiday presents.
Share Your Creation!
We hope you enjoyed this journey into creating your very own fabric pumpkin! This sewing tutorial for beginners is designed to be straightforward and rewarding, helping you add a touch of handmade warmth to your home or create thoughtful gifts. Remember, the beauty of DIY is in the unique touches you bring to it. Don’t hesitate to experiment with different fabrics, colors, and finishes to truly make this project your own.
We’d love to see your finished autumn home decor creations! Share them online using relevant hashtags like #FabricPumpkin #DIYPumpkin #SewingProject. And a huge thank you to The Sewing Room Channel via YouTube for this brilliant pattern and for all the inspiring images used here. Their channel is a treasure trove of creative sewing ideas. Be sure to give their channel a visit and subscribe for more amazing tutorials!
Watch the Full Video Tutorial
For a detailed visual guide and additional tips, watch the complete “Easy Pumpkin Pattern Sewing Tutorial” by The Sewing Room Channel.