
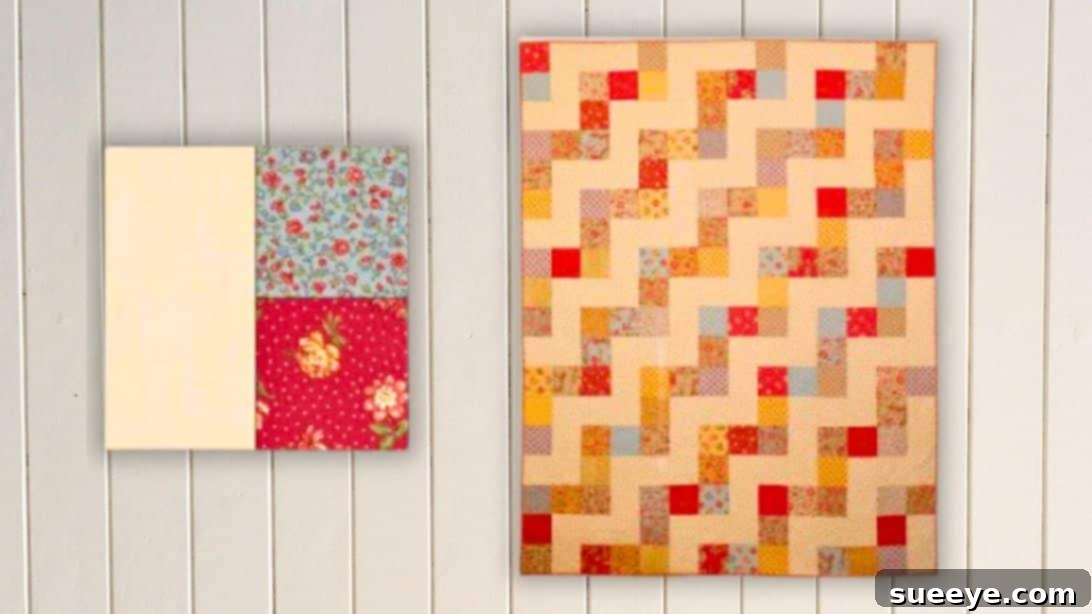
Embark on a delightful quilting journey with this incredibly quick and easy layer cake or jolly bar quilt pattern. Its charming diagonal zigzag design adds a touch of modern elegance to any space, making it one of the most adorable projects you’ll create. The vibrant colors and dynamic pattern, beautifully showcased by quilting expert Carol Thelen, instantly catch the eye. This popular design originated from the renowned Fat Quarter Shop, and you can conveniently find the free PDF pattern on their website, ensuring you have all the resources you need to get started.
RELATED: 7 Beginner Sewing Mistakes To Avoid
True to its name, this versatile quilt pattern is perfectly suited for precut fabric bundles such as layer cakes (10-inch squares) or jolly bars (5-inch x 10-inch rectangles), simplifying the fabric cutting process and allowing you to jump straight into sewing. The beauty of this pattern lies in its simplicity, utilizing just one foundational unit known as the “no-bake block.” This block is designed for ease and speed, making it an ideal choice for quilters of all skill levels, especially beginners. The steps are straightforward and easy to follow, minimizing potential frustrations. The primary focus for success will be paying close attention to the orientation of your blocks during assembly, ensuring that each piece is placed correctly to form the stunning zigzag motif. With a little care and precision, even novice sewers can achieve professional-looking results.
For those looking to expand their quilting repertoire with more beginner-friendly projects, explore these fantastic tutorials: Box Spring Quilt Tutorial, ZigZag Quilt Tutorial, and the Honey Do Quilt Tutorial for Beginners. Each offers unique designs and straightforward instructions to help you build your quilting confidence.
Essential Materials for Your Easy Jolly Bar Quilt
Gathering your materials before you begin is crucial for a smooth and enjoyable quilting process. This project is designed to be accessible, primarily using precut fabrics to save you time and effort. Here’s what you’ll need to create your beautiful diagonal zigzag quilt:
- Fabric A: 64 pieces of 5″ x 10″ rectangles. These will form the main patterned elements of your quilt. If you’re using a jolly bar pack, you’ll find these dimensions readily available. For layer cakes, you might need to cut your 10″ squares in half.
- Solid Fabric (Fabric B): 2 1/2 yards of a complementary solid color. This fabric will provide a striking contrast and help highlight the zigzag design, often referred to as the background fabric. Choose a color that enhances your Fabric A prints.
- Binding Fabric: 3/4 yard. This fabric will be used to create the finished edge of your quilt, giving it a polished and durable border. Select a color that ties all your fabrics together or offers a bold accent.
- Backing Fabric: 5 1/8 yards. The backing fabric is the bottom layer of your quilt sandwich. While it won’t be seen from the front, it plays a vital role in the overall feel and warmth of your quilt. Choose a comfortable fabric, perhaps a soft flannel or a coordinating print.
- Batting: Approximately 60″ x 70″ (for a throw-sized quilt). While not listed in the original materials, batting is essential for any quilt as it provides warmth, loft, and helps to define the quilting stitches.
- Basic Quilting Tools: Rotary cutter, self-healing mat, quilting ruler (6″ x 24″ is versatile), sewing machine, thread, iron, ironing board, and fabric scissors. These tools will ensure precise cuts and accurate seams, leading to a professional finish.
Step-by-Step Guide: Crafting Your Jolly Bar Quilt
Follow these detailed instructions to construct your stunning diagonal zigzag quilt. Precision in cutting and sewing will ensure your blocks align perfectly, creating a captivating design.
Step 1: Preparing Your Fabrics
Begin by meticulously cutting your fabrics. From your solid Fabric B, cut 32 pieces, each measuring 9 1/2″ x 10″. These rectangles will form the foundational elements against which your patterned fabrics will pop. Next, prepare your binding fabric by cutting it into 8 strips, each 2 1/2″ wide and the full width of the fabric (WOF). This typically means around 42-44 inches in length. Accurate cutting in this initial stage is paramount for achieving precise blocks and a professional-looking finish for your quilt.
Step 2: Constructing the Fabric A Units
Take two individual pieces of your 5″ x 10″ Fabric A rectangles. Align them with right sides together, ensuring all edges are perfectly matched. Using your sewing machine, sew along one of the long 10-inch sides with a consistent 1/4″ seam allowance. This creates a longer strip of pieced fabric. After sewing, carefully press the seam open or to one side – whichever method you prefer for reducing bulk. Repeat this process until you have created 32 of these pieced Fabric A units. This step combines your patterned fabrics, laying the groundwork for the dynamic visual effect.
Step 3: Integrating Fabric B with Your Units
Now, take one of your pieced Fabric A units from Step 2. Select one of your 9 1/2″ x 10″ Fabric B rectangles. Place the Fabric B rectangle on top of your pieced Fabric A unit, ensuring their right sides are together. Align the 10-inch edges carefully. Sew along both the top and bottom 10-inch sides with a precise 1/4″ seam allowance. It’s crucial that your stitching runs across both the Fabric A unit and the Fabric B rectangle, securing them together. Accuracy here is key to the structural integrity of your block. Repeat this for all 32 units, resulting in 32 layered pieces ready for the next stage.
Step 4: Creating the “No-Bake” Blocks
With your layered unit (Fabric A pieced with Fabric B) now sewn, the next step transforms it into the iconic “no-bake” block. Carefully position your layered unit on your cutting mat. Using your rotary cutter and quilting ruler, cut the unit in half across its width. This means you will be cutting along the 9 1/2-inch dimension, resulting in two perfectly square blocks. Each of these new blocks should accurately measure 9 1/2″ x 9 1/2″. This precise cut creates the unique angle that forms the zigzag pattern. From your 32 layered units, you will yield a total of 64 individual 9 1/2″ x 9 1/2″ “no-bake” blocks. Double-check your measurements to ensure consistency across all blocks.
Step 5: Assembling Quilt Rows – Type 1
Now, let’s start bringing the quilt top to life. Gather seven of your newly created 9 1/2″ x 9 1/2″ blocks. Referring to the provided photo below for visual guidance, arrange these seven blocks in a row. Pay very close attention to the orientation of each block to ensure the diagonal zigzag pattern continues seamlessly. Once you are satisfied with the arrangement, sew these seven blocks together, one by one, using a 1/4″ seam allowance. Press your seams consistently, either open or to one side, to reduce bulk. You will need to create a total of 5 rows of this specific type. Laying them out beforehand on a design wall or floor can help visualize the pattern and prevent mistakes.
Step 6: Assembling Quilt Rows – Type 2
For the second type of quilt row, gather another set of seven 9 1/2″ x 9 1/2″ blocks. Just like in the previous step, carefully arrange them side by side, paying meticulous attention to their orientation. This row type will have a slightly different diagonal alignment compared to the first, creating the alternating effect that defines the zigzag. Consult the second photo below to guide your block placement. Once satisfied, sew these seven blocks together with a 1/4″ seam allowance, and press your seams. You will need to make 4 rows of this type. Visualizing both row types side-by-side (before sewing them into a full quilt) can help confirm the desired pattern is forming correctly.
Step 7: Final Quilt Top Assembly
With all your rows prepared, it’s time to assemble the full quilt top. Lay out your 5 rows of Type 1 and 4 rows of Type 2 on a large flat surface or a design wall. Carefully alternate the two row types, ensuring that the zigzag pattern flows continuously and correctly across the entire quilt. This step is where the magic happens, as your individual blocks come together to form the cohesive design. Once you are confident in your arrangement, begin sewing the rows together, matching seam intersections as precisely as possible (“nesting” seams can help with this). Use your consistent 1/4″ seam allowance. Press all final seams open or to one side to ensure the quilt top lays flat. Congratulations, your beautiful and vibrant quilt top is now complete!
After your quilt top is assembled, the next steps involve creating the “quilt sandwich” – layering your quilt top, batting, and backing fabric. Secure these layers together, then proceed with quilting, which involves stitching through all three layers to hold them in place and add texture. Finally, attach the binding strips prepared in Step 1 around the edges of your quilt, either by hand or machine, to give it a neat, durable, and professional finish. This easy layer cake or jolly bar quilt truly makes for a charming addition to any home or a heartfelt handmade gift.
This quick and easy layer cake jolly bar quilt, featuring its distinctive diagonal zigzag pattern, is not only a joy to construct but also results in an absolutely adorable finished piece. Its beginner-friendly nature and stunning visual appeal make it a perfect project for anyone looking to create something beautiful without extensive experience. Enjoy the process of bringing this charming design to life!