
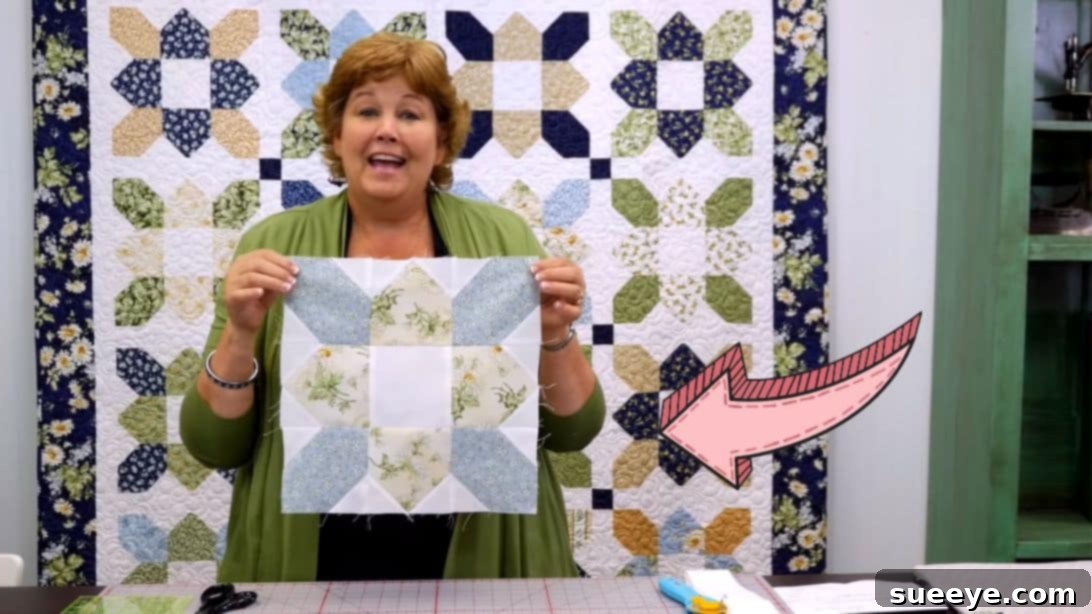
There’s an undeniable joy that comes with seeing fabric transform into a work of art, and sewing flowers into a quilt is truly a mood-lifter! The Prairie Flower Quilt, popularized by the renowned Missouri Star Quilt Company, is a timeless pattern that every quilter will want to add to their repertoire. Despite its intricate appearance, this design is surprisingly simple to achieve, making it perfect for both novice quilters and seasoned enthusiasts looking for a delightful project. With clear, step-by-step instructions, you’ll discover how effortlessly these charming floral blocks come together, culminating in a breathtaking quilt top. Prepare your sewing machine and your favorite fabrics; we’re about to embark on a creative journey to craft a stunning Prairie Flower Quilt that will bring warmth and beauty to any home.
Materials You’ll Need for Your Prairie Flower Quilt
Gathering your materials is the first exciting step in any quilting adventure. For this Prairie Flower Quilt, we’ve carefully selected components that ensure a beautiful outcome while keeping the process enjoyable. Here’s a detailed list of what you’ll need to create your approximately 60″ x 70″ throw quilt:
- 1 Pack (42 pieces) of 10″ Fabric Squares: Often referred to as “layer cakes,” these pre-cut squares are a fantastic time-saver, offering a curated collection of coordinating fabrics. Choose a pack with a variety of prints and colors that appeal to you, ensuring some have good contrast for your floral designs.
- 3 1/4 Yards Background Fabric: This fabric will provide the canvas for your flowers to bloom. A solid or tone-on-tone light fabric is typically chosen to make your colorful prints pop. From this yardage, you will need to:
- Cut 22 pieces of 2 1/2″ strips, then further cut these into 2 1/2″ squares. These small squares will be used to create the crisp corners and petals of your flowers, adding definition to each block.
- Cut 5″ strips, then cut these into 5″ squares to make approximately 20 pieces. These larger background squares will form the foundation of some of your block components and help separate the busy prints.
- 1/4 Yard Cornerstone Fabric: Cornerstones are small squares that add definition and a touch of elegance at the intersections of your sashing strips. Choose a color that complements your main fabrics and provides a subtle accent, enhancing the overall visual flow of the quilt.
- 1 1/2 Yards Border Fabric: The border frames your quilt top, giving it a polished and finished look. Select a fabric that ties all your block colors together or introduces a new, complementary shade to enhance the overall design and draw the eye inward.
- 3/4 Yards Binding Fabric: The binding is the final edge of your quilt, encasing all the raw edges and protecting the layers. It’s often chosen to match or contrast slightly with the border, adding a professional touch and durability to your handmade masterpiece.
- Basic Quilting Supplies: While not listed above, ensure you have essential tools such as a sharp rotary cutter, a large self-healing cutting mat, quilting rulers (various sizes are helpful), a sewing machine in good working order, good quality thread, fabric scissors, an ample supply of pins or wonder clips, and an iron with an ironing board.
Essential Quilting Tips for Success
Before we dive into the step-by-step instructions, here are some fundamental quilting tips that will help ensure precision and enjoyment throughout your Prairie Flower Quilt project. Adhering to these best practices will elevate the quality of your finished quilt and make the entire process more rewarding.
- Accurate Cutting is Key: In quilting, the adage “measure twice, cut once” is paramount. Use a sharp rotary cutter and a reliable quilting ruler on a self-healing mat. Even a slight variation in cutting (a tiny bit off a quarter-inch) can accumulate errors and lead to misaligned seams and puckers later on. Take your time and be precise.
- Consistent Seam Allowance: A standard 1/4-inch seam allowance is crucial for quilting. Practice sewing a consistent 1/4-inch seam by using a 1/4-inch foot on your sewing machine or by marking a guide line with tape. This consistency ensures your blocks will be the correct size when assembled and your points will match beautifully.
- Pressing Matters, Don’t Iron: Pressing is not ironing. When you iron, you move the iron back and forth, which can stretch and distort your fabric, especially on the bias. Pressing involves lifting and placing the iron down firmly, holding it in place, then lifting it again. For seams, you’ll generally press them towards the darker fabric to prevent shadowing on lighter prints, or press them open for less bulk, depending on the pattern’s requirements. Always press after each step to ensure flat, accurate blocks.
- Quality Thread: Use good quality 100% cotton thread that matches your fabric or is a neutral color like grey or off-white. This helps prevent lint buildup in your machine, reduces thread breakage, and ensures strong, durable seams that will stand the test of time.
- Stay Organized: As you cut and create different components, especially when working with many identical pieces, keep them organized. Labeling small bags or trays for each type of unit can prevent confusion and speed up the assembly process.
- Take Breaks: Quilting should be enjoyable! If you find yourself getting frustrated or tired, step away for a bit. A fresh perspective can often resolve issues and prevent mistakes.
Step-by-Step Prairie Flower Quilt Instructions
Step 1: Preparing Your Fabric Pairs and Initial Cutting
To begin creating your beautiful Prairie Flower Quilt blocks, you’ll first prepare your main fabric pieces. From your generous pack of 10″ fabric squares (layer cakes), select two squares that offer a lovely contrast in color and/or pattern. The interplay of these chosen fabrics is what will give your flowers their unique depth and visual vibrancy. Place these two chosen squares neatly on top of each other, aligning all edges perfectly. This careful alignment is essential for accurate cutting. Using your sharp rotary cutter and a reliable quilting ruler, carefully cut both stacked squares simultaneously. You will cut them into four equal 5″ squares. This method ensures that your paired pieces are identical in size, which is critical for consistent block construction. Repeat this pairing and cutting process until you have enough 5″ print squares to create 20 flower blocks. Remember, each flower block will ultimately require a combination of two different 5″ print squares to form its distinct floral motif.
Step 2: Preparing Background Corner Squares for Precision
Now, let’s prepare the background fabric pieces that will form the crisp corners and “petals” of your prairie flowers. Take your stack of 2 1/2″ background squares. For each individual square, carefully fold it in half diagonally, ensuring that the corners meet precisely and the raw edges align. Once folded, press firmly and carefully with a hot iron to create a sharp, clear crease down the diagonal. This crease is vital; it will serve as your exact sewing guide in the subsequent steps, making it incredibly easy to achieve accurate diagonal seams without having to draw lines. Repeat this precise folding and pressing process for all your 2 1/2″ background squares, ensuring each one has a well-defined diagonal crease.
Step 3: Crafting the Initial Corner Units for Flower Definition
This step brings your background fabric together with your main prints to start forming the flower shape. Select one of your 5″ print squares—this will serve as the central component for your corner unit. Take two of the pressed 2 1/2″ background squares that you prepared in Step 2. Place one background square on each of two opposite corners of your 5″ print square. It’s important to align the raw edges of the background square with the raw edges of the print square, ensuring that the diagonal crease runs from the outer corner towards the center of the print square. Sew precisely along the diagonal crease line you created. After sewing, carefully trim the excess fabric, leaving a 1/4-inch seam allowance just outside the sewn line. This reduces bulk and allows for a flatter block. Carefully press the background fabric open, revealing a crisp, new corner. Repeat this process on the opposite corner of the same 5″ print square. Once both corners are sewn and pressed, you will have a 5″ square with two contrasting background corners. You will need a total of 40 of these corner units for your quilt, which means you’ll process 40 of your 5″ print squares in this manner.
Step 4: Forming the Petal Square Units for Floral Effect
Next, we will create the “petal” components that give the Prairie Flower its distinctive look. Take another one of your 5″ print squares. This can be a different print for more variety or the matching print if you prefer a more cohesive flower design. Select two more of your pressed 2 1/2″ background squares. Place one background square on each of the *remaining two* (the other opposite corners) of your 5″ print square. Again, align the raw edges meticulously and ensure the diagonal crease runs correctly. Sew directly on the diagonal crease line. After stitching, trim the excess fabric, leaving a 1/4-inch seam allowance just outside your sewn line, similar to Step 3. Press the background fabric open, creating neat, crisp “petals” that will define the flower’s edges. Repeat this for the second corner on the same 5″ print square. Once completed, you will have a 5″ square with background fabric forming two opposite “petals” on its corners. You will need 40 of these petal units to complete your flower blocks, ensuring you have enough for all 20 of your main quilt blocks.
Step 5: Arranging Your Flower Block Components into the Design
With your corner units (from Step 3) and petal units (from Step 4) meticulously prepared, it’s time to arrange them into the distinctive Prairie Flower pattern. For each complete flower block, you will need two corner units and two petal units. Lay out your four units on a flat surface, such as your design wall, floor, or a large table, arranging them into a 2×2 grid. Visually, the corner units should be placed in opposite positions (for example, the top-left and bottom-right positions), and the petal units will fill the other opposite positions (top-right and bottom-left). The key is to carefully orient each unit so that when they are sewn together, they form a clear and appealing floral design, with the background fabric creating a swirling or petal-like effect around the central print sections. Take your time to experiment with the orientation of each piece until you achieve the desired flower shape and visual balance. This step is crucial for visualizing the final block before you commit to stitching, allowing you to make any adjustments for fabric placement or color flow.
Step 6: Sewing the Rows of Each Flower Block for Assembly
Once you are completely satisfied with the arrangement of your four units for a single flower block, it’s time to sew them together. Working with one block at a time, first sew the two units of the top row together, using a consistent 1/4-inch seam allowance. Precision here is paramount for ensuring your block squares up correctly. Then, sew the two units of the bottom row together, again maintaining that precise 1/4-inch seam. After sewing each row, carefully press the seams. For the top row, it is often beneficial to press the seam towards the right unit. For the bottom row, press the seam towards the left unit. This opposing pressing technique is vital as it helps to “nest” the seams when you join the two rows, reducing bulk and allowing for better alignment and perfectly matching points. This meticulous pressing helps ensure your finished blocks lie perfectly flat.
Step 7: Completing the Prairie Flower Blocks and Checking Size
With both rows sewn and meticulously pressed, it’s time to bring them together to complete your individual flower block. Place the top row and the bottom row right sides together, carefully aligning the center seam where the two units meet. You can “nest” the seams (where the seams from the top row and bottom row butt up against each other) for perfect alignment. Pin generously at the seam intersections to prevent any shifting as you sew. Sew the two rows together with a consistent 1/4-inch seam allowance. Once sewn, press the entire block flat. You have the option to press the seam open to further reduce bulk, or press it to one side, usually towards the darker fabric to prevent any shadow-through. Flip the block over and ensure all seams lay perfectly flat. Each finished Prairie Flower block should measure approximately 9 1/2″ square. You will need a total of 20 of these beautiful blocks for your quilt top, so diligently repeat Steps 1-7 until you have all your blocks ready for the final assembly.
Step 8: Assembling the Quilt Top with Sashing and Cornerstones
Now that you have all 20 of your beautiful Prairie Flower blocks meticulously crafted, it’s time for the exciting stage of assembling the main quilt top. For this particular layout, you will arrange your blocks into 5 rows, with 4 blocks per row. Between each block within a row, you’ll insert sashing strips. Sashing strips are long strips of fabric (typically cut from your background fabric or a coordinating solid that complements your blocks) that serve to separate your blocks, providing visual breathing room and a cohesive structural element. Additionally, you will cut sashing strips to go horizontally between each row of blocks. At the intersections of these horizontal and vertical sashing strips, you’ll place your cornerstone squares, which add a delightful detail and a touch of professional finish to the overall design. Lay out your entire quilt top on a design wall or a large flat surface to ensure you like the arrangement and color flow before you begin sewing. First, sew your blocks and vertical sashing strips together to form individual horizontal rows. Then, assemble your horizontal sashing rows, which include the cornerstone squares. Finally, join these horizontal block rows and sashing rows together, alternating them, to complete your intricate and beautiful quilt top. You will make a total of 5 such main rows for the entire quilt top.
Step 9: Layering and Basting Your Quilt for Quilting
After your intricate quilt top is complete, the next crucial step is to prepare it for the actual quilting process. This involves creating the “quilt sandwich,” which consists of three essential layers. First, you will need your carefully pieced quilt top. Second, a layer of batting (the soft inner filling that gives your quilt its warmth, loft, and dimension). Third, a backing fabric, which can be a single large piece of fabric or artfully pieced together from smaller cuts to match the size of your quilt. Begin by laying your backing fabric right side down on a clean, large, and flat surface (such as a large table or a clean floor), smoothing out all wrinkles. Tape it down if needed to keep it taut and wrinkle-free. Next, center your batting evenly over the backing fabric, again smoothing it out completely. Finally, place your quilt top right side up on top of the batting, carefully centering it and ensuring all three layers are smooth and free of any wrinkles, puckers, or folds. Then, you’ll baste these layers together to prevent any shifting, puckering, or bunching during the quilting process. Common basting methods include pin basting (using safety pins every 4-6 inches across the quilt, starting from the center and working outwards), spray basting (using a temporary fabric adhesive specially designed for quilting), or hand basting (with large, long stitches). Choose the method that you are most comfortable with and that best suits your quilt size and personal preference.
Step 10: Quilting Your Prairie Flower Masterpiece for Durability and Texture
This is where your quilt truly comes to life, as the quilting process transforms your three layers into a cohesive and durable textile! Quilting involves stitching through all three layers (quilt top, batting, and backing) to securely hold them together and to add beautiful texture and design. You have the freedom to choose between machine quilting or hand quilting, depending on your skill level and desired aesthetic. For machine quilting, consider simple straight lines that echo the lines of your sashing, or “stitch-in-the-ditch” which means sewing precisely along the seam lines of your blocks. If you’re feeling more adventurous and have experience, free-motion quilting can add intricate patterns. For a first quilt, simple straight lines, diagonal grids, or a basic meandering stitch can be very effective, manageable, and create a lovely texture without being overly complicated. If you prefer the meditative process of hand quilting, a simple running stitch along the outlines of your flower petals or around your block divisions would be charming and add a timeless quality. Take your time with this step; the quilting adds not only aesthetic appeal but also ensures the longevity and integrity of your finished project.
Step 11: Squaring Up and Binding Your Quilt for a Professional Finish
Once the quilting is meticulously complete, the final steps bring your quilt to a professional and enduring finish. First, you must “square up” your quilt. Lay it flat on your cutting mat and use your large quilting ruler and sharp rotary cutter to carefully trim all four edges. The goal is to make sure they are perfectly straight and at precise 90-degree angles. This removes any excess batting or backing and ensures a neat, even edge for your binding. Next, prepare your binding strips. Typically, you would cut 2 1/2″ wide strips from your chosen binding fabric. Join these strips end-to-end with diagonal seams to create one continuous, long strip. Press this strip in half lengthwise, wrong sides together, to create a neat folded edge. Attach this prepared binding strip to the front edge of your quilt, aligning raw edges, and sewing with a consistent 1/4-inch seam allowance. After machine-sewing it to the front, wrap the binding neatly around to the back of the quilt. You can then either hand-stitch it down for an invisible, elegant finish or machine-stitch it from the front for a quicker, durable, and more modern edge. Pay special attention to neatly mitered corners for a truly polished and professional look on your finished Prairie Flower Quilt.
Your Beautiful Prairie Flower Quilt: A Timeless Treasure
Congratulations! You’ve successfully navigated the steps and completed your stunning Prairie Flower Quilt. From carefully selecting your fabrics and patiently piecing intricate blocks, to basting, quilting, and finally, adding the perfect binding, each step has contributed to creating a truly unique and heartwarming textile art piece. The Prairie Flower pattern, with its delightful blend of traditional charm and approachable construction, is a testament to the enduring beauty and satisfaction of handmade quilts. This project is more than just a collection of fabric squares and stitches; it’s a testament to your creativity, patience, and growing skill as a quilter. Display your quilt with pride in your home, gift it to a cherished loved one as a symbol of your affection, or simply cozy up under its warmth on a quiet evening. It’s a handmade treasure that will be admired and cherished for many years to come, potentially becoming a beloved family heirloom. We hope this detailed tutorial, inspired by the wonderful educators at Missouri Star Quilt Company, has not only guided you to success with this project but has also empowered you to embrace the profound joy of quilting and perhaps inspired you to explore even more beautiful patterns in the future. Happy quilting, and may your creative journey continue to bloom!