
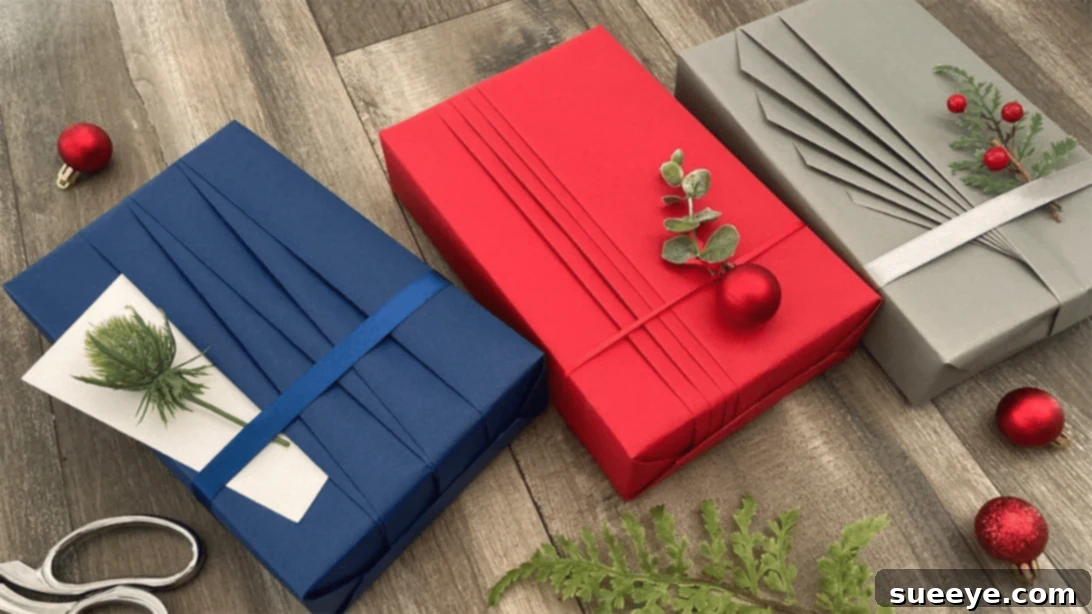
Transforming a simple gift into a memorable present often starts with its presentation. While the gift itself is certainly important, the way it’s wrapped can significantly enhance its perceived value and the excitement of the recipient. If you’re looking to add an extra touch of sophistication and charm to your gifts this holiday season, or for any special occasion, mastering the art of pleated gift wrapping is an excellent choice. This elegant technique, as demonstrated in a fantastic video tutorial by Gift Wrapping Love on YouTube, offers a quick and surprisingly easy way to create beautifully textured wraps using any standard wrapping paper.
The beauty of pleated gift wrapping lies in its ability to elevate even the most basic paper into a luxurious package. It’s a favorite among gift-givers for its neat, polished, and inherently fancy appearance. Imagine a plain, solid-colored wrapping paper suddenly gaining depth and visual interest through neatly folded pleats – it’s a game-changer! What makes this method even more appealing is its simplicity. The instructions are incredibly straightforward, ensuring that anyone, regardless of their gift-wrapping experience, can achieve stunning results on their very first attempt. Get ready to impress your loved ones with gifts that look professionally wrapped, showcasing your attention to detail and personal touch.
RELATED: Easy & Genius Life-Changing Gift Wrapping Hacks
Why Choose Pleated Gift Wrapping? The Benefits of Elegance and Simplicity
Beyond its aesthetic appeal, pleated gift wrapping offers several compelling advantages. Firstly, it adds a tactile dimension to your gift, inviting the recipient to appreciate the intricate folds before even tearing into the paper. This layered texture instantly signals thoughtfulness and care. Secondly, it’s incredibly versatile. Whether you opt for a vibrant patterned paper, a subtle matte finish, or a rustic kraft paper, the pleats introduce an element of sophistication that enhances the chosen design. You don’t need expensive, specialty papers to create a high-end look; the technique itself is the star.
Another significant benefit is the customization it allows. You can experiment with the width and number of your pleats to create different visual effects, adapting the style to suit the occasion or the personality of the recipient. A few wide, bold pleats might be perfect for a modern, minimalist look, while narrower, more numerous pleats could lend themselves to a delicate, traditional aesthetic. Furthermore, this method helps to conceal any minor imperfections in the wrapping paper or the gift box itself, as the folds naturally create a more forgiving surface. It’s a technique that truly transforms the act of giving into an art form, making every present feel like a bespoke creation.
Essential Materials for Your Pleated Masterpiece:
Gathering the right tools beforehand will make your pleated gift wrapping experience smooth and enjoyable. You likely already have most of these items around your home, making this an accessible DIY project for anyone:
- Wrapping paper: Choose any paper you like! The magic of pleats works with patterns, solids, thin, or slightly thicker papers.
- Pencil: Essential for precise measurements and marking your folds before creasing.
- Ruler: A must-have for accurate measurements, ensuring your pleats are uniform and neat.
- Scissors: Sharp scissors are crucial for clean, straight cuts, which are the foundation of professional-looking pleats.
- Clear tape: Use this for securing initial folds and the main wrap, ensuring a discreet finish.
- Double-sided tape: This is the secret weapon for a seamless, invisible finish, particularly for the final folds, giving your gift a polished look without visible tape lines.
Step-by-Step Guide: How to Wrap Gifts with Elegant Pleats
Follow these detailed steps to achieve a flawless pleated gift wrap. Precision in measuring and folding is key to creating a truly beautiful finish.
Step 1: Prepare Your Wrapping Paper with Precision
The foundation of beautiful pleated wrapping begins with accurate paper preparation. First, lay your gift box in the center of your chosen wrapping paper. Using your pencil and ruler, carefully measure and cut the wrapping paper to the correct size. The paper should be rectangular. For the width, ensure it’s sufficient to comfortably cover the height of your box, with an extra 1-2 inches on each side for a clean overlap. For the length, the paper needs to be long enough to wrap entirely around the box, plus an additional 3-4 inches (7.5-10 cm) for the pleats and an overlap. A general rule of thumb is that the length should be approximately 2.5 times the longest side of your box.
Once your paper is cut, lay it face down. Now, let’s create the base for your pleats. On one of the shorter edges of the paper, make a narrow fold, about 0.5 to 1 inch (1.25 to 2.5 cm) wide, and crease it sharply. This initial fold will provide a clean edge for your pleats. Next, from this narrow fold, begin creating your wider pleat folds. The width of these folds will determine the overall look of your pleated design. For a more subtle effect, keep them around 1.5 to 2 inches (3.75 to 5 cm) wide. For a bolder statement, you can go wider, up to 3-4 inches (7.5-10 cm). Continue making parallel folds, alternating between folding forward and backward like an accordion. Aim for at least three to five pleats, depending on your paper width and desired design. Once your folds are made, flip the paper over so the pleated side is now face up.
Step 2: Form the Pleats and Position Your Gift Box
With your paper folded, it’s time to solidify those pleats. Carefully gather the folds you’ve just made, gently pressing them together to create defined pleats. To secure these pleats in place, turn the paper over again (pleated side down). Apply small pieces of clear tape strategically along the back of the pleats. This will prevent them from unraveling while you wrap, ensuring they maintain their crisp, elegant appearance throughout the process. Make sure the tape is placed where it won’t be visible from the front of the wrapped gift.
Now, place your gift box precisely at the center of your prepared wrapping paper. The pleated section should be positioned so it will gracefully cover one of the longer sides of the box. Carefully bring the pleated side of the paper up and over the box, ensuring the pleats remain intact and lie flat against the surface. Gently crease the edges of the paper along the sides of the box to define the shape. Next, lift the pleated flap slightly. Take the opposite, unpleated side of the wrapping paper, bring it over the box, and secure it with a piece of clear tape, making sure it’s snug. Finally, lay the pleated side over this secured flap, aligning it perfectly to create a clean seam. The goal is to have the pleated section as the prominent, visible part of your wrapping.
Step 3: Secure the Ends and Add Finishing Touches
With the main body of the box wrapped, it’s time to tackle the ends. Focus on one of the short sides of the box. Begin by folding down the top edge of the wrapping paper neatly. Crease it sharply and secure it with a piece of clear tape. Next, carefully fold in the side corners of the paper, creating two neat triangular flaps on the left and right. Press these folds down firmly and secure them with tape, ensuring the corners are crisp and taut against the box. Finally, take the bottom flap of paper. For a truly professional and seamless finish, apply strips of double-sided tape along the edge of this flap. Then, fold it up securely against the side of the box, pressing firmly to ensure the double-sided tape adheres the paper in place without any visible tape lines.
Repeat this entire process for the other short side of the gift box, meticulously folding and taping the ends to match the first. Once both ends are perfectly sealed, take a moment to admire your beautifully pleated creation. This method results in a gift that looks store-bought, if not better! For an extra personal touch, consider inserting a small, heartfelt greeting card beneath one of the pleats or tucking it into the final fold. To truly complete the look, add any desired embellishments such as a satin ribbon, a sprig of evergreen, a decorative tag, or even a small ornament. The pleated texture itself is a decoration, so often, simple additions work best to complement its elegance.
Expert Tips for Achieving the Perfect Pleated Gift Wrap
To further refine your pleated gift wrapping skills and ensure every present looks impeccable, consider these additional tips:
- Practice Makes Perfect: If you’re new to pleating, try a practice run with a spare piece of paper and a box of similar size. This will help you get a feel for the folds and measurements without wasting your best wrapping paper.
- Choose Your Paper Wisely: While any paper works, thinner papers tend to crease more sharply and are easier to fold. Thicker papers can offer a more luxurious feel but might require a firmer hand for crisp pleats. Avoid overly stiff or laminated papers, as they can be challenging to pleat neatly.
- Ensure Consistent Pleat Width: The key to an elegant pleated design is uniformity. Use your ruler to ensure each pleat you create is the same width. Inconsistencies can make the wrap look messy.
- Use a Bone Folder: For exceptionally sharp creases, especially with thicker papers, a bone folder can be an invaluable tool. It helps to flatten and define your folds much better than just using your fingers.
- Secure Pleats Firmly: Don’t skimp on the tape when securing the pleats on the back. This ensures they stay in place and don’t lose their shape as you wrap the rest of the gift.
- Consider Your Embellishments: Since pleated wrapping is already quite decorative, opt for minimalist embellishments. A simple silk ribbon, a sprig of fresh greenery, or a single elegant tag can complement the pleats beautifully without overwhelming the design.
- Store Supplies Neatly: Keep your wrapping paper rolls, tapes, and tools organized. This makes the entire wrapping process much more efficient and enjoyable.
By following these steps and incorporating these tips, you’ll soon be a master of elegant pleated gift wrapping. The effort you put into the presentation will undoubtedly be appreciated, making your gifts stand out and creating an unforgettable unwrapping experience.
*All image credit belongs to Gift Wrapping Love via YouTube. Follow and subscribe to her channel for more amazing gift wrapping tutorials and inspiration!
Elevate Your Gifts with This Easy Pleated Gift-Wrapping Hack
In conclusion, the simple yet sophisticated technique of pleated gift wrapping is an accessible hack that can dramatically enhance the aesthetic of any present. It’s an easy-to-learn method that promises professional-looking results without requiring specialized skills or materials. Whether you’re preparing for a festive holiday, a birthday celebration, or any occasion that calls for a thoughtful gesture, this method ensures your gift makes a truly lasting impression. Say goodbye to plain, uninspired wraps and embrace the elegance and charm that pleated designs bring. Give it a try, and watch as your gifts become the highlight of any event!