
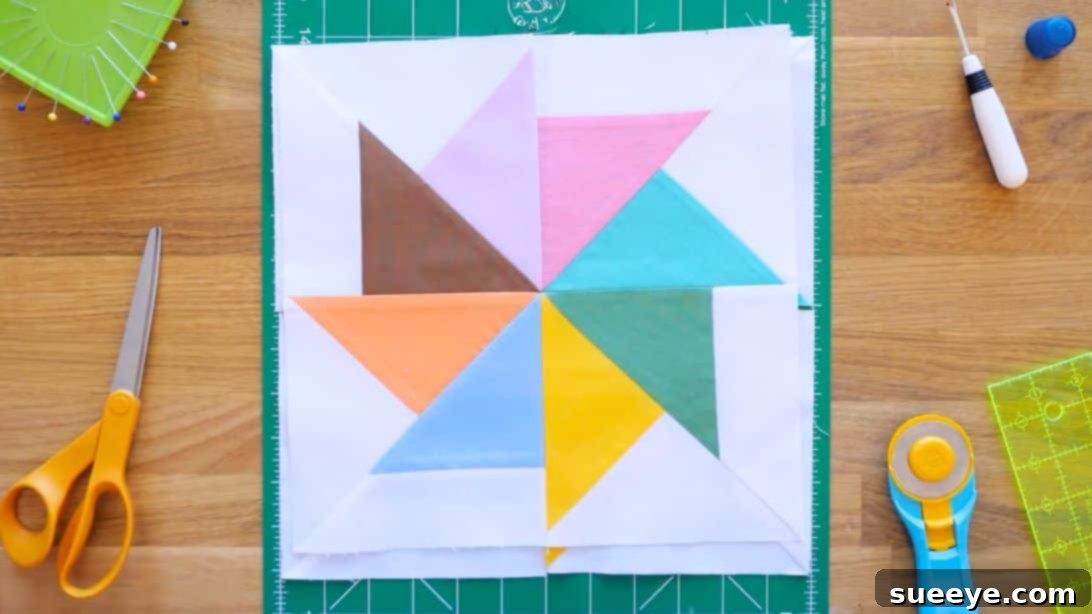
Do you adore the timeless charm of pinwheel quilt patterns? If so, prepare to fall in love with the Kindred Pinwheels Quilt – a delightful twist on a beloved classic! This easy-to-follow pattern, inspired by quilting masters like Missouri Star, offers a refreshing take on the traditional pinwheel design, making it a perfect addition to your crafting repertoire. Whether you’re a seasoned quilter or just starting your journey, this project promises a rewarding experience with stunning results.
The Kindred Pinwheels Quilt introduces a clever modification to the basic pinwheel block, elevating its visual appeal without complicating the process. While it still utilizes the fundamental half-square triangle (HST) technique, the addition of a rectangular strip gives each pinwheel a unique, almost three-dimensional depth. This innovative approach makes for an eye-catching quilt that looks far more intricate than it actually is to construct. Get ready to transform simple fabric squares into a dynamic and beautiful textile art piece!
Why Choose the Kindred Pinwheels Quilt Pattern?
The allure of pinwheel patterns lies in their captivating movement and optical illusion. The Kindred Pinwheels design takes this fascination a step further, offering a distinctive elegance that sets it apart. Here’s why this quilt project should be your next creative endeavor:
- Unique Aesthetic: Unlike standard pinwheels, the kindred variation incorporates a subtle asymmetry that adds visual interest and a modern touch. It’s a fantastic way to showcase your favorite fabrics and create a quilt that truly stands out.
- Beginner-Friendly Techniques: Despite its sophisticated appearance, this pattern relies on fundamental quilting skills, primarily cutting squares, creating HSTs, and straight-line sewing. The instructions are clear and concise, guiding you through each step with ease.
- Versatile Design: The Kindred Pinwheels block is incredibly versatile. You can create a simple baby quilt, a cozy throw, or even an elaborate bed-sized quilt by simply adjusting the number of blocks you make. Experiment with different color palettes to achieve various moods and styles, from vibrant and playful to serene and sophisticated.
- Scrap Busting Potential: This pattern is ideal for using up those beloved 5-inch fabric squares from charm packs or your stash of fabric scraps. It’s a wonderful way to give new life to smaller pieces of fabric you’ve been saving.
- Rewarding Project: There’s immense satisfaction in watching your fabric pieces transform into a cohesive and beautiful quilt. The Kindred Pinwheels Quilt offers a sense of accomplishment, yielding a finished product that’s both functional and decorative.
This tutorial will walk you through every step, from selecting your materials to assembling your final quilt blocks. Let’s gather your supplies and dive into the wonderful world of Kindred Pinwheels!
Essential Materials for Your Kindred Pinwheels Quilt
Gathering the right materials is the first step towards a successful quilting project. For the Kindred Pinwheels Quilt, you’ll need a few key items, many of which are standard quilting tools. Precision in cutting and sewing is crucial for stunning results, so ensure your tools are in good working order.
- Background Fabric: This fabric will provide contrast and allow your pinwheel blocks to truly pop. Choose a solid, a tone-on-tone, or a subtle print that complements your main print squares. The amount will depend on your desired quilt size, but starting with 1-2 yards is a good general recommendation for a small throw.
- 1 Pack of 5″ Print Squares (Charm Pack): Charm packs are perfect for this project, offering a curated collection of coordinating fabrics. Alternatively, you can cut your own 5-inch squares from your fabric stash. The number of squares needed will directly correlate to the size of your final quilt. For example, a single Kindred Pinwheels block requires two 5-inch print squares.
- 2.5″ x 7″ Background Strips: These strips are integral to creating the unique “kindred” effect. You’ll need one strip for each main Kindred Pinwheel block you plan to make. Consider cutting these from your chosen background fabric for consistency.
- Square Ruler with a 45-Degree Line: An essential tool for accurate trimming and squaring up your blocks. A 6.5-inch or 8.5-inch square ruler is highly recommended, as the 45-degree line will guide precise diagonal cuts and ensure your blocks are perfectly sized.
- Rotary Cutter and Mat: For precise and efficient fabric cutting. Ensure your rotary blade is sharp for clean edges.
- Sewing Machine: A reliable sewing machine with a 1/4″ foot is ideal for maintaining consistent seam allowances.
- Matching Thread: Choose a high-quality cotton thread that matches or blends with your fabrics.
- Iron and Ironing Mat: Crucial for pressing seams flat and accurately.
- Fabric Scissors: For trimming threads and other small cuts.
- Seam Ripper: Every quilter’s best friend – mistakes happen, and a good seam ripper makes them easy to fix.
Before you begin, it’s often a good practice to pre-wash and press your fabrics to prevent shrinkage and remove any sizing, ensuring your finished quilt remains beautiful for years to come. Now, let’s get into the step-by-step process of creating your Kindred Pinwheels Quilt!
How to Make the Kindred Pinwheels Quilt: Step-by-Step Tutorial
The construction of the Kindred Pinwheels block is broken down into manageable steps, focusing on precision and clear instruction. Follow along carefully, paying close attention to seam allowances and pressing, to achieve beautifully consistent blocks.
Step 1: Crafting Your First Half-Square Triangle Unit
This initial step sets the foundation for your first component of the Kindred Pinwheel block. You’ll be creating a simple yet versatile half-square triangle unit that will later be combined with another unique piece.
Begin by selecting one 5-inch print square and one 5-inch background square. Place these two squares right sides together, ensuring all edges are perfectly aligned. Next, using a ruler and a fabric marker or pencil, draw a diagonal line from one corner to the opposite corner. This line will serve as your cutting guide.
Carefully cut along this diagonal line, yielding two half-square triangles (HSTs). For this step, you only need one set, so set aside the other pair for future blocks or another project. Take one of these newly formed HST sets and place it under your sewing machine. Sew along one of the short sides of the fabric, ensuring you maintain a precise 1/4-inch seam allowance. This consistent seam allowance is vital for your blocks to square up correctly later.
Once sewn, open up the fabric unit and press the seam flat. You can choose to press the seam open for less bulk or press it towards the darker fabric to conceal the seam allowance. Consistency in your pressing method across all blocks will contribute to a flatter, more professional-looking quilt. Set this completed unit aside; it will be used in Step 3.
Step 2: Building the Unique Rectangular Strip Unit
This step introduces the element that gives the Kindred Pinwheels its distinctive character. You’ll be combining a triangle with a rectangular strip to create a larger, asymmetric triangle unit.
Take another 5-inch print square. Unlike the previous step, you will only cut this square once diagonally from corner to corner, yielding two triangles. Set aside one of these triangles for another block or future use. Focus on one triangle for this step.
Orient the triangle so that one of its shorter edges is facing towards the right. This positioning is important for the subsequent sewing and trimming. Now, take a 2.5-inch by 7-inch background strip. Align this background strip on top of the print triangle, ensuring their bottom raw edges are perfectly lined up. The background strip will extend beyond the left and right sides of the triangle, which is perfectly normal.
Sew these two pieces together along the bottom edge with a precise 1/4-inch seam allowance. Once sewn, open the unit and press the seam flat. Again, press towards the background strip for a cleaner finish.
Now comes a crucial trimming step to refine this unit. Place your square ruler on top of the unit. You will use the diagonal seam line of the triangle as your guide. Align the 45-degree line on your ruler with the diagonal edge of the original print triangle. Carefully trim off the excess white background strip, following the diagonal line of the print triangle. This precise trim will transform your unit into a larger, elongated triangle, ready to be joined with the piece from Step 1.
Step 3: Assembling Your First Kindred Pinwheel Block
With both unique units prepared, it’s time to bring them together to form the core Kindred Pinwheel block. This step requires careful arrangement and accurate squaring up.
Retrieve the half-square triangle unit you made in Step 1 and the rectangular strip unit you just completed in Step 2. Arrange these two units side-by-side on your workspace, positioning them exactly as shown in the reference photo. The goal is to create a dynamic diagonal line that will contribute to the pinwheel effect. Ensure the points and edges that will be sewn together are aligned.
Carefully sew these two units together along their long edges with a consistent 1/4-inch seam allowance. Take your time to match the seams where the fabrics meet, ensuring a smooth and precise join. Once sewn, open the block and press the seam flat. Pressing open can help reduce bulk at the intersection, leading to a flatter block.
Now, the most critical step for block uniformity: squaring up. Using your square ruler, trim the entire block to a perfect 6 inches. A helpful tip for squaring up this particular block is to align the 3-inch ruler mark directly on the point where the two triangles meet in the center of your newly formed block. This method helps ensure your block is centered and evenly trimmed. Trim off any excess fabric from all four sides until you have a perfectly square 6-inch block. This complete 6-inch square is your finished Kindred Pinwheel block.
You will need to repeat these three steps to create a total of four such blocks for a single, larger Kindred Pinwheel unit, ideally using a variety of print fabrics for a vibrant look.
Step 4: Bringing the Pinwheel to Life: Assembling the Four-Patch
Now that you have four beautifully constructed 6-inch Kindred Pinwheel blocks, it’s time to arrange them to reveal the stunning pinwheel design. This is where the magic truly happens!
Lay out your four individual blocks on your design wall or a flat surface. Arrange them together in a 2×2 grid, just like a traditional four-patch block. Carefully rotate each block until the diagonal lines from each block converge in the center, forming a captivating, larger pinwheel pattern. Play with the orientation until you achieve the desired visual flow and the pinwheel truly “spins.”
Once you are happy with the arrangement, begin sewing the blocks together. First, sew the two top blocks together, maintaining a consistent 1/4-inch seam allowance. Then, sew the two bottom blocks together, also with a 1/4-inch seam allowance. Press these seams open or to one side, nesting them if possible for a flatter intersection later.
Finally, join these two rows together. Carefully align the center seams, pinning them to ensure they nest perfectly and create a sharp, accurate point in the center of your pinwheel. Sew this final seam with a 1/4-inch allowance. Press the entire unit flat, and voilà! You have created a magnificent, larger Kindred Pinwheel unit, which now measures 12 inches square (if your individual blocks were squared to 6 inches).
Repeat this process of making four smaller blocks and assembling them into a larger pinwheel unit until you have enough units for your desired quilt size. The repetition will build your skills and speed, making the process even more enjoyable!
Tips for Mastering Your Kindred Pinwheels Quilt
Achieving a beautiful and professional-looking quilt involves more than just following steps; it requires attention to detail and a few helpful techniques. Here are some tips to ensure your Kindred Pinwheels Quilt project is a resounding success:
- Accuracy is Paramount: In quilting, precision is key. A slight deviation in your 1/4-inch seam allowance or an imprecise cut can lead to blocks that don’t fit together perfectly. Take your time with measuring, cutting, and sewing. Consider using a specialty 1/4-inch presser foot for your sewing machine.
- Pressing Makes Perfect: Proper pressing is as important as sewing. Pressing seams flat and in the correct direction (often towards the darker fabric or open) helps to reduce bulk, prevents shadows from showing through lighter fabrics, and ensures your blocks lie flat. Avoid ironing back and forth, which can distort fabric; instead, press straight down.
- Chain Piecing for Efficiency: To save time, especially when making multiple identical units (like the HSTs or the rectangular strip units), try chain piecing. Sew multiple units consecutively without cutting your thread in between. This speeds up the process and can even help maintain consistent seam allowances.
- Make a Test Block: Before committing all your fabric, especially if it’s your first time trying this pattern, make one complete Kindred Pinwheel block. This allows you to practice the steps, check your measurements, and ensure you’re happy with your fabric choices before proceeding with the rest of the quilt.
- Embrace Your Seam Ripper: Even experienced quilters make mistakes. Don’t be afraid to use your seam ripper to correct errors. It’s better to unpick a few stitches than to have a misaligned block in your finished quilt.
- Fabric Selection and Contrast: The Kindred Pinwheels pattern shines when there’s good contrast between your print fabrics and the background. Think about how colors interact and choose fabrics that complement each other while still providing enough visual separation for the pattern to stand out.
- Stay Organized: As you create multiple units and blocks, keep them organized. Use design boards or label stacks of blocks to keep track of what goes where, especially if you’re working on a larger quilt.
Taking Your Kindred Pinwheels Quilt Further: Design Ideas and Variations
Once you’ve mastered the Kindred Pinwheels block, the possibilities for creative expression are endless. Here are some ideas to customize and expand your project:
- Vary Quilt Sizes: The beauty of quilting is its scalability. Adjust the number of 12-inch Kindred Pinwheel units you make to create anything from a small wall hanging or baby quilt (e.g., 2×2 units for a small throw) to a larger throw (e.g., 3×4 units) or even a bed-sized quilt (e.g., 6×7 units for a king-sized quilt).
- Color Palette Exploration:
- Monochromatic Magic: Use various shades of a single color for a sophisticated and serene look.
- Rainbow Radiance: Arrange blocks in a gradient of colors for a vibrant and cheerful quilt.
- Scrappy Delight: Embrace a truly scrappy look by using a wide variety of print fabrics from your stash, unified by a consistent background fabric.
- Seasonal Themes: Choose fabrics that reflect holidays or seasons – reds and greens for Christmas, pastels for spring, or autumnal hues for fall.
- Adding Borders: Borders frame your quilt and can add significant visual impact.
- Inner Borders: A thin, contrasting inner border can help separate your pieced blocks from the outer borders.
- Outer Borders: Wide outer borders can feature a large-scale print, solid fabric, or even pieced designs to complement your pinwheels.
- Quilting Designs: The quilting stitches themselves add another layer of texture and design.
- Simple Stitch-in-the-Ditch: Outline your blocks for a clean finish.
- Custom Free-Motion Quilting: Embellish with swirls, feathers, or geometric designs that echo the pinwheel motif.
- Straight-Line Quilting: Create a modern look with parallel lines or a grid pattern.
- Binding Choices: The binding is the final touch that finishes your quilt edges.
- Coordinating Fabric: Choose a binding fabric that matches one of your prints or the background.
- Contrasting Pop: A bright, contrasting binding can frame the entire quilt and make it pop.
- Scrappy Binding: Use strips of leftover fabrics for a fun and eclectic edge.
- Combining with Other Blocks: Integrate your Kindred Pinwheels with other simple quilt blocks like Nine-Patch, Four-Patch, or Solid Squares to create a sampler quilt or a more complex layout.
Allow your creativity to guide you! The Kindred Pinwheels Quilt is a fantastic foundation for endless design possibilities.
Your Journey to a Beautiful Kindred Pinwheels Quilt
Congratulations on embarking on the journey to create your very own Kindred Pinwheels Quilt! This pattern offers a truly satisfying quilting experience, blending ease of construction with an undeniably elegant result. Whether you’re making your first quilt or simply looking for a fresh, engaging project, the Kindred Pinwheels design is an excellent choice. Its unique take on the classic pinwheel ensures that your finished quilt will be a cherished item, full of character and charm.
Remember, quilting is not just about the finished product; it’s about the joy of the process, the meditative rhythm of sewing, and the satisfaction of seeing fabric transform under your hands. Don’t be afraid to experiment with your fabric choices, to make the pattern your own, and to enjoy every stitch along the way. Your dedication will undoubtedly result in a beautiful, heirloom-quality quilt that reflects your personal style and craftsmanship.
So, gather your fabrics, sharpen your rotary cutter, and let the adventure begin. We can’t wait to see the stunning Kindred Pinwheels quilts you create. Happy quilting!
RELATED: Looking for more pinwheel inspiration? Check out our Easy Double Pinwheel Quilt Block Tutorial for another captivating design, or explore the 3D Dimensional Pinwheel Quilt Block for a truly unique visual effect.